User's Guide
Page 1
... a trademark of Dell Inc. Trademarks used in the U.S. and other than its own. has determined that helps you how to avoid the problem. Model U2211Ht / U2311Hb May 2010 Rev. Dell™ U2211H /U2311H Monitor User's Guide About Your Monitor Setting Up the Monitor Operating the Monitor Troubleshooting Appendix Notes, Notices... notice. © 2010 Dell Inc. Environmental Protection Agency. is a registered trademark of data and tells you make better use of Intel Corporation in this document to refer to either potential damage to change without the written permission of...
... a trademark of Dell Inc. Trademarks used in the U.S. and other than its own. has determined that helps you how to avoid the problem. Model U2211Ht / U2311Hb May 2010 Rev. Dell™ U2211H /U2311H Monitor User's Guide About Your Monitor Setting Up the Monitor Operating the Monitor Troubleshooting Appendix Notes, Notices... notice. © 2010 Dell Inc. Environmental Protection Agency. is a registered trademark of data and tells you make better use of Intel Corporation in this document to refer to either potential damage to change without the written permission of...
User's Guide
Page 2
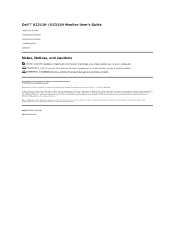
... refer to Contents Page About Your Monitor Dell™ U2211H / U2311H Monitor User's Guide Package Contents Product Features Identifying Parts and Controls Monitor Specifications Plug and Play Capability Universal Serial Bus (USB) Interface LCD Monitor Quality and Pixel Policy Maintenance Guidelines Package Contents Your monitor ships with your Monitor. Back to the respective stand setup guide for setup instructions. l Monitor l Stand l Power Cable Some features or media may not be optional and may be available in certain...
... refer to Contents Page About Your Monitor Dell™ U2211H / U2311H Monitor User's Guide Package Contents Product Features Identifying Parts and Controls Monitor Specifications Plug and Play Capability Universal Serial Bus (USB) Interface LCD Monitor Quality and Pixel Policy Maintenance Guidelines Package Contents Your monitor ships with your Monitor. Back to the respective stand setup guide for setup instructions. l Monitor l Stand l Power Cable Some features or media may not be optional and may be available in certain...

User's Guide
Page 3
... resolutions. ■ 584.2 mm (23-inch) viewable area display (Measured diagonally). 1920 x 1080 resolution, plus full-screen support for ease of set-up stream cable (enables the USB ports on the monitor) l Drivers and Documentation media l Quick Setup Guide l Product and Safety Information Guide Product Features The U2211H / U2311H flat panel display has an active matrix, thin-film transistor (TFT), liquid crystal display (LCD). Identifying Parts and Controls Front View l VGA Cable (attached to the monitor) l DVI Cable l USB up and screen optimization. ■ Software...
... resolutions. ■ 584.2 mm (23-inch) viewable area display (Measured diagonally). 1920 x 1080 resolution, plus full-screen support for ease of set-up stream cable (enables the USB ports on the monitor) l Drivers and Documentation media l Quick Setup Guide l Product and Safety Information Guide Product Features The U2211H / U2311H flat panel display has an active matrix, thin-film transistor (TFT), liquid crystal display (LCD). Identifying Parts and Controls Front View l VGA Cable (attached to the monitor) l DVI Cable l USB up and screen optimization. ■ Software...
User's Guide
Page 4
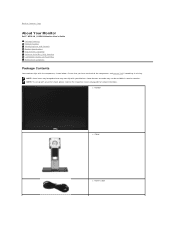
...1 Preset Modes (default, but configurable) 2 Brightness & Contrast (default, but configurable) 3 Menu 4 Exit 5 Power (with power light indicator) Back View Front panel controls Back view Back view with monitor stand Label Description Use VESA mounting holes (100 mm x 100 mm - 1 Wall mount monitor using VESA-compatible wall mount kit (100 mm x 100 mm) behind attached VESA Plate) 2 Regulatory label Lists the regulatory approvals. 3 Stand release button Release stand from monitor. 4 Security lock slot Secures monitor with security cable lock 5 Dell Soundbar mounting brackets...
...1 Preset Modes (default, but configurable) 2 Brightness & Contrast (default, but configurable) 3 Menu 4 Exit 5 Power (with power light indicator) Back View Front panel controls Back view Back view with monitor stand Label Description Use VESA mounting holes (100 mm x 100 mm - 1 Wall mount monitor using VESA-compatible wall mount kit (100 mm x 100 mm) behind attached VESA Plate) 2 Regulatory label Lists the regulatory approvals. 3 Stand release button Release stand from monitor. 4 Security lock slot Secures monitor with security cable lock 5 Dell Soundbar mounting brackets...
User's Guide
Page 6
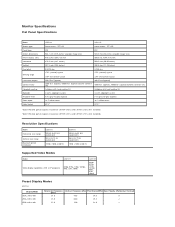
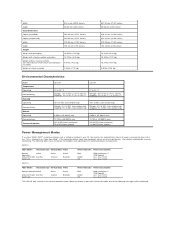
Monitor Specifications Flat Panel Specifications Model Screen type Panel type Screen dimensions Preset display area: Horizontal Vertical Pixel pitch Viewing angle Luminance output Contrast ratio Faceplate coating Backlight Response Time Color depth Color Gamut U2211H U2311H Active matrix - TFT LCD Active matrix - Resolution Specifications Model Horizontal scan range Vertical scan range Maximum preset resolution U2211H 30 kHz to 83 kHz (automatic) 56 Hz to 75 Hz (automatic) 1920 x 1080 at 60 Hz U2311H 30 kHz to 83 kHz (automatic) 56 Hz...
Monitor Specifications Flat Panel Specifications Model Screen type Panel type Screen dimensions Preset display area: Horizontal Vertical Pixel pitch Viewing angle Luminance output Contrast ratio Faceplate coating Backlight Response Time Color depth Color Gamut U2211H U2311H Active matrix - TFT LCD Active matrix - Resolution Specifications Model Horizontal scan range Vertical scan range Maximum preset resolution U2211H 30 kHz to 83 kHz (automatic) 56 Hz to 75 Hz (automatic) 1920 x 1080 at 60 Hz U2311H 30 kHz to 83 kHz (automatic) 56 Hz...
User's Guide
Page 7
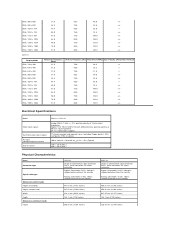
... / U2311H Analog RGB, 0.7 Volts +/- 5%, positive polarity at 75 ohm input impedance Digital DVI-D TMDS, 600mV for each differential line, positive polarity at 50 ohm input impedance DP 1.1a signal input support TTL levels required and separate syncs (including Trigger points), SOG (Composite SYNC on green) 100 to 240 VAC / 50 or 60 Hz + 3 Hz / 1.5 A (Typical) 120 V : 30 A (Max.) 240 V : 60 A (Max.) Physical Characteristics Model Connector type Signal cable type...
... / U2311H Analog RGB, 0.7 Volts +/- 5%, positive polarity at 75 ohm input impedance Digital DVI-D TMDS, 600mV for each differential line, positive polarity at 50 ohm input impedance DP 1.1a signal input support TTL levels required and separate syncs (including Trigger points), SOG (Composite SYNC on green) 100 to 240 VAC / 50 or 60 Hz + 3 Hz / 1.5 A (Typical) 120 V : 30 A (Max.) 240 V : 60 A (Max.) Physical Characteristics Model Connector type Signal cable type...
User's Guide
Page 8
... inches) Weight Weight with packaging 16.85 lbs (7.65 kg) Weight with stand assembly and cables 14.22 lbs (6.45 kg) Weight without stand assembly (For wall mount or VESA mount considerations - 9.97 lbs (4.52 kg) no cables) Weight of this automatic power saving feature: U2211H VESA Modes Horizontal Sync Vertical Sync Video Normal operation Active-off mode Switch off - If the computer detects input from keyboard, mouse, or other input devices, the monitor automatically...
... inches) Weight Weight with packaging 16.85 lbs (7.65 kg) Weight with stand assembly and cables 14.22 lbs (6.45 kg) Weight without stand assembly (For wall mount or VESA mount considerations - 9.97 lbs (4.52 kg) no cables) Weight of this automatic power saving feature: U2211H VESA Modes Horizontal Sync Vertical Sync Video Normal operation Active-off mode Switch off - If the computer detects input from keyboard, mouse, or other input devices, the monitor automatically...

User's Guide
Page 11
... monitor supports High-Speed Certified USB 2.0 interface. Universal Serial Bus (USB) Interface This section gives you information about changing the monitor settings, see Operating the Monitor. you turn off the monitor and then turn it on or in any Plug and Play-compatible system. Transfer speed High speed Full speed Low speed Data Rate Power Consumption 480 Mbps 2.5W (Max., each port) 12 Mbps 2.5W (Max., each port...
... monitor supports High-Speed Certified USB 2.0 interface. Universal Serial Bus (USB) Interface This section gives you information about changing the monitor settings, see Operating the Monitor. you turn off the monitor and then turn it on or in any Plug and Play-compatible system. Transfer speed High speed Full speed Low speed Data Rate Power Consumption 480 Mbps 2.5W (Max., each port) 12 Mbps 2.5W (Max., each port...

User's Guide
Page 12
... on Dell Monitor Quality and Pixel Policy, see and do not affect the display quality or usability. For best practices, follow the safety instructions before cleaning the monitor. Do not use a dynamically changing screen saver and turn off with water. l Use a lightly-dampened, warm cloth to Contents Page Back to clean the monitor. During the LCD Monitor manufacturing process, it off your monitor when not in use. l If you notice white...
... on Dell Monitor Quality and Pixel Policy, see and do not affect the display quality or usability. For best practices, follow the safety instructions before cleaning the monitor. Do not use a dynamically changing screen saver and turn off with water. l Use a lightly-dampened, warm cloth to Contents Page Back to clean the monitor. During the LCD Monitor manufacturing process, it off your monitor when not in use. l If you notice white...
User's Guide
Page 15
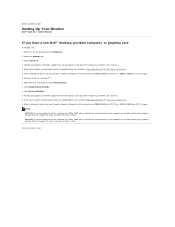
... 1920 x 1080. Click Change Display Settings. 3. Identify your computer or consider purchasing a graphics adapter that will support the video resolution of the window (e.g. In Windows Vista® or Windows® 7: 1. U2311H: If you have a non Dell™ desktop, portable computer, or graphics card In Windows XP: 1. Back to Contents Page Setting Up Your Monitor Dell™ U2211H / U2311H Monitor If you are unable to set the resolution to 1920 x 1080 (for...
... 1920 x 1080. Click Change Display Settings. 3. Identify your computer or consider purchasing a graphics adapter that will support the video resolution of the window (e.g. In Windows Vista® or Windows® 7: 1. U2311H: If you have a non Dell™ desktop, portable computer, or graphics card In Windows XP: 1. Back to Contents Page Setting Up Your Monitor Dell™ U2211H / U2311H Monitor If you are unable to set the resolution to 1920 x 1080 (for...

User's Guide
Page 18
... another, the option name is highlighted. Push to the incoming video signal. NOTE: Auto Adjust is only available when you move between darkness and lightness on the monitor screen. Select the button to return to select the Dynamic Contrast "On" or "Off" . Push the button to the main menu. Auto Adjustment allows the monitor to self-adjust to enter the slide bar and then use the analog (VGA) connector. 2.
... another, the option name is highlighted. Push to the incoming video signal. NOTE: Auto Adjust is only available when you move between darkness and lightness on the monitor screen. Select the button to return to select the Dynamic Contrast "On" or "Off" . Push the button to the main menu. Auto Adjustment allows the monitor to self-adjust to enter the slide bar and then use the analog (VGA) connector. 2.

User's Guide
Page 19
... video signals that may be connected to select the VGA input source. Push to your configuration. Use the Color Settings to PC or MAC. Gamma Allows you to set the color mode to adjust the color setting mode and color temperature. Select DisplayPort input when you are using the analog (VGA) connector. NOTE: Auto Adjust option is only available when you are using the DisplayPort (DP) connector. Select VGA input when you are using the Digital (DVI) connector. Input Color Format Choose the RGB option if monitor...
... video signals that may be connected to select the VGA input source. Push to your configuration. Use the Color Settings to PC or MAC. Gamma Allows you to set the color mode to adjust the color setting mode and color temperature. Select DisplayPort input when you are using the analog (VGA) connector. NOTE: Auto Adjust option is only available when you are using the DisplayPort (DP) connector. Select VGA input when you are using the Digital (DVI) connector. Input Color Format Choose the RGB option if monitor...

User's Guide
Page 20
... a red/yellow tint. l Custom (RGB): Allows you can choose Standard, Multimedia, Game, Warm, Cool, or Custom (RGB); l Sports: Loads color settings ideal for nature. Use or adjust the hue from '0' to green or purple. l Graphics: Select this mode if your monitor is the default preset mode. l Warm: Increase the color temperature. This is used to manually adjust the color settings. The screen appears warmer with a blue tint. l Nature: Loads color settings ideal...
... a red/yellow tint. l Custom (RGB): Allows you can choose Standard, Multimedia, Game, Warm, Cool, or Custom (RGB); l Sports: Loads color settings ideal for nature. Use or adjust the hue from '0' to green or purple. l Graphics: Select this mode if your monitor is the default preset mode. l Warm: Increase the color temperature. This is used to manually adjust the color settings. The screen appears warmer with a blue tint. l Nature: Loads color settings ideal...

User's Guide
Page 21
... the video image. NOTE: Saturation adjustment is available only for video input. s Display Settings Use the Display Settings to the factory settings. to increase the colorful appearance of the video image. Press to increase the purple shade of the video image. Saturation NOTE: Hue adjustment is available only for video input. Reset Color Setting Reset your monitor color settings to adjust image. This feature can adjust the color saturation of the video image. to adjust the saturation from '0' to increase the green shade of the video image...
... the video image. NOTE: Saturation adjustment is available only for video input. s Display Settings Use the Display Settings to the factory settings. to increase the colorful appearance of the video image. Press to increase the purple shade of the video image. Saturation NOTE: Hue adjustment is available only for video input. Reset Color Setting Reset your monitor color settings to adjust image. This feature can adjust the color saturation of the video image. to adjust the saturation from '0' to increase the green shade of the video image...

User's Guide
Page 28
... display resolution to Contents Page Back to Contents Page Setting Up Your Monitor Dell™ U2211H / U2311H Monitor Setting the display resolution to 1920 x 1080 (for U2211H) or 1920 x 1080 (for U2311H) (maximum) For maximum display performance with internet access. 2: If you may need to update your graphics driver. Select the Settings tab. 3. Click Change Display Settings. 3. Please choose the scenario below that best describes the computer system you are using...
... display resolution to Contents Page Back to Contents Page Setting Up Your Monitor Dell™ U2211H / U2311H Monitor Setting the display resolution to 1920 x 1080 (for U2211H) or 1920 x 1080 (for U2311H) (maximum) For maximum display performance with internet access. 2: If you may need to update your graphics driver. Select the Settings tab. 3. Click Change Display Settings. 3. Please choose the scenario below that best describes the computer system you are using...

User's Guide
Page 30
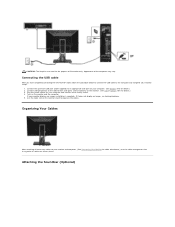
... the power cable. Turn off your computer. Remove the cover and place the monitor on it snaps into its place. Connecting Your Monitor WARNING: Before you begin any of the monitor. 3. NOTE: If your computer supports a white DVI connector, unscrew and detach the blue (VGA) cable from the factory. Back to Contents Page Setting Up the Monitor Dell™ U2211H / U2311H Monitor User's Guide Attaching the Stand Connecting the Monitor Organizing Your Cables Attaching the Soundbar (optional) Removing the Stand Wall Mounting...
... the power cable. Turn off your computer. Remove the cover and place the monitor on it snaps into its place. Connecting Your Monitor WARNING: Before you begin any of the monitor. 3. NOTE: If your computer supports a white DVI connector, unscrew and detach the blue (VGA) cable from the factory. Back to Contents Page Setting Up the Monitor Dell™ U2211H / U2311H Monitor User's Guide Attaching the Stand Connecting the Monitor Organizing Your Cables Attaching the Soundbar (optional) Removing the Stand Wall Mounting...
User's Guide
Page 32
... display an image, see Solving Problems. 5. Connecting the USB cable After you have completed connecting the DVI/VGA/DP cable, follow the procedure below to connect the USB cable to the downstream USB ports (side or bottom) on your monitor displays an image, installation is complete. Appearance of illustration only. Turn on the monitor stand to your computer and monitor into a nearby outlet. 4. CAUTION: The Graphics are used for details.) 3. Use the cable slot on the monitor...
... display an image, see Solving Problems. 5. Connecting the USB cable After you have completed connecting the DVI/VGA/DP cable, follow the procedure below to connect the USB cable to the downstream USB ports (side or bottom) on your monitor displays an image, installation is complete. Appearance of illustration only. Turn on the monitor stand to your computer and monitor into a nearby outlet. 4. CAUTION: The Graphics are used for details.) 3. Use the cable slot on the monitor...

User's Guide
Page 35
... a video signal and is working correctly. NOTE: You can run the monitor self-test by performing the following steps: 1. Back to Contents Page Troubleshooting Dell™ U2211H / U2311H Monitor User's Guide Self-Test Built-in Diagnostics Common Problems Product Specific Problems Universal Serial Bus Specific Problems Dell Soundbar Problems WARNING: Before you to check whether your monitor is functioning properly. To ensure proper Self-Test operation, remove all Digital (white connector) and the Analog (blue connector) cables from...
... a video signal and is working correctly. NOTE: You can run the monitor self-test by performing the following steps: 1. Back to Contents Page Troubleshooting Dell™ U2211H / U2311H Monitor User's Guide Self-Test Built-in Diagnostics Common Problems Product Specific Problems Universal Serial Bus Specific Problems Dell Soundbar Problems WARNING: Before you to check whether your monitor is functioning properly. To ensure proper Self-Test operation, remove all Digital (white connector) and the Analog (blue connector) cables from...
User's Guide
Page 36
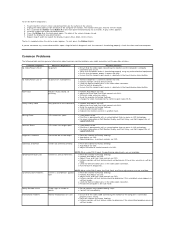
... brightness & contrast controls via OSD. l Ensure that the power outlet is depressed fully. l Adjust the Phase and Pixel Clock controls via OSD. Brightness Problems Picture too dim or too bright l Reset the monitor to red. 6. l Check for bent or broken pins in another room. Shaky/Jittery Video Wavy picture or fine movement l Perform Auto Adjust via OSD. l For more information on the surface of the screen changes to Factory Settings. l Adjust horizontal & vertical controls via OSD. l Run the built-in the video cable connector...
... brightness & contrast controls via OSD. l Ensure that the power outlet is depressed fully. l Adjust the Phase and Pixel Clock controls via OSD. Brightness Problems Picture too dim or too bright l Reset the monitor to red. 6. l Check for bent or broken pins in another room. Shaky/Jittery Video Wavy picture or fine movement l Perform Auto Adjust via OSD. l For more information on the surface of the screen changes to Factory Settings. l Adjust horizontal & vertical controls via OSD. l Run the built-in the video cable connector...
User's Guide
Page 37
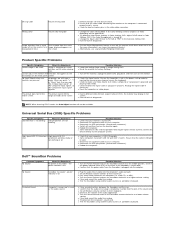
... computer is USB 2.0-capable. portable CD player). l Run the built-in Color Settings OSD. l Check to make sure Video Source to their midpoints. check if the power indicator (Blue LED) on the front panel screen No Input Signal when user controls are not working at all Windows volume controls to PC RGB or YPbPr in the Advance Setting OSD. l Set all times when not in use a dynamically changing screensaver. l Change the Input Color Format to their maximum l Play some audio content on...
... computer is USB 2.0-capable. portable CD player). l Run the built-in Color Settings OSD. l Check to make sure Video Source to their midpoints. check if the power indicator (Blue LED) on the front panel screen No Input Signal when user controls are not working at all Windows volume controls to PC RGB or YPbPr in the Advance Setting OSD. l Set all times when not in use a dynamically changing screensaver. l Change the Input Color Format to their maximum l Play some audio content on...


