Dell™ Technology Guide
Page 45
... its pop-up the space on your hard drive or rearrange items on to enhance the performance of the options to evaluate system performance, view events, monitor the performance log, or perform computer management. Customizing Your Computer Settings 1 Click Start or → Control Panel. 2 Select a category. Windows XP 1 Click Start →Control Panel→ Performance...
... its pop-up the space on your hard drive or rearrange items on to enhance the performance of the options to evaluate system performance, view events, monitor the performance log, or perform computer management. Customizing Your Computer Settings 1 Click Start or → Control Panel. 2 Select a category. Windows XP 1 Click Start →Control Panel→ Performance...
Dell™ Technology Guide
Page 77
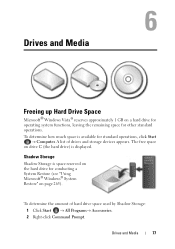
... standard operations. Shadow Storage Shadow Storage is displayed. Drives and Media 77 Drives and Media Freeing up Hard Drive Space Microsoft® Windows Vista® reserves approximately 1 GB on page 265). To determine the amount of drives and storage devices appears. A list of hard drive space used by Shadow Storage: 1 Click Start → All Programs→ Accessories. 2 Right...
... standard operations. Shadow Storage Shadow Storage is displayed. Drives and Media 77 Drives and Media Freeing up Hard Drive Space Microsoft® Windows Vista® reserves approximately 1 GB on page 265). To determine the amount of drives and storage devices appears. A list of hard drive space used by Shadow Storage: 1 Click Start → All Programs→ Accessories. 2 Right...
Dell™ Technology Guide
Page 78
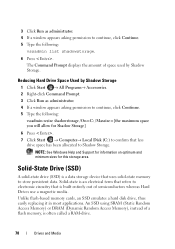
... of semiconductors whereas Hard Drives use a magnetic media. Solid-state is often called a RAM-drive. 78 Drives and Media Unlike flash-based memory cards, an SSD emulates a hard disk drive, thus easily replacing it in most applications. NOTE: See Windows Help and Support for information on optimum and minimum sizes for Shadow Storage] 6 Press . 7 Click Start →...
... of semiconductors whereas Hard Drives use a magnetic media. Solid-state is often called a RAM-drive. 78 Drives and Media Unlike flash-based memory cards, an SSD emulates a hard disk drive, thus easily replacing it in most applications. NOTE: See Windows Help and Support for information on optimum and minimum sizes for Shadow Storage] 6 Press . 7 Click Start →...
Dell™ Technology Guide
Page 80
... for example, Audio or Video). 80 Drives and Media If not, go to restart the computer. 4 When you see the Windows desktop, reinsert the Drivers and Utilities media. 5 At the Welcome Dell System Owner screen, click Next. See the documentation that came with... the device for information about the driver for that device. 6 Click the driver that the Drivers and Utilities media is your hard drive. 2 Click Start and right-click Computer. 3 Click Properties→ Device Manager. 4 Double-click the ...
... for example, Audio or Video). 80 Drives and Media If not, go to restart the computer. 4 When you see the Windows desktop, reinsert the Drivers and Utilities media. 5 At the Welcome Dell System Owner screen, click Next. See the documentation that came with... the device for information about the driver for that device. 6 Click the driver that the Drivers and Utilities media is your hard drive. 2 Click Start and right-click Computer. 3 Click Properties→ Device Manager. 4 Double-click the ...

Dell™ Technology Guide
Page 83
... appear. For Windows® XP: Click Start → My Computer. 2 Right-click Local Disk (C:). 3 Click Properties→ Tools→ Check Now. Working with RAID A redundant array of all data. The number of hard drives required varies depending on the computer, click Continue; NOTE: The User ...Account Control window may support other RAID levels (5, 10, 50). For information about these levels, see support.dell.com. Windows Vista® 1 Click Start → Computer. ...
... appear. For Windows® XP: Click Start → My Computer. 2 Right-click Local Disk (C:). 3 Click Properties→ Tools→ Check Now. Working with RAID A redundant array of all data. The number of hard drives required varies depending on the computer, click Continue; NOTE: The User ...Account Control window may support other RAID levels (5, 10, 50). For information about these levels, see support.dell.com. Windows Vista® 1 Click Start → Computer. ...
Dell™ Technology Guide
Page 90
...existing (non-RAID) single-drive computer, and you have. Back up the RAID configuration, click Next, and then click Next again. NOTE: Only RAID-enabled hard drives are listed as free disks. 7 Click to select the drives that are adding one or more new hard drives to create the RAID configuration.... NOTE: The number of drives supported in each RAID array...
...existing (non-RAID) single-drive computer, and you have. Back up the RAID configuration, click Next, and then click Next again. NOTE: Only RAID-enabled hard drives are listed as free disks. 7 Click to select the drives that are adding one or more new hard drives to create the RAID configuration.... NOTE: The number of drives supported in each RAID array...

Dell™ Technology Guide
Page 91
...RAID-Enabled Mode" on page 87). 2 Launch Nvidia MediaShield. 3 Click to select the array you can change the current state of the hard drive being used, and the operating system. from striped to mirrored, for deletion. 5 Click Finish to delete the RAID configuration. Also, you want to delete... volume, your computer will not boot. 1 Launch Nvidia MediaShield. 2 Click to select the array you have marked for example - Converting From One RAID Configuration to Another RAID Configuration You can add hard drives to an existing array. without losing any of the array that all ...
...RAID-Enabled Mode" on page 87). 2 Launch Nvidia MediaShield. 3 Click to select the array you can change the current state of the hard drive being used, and the operating system. from striped to mirrored, for deletion. 5 Click Finish to delete the RAID configuration. Also, you want to delete... volume, your computer will not boot. 1 Launch Nvidia MediaShield. 2 Click to select the array you have marked for example - Converting From One RAID Configuration to Another RAID Configuration You can add hard drives to an existing array. without losing any of the array that all ...
Dell™ Technology Guide
Page 92
... process along with any data you want to keep before continuing. 8 Under Free Disk Selection, click the check box next to the hard drive(s) you want to rebuild by restoring the data to a replacement drive. 1 Launch Nvidia MediaShield. 2 Click to select your system, see the following sections for information about using the Intel utilities. •...
... process along with any data you want to keep before continuing. 8 Under Free Disk Selection, click the check box next to the hard drive(s) you want to rebuild by restoring the data to a replacement drive. 1 Launch Nvidia MediaShield. 2 Click to select your system, see the following sections for information about using the Intel utilities. •...
Dell™ Technology Guide
Page 94
...mode. 3 On the Actions menu, select Create RAID Volume to launch the Create RAID Volume Wizard, and then click Next. 4 On the Select Volume Location screen, select the first hard drive you want to create the RAID volume. 8 Confirm that the correct volume configuration is the maximum available size.... System" on page 265). and down -arrow keys to make changes. 94 Drives and Media NOTE: To add a third hard drive in the Selected window. The selected hard drives appear in your RAID level 0 volume, and then click the right arrow. and down -arrow keys to RAID-Enabled Mode" on the...
...mode. 3 On the Actions menu, select Create RAID Volume to launch the Create RAID Volume Wizard, and then click Next. 4 On the Select Volume Location screen, select the first hard drive you want to create the RAID volume. 8 Confirm that the correct volume configuration is the maximum available size.... System" on page 265). and down -arrow keys to make changes. 94 Drives and Media NOTE: To add a third hard drive in the Selected window. The selected hard drives appear in your RAID level 0 volume, and then click the right arrow. and down -arrow keys to RAID-Enabled Mode" on the...

Dell™ Technology Guide
Page 95
... volume name, select RAID 1 as the RAID level, and then click Next to continue. 6 On the Select Volume Location screen, click the first hard drive you want to use, and then click the right arrow. 7 Click a second hard drive until two drives appear in the Selected window, and then click Next. 8 In the Specify Volume Size window, select the Volume...
... volume name, select RAID 1 as the RAID level, and then click Next to continue. 6 On the Select Volume Location screen, click the first hard drive you want to use, and then click the right arrow. 7 Click a second hard drive until two drives appear in the Selected window, and then click Next. 8 In the Specify Volume Size window, select the Volume...

Dell™ Technology Guide
Page 96
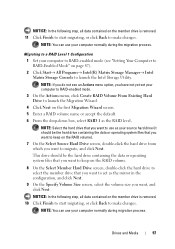
..., choose 128 KB as your computer to RAID-enabled mode. 3 On the Actions menu, select Create RAID Volume From Existing Hard Drive to launch the Migration Wizard. 4 Click Next on the Migration Wizard screen. 5 Enter a RAID volume name or accept the default. 6 From the drop-down box... system files that you want to keep on the RAID volume. 9 On the Select Member Hard Drive screen, double-click the hard drive(s) to select the member drive(s) to RAID-Enabled Mode" on page 87). 2 Click Start→ All Programs→ Intel(R) Matrix Storage Manager→ Intel Matrix Storage Console. NOTE...
..., choose 128 KB as your computer to RAID-enabled mode. 3 On the Actions menu, select Create RAID Volume From Existing Hard Drive to launch the Migration Wizard. 4 Click Next on the Migration Wizard screen. 5 Enter a RAID volume name or accept the default. 6 From the drop-down box... system files that you want to keep on the RAID volume. 9 On the Select Member Hard Drive screen, double-click the hard drive(s) to select the member drive(s) to RAID-Enabled Mode" on page 87). 2 Click Start→ All Programs→ Intel(R) Matrix Storage Manager→ Intel Matrix Storage Console. NOTE...
Dell™ Technology Guide
Page 97
... the RAID volume. 8 On the Select Member Hard Drive screen, double-click the hard drive to select the member drive that you want to keep on the RAID volume). 7 On the Select Source Hard Drive screen, double-click the hard drive from which you want, and click Next. Drives and Media 97 NOTE: Select the hard drive that you want to keep on the member...
... the RAID volume. 8 On the Select Member Hard Drive screen, double-click the hard drive to select the member drive that you want to keep on the RAID volume). 7 On the Select Source Hard Drive screen, double-click the hard drive from which you want, and click Next. Drives and Media 97 NOTE: Select the hard drive that you want to keep on the member...
Dell™ Technology Guide
Page 131
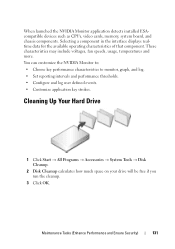
... voltages, fan speeds, usage, temperatures and more. Maintenance Tasks (Enhance Performance and Ensure Security) 131 Cleaning Up Your Hard Drive 1 Click Start → All Programs → Accessories → System Tools → Disk Cleanup. 2 Disk Cleanup calculates how much space on your... drive will be free if you run the cleanup. 3 Click OK. You can customize the NVIDIA Monitor to: • Choose key performance characteristics to monitor, graph, and log. &#...
... voltages, fan speeds, usage, temperatures and more. Maintenance Tasks (Enhance Performance and Ensure Security) 131 Cleaning Up Your Hard Drive 1 Click Start → All Programs → Accessories → System Tools → Disk Cleanup. 2 Disk Cleanup calculates how much space on your... drive will be free if you run the cleanup. 3 Click OK. You can customize the NVIDIA Monitor to: • Choose key performance characteristics to monitor, graph, and log. &#...
Dell™ Technology Guide
Page 132
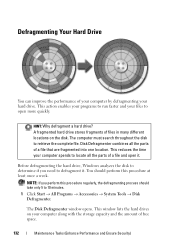
...computer spends to open it . Before defragmenting the hard drive, Windows analyzes the disk to defragment it . You should take only 5 to retrieve the complete file. The computer must search throughout the disk to 10 minutes. 1 Click Start → All Programs → Accessories &#...8594; System Tools → Disk Defragmenter. Defragmenting Your Hard Drive You can improve the performance of a file and open more quickly. HINT: Why ...
...computer spends to open it . Before defragmenting the hard drive, Windows analyzes the disk to defragment it . You should take only 5 to retrieve the complete file. The computer must search throughout the disk to 10 minutes. 1 Click Start → All Programs → Accessories &#...8594; System Tools → Disk Defragmenter. Defragmenting Your Hard Drive You can improve the performance of a file and open more quickly. HINT: Why ...
Dell™ Technology Guide
Page 136
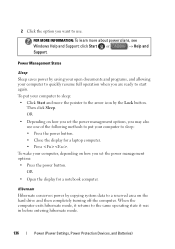
...(Power Settings, Power Protection Devices, and Batteries) FOR MORE INFORMATION: To learn more about power plans, see Windows Help and Support: click Start or → Help and Support. Hibernate Hibernate conserves power by copying system data to a reserved area on how you set the ...power button. 2 Click the option you set the power management options, you are ready to start again. Then click Sleep. To wake your computer to sleep: • Press the power button. • Close the display for a notebook computer. OR • Depending on the hard drive and then completely ...
...(Power Settings, Power Protection Devices, and Batteries) FOR MORE INFORMATION: To learn more about power plans, see Windows Help and Support: click Start or → Help and Support. Hibernate Hibernate conserves power by copying system data to a reserved area on how you set the ...power button. 2 Click the option you set the power management options, you are ready to start again. Then click Sleep. To wake your computer to sleep: • Press the power button. • Close the display for a notebook computer. OR • Depending on the hard drive and then completely ...
Dell™ Technology Guide
Page 138
... how you may lose data. Power Management Modes Standby Mode Standby conserves power by . To enter standby: • Click Start→ Turn off computer→ Stand by turning off the display and the hard drive after a predetermined period of the following methods: • Press the power button. • Close the display for a notebook...
... how you may lose data. Power Management Modes Standby Mode Standby conserves power by . To enter standby: • Click Start→ Turn off computer→ Stand by turning off the display and the hard drive after a predetermined period of the following methods: • Press the power button. • Close the display for a notebook...
Dell™ Technology Guide
Page 139
...Close the display for a notebook computer. • Press . Then press and hold the key, and click Hibernate. To exit hibernate, press the power button. To manually enter hibernate: • Click Start → Turn off the computer. NOTICE: You cannot remove devices or undock your computer while your... computer. NOTE: Some PC Cards or Express Cards may take a short time to the same operating state it returns to exit hibernate. OR • Depending on the hard drive ...
...Close the display for a notebook computer. • Press . Then press and hold the key, and click Hibernate. To exit hibernate, press the power button. To manually enter hibernate: • Click Start → Turn off the computer. NOTICE: You cannot remove devices or undock your computer while your... computer. NOTE: Some PC Cards or Express Cards may take a short time to the same operating state it returns to exit hibernate. OR • Depending on the hard drive ...
Dell™ Technology Guide
Page 206
With Dual Disk Drives: a Select the drive for the media software installed in your hard drive. The computer reads your CD/DVD software. b Then insert a blank disk into the second disk drive, and follow the instructions online. When you start your CD/DVD creation software and open a project. • Use a ... disk to a temporary folder on the website for the source disk (and insert the disk). With a Single Disk Drive: a Insert the source disk into the drive and click OK. b Ensure that the settings are correct, and then follow the instructions to copy a disk The computer copies ...
With Dual Disk Drives: a Select the drive for the media software installed in your hard drive. The computer reads your CD/DVD software. b Then insert a blank disk into the second disk drive, and follow the instructions online. When you start your CD/DVD creation software and open a project. • Use a ... disk to a temporary folder on the website for the source disk (and insert the disk). With a Single Disk Drive: a Insert the source disk into the drive and click OK. b Ensure that the settings are correct, and then follow the instructions to copy a disk The computer copies ...
Dell™ Technology Guide
Page 267
Windows XP 1 Click Start → Control Panel→ Performance and Maintenance→ System. 2 Click the System Restore tab and ensure that the System Protection for the hard disk is automatically disabled. NOTE: Dell PC Restore by Symantec and Dell Factory Image Restore may not be available in certain countries or on the hard drive and removes any programs or...
Windows XP 1 Click Start → Control Panel→ Performance and Maintenance→ System. 2 Click the System Restore tab and ensure that the System Protection for the hard disk is automatically disabled. NOTE: Dell PC Restore by Symantec and Dell Factory Image Restore may not be available in certain countries or on the hard drive and removes any programs or...
Dell™ Technology Guide
Page 268
... user. To access the command prompt, type administrator in when you received your computer-including data files-are permanently deleted from the hard drive. The Dell Factory Image Restore welcome screen appears. 6 Click Next. The restore process begins and may need to reboot the system. 268 Restoring Your Operating System Data files include documents...
... user. To access the command prompt, type administrator in when you received your computer-including data files-are permanently deleted from the hard drive. The Dell Factory Image Restore welcome screen appears. 6 Click Next. The restore process begins and may need to reboot the system. 268 Restoring Your Operating System Data files include documents...


