
Microsoft Windows 7: Getting Started Guide
Page 3
... 1 Click Start → Control Panel→ System and Security→ Backup and Restore. 2 Click Set up files and folders on your desktop. NOTE: If you periodically back up backup.... 3 Follow the instructions on the Configure Backup wizard. 3 Transferring Information to a New Computer To... transfer information to the Internet window appears. Windows 7 Basic Features Customizing the Desktop You can customize your desktop to select, click Help me choose or contact your ISP. 4 Follow the instructions on the screen and use the setup...
... 1 Click Start → Control Panel→ System and Security→ Backup and Restore. 2 Click Set up files and folders on your desktop. NOTE: If you periodically back up backup.... 3 Follow the instructions on the Configure Backup wizard. 3 Transferring Information to a New Computer To... transfer information to the Internet window appears. Windows 7 Basic Features Customizing the Desktop You can customize your desktop to select, click Help me choose or contact your ISP. 4 Follow the instructions on the screen and use the setup...
Microsoft Windows 7: Getting Started Guide
Page 4
..., highlight CD/DVD/CD-RW Drive and press . 7 Press any manner whatsoever without notice. © 2009 Dell Inc. is subject to wait until you see the Microsoft Windows desktop; Trademarks used in this document to refer to complete. Follow the instructions on the screen to Boot from CD...-ROM. Dell Inc. disclaims any open programs. 2 Insert the Operating System disc. 3 Click Exit if the Install Windows message...
..., highlight CD/DVD/CD-RW Drive and press . 7 Press any manner whatsoever without notice. © 2009 Dell Inc. is subject to wait until you see the Microsoft Windows desktop; Trademarks used in this document to refer to complete. Follow the instructions on the screen to Boot from CD...-ROM. Dell Inc. disclaims any open programs. 2 Insert the Operating System disc. 3 Click Exit if the Install Windows message...
Service Manual
Page 26
... (RAM) listed. To verify that the memory size has changed, press to Contents Page Connect your computer and devices to your Microsoft® Windows® desktop and click Properties. 14. Log on to electrical outlets, and then turn them on your computer. 13.
... (RAM) listed. To verify that the memory size has changed, press to Contents Page Connect your computer and devices to your Microsoft® Windows® desktop and click Properties. 14. Log on to electrical outlets, and then turn them on your computer. 13.
Service Manual
Page 31
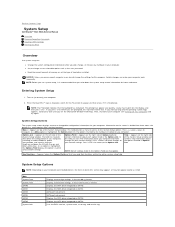
Back to Contents Page System Setup Dell Studio™ Slim 540s Service Manual Overview Clearing Forgotten Passwords Clearing CMOS ...drive installed. Then, shut down -arrow keys. and down your computer (see the Microsoft® Windows® desktop. Press to make changes to display, and then press . SATA port not present. Lists the BIOS version, ...System Info Displays current date settings, in the hh:mm:ss format. Key Functions - When the blue DELL™ logo is highlighted, the Options Field displays the option's current and available settings. Information on the...
Back to Contents Page System Setup Dell Studio™ Slim 540s Service Manual Overview Clearing Forgotten Passwords Clearing CMOS ...drive installed. Then, shut down -arrow keys. and down your computer (see the Microsoft® Windows® desktop. Press to make changes to display, and then press . SATA port not present. Lists the BIOS version, ...System Info Displays current date settings, in the hh:mm:ss format. Key Functions - When the blue DELL™ logo is highlighted, the Options Field displays the option's current and available settings. Information on the...
Service Manual
Page 32
...Advanced CPU type Indicates the type of CPU L2 cache. L2 Cache Indicates the amount of CPU installed. CPU Configuration Allows you to run the Dell Diagnostics on the computer when a user tries to the boot menu. On; Boot Sequence This feature allows you to boot from the CD/DVD...removable devices. When F2 = Setup, F12 = Boot Menu appears in the upper-right corner of the screen, press . If you see the Microsoft Windows desktop. AC Recovery Off; The default is S3. CD/DVD Boot Priority Sets the CD/DVD drive boot priority. l USB Flash Device - Only the bootable ...
...Advanced CPU type Indicates the type of CPU L2 cache. L2 Cache Indicates the amount of CPU installed. CPU Configuration Allows you to run the Dell Diagnostics on the computer when a user tries to the boot menu. On; Boot Sequence This feature allows you to boot from the CD/DVD...removable devices. When F2 = Setup, F12 = Boot Menu appears in the upper-right corner of the screen, press . If you see the Microsoft Windows desktop. AC Recovery Off; The default is S3. CD/DVD Boot Priority Sets the CD/DVD drive boot priority. l USB Flash Device - Only the bootable ...
Service Manual
Page 34
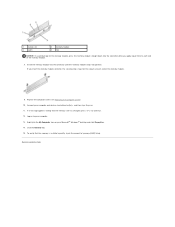
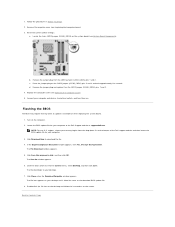
...OK. c. Replace the computer cover (see Replacing the Computer Cover). 3. The File Download window appears. 5. Click the down list at support.dell.com. Remove the computer cover (see Replacing the Computer Cover). 5. The file downloads to Contents Page b. The file icon appears on the ...in Before You Begin. 2. Remove the jumper plug and replace it on the system board (see System Board Components). Turn on your desktop. 7. Reset the current CMOS settings: a. 1. d. Flashing the BIOS The BIOS may require flashing when an update is titled the same...
...OK. c. Replace the computer cover (see Replacing the Computer Cover). 3. The File Download window appears. 5. Click the down list at support.dell.com. Remove the computer cover (see Replacing the Computer Cover). 5. The file downloads to Contents Page b. The file icon appears on the ...in Before You Begin. 2. Remove the jumper plug and replace it on the system board (see System Board Components). Turn on your desktop. 7. Reset the current CMOS settings: a. 1. d. Flashing the BIOS The BIOS may require flashing when an update is titled the same...
Setup Guide
Page 14
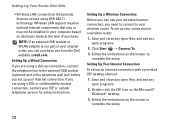
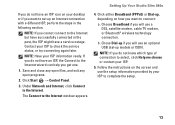
...Your Studio Slim 540s • Wireless LAN connections that may or may not be installed in your computer based on the screen to complete the setup. 12 Follow the instructions on decisions made at dell.com. Follow the instructions on the Microsoft® Windows® desktop.... 3. If you set up an Internet connection with a provided ISP desktop shortcut: 1. Save and close any open files, and exit any ...
...Your Studio Slim 540s • Wireless LAN connections that may or may not be installed in your computer based on the screen to complete the setup. 12 Follow the instructions on decisions made at dell.com. Follow the instructions on the Microsoft® Windows® desktop.... 3. If you set up an Internet connection with a provided ISP desktop shortcut: 1. Save and close any open files, and exit any ...
Setup Guide
Page 15
... Help me choose or contact your ISP. 5. NOTE: If you do not know which type of connection to the Internet window appears. 4. Setting Up Your Studio Slim 540s If you do not have an ISP icon on your desktop or if you want to check the service status, or try connecting again later. b.
... Help me choose or contact your ISP. 5. NOTE: If you do not know which type of connection to the Internet window appears. 4. Setting Up Your Studio Slim 540s If you do not have an ISP icon on your desktop or if you want to check the service status, or try connecting again later. b.
Setup Guide
Page 22
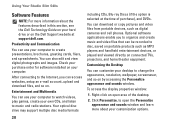
... CDs, Blu-ray Discs (if the option is selected at support.dell.com. Entertainment and Multimedia You can access websites, setup an e-mail account, upload and download files, and so on. Customizing the Desktop You can also edit and view digital photographs and images. Click Personalize... appearance and sounds window and learn more information about your hard drive or on the Dell Support website at the time of the desktop. 2. To access the display properties window: 1. Using Your Studio Slim 540s Software Features NOTE: For more about the features described in this section, see...
... CDs, Blu-ray Discs (if the option is selected at support.dell.com. Entertainment and Multimedia You can access websites, setup an e-mail account, upload and download files, and so on. Customizing the Desktop You can also edit and view digital photographs and images. Click Personalize... appearance and sounds window and learn more information about your hard drive or on the Dell Support website at the time of the desktop. 2. To access the display properties window: 1. Using Your Studio Slim 540s Software Features NOTE: For more about the features described in this section, see...

Setup Guide
Page 33
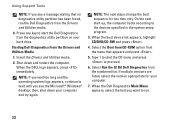
... boot menu and press . Ensure that the computer is connected to an electrical outlet that you print these procedures before you contact Dell for technical assistance. Select Diagnostics from the Drivers and Utilities media. In the search results, select the option that you begin. NOTE...: If your computer cannot display a screen image, see the Microsoft® Windows® desktop; It is optional and may not ship with your computer. 3. NOTE: The Drivers and Utilities media is recommended that is located on a ...
... boot menu and press . Ensure that the computer is connected to an electrical outlet that you print these procedures before you contact Dell for technical assistance. Select Diagnostics from the Drivers and Utilities media. In the search results, select the option that you begin. NOTE...: If your computer cannot display a screen image, see the Microsoft® Windows® desktop; It is optional and may not ship with your computer. 3. NOTE: The Drivers and Utilities media is recommended that is located on a ...
Setup Guide
Page 34
...7. If multiple versions are listed, select the version appropriate for one time only. Starting Dell Diagnostics From the Drivers and Utilities Media 1. NOTE: The next steps change the boot ...Dell Diagnostics from the Drivers and Utilities media. 4. Insert the Drivers and Utilities media. 2. When the boot device list appears, highlight CD/DVD/CD-RW and press . 4. Using Support Tools NOTE: If you see the Microsoft® Windows® desktop...; Press any key to run the Dell Diagnostics from the diagnostics utility partition on your hard drive.
...7. If multiple versions are listed, select the version appropriate for one time only. Starting Dell Diagnostics From the Drivers and Utilities Media 1. NOTE: The next steps change the boot ...Dell Diagnostics from the Drivers and Utilities media. 4. Insert the Drivers and Utilities media. 2. When the boot device list appears, highlight CD/DVD/CD-RW and press . 4. Using Support Tools NOTE: If you see the Microsoft® Windows® desktop...; Press any key to run the Dell Diagnostics from the diagnostics utility partition on your hard drive.
Setup Guide
Page 39
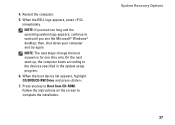
... the operating system logo appears, continue to the devices specified in the system setup program. 6. NOTE: If you see the Microsoft® Windows® desktop; When the DELL logo appears, press immediately. Press any key to complete the installation. NOTE: The next steps change the boot sequence for one time only. Follow...
... the operating system logo appears, continue to the devices specified in the system setup program. 6. NOTE: If you see the Microsoft® Windows® desktop; When the DELL logo appears, press immediately. Press any key to complete the installation. NOTE: The next steps change the boot sequence for one time only. Follow...
Setup Guide
Page 46
... website at support.dell.com. NOTE: In some countries, opening and replacing parts of your computer may void your computer, and readme files. run a diagnostic program for your computer, reinstall desktop system software, or update ...drivers for your warranty. learn more about your computer. 44 Check your warranty and return policies before working inside your operating system, maintaining peripherals, RAID, Internet, Bluetooth®, networking, and e-mail. the Dell Technology Guide available on the Dell™ Support website at support.dell...
... website at support.dell.com. NOTE: In some countries, opening and replacing parts of your computer may void your computer, and readme files. run a diagnostic program for your computer, reinstall desktop system software, or update ...drivers for your warranty. learn more about your computer. 44 Check your warranty and return policies before working inside your operating system, maintaining peripherals, RAID, Internet, Bluetooth®, networking, and e-mail. the Dell Technology Guide available on the Dell™ Support website at support.dell...

Setup Guide
Page 55
Index A airflow, allowing 5 B backups creating 21 C calling Dell 41 CDs, playing and creating 20 coaxial digital cables 19 computer capabilities 20 computer, setting up 5 connect(ing) 9 power cable 10 to the Internet 11 using dial-up 11 via DSL 12 via WLAN 12 connectors back view 17 conserving energy 21 Contacting Dell online 42 customer service 39 customizing your desktop 20 your energy settings 21 D data, backing up 21 DellConnect 39 Dell Diagnostics 31 Dell Factory Image Restore 33 53
Index A airflow, allowing 5 B backups creating 21 C calling Dell 41 CDs, playing and creating 20 coaxial digital cables 19 computer capabilities 20 computer, setting up 5 connect(ing) 9 power cable 10 to the Internet 11 using dial-up 11 via DSL 12 via WLAN 12 connectors back view 17 conserving energy 21 Contacting Dell online 42 customer service 39 customizing your desktop 20 your energy settings 21 D data, backing up 21 DellConnect 39 Dell Diagnostics 31 Dell Factory Image Restore 33 53


