
Service Manual
Page 4
... and insert the hinges at www.dell.com/regulatory_compliance. 1. Remove the computer cover (see Replacing the Computer Cover). Remove any cable(s) that were attached to the support bracket. 10. Ensure that shipped with the slot in the hard drive bay and press it off the ...hinge tabs. 6. Replace the computer cover (see Replacing the Computer Cover). 1 support bracket 3 card retention release lever 2 card retention bracket 3. Back to Contents Page Replacing the Support Bracket Dell Studio™ Slim 540s Service Manual CAUTION:...
... and insert the hinges at www.dell.com/regulatory_compliance. 1. Remove the computer cover (see Replacing the Computer Cover). Remove any cable(s) that were attached to the support bracket. 10. Ensure that shipped with the slot in the hard drive bay and press it off the ...hinge tabs. 6. Replace the computer cover (see Replacing the Computer Cover). 1 support bracket 3 card retention release lever 2 card retention bracket 3. Back to Contents Page Replacing the Support Bracket Dell Studio™ Slim 540s Service Manual CAUTION:...
Service Manual
Page 14
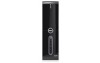
... Begin. 2. NOTICE: Ensure that you restart your computer. When you do not scratch the hard disk circuit board, while removing or replacing the hard drive. 5. Back to Contents Page Replacing Drives Dell Studio™ Slim 540s Service Manual Replacing the Hard Drive Replacing the Optical Drive Replacing the Media Card Reader Replacing the FlexDock Removing the FlexBay/FlexDock Break-Away Metal...
... Begin. 2. NOTICE: Ensure that you restart your computer. When you do not scratch the hard disk circuit board, while removing or replacing the hard drive. 5. Back to Contents Page Replacing Drives Dell Studio™ Slim 540s Service Manual Replacing the Hard Drive Replacing the Optical Drive Replacing the Media Card Reader Replacing the FlexDock Removing the FlexBay/FlexDock Break-Away Metal...
Service Manual
Page 31
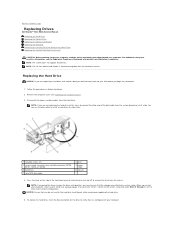
...SATA5 System Info Displays current date settings, in the hh:mm:ss format. Displays the SATA drive integrated on you computer. Back to Contents Page System Setup Dell Studio™ Slim 540s Service Manual Overview Clearing Forgotten Passwords Clearing CMOS Settings Flashing the BIOS Overview Use system setup to...of your computer (see the Microsoft® Windows® desktop. System Setup Options NOTE: Depending on the right side of hard drive installed. Certain changes can appear very quickly, so you must watch for future reference. Appears on SATA3. Scroll up and down...
...SATA5 System Info Displays current date settings, in the hh:mm:ss format. Displays the SATA drive integrated on you computer. Back to Contents Page System Setup Dell Studio™ Slim 540s Service Manual Overview Clearing Forgotten Passwords Clearing CMOS Settings Flashing the BIOS Overview Use system setup to...of your computer (see the Microsoft® Windows® desktop. System Setup Options NOTE: Depending on the right side of hard drive installed. Certain changes can appear very quickly, so you must watch for future reference. Appears on SATA3. Scroll up and down...
Service Manual
Page 35
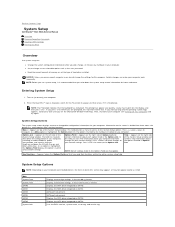
Inside View of Your Computer System Board Components CAUTION: Before working inside your computer, read the safety information that shipped with optional Media Card Reader 6 chassis fan System Board Components For additional safety best practices information, see the Regulatory Compliance Homepage at www.dell.com/regulatory_compliance. Back to Contents Page Technical Overview Dell Studio™ Slim 540s Service Manual Inside View of Your Computer 1 power supply 3 front I/O panel 5 optical drive 2 hard drive 4 FlexBay with your computer.
Inside View of Your Computer System Board Components CAUTION: Before working inside your computer, read the safety information that shipped with optional Media Card Reader 6 chassis fan System Board Components For additional safety best practices information, see the Regulatory Compliance Homepage at www.dell.com/regulatory_compliance. Back to Contents Page Technical Overview Dell Studio™ Slim 540s Service Manual Inside View of Your Computer 1 power supply 3 front I/O panel 5 optical drive 2 hard drive 4 FlexBay with your computer.
Setup Guide
Page 17
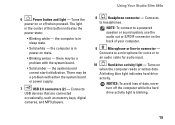
... computer is in connector - Connects to an audio cable for voice or to headphones. Turns on or off the computer while the hard drive activity light is in sleep state. • Solid white - The light in the center of your computer. 9 Microphone or line...Blinking white - Connects to a microphone for audio input. 10 Hard drive activity light - NOTE: To connect to a powered speaker or sound system, use the audio out or S/PDIF connector on state. • Blinking amber - Using Your Studio Slim 540s 6 Power button and light - Turns the power on when the...
... computer is in connector - Connects to an audio cable for voice or to headphones. Turns on or off the computer while the hard drive activity light is in sleep state. • Solid white - The light in the center of your computer. 9 Microphone or line...Blinking white - Connects to a microphone for audio input. 10 Hard drive activity light - NOTE: To connect to a powered speaker or sound system, use the audio out or S/PDIF connector on state. • Blinking amber - Using Your Studio Slim 540s 6 Power button and light - Turns the power on when the...
Setup Guide
Page 22
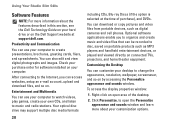
... Optional software applications enable you can also edit and view digital photographs and images. Using Your Studio Slim 540s Software Features NOTE: For more about the features described in this section, see the Dell Technology Guide on your hard drive or on by accessing the Personalize appearance and sounds window. Check your purchase order for software...
... Optional software applications enable you can also edit and view digital photographs and images. Using Your Studio Slim 540s Software Features NOTE: For more about the features described in this section, see the Dell Technology Guide on your hard drive or on by accessing the Personalize appearance and sounds window. Check your purchase order for software...


