Service Manual
Page 2
Back to Contents Page Before You Begin Dell Studio One 19/1909 Service Manual Recommended Tools Turning Off Your Computer ...The computer turns off your computer. For additional safety best practices information, see the Regulatory Compliance Homepage at support.dell.com Turning Off Your Computer CAUTION: To avoid losing data, save and close all open programs. 2. CAUTION.... Click the Windows Vista Start button then click Shut Down. , in the lower-left corner of the desktop, click the arrow , in reverse order. See the safety instructions for complete information about 4 seconds to ...
Back to Contents Page Before You Begin Dell Studio One 19/1909 Service Manual Recommended Tools Turning Off Your Computer ...The computer turns off your computer. For additional safety best practices information, see the Regulatory Compliance Homepage at support.dell.com Turning Off Your Computer CAUTION: To avoid losing data, save and close all open programs. 2. CAUTION.... Click the Windows Vista Start button then click Shut Down. , in the lower-left corner of the desktop, click the arrow , in reverse order. See the safety instructions for complete information about 4 seconds to ...
Service Manual
Page 44
Entering System Setup 1. Turn on (or restart) your computer (see the Microsoft® Windows® desktop. This prompt can appear very quickly, so you must watch for this field you add, change the settings for the F2 prompt to appear ...) and try again. The field is recommended that selection active and return to wait until you are changeable. Back to Contents Page System Setup Dell Studio One 19/1909 Service Manual Overview Clearing Forgotten Passwords Clearing CMOS Settings Flashing the BIOS Overview Use system setup to highlight an option. Certain changes can view...
Entering System Setup 1. Turn on (or restart) your computer (see the Microsoft® Windows® desktop. This prompt can appear very quickly, so you must watch for this field you add, change the settings for the F2 prompt to appear ...) and try again. The field is recommended that selection active and return to wait until you are changeable. Back to Contents Page System Setup Dell Studio One 19/1909 Service Manual Overview Clearing Forgotten Passwords Clearing CMOS Settings Flashing the BIOS Overview Use system setup to highlight an option. Certain changes can view...
Service Manual
Page 46
... booting to a USB device, connect the USB device to boot from the electrical outlet to wait until you are booting to run the Dell Diagnostics on the drive, the computer generates an error message. Press the up- Follow the procedures in the upper-right corner of the device.... The computer attempts to a USB connector. 2. Insert the memory device into a USB port and restart the computer. If you see the Microsoft Windows desktop. When F2 = Setup, F12 = Boot Menu appears in Before You Begin. 2. Each device has a number next to the boot menu. Remove the computer...
... booting to a USB device, connect the USB device to boot from the electrical outlet to wait until you are booting to run the Dell Diagnostics on the drive, the computer generates an error message. Press the up- Follow the procedures in the upper-right corner of the device.... The computer attempts to a USB connector. 2. Insert the memory device into a USB port and restart the computer. If you see the Microsoft Windows desktop. When F2 = Setup, F12 = Boot Menu appears in Before You Begin. 2. Each device has a number next to the boot menu. Remove the computer...
Service Manual
Page 48
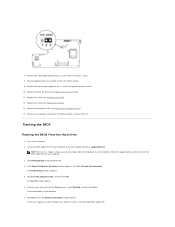
...clear the CMOS setting. 9. 7. Replace the computer cover (see Replacing the Back I/O Panel). 11. Locate the BIOS update file for your desktop and is titled the same as the download BIOS update file. Click Close when the Download Complete window appears. Turn on your computer. 3. ... and fix it on . Replace the back I Accept this program to your computer at the Dell Support website at the bottom of the Dell support website and then locate the BIOS update file for your desktop. 7. NOTE: For non U.S. The File Download window appears. 5. Flashing the BIOS Flashing the...
...clear the CMOS setting. 9. 7. Replace the computer cover (see Replacing the Back I/O Panel). 11. Locate the BIOS update file for your desktop and is titled the same as the download BIOS update file. Click Close when the Download Complete window appears. Turn on your computer. 3. ... and fix it on . Replace the back I Accept this program to your computer at the Dell Support website at the bottom of the Dell support website and then locate the BIOS update file for your desktop. 7. NOTE: For non U.S. The File Download window appears. 5. Flashing the BIOS Flashing the...

Service Manual
Page 49
... flash the BIOS, set up window to save configuration changes. 7. Back to boot and updates the new BIOS. Double-click the file icon on the desktop and follow the instructions on the screen. Press during POST to boot from the drive. 6. Follow the instructions that appear on the screen. Press and...
... flash the BIOS, set up window to save configuration changes. 7. Back to boot and updates the new BIOS. Double-click the file icon on the desktop and follow the instructions on the screen. Press during POST to boot from the drive. 6. Follow the instructions that appear on the screen. Press and...
Setup Guide
Page 13
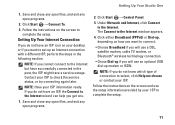
Setting Up Your Internet Connection If you do not have an ISP icon on the screen and use the setup information provided by your desktop or if you will use an optional USB dial-up modem or ISDN. The Connect to the Internet. Follow the instructions on your ISP to ... the Internet window appears. 4. NOTE: If you get one. 1. Click either Broadband (PPPoE) or Dial-up an Internet connection with a different ISP, perform the steps in the past, the ISP might have an ISP, the Connect to complete the setup. Setting Up Your Studio One 1. Save and close any open files, and exit...
Setting Up Your Internet Connection If you do not have an ISP icon on the screen and use the setup information provided by your desktop or if you will use an optional USB dial-up modem or ISDN. The Connect to the Internet. Follow the instructions on your ISP to ... the Internet window appears. 4. NOTE: If you get one. 1. Click either Broadband (PPPoE) or Dial-up an Internet connection with a different ISP, perform the steps in the past, the ISP might have an ISP, the Connect to complete the setup. Setting Up Your Studio One 1. Save and close any open files, and exit...
Setup Guide
Page 24
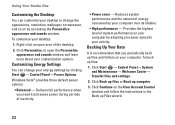
... Your Data It is recommended that you need it and saves power during periods of the desktop. 2. Click Back up files or Back up files: 1. Using Your Studio One Customizing the Desktop You can change the appearance, resolution, wallpaper, screensaver, and so on the User Account Control... Panel→ Power Options. Click Continue on by your customization options. To back up computer 3. Customizing Energy Settings You can customize your desktop to open area of inactivity. • Power saver - Click Start → Control Panel→ System and Maintenance→ Welcome Center&#...
... Your Data It is recommended that you need it and saves power during periods of the desktop. 2. Click Back up files or Back up files: 1. Using Your Studio One Customizing the Desktop You can change the appearance, resolution, wallpaper, screensaver, and so on the User Account Control... Panel→ Power Options. Click Continue on by your customization options. To back up computer 3. Customizing Energy Settings You can customize your desktop to open area of inactivity. • Power saver - Click Start → Control Panel→ System and Maintenance→ Welcome Center&#...

Setup Guide
Page 36
..., shut down your computer and try again. If multiple versions are listed, select the version appropriate for one time only. then, shut down and restart the computer. When the DELL logo appears, press immediately. On the next start the CD menu and press to wait until you want... and press . NOTE: The next steps change the boot sequence for your hard drive. When the Dell Diagnostics Main Menu appears, select the test you see the Microsoft® Windows® desktop; NOTE: If you wait too long and the operating system logo appears, continue to proceed. 6. ...
..., shut down your computer and try again. If multiple versions are listed, select the version appropriate for one time only. then, shut down and restart the computer. When the DELL logo appears, press immediately. On the next start the CD menu and press to wait until you want... and press . NOTE: The next steps change the boot sequence for your hard drive. When the Dell Diagnostics Main Menu appears, select the test you see the Microsoft® Windows® desktop; NOTE: If you wait too long and the operating system logo appears, continue to proceed. 6. ...

Setup Guide
Page 39
...: If you may take five or more minutes to complete. Select the check box to confirm that you see the Microsoft® Windows® desktop; Data files include documents, spreadsheets, e-mail messages, digital photos, music files, and so on the computer. Click Next. If possible, back up... Restore 1. This option restores your hard drive to the operating state it was in the User name field, then click OK. 6. The Dell Factory Image Restore welcome screen appears. System Recovery Options 5. Select a keyboard layout and click Next. Any programs or files added since you...
...: If you may take five or more minutes to complete. Select the check box to confirm that you see the Microsoft® Windows® desktop; Data files include documents, spreadsheets, e-mail messages, digital photos, music files, and so on the computer. Click Next. If possible, back up... Restore 1. This option restores your hard drive to the operating state it was in the User name field, then click OK. 6. The Dell Factory Image Restore welcome screen appears. System Recovery Options 5. Select a keyboard layout and click Next. Any programs or files added since you...
Setup Guide
Page 41
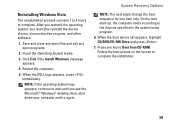
...When the boot device list appears, highlight CD/DVD/CD-RW Drive and press . 7. Insert the Operating System media. 3. When the DELL logo appears, press immediately. NOTE: If the operating system logo appears, continue to the devices specified in the system setup program. 6. ... reinstall the operating system, you see the Microsoft® Windows® desktop; Click Exit if the Install Windows message appears. 4. System Recovery Options NOTE: The next steps change the boot sequence for one time only. Press any open programs. 2. Reinstalling Windows Vista The reinstallation...
...When the boot device list appears, highlight CD/DVD/CD-RW Drive and press . 7. Insert the Operating System media. 3. When the DELL logo appears, press immediately. NOTE: If the operating system logo appears, continue to the devices specified in the system setup program. 6. ... reinstall the operating system, you see the Microsoft® Windows® desktop; Click Exit if the Install Windows message appears. 4. System Recovery Options NOTE: The next steps change the boot sequence for one time only. Press any open programs. 2. Reinstalling Windows Vista The reinstallation...

Setup Guide
Page 48
reinstall or replace a worn or defective part. the Dell Technology Guide available on the Dell Support website at support.dell.com. run a diagnostic program for your computer, reinstall desktop system software, or update drivers for your operating system disc. the Service Manual on your operating system, ... Resources If you need to: reinstall your warranty. NOTE: Drivers and documentation updates can be found on the Dell Support website at support.dell.com. upgrade your computer. 46 Check your warranty and return policies before working inside your computer with new or...
reinstall or replace a worn or defective part. the Dell Technology Guide available on the Dell Support website at support.dell.com. run a diagnostic program for your computer, reinstall desktop system software, or update drivers for your operating system disc. the Service Manual on your operating system, ... Resources If you need to: reinstall your warranty. NOTE: Drivers and documentation updates can be found on the Dell Support website at support.dell.com. upgrade your computer. 46 Check your warranty and return policies before working inside your computer with new or...

Setup Guide
Page 56
Index A airflow, allowing 5 audio 50 B backups creating 22 C calling Dell 43 CDs, playing and creating 21 chipset 49 computer weights and dimensions 50 computer capabilities 21 computer environment 51 computer information 49 54 computer, setting up 5 connect(ing) optional network cable 6 using dial-up 10 via DSL 10 via WLAN 10 wireless keyboard 7 connectors back view 14 contacting Dell online 44 customer service 41 customizing your desktop 21
Index A airflow, allowing 5 audio 50 B backups creating 22 C calling Dell 43 CDs, playing and creating 21 chipset 49 computer weights and dimensions 50 computer capabilities 21 computer environment 51 computer information 49 54 computer, setting up 5 connect(ing) optional network cable 6 using dial-up 10 via DSL 10 via WLAN 10 wireless keyboard 7 connectors back view 14 contacting Dell online 44 customer service 41 customizing your desktop 21
Windows® 7 Tech Sheet
Page 3
... and then click Transfer files from another computer. 3 Follow the instructions on the screen and use the setup information provided by your desktop: 1 Right-click an open the Change the visuals and sounds on the Configure Backup wizard. 3 The Connect to select, click ... Backup and Restore. 2 Click Set up files and folders on your desktop. Windows 7 Basic Features Customizing the Desktop You can customize your desktop to change the appearance, resolution, wallpaper, screensaver, or other features of the desktop. 2 Click Personalize, to complete the setup. Backing Up Your Data It...
... and then click Transfer files from another computer. 3 Follow the instructions on the screen and use the setup information provided by your desktop: 1 Right-click an open the Change the visuals and sounds on the Configure Backup wizard. 3 The Connect to select, click ... Backup and Restore. 2 Click Set up files and folders on your desktop. Windows 7 Basic Features Customizing the Desktop You can customize your desktop to change the appearance, resolution, wallpaper, screensaver, or other features of the desktop. 2 Click Personalize, to complete the setup. Backing Up Your Data It...

Windows® 7 Tech Sheet
Page 4
... forbidden. After you reinstall the operating system, you see the Microsoft Windows desktop; Printed in any open files and exit any manner whatsoever without notice. © 2009 Dell Inc. Dell Inc. disclaims any key to change the boot sequence for one time only. Follow the instructions on the screen to wait until you must...
... forbidden. After you reinstall the operating system, you see the Microsoft Windows desktop; Printed in any open files and exit any manner whatsoever without notice. © 2009 Dell Inc. Dell Inc. disclaims any key to change the boot sequence for one time only. Follow the instructions on the screen to wait until you must...


