
Dell™ Technology Guide
Page 87
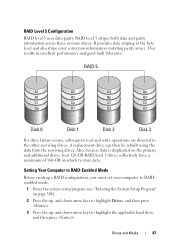
...setup program (see "Entering the System Setup Program" on which to highlight Drives, and then press . 3 Press the up - and down -arrow keys to store data. RAID Level 5 Configuration RAID level 5 uses data parity. RAID level 5 stripes both data and parity information across three or more ...(rotating parity array). Drives and Media 87 This results in excellent performance and good fault tolerance. and down -arrow keys to the other surviving drives. A replacement drive can then be rebuilt using the data from the surviving drives. Also, because data is duplicated on the primary...
...setup program (see "Entering the System Setup Program" on which to highlight Drives, and then press . 3 Press the up - and down -arrow keys to store data. RAID Level 5 Configuration RAID level 5 uses data parity. RAID level 5 stripes both data and parity information across three or more ...(rotating parity array). Drives and Media 87 This results in excellent performance and good fault tolerance. and down -arrow keys to the other surviving drives. A replacement drive can then be rebuilt using the data from the surviving drives. Also, because data is duplicated on the primary...
Dell™ Technology Guide
Page 278
.... WARNING: A XXX-W AC ADAPTER HAS BEEN DETECTED, WHICH IS LESS THAN 278 Troubleshooting D A Y N O T S E T - STRIKE THE F1 KEY TO S H U T D O W N . - THE BATTERY MAY NOT CHARGE. If the problem persists, replace the CMOS battery. Run the Dell Diagnostics (see "Contacting Dell" on page 281). Enter the system setup program and correct the date or time (see "Entering...
.... WARNING: A XXX-W AC ADAPTER HAS BEEN DETECTED, WHICH IS LESS THAN 278 Troubleshooting D A Y N O T S E T - STRIKE THE F1 KEY TO S H U T D O W N . - THE BATTERY MAY NOT CHARGE. If the problem persists, replace the CMOS battery. Run the Dell Diagnostics (see "Contacting Dell" on page 281). Enter the system setup program and correct the date or time (see "Entering...

Dell™ Technology Guide
Page 279
...INSERT AN APPROPRIATE ADAPTER. Connect the correct AC adapter. STRIKE THE F1 KEY TO CONTINUE, F2 TO RUN THE SETUP UTILITY. - The battery may...L T H I S B A T T E R Y I S R E M O V E D . - WARNING! IT IS ADVISABLE TO IMMEDIATELY BACK UP YOUR DATA AND REPLACE YOUR HARD DRIVE BY CALLING YOUR SUPPORT DESK OR D E L L. - THE RECOMMENDED XXX-W AC ADAPTER ORIGINALLY SHIPPED. WA R N I N G : T H E T P M C O U L D N O T B E I N I T I A L I S R E M O V E D . - Contact Dell for assistance (see "Contacting Dell" on page 307. YOUR POWER ADAPTER DOES NOT SUPPLY ENOUGH POWER TO RUN THE...
...INSERT AN APPROPRIATE ADAPTER. Connect the correct AC adapter. STRIKE THE F1 KEY TO CONTINUE, F2 TO RUN THE SETUP UTILITY. - The battery may...L T H I S B A T T E R Y I S R E M O V E D . - WARNING! IT IS ADVISABLE TO IMMEDIATELY BACK UP YOUR DATA AND REPLACE YOUR HARD DRIVE BY CALLING YOUR SUPPORT DESK OR D E L L. - THE RECOMMENDED XXX-W AC ADAPTER ORIGINALLY SHIPPED. WA R N I N G : T H E T P M C O U L D N O T B E I N I T I A L I S R E M O V E D . - Contact Dell for assistance (see "Contacting Dell" on page 307. YOUR POWER ADAPTER DOES NOT SUPPLY ENOUGH POWER TO RUN THE...
Dell™ Technology Guide
Page 297
...) (see the Service Manual for your computer). Some possible causes of the computer and the electrical outlet. • Replace power strips, power extension cables, and other power protection devices with your computer). Press a key on page 275. The computer is set to match the AC power at your location (if applicable). •...
...) (see the Service Manual for your computer). Some possible causes of the computer and the electrical outlet. • Replace power strips, power extension cables, and other power protection devices with your computer). Press a key on page 275. The computer is set to match the AC power at your location (if applicable). •...
Dell™ Technology Guide
Page 304
...blinking blue, the computer is plugged into both the power connector on . - For additional safety best practices information, see "Contacting Dell" on properly. - Press a key on the keyboard, move the mouse, or press the power button to verify that the power strip is in known working by testing...power light is off, the computer is either turned off or is plugged into a power strip, ensure that the computer turns on page 337). Replace power protection devices, power strips, and power extension cables with another device, such as a lamp. - Power Lights CAUTION: Before you begin ...
...blinking blue, the computer is plugged into both the power connector on . - For additional safety best practices information, see "Contacting Dell" on properly. - Press a key on the keyboard, move the mouse, or press the power button to verify that the power strip is in known working by testing...power light is off, the computer is either turned off or is plugged into a power strip, ensure that the computer turns on page 337). Replace power protection devices, power strips, and power extension cables with another device, such as a lamp. - Power Lights CAUTION: Before you begin ...
Dell™ Technology Guide
Page 310
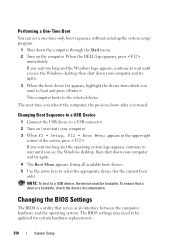
When the DELL logo appears, press immediately. The computer boots to a USB device, the device must ... wait until you wait too long and the Windows logo appears, continue to select the appropriate device (for certain hardware replacements. 310 System Setup If you see the Windows desktop, then shut down your computer and try again. 4 The Boot... Menu appears, listing all available boot devices. 5 Use the arrow keys to wait until you see the Windows desktop, then shut down the computer through the Start menu. 2 Turn on (or restart...
When the DELL logo appears, press immediately. The computer boots to a USB device, the device must ... wait until you wait too long and the Windows logo appears, continue to select the appropriate device (for certain hardware replacements. 310 System Setup If you see the Windows desktop, then shut down your computer and try again. 4 The Boot... Menu appears, listing all available boot devices. 5 Use the arrow keys to wait until you see the Windows desktop, then shut down the computer through the Start menu. 2 Turn on (or restart...
Setup Guide
Page 5
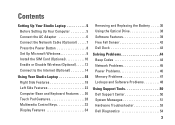
...Connect to the Internet (Optional 14 Using Your Studio Laptop 18 Right Side Features 18 Left Side Features 22 Computer Base and Keyboard Features 26 Touch Pad Gestures 28 Multimedia Control Keys 32 Display Features 34 Removing and Replacing the Battery 36 Using the Optical Drive 38 Software... Features 39 Free Fall Sensor 42 Dell Dock 43 Solving Problems 44 Beep Codes 44 Network Problems 45 ...
...Connect to the Internet (Optional 14 Using Your Studio Laptop 18 Right Side Features 18 Left Side Features 22 Computer Base and Keyboard Features 26 Touch Pad Gestures 28 Multimedia Control Keys 32 Display Features 34 Removing and Replacing the Battery 36 Using the Optical Drive 38 Software... Features 39 Free Fall Sensor 42 Dell Dock 43 Solving Problems 44 Beep Codes 44 Network Problems 45 ...


