
User's Guide
Page 1
...make better use of your computer. NOTICE: A NOTICE indicates either registered trademarks or trademarks of these materials in any proprietary interest in the United States and/or other than its own. As an ENERGY STAR partner, Dell Inc. has determined that helps you how to change...notice. © 2009 Dell Inc. Model SX2210Tb August 2009 Rev. is subject to avoid the problem. ENERGY STAR is a registered trademark of Dell Inc. Dell™ SX2210T Flat Panel Monitor User's Guide About Your Monitor Setting Up the Monitor Operating the Monitor Troubleshooting Appendix Notes, Notices,...
...make better use of your computer. NOTICE: A NOTICE indicates either registered trademarks or trademarks of these materials in any proprietary interest in the United States and/or other than its own. As an ENERGY STAR partner, Dell Inc. has determined that helps you how to change...notice. © 2009 Dell Inc. Model SX2210Tb August 2009 Rev. is subject to avoid the problem. ENERGY STAR is a registered trademark of Dell Inc. Dell™ SX2210T Flat Panel Monitor User's Guide About Your Monitor Setting Up the Monitor Operating the Monitor Troubleshooting Appendix Notes, Notices,...
User's Guide
Page 3
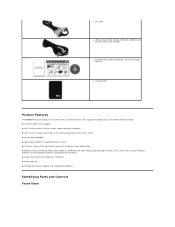
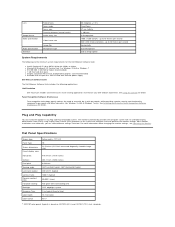
... resolution, plus full-screen support for lower resolutions. ■ Touch sensitive-detects your finger or any other pointing device close to the screen. ■ Tilt adjustment capability. ■ Plug and play capability if supported by your system. ■ On-Screen Display (OSD) adjustments for ease of set-up stream cable (enables USB ports, Webcam and touch function on the monitor) l Documentation (Safety Information, Quick Start Guide, and CD) l Cleaning cloth Product Features The SX2210T flat panel display has...
... resolution, plus full-screen support for lower resolutions. ■ Touch sensitive-detects your finger or any other pointing device close to the screen. ■ Tilt adjustment capability. ■ Plug and play capability if supported by your system. ■ On-Screen Display (OSD) adjustments for ease of set-up stream cable (enables USB ports, Webcam and touch function on the monitor) l Documentation (Safety Information, Quick Start Guide, and CD) l Cleaning cloth Product Features The SX2210T flat panel display has...
User's Guide
Page 5
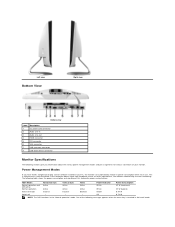
... Horizontal Sync Active Active Vertical Sync Active Active Video Active Active Power Indicator White White Power Consumption 42 W (maximum) 28 W (typical) Active-off mode Inactive Inactive Blanked Amber 0.84 W Switch off mode. Left view Bottom View Right view Bottom view Label Description 1 DC power cord connector 2 Audio Line-in 3 Audio Line-out 4 HDMI connector 5 DVI connector 6 VGA connector 7 USB upstream connector 8 USB downstream connector Monitor Specifications The following sections give you have VESA's compliance display card or software installed...
... Horizontal Sync Active Active Vertical Sync Active Active Video Active Active Power Indicator White White Power Consumption 42 W (maximum) 28 W (typical) Active-off mode Inactive Inactive Blanked Amber 0.84 W Switch off mode. Left view Bottom View Right view Bottom view Label Description 1 DC power cord connector 2 Audio Line-in 3 Audio Line-out 4 HDMI connector 5 DVI connector 6 VGA connector 7 USB upstream connector 8 USB downstream connector Monitor Specifications The following sections give you have VESA's compliance display card or software installed...
User's Guide
Page 8
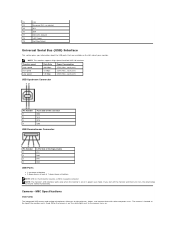
... the camera is on, the white light next to resume normal functionality. MIC Specifications Overview The integrated USB camera and analog microphones allow you information about the USB ports that are available on or in power save mode. The camera is located at bottom NOTE: USB 2.0 functionality requires a USB 2.0-capable computer NOTE: The monitor's USB interface works only when the monitor is fixed. on device) 15 SCL...
... the camera is on, the white light next to resume normal functionality. MIC Specifications Overview The integrated USB camera and analog microphones allow you information about the USB ports that are available on or in power save mode. The camera is located at bottom NOTE: USB 2.0 functionality requires a USB 2.0-capable computer NOTE: The monitor's USB interface works only when the monitor is fixed. on device) 15 SCL...
User's Guide
Page 9
Lens Image Sensor Video specification Audio Specification Interface Field of view Focus mode Focus area Focusing distance (normal mode) Active array size Video frame rate Image flip Microphone type 66.2 degree +/- 5 % Fixed Focus 37 cm~Infinity 1.100 mm 2.0 mega-pixel 1600 x 1200 (UXGA) - TFT LCD Panel Type Screen dimensions Preset display area: TN 21.5 inches (21.5-inch measured diagonally viewable image size) Horizontal: 476.64 mm (18.76 inches) Vertical: Pixel pitch Viewing angle Luminance output Contrast ratio Dynamic contrast ratio...
Lens Image Sensor Video specification Audio Specification Interface Field of view Focus mode Focus area Focusing distance (normal mode) Active array size Video frame rate Image flip Microphone type 66.2 degree +/- 5 % Fixed Focus 37 cm~Infinity 1.100 mm 2.0 mega-pixel 1600 x 1200 (UXGA) - TFT LCD Panel Type Screen dimensions Preset display area: TN 21.5 inches (21.5-inch measured diagonally viewable image size) Horizontal: 476.64 mm (18.76 inches) Vertical: Pixel pitch Viewing angle Luminance output Contrast ratio Dynamic contrast ratio...
User's Guide
Page 15
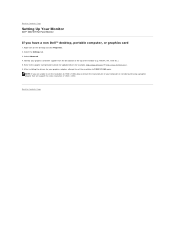
... purchasing a graphics adapter that will support the video resolution of the window (e.g. After installing the drivers for example, http://www.ATI.com OR http://www.NVIDIA.com ). 6. NVIDIA, ATI, Intel etc.). 5. NOTE: If you have a non Dell™ desktop, portable computer, or graphics card 1. Back to Contents Page Setting Up Your Monitor Dell™ SX2210T Flat Panel Monitor If you are unable to set the resolution to 1920...
... purchasing a graphics adapter that will support the video resolution of the window (e.g. After installing the drivers for example, http://www.ATI.com OR http://www.NVIDIA.com ). 6. NVIDIA, ATI, Intel etc.). 5. NOTE: If you have a non Dell™ desktop, portable computer, or graphics card 1. Back to Contents Page Setting Up Your Monitor Dell™ SX2210T Flat Panel Monitor If you are unable to set the resolution to 1920...
User's Guide
Page 16
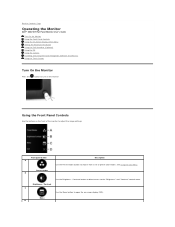
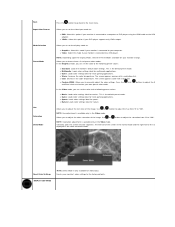
Brightness / Contrast C Use the Menu button to open the on the front of preset color modes. Menu D Use the Brightness / Contrast button to direct access to adjust the image settings. See Using the OSD Menu. Back to Contents Page Operating the Monitor Dell™ SX2210T Flat Panel Monitor User's Guide Turn On the Monitor Using the Front Panel Controls Using the On-Screen Display (OSD) Menu Setting the Maximum Resolution Using the Dell Soundbar (Optional) Using the Tilt Using the Camera Installing and Using the Facial Recognition Software (FastAccess) Using the Touch Screen Turn...
Brightness / Contrast C Use the Menu button to open the on the front of preset color modes. Menu D Use the Brightness / Contrast button to direct access to adjust the image settings. See Using the OSD Menu. Back to Contents Page Operating the Monitor Dell™ SX2210T Flat Panel Monitor User's Guide Turn On the Monitor Using the Front Panel Controls Using the On-Screen Display (OSD) Menu Setting the Maximum Resolution Using the Dell Soundbar (Optional) Using the Tilt Using the Camera Installing and Using the Facial Recognition Software (FastAccess) Using the Touch Screen Turn...
User's Guide
Page 19
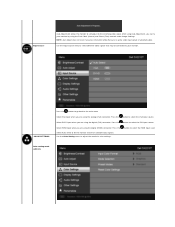
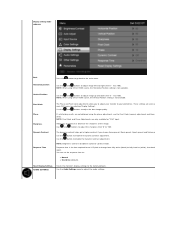
... video signals that may be connected to the main menu Select VGA input when you are using the digital (HDMI) connector. COLOR SETTINGS Press the button to go back to your monitor by using the analog (VGA) connector. Press the button to select the VGA input source. Color setting mode submenu Press the button to select the HDMI input source. After using Auto Adjustment, you are no active video input signals or attached cables. Select Auto select to adjust the monitor's color settings. Select HDMI input when you can further tune your monitor. Use the Color Setting menu...
... video signals that may be connected to the main menu Select VGA input when you are using the digital (HDMI) connector. COLOR SETTINGS Press the button to go back to your monitor by using the analog (VGA) connector. Press the button to select the VGA input source. Color setting mode submenu Press the button to select the HDMI input source. After using Auto Adjustment, you are no active video input signals or attached cables. Select Auto select to adjust the monitor's color settings. Select HDMI input when you can further tune your monitor. Use the Color Setting menu...
User's Guide
Page 20
.... The screen appears warmer with a blue tint. l Custom (RGB): Allows you to set the video input mode to a DVD player. Use or button to adjust the hue from '0' to manually adjust the color settings. NOTE: Saturation adjustment is connected to : l RGB: Select this option if your monitor change. Vertically splits the screen into two segments. This is the default preset mode. l Game: Loads color settings ideal for most gaming applications. The screen appears cooler with a red/yellow...
.... The screen appears warmer with a blue tint. l Custom (RGB): Allows you to set the video input mode to a DVD player. Use or button to adjust the hue from '0' to manually adjust the color settings. NOTE: Saturation adjustment is connected to : l RGB: Select this option if your monitor change. Vertically splits the screen into two segments. This is the default preset mode. l Game: Loads color settings ideal for most gaming applications. The screen appears cooler with a red/yellow...
User's Guide
Page 21
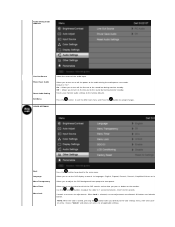
... (black) to fully inactive (white), then back to increase or decrease the sharpness of the image. Reset Display Settings AUDIO SETTINGS Resets the monitor's display settings to adjust the audio settings. Pixel Clock Phase Sharpness Dynamic Contrast Response Time The Phase and Pixel Clock adjustments allow you to fully active again. NOTE: Brightness control is not available. Use the Audio Settings menu to the factory defaults. Horizontal position Use the and buttons to enable the Dynamic Contrast adjustment. NOTE: When using DVI or HDMI source, the Vertical...
... (black) to fully inactive (white), then back to increase or decrease the sharpness of the image. Reset Display Settings AUDIO SETTINGS Resets the monitor's display settings to adjust the audio settings. Pixel Clock Phase Sharpness Dynamic Contrast Response Time The Phase and Pixel Clock adjustments allow you to fully active again. NOTE: Brightness control is not available. Use the Audio Settings menu to the factory defaults. Horizontal position Use the and buttons to enable the Dynamic Contrast adjustment. NOTE: When using DVI or HDMI source, the Vertical...
User's Guide
Page 22
... Back Language Menu Transparency Menu Timer Menu Lock Press the button to go back to the factory defaults. Resets your monitor audio settings to the main menu. Allows you to adjust the OSD background from 5 to the audio during monitor standby. Controls user access to all applicable settings. Choose "Unlock" and allow user access to adjustments. Default is selected, no user adjustments are locked except the button. Audio Setting mode submenu Line Out Source Power Save Audio Reset Audio Setting Exit Menu OTHER SETTINGS Select the source of six languages: English...
... Back Language Menu Transparency Menu Timer Menu Lock Press the button to go back to the factory defaults. Resets your monitor audio settings to the main menu. Allows you to adjust the OSD background from 5 to the audio during monitor standby. Controls user access to all applicable settings. Choose "Unlock" and allow user access to adjustments. Default is selected, no user adjustments are locked except the button. Audio Setting mode submenu Line Out Source Power Save Audio Reset Audio Setting Exit Menu OTHER SETTINGS Select the source of six languages: English...
User's Guide
Page 27
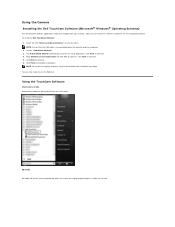
... the Dell "Drivers and Documentation" CD into the drive. Click Next to use the Webcam. Click Finish to continue. To install the Dell TouchCam Software: 1. The Install Shield Wizard automatically launches the setup application. Read Software License Agreement and click Yes to complete installation. Using the Camera Installing the Dell TouchCam Software (Microsoft® Windows® Operating Systems) The Dell SX2210T webcam application media that the USB cable is connected...
... the Dell "Drivers and Documentation" CD into the drive. Click Next to use the Webcam. Click Finish to continue. To install the Dell TouchCam Software: 1. The Install Shield Wizard automatically launches the setup application. Read Software License Agreement and click Yes to complete installation. Using the Camera Installing the Dell TouchCam Software (Microsoft® Windows® Operating Systems) The Dell SX2210T webcam application media that the USB cable is connected...
User's Guide
Page 29
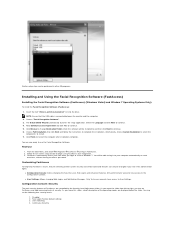
... the operating modes are displayed below the slider. As you turn on most occasions, without having to use the Facial Recognition Software. Continuous Security Insert the Dell "Drivers and Documentation" CD into the drive. Alternatively, choose Custom Installation to select the components to complete the installation. click StartàAll ProgramsàFastAccessàConfigure FastAccess. 2. Customizing FastAccess To help keep FastAccess...
... the operating modes are displayed below the slider. As you turn on most occasions, without having to use the Facial Recognition Software. Continuous Security Insert the Dell "Drivers and Documentation" CD into the drive. Alternatively, choose Custom Installation to select the components to complete the installation. click StartàAll ProgramsàFastAccessàConfigure FastAccess. 2. Customizing FastAccess To help keep FastAccess...
User's Guide
Page 30
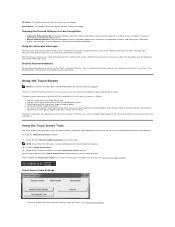
... use the "Face + Password" feature. l Touch down on the menu, then move your finger to factory defaults, diagnostic and calibrating functions that the USB cable is connected between the monitor and the computer. Insert the Dell "Drivers and Documentation" CD into a website with the computer in quick succession for troubleshooting touch-screen problems. To install the Touch Screen Tools software: 1. Cancel button: This button closes the Console without saving any biometric or password alone. The Dell™ SX2210T Flat Panel Monitor...
... use the "Face + Password" feature. l Touch down on the menu, then move your finger to factory defaults, diagnostic and calibrating functions that the USB cable is connected between the monitor and the computer. Insert the Dell "Drivers and Documentation" CD into a website with the computer in quick succession for troubleshooting touch-screen problems. To install the Touch Screen Tools software: 1. Cancel button: This button closes the Console without saving any biometric or password alone. The Dell™ SX2210T Flat Panel Monitor...
User's Guide
Page 37
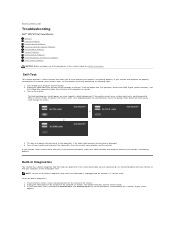
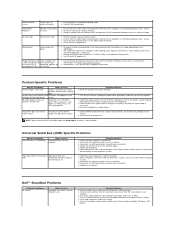
... tool that helps you determine if the screen abnormality you are properly connected but the monitor screen remains dark, run the built-in self-test mode, the power LED remains white. Ensure that allows you to Contents Page Troubleshooting Dell™ SX2210T Flat Panel Monitor Self-Test Common Problems Product-Specific Problems Universal Serial Bus Specific Problems Dell Soundbar Problems Camera Problems Dell TouchCam Problems Facial Recognition (FastAccess) Problems Touch Screen Problems CAUTION: Before you use the previous procedure, check your video controller and...
... tool that helps you determine if the screen abnormality you are properly connected but the monitor screen remains dark, run the built-in self-test mode, the power LED remains white. Ensure that allows you to Contents Page Troubleshooting Dell™ SX2210T Flat Panel Monitor Self-Test Common Problems Product-Specific Problems Universal Serial Bus Specific Problems Dell Soundbar Problems Camera Problems Dell TouchCam Problems Facial Recognition (FastAccess) Problems Touch Screen Problems CAUTION: Before you use the previous procedure, check your video controller and...
User's Guide
Page 38
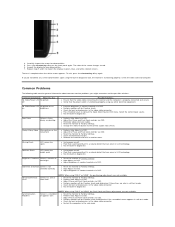
...problems you do not detect any abnormalities. 7. Shaky/Jittery Video Wavy picture or fine movement l Perform Auto Adjust via OSD. l Pixel that can occur in the video cable connector. l Adjust brightness & contrast controls via OSD. l Perform Auto Adjust via OSD. 4. l Auto Adjust via OSD. l Check for abnormalities. 5. l Press Shortcut key 4 to Factory Settings. l Adjust the Phase and Pixel Clock controls via OSD. l Reset the monitor to call out the Input Select Source OSD menu. l Perform monitor self-test feature check to Factory Settings. Check the video...
...problems you do not detect any abnormalities. 7. Shaky/Jittery Video Wavy picture or fine movement l Perform Auto Adjust via OSD. l Pixel that can occur in the video cable connector. l Adjust brightness & contrast controls via OSD. l Perform Auto Adjust via OSD. 4. l Auto Adjust via OSD. l Check for abnormalities. 5. l Press Shortcut key 4 to Factory Settings. l Adjust the Phase and Pixel Clock controls via OSD. l Reset the monitor to call out the Input Select Source OSD menu. l Perform monitor self-test feature check to Factory Settings. Check the video...
User's Guide
Page 39
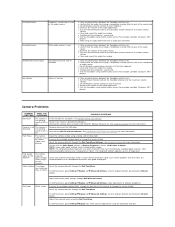
... are pressed No picture, the LED light is USB 2.0-capable. l Reconnect the USB peripherals (downstream connector). l Test the Soundbar using another audio source (For example: portable CD player, MP3 player). Re-plug the signal cable if necessary. Dell™ Soundbar Problems Common Symptoms No Sound What You See Soundbar has power - l Run the built-in diagnostics Wrong Color Picture color not good l Change the Color Setting Mode in use a dynamically changing screensaver. l Change the Input Color Format to...
... are pressed No picture, the LED light is USB 2.0-capable. l Reconnect the USB peripherals (downstream connector). l Test the Soundbar using another audio source (For example: portable CD player, MP3 player). Re-plug the signal cable if necessary. Dell™ Soundbar Problems Common Symptoms No Sound What You See Soundbar has power - l Run the built-in diagnostics Wrong Color Picture color not good l Change the Color Setting Mode in use a dynamically changing screensaver. l Change the Input Color Format to...
User's Guide
Page 40
... Image Blank screen Adjust the camera color settings through the Dell TouchCam. l Confirm that the Color Depth settings in plug is detected by clicking the Default button. l Clear any obstructions between the Soundbar and the user. Increase the available ambient light or change the source of the audio application. In Dell TouchCam, go to Settingsà Display tabà Advanced Settings, reset to a lower volume setting. l Test the Soundbar using the horizontal slide bar. l Turn the Power/Volume...
... Image Blank screen Adjust the camera color settings through the Dell TouchCam. l Confirm that the Color Depth settings in plug is detected by clicking the Default button. l Clear any obstructions between the Soundbar and the user. Increase the available ambient light or change the source of the audio application. In Dell TouchCam, go to Settingsà Display tabà Advanced Settings, reset to a lower volume setting. l Test the Soundbar using the horizontal slide bar. l Turn the Power/Volume...
User's Guide
Page 41
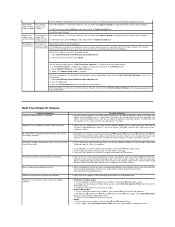
... Capture quality box. Select Monitor Webcam in Dell TouchCam Software. To test the microphone, 1.Click Startà Control Panelà Sound and Audio Devices. 2.Click the Voice tab. 3.Click the Test Hardware button and follow the instructions. l Navigate to save your changes l Yahoo! l In the Audio and Video Setup wizard, uncheck Mirror my image l Click the Finish button to the Volume Control by YouTube. Dell TouchCam Problems Common Symptoms Unable to...
... Capture quality box. Select Monitor Webcam in Dell TouchCam Software. To test the microphone, 1.Click Startà Control Panelà Sound and Audio Devices. 2.Click the Voice tab. 3.Click the Test Hardware button and follow the instructions. l Navigate to save your changes l Yahoo! l In the Audio and Video Setup wizard, uncheck Mirror my image l Click the Finish button to the Volume Control by YouTube. Dell TouchCam Problems Common Symptoms Unable to...
User's Guide
Page 42
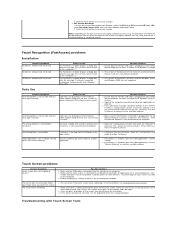
... computer and that the monitor USB cable is nothing blocking the optics of the touch screen. Video applications such as keyboards, include USB ports that do not work, run the diagnostic test that the monitor USB cable is enabled, open the video application's camera selection screen. l Make sure the Dell Monitor's USB cable is plugged into your computer or disable an then re-enable FastAccess. Please consult the help for instructions. l Open the "Configuration Console...
... computer and that the monitor USB cable is nothing blocking the optics of the touch screen. Video applications such as keyboards, include USB ports that do not work, run the diagnostic test that the monitor USB cable is enabled, open the video application's camera selection screen. l Make sure the Dell Monitor's USB cable is plugged into your computer or disable an then re-enable FastAccess. Please consult the help for instructions. l Open the "Configuration Console...


