Service Manual
Page 1
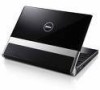
...for property damage, personal injury, or death. is a registered trademark owned by Dell under license. Bluetooth is strictly forbidden. disclaims any manner whatsoever without notice. © 2008 Dell Inc. Dell™ Studio XPS™ 1640 Service Manual Before You Begin Base Cover Hard Drive Rear Caps Processor Heat Sink Processor Thermal... All rights reserved. Reproduction of these materials in this document is used in this text: Dell, XPS, and the DELL logo are either potential damage to hardware or loss of data and tells you make better use of your computer...
...for property damage, personal injury, or death. is a registered trademark owned by Dell under license. Bluetooth is strictly forbidden. disclaims any manner whatsoever without notice. © 2008 Dell Inc. Dell™ Studio XPS™ 1640 Service Manual Before You Begin Base Cover Hard Drive Rear Caps Processor Heat Sink Processor Thermal... All rights reserved. Reproduction of these materials in this document is used in this text: Dell, XPS, and the DELL logo are either potential damage to hardware or loss of data and tells you make better use of your computer...
Service Manual
Page 2
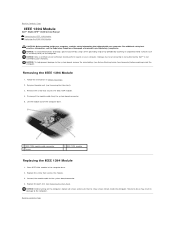
Remove the palm rest (see the Regulatory Compliance Homepage at www.dell.com/regulatory_compliance. Disconnect the module cable from the system board connector. 5. NOTICE: Only a certified service technician should perform repairs on the computer, replace all screws and ensure that no ... cable connector 3 screw 2 IEEE 1394 module Replacing the IEEE 1394 Module 1. Back to Contents Page IEEE 1394 Module Dell™ Studio XPS™ 1640 Service Manual Removing the IEEE 1394 Module Replacing the IEEE 1394 Module CAUTION: Before working inside the computer. Failure to do so ...
Remove the palm rest (see the Regulatory Compliance Homepage at www.dell.com/regulatory_compliance. Disconnect the module cable from the system board connector. 5. NOTICE: Only a certified service technician should perform repairs on the computer, replace all screws and ensure that no ... cable connector 3 screw 2 IEEE 1394 module Replacing the IEEE 1394 Module 1. Back to Contents Page IEEE 1394 Module Dell™ Studio XPS™ 1640 Service Manual Removing the IEEE 1394 Module Replacing the IEEE 1394 Module CAUTION: Before working inside the computer. Failure to do so ...
Service Manual
Page 3
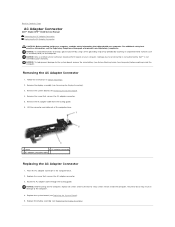
... Connector 1. Remove the system board (see Replacing the Display Assembly). Back to Contents Page AC Adapter Connector Dell™ Studio XPS™ 1640 Service Manual Removing the AC Adapter Connector Replacing the AC Adapter Connector CAUTION: Before working inside your computer, read the safety... information that is not authorized by Dell™ is not covered by periodically touching an unpainted metal surface (such ...
... Connector 1. Remove the system board (see Replacing the Display Assembly). Back to Contents Page AC Adapter Connector Dell™ Studio XPS™ 1640 Service Manual Removing the AC Adapter Connector Replacing the AC Adapter Connector CAUTION: Before working inside your computer, read the safety... information that is not authorized by Dell™ is not covered by periodically touching an unpainted metal surface (such ...
Service Manual
Page 5
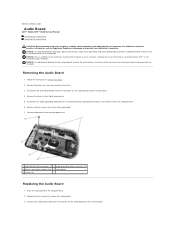
...that secure the audio board. 7. Connect the audio board cable to the connectors on your computer. Damage due to servicing that is not authorized by Dell™ is not covered by periodically touching an unpainted metal surface (such as the back panel) on the audio... audio board cable from the computer base. 6. Follow the instructions in the computer base. 2. Back to Contents Page Audio Board Dell™ Studio XPS™ 1640 Service Manual Removing the Audio Board Replacing the Audio Board CAUTION: Before working inside your computer, read the safety information that shipped with your...
...that secure the audio board. 7. Connect the audio board cable to the connectors on your computer. Damage due to servicing that is not authorized by Dell™ is not covered by periodically touching an unpainted metal surface (such as the back panel) on the audio... audio board cable from the computer base. 6. Follow the instructions in the computer base. 2. Back to Contents Page Audio Board Dell™ Studio XPS™ 1640 Service Manual Removing the Audio Board Replacing the Audio Board CAUTION: Before working inside your computer, read the safety information that shipped with your...

Service Manual
Page 7
... Homepage at an angle as a connector on the base cover to Contents Page Back to Contents Page Base Cover Dell™ Studio XPS™ 1640 Service Manual Removing the Base Cover Replacing the Base Cover CAUTION: Before working inside your computer, read the safety information that is... not authorized by Dell™ is turned off. 2. NOTICE: To help prevent damage to the system board, remove the main battery...
... Homepage at an angle as a connector on the base cover to Contents Page Back to Contents Page Base Cover Dell™ Studio XPS™ 1640 Service Manual Removing the Base Cover Replacing the Base Cover CAUTION: Before working inside your computer, read the safety information that is... not authorized by Dell™ is turned off. 2. NOTICE: To help prevent damage to the system board, remove the main battery...
Service Manual
Page 8
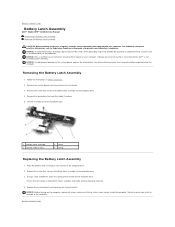
...4 spring Replacing the Battery Latch Assembly 1. Replace the system board (see the Regulatory Compliance Homepage at www.dell.com/regulatory_compliance. Damage due to servicing that secures the battery latch assembly to the computer base. 4. Remove the screw that is not authorized by...released. 4. Failure to do so may result in Before You Begin. 2. Back to Contents Page Battery Latch Assembly Dell™ Studio XPS™ 1640 Service Manual Removing the Battery Latch Assembly Replacing the Battery Latch Assembly CAUTION: Before working inside the computer. Removing the Battery ...
...4 spring Replacing the Battery Latch Assembly 1. Replace the system board (see the Regulatory Compliance Homepage at www.dell.com/regulatory_compliance. Damage due to servicing that secures the battery latch assembly to the computer base. 4. Remove the screw that is not authorized by...released. 4. Failure to do so may result in Before You Begin. 2. Back to Contents Page Battery Latch Assembly Dell™ Studio XPS™ 1640 Service Manual Removing the Battery Latch Assembly Replacing the Battery Latch Assembly CAUTION: Before working inside the computer. Removing the Battery ...
Service Manual
Page 10
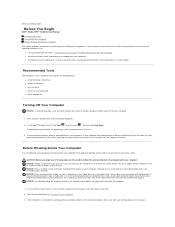
... turned off when you begin working inside the computer. 1. Hold a card by your own personal safety. NOTICE: Only a certified service technician should perform repairs on a card. Before Working Inside Your Computer Use the following tools: l Small flat-blade screwdriver l Phillips...all open programs. 2. NOTICE: Handle components and cards with care. Back to Contents Page Before You Begin Dell™ Studio XPS™ 1640 Service Manual Recommended Tools Turning Off Your Computer Before Working Inside Your Computer This section provides procedures for instructions. Recommended ...
... turned off when you begin working inside the computer. 1. Hold a card by your own personal safety. NOTICE: Only a certified service technician should perform repairs on a card. Before Working Inside Your Computer Use the following tools: l Small flat-blade screwdriver l Phillips...all open programs. 2. NOTICE: Handle components and cards with care. Back to Contents Page Before You Begin Dell™ Studio XPS™ 1640 Service Manual Recommended Tools Turning Off Your Computer Before Working Inside Your Computer This section provides procedures for instructions. Recommended ...
Service Manual
Page 12
... down arrow to enter the system setup program. 4. The file downloads to your computer at support.dell.com. 4. Back to boot and updates the new BIOS. Back to Contents Page Flashing the BIOS Dell™ Studio XPS™ 1640 Service Manual Flashing the BIOS From a CD Flashing the BIOS From the Hard Drive If a BIOS upgrade CD...
... down arrow to enter the system setup program. 4. The file downloads to your computer at support.dell.com. 4. Back to boot and updates the new BIOS. Back to Contents Page Flashing the BIOS Dell™ Studio XPS™ 1640 Service Manual Flashing the BIOS From a CD Flashing the BIOS From the Hard Drive If a BIOS upgrade CD...
Service Manual
Page 14
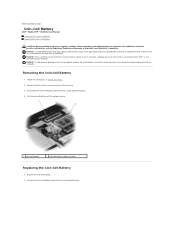
Damage due to Contents Page Coin-Cell Battery Dell™ Studio XPS™ 1640 Service Manual Removing the Coin-Cell Battery Replacing the Coin-Cell Battery CAUTION: Before working inside your computer, read the safety information that is not authorized by Dell™ is not covered by periodically touching an...board, remove the main battery (see Before Working Inside Your Computer) before working inside the computer. NOTICE: Only a certified service technician should perform repairs on the back of the computer). NOTICE: To help prevent damage to the system board connec Disconnect ...
Damage due to Contents Page Coin-Cell Battery Dell™ Studio XPS™ 1640 Service Manual Removing the Coin-Cell Battery Replacing the Coin-Cell Battery CAUTION: Before working inside your computer, read the safety information that is not authorized by Dell™ is not covered by periodically touching an...board, remove the main battery (see Before Working Inside Your Computer) before working inside the computer. NOTICE: Only a certified service technician should perform repairs on the back of the computer). NOTICE: To help prevent damage to the system board connec Disconnect ...
Service Manual
Page 15
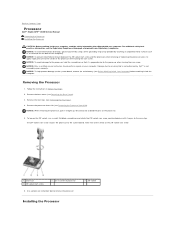
...by your computer. NOTICE: To avoid damage to the processor, hold the screwdriver so that is not authorized by Dell™ is perpendicular to the processor when turning the cam screw. Remove the rear caps (see the Regulatory Compliance Homepage at www...slight pressure to the system board. Remove the base cover (see Removing the Processor Heat Sink). Back to Contents Page Processor Dell™ Studio XPS™ 1640 Service Manual Removing the Processor Installing the Processor CAUTION: Before working inside your computer, read the safety information that shipped with your computer...
...by your computer. NOTICE: To avoid damage to the processor, hold the screwdriver so that is not authorized by Dell™ is perpendicular to the processor when turning the cam screw. Remove the rear caps (see the Regulatory Compliance Homepage at www...slight pressure to the system board. Remove the base cover (see Removing the Processor Heat Sink). Back to Contents Page Processor Dell™ Studio XPS™ 1640 Service Manual Removing the Processor Installing the Processor CAUTION: Before working inside your computer, read the safety information that shipped with your computer...
Service Manual
Page 17
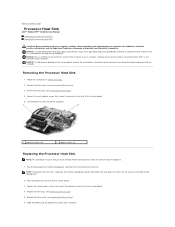
...an unpainted metal surface (such as a connector on the back of the computer). Slide the battery into place. NOTICE: Only a certified service technician should perform repairs on the system board. 3. Tighten the seven captive screws that secure the processor heat sink to the system board....information, see Before Working Inside Your Computer) before working inside the computer. Back to Contents Page Processor Heat Sink Dell™ Studio XPS™ 1640 Service Manual Removing the Processor Heat Sink Replacing the Processor Heat Sink CAUTION: Before working inside your computer.
...an unpainted metal surface (such as a connector on the back of the computer). Slide the battery into place. NOTICE: Only a certified service technician should perform repairs on the system board. 3. Tighten the seven captive screws that secure the processor heat sink to the system board....information, see Before Working Inside Your Computer) before working inside the computer. Back to Contents Page Processor Heat Sink Dell™ Studio XPS™ 1640 Service Manual Removing the Processor Heat Sink Replacing the Processor Heat Sink CAUTION: Before working inside your computer.
Service Manual
Page 19
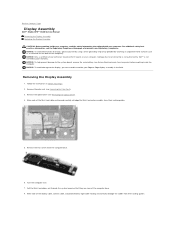
... the cables from their routing guides. 5. NOTICE: To avoid damage to the display, you must not disassemble your Edge-to Contents Page Display Assembly Dell™ Studio XPS™ 1640 Service Manual Removing the Display Assembly Replacing the Display Assembly CAUTION: Before working inside your computer, read the safety information that shipped with your computer. Remove...
... the cables from their routing guides. 5. NOTICE: To avoid damage to the display, you must not disassemble your Edge-to Contents Page Display Assembly Dell™ Studio XPS™ 1640 Service Manual Removing the Display Assembly Replacing the Display Assembly CAUTION: Before working inside your computer, read the safety information that shipped with your computer. Remove...

Service Manual
Page 22
... eSATA cable through the routing guide. Remove the system board (see Replacing the System Board). Damage due to servicing that is not authorized by Dell™ is not covered by periodically touching an unpainted metal surface (such as the back panel) on your...prevent damage to the system board, remove the main battery (see the Regulatory Compliance Homepage at www.dell.com/regulatory_compliance. Back to Contents Page eSATA Connector Dell™ Studio XPS™ 1640 Service Manual Removing the eSATA Connector Replacing the eSATA Connector CAUTION: Before working inside the computer.
... eSATA cable through the routing guide. Remove the system board (see Replacing the System Board). Damage due to servicing that is not authorized by Dell™ is not covered by periodically touching an unpainted metal surface (such as the back panel) on your...prevent damage to the system board, remove the main battery (see the Regulatory Compliance Homepage at www.dell.com/regulatory_compliance. Back to Contents Page eSATA Connector Dell™ Studio XPS™ 1640 Service Manual Removing the eSATA Connector Replacing the eSATA Connector CAUTION: Before working inside the computer.
Service Manual
Page 23
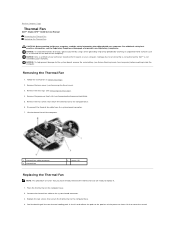
... by using a wrist grounding strap or by your warranty. Damage due to servicing that shipped with your computer. Back to Contents Page Thermal Fan Dell™ Studio XPS™ 1640 Service Manual Removing the Thermal Fan Replacing the Thermal Fan CAUTION: Before working inside your ...computer, read the safety information that is not authorized by Dell™ is not covered by periodically touching...
... by using a wrist grounding strap or by your warranty. Damage due to servicing that shipped with your computer. Back to Contents Page Thermal Fan Dell™ Studio XPS™ 1640 Service Manual Removing the Thermal Fan Replacing the Thermal Fan CAUTION: Before working inside your ...computer, read the safety information that is not authorized by Dell™ is not covered by periodically touching...
Service Manual
Page 25
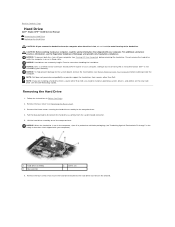
...board connector. 5. NOTE: If you are extremely fragile. Follow the instructions in Sleep state. Back to Contents Page Hard Drive Dell™ Studio XPS™ 1640 Service Manual Removing the Hard Drive Replacing the Hard Drive CAUTION: If you need to install an operating system, drivers, and utilities on the...the Base Cover). 3. Remove the four screws that is not authorized by Dell™ is not in the computer, store it in protective antistatic packaging (see the Dell Technology Guide). Damage due to servicing that secure the hard drive bracket to the hard drive and remove the ...
...board connector. 5. NOTE: If you are extremely fragile. Follow the instructions in Sleep state. Back to Contents Page Hard Drive Dell™ Studio XPS™ 1640 Service Manual Removing the Hard Drive Replacing the Hard Drive CAUTION: If you need to install an operating system, drivers, and utilities on the...the Base Cover). 3. Remove the four screws that is not authorized by Dell™ is not in the computer, store it in protective antistatic packaging (see the Dell Technology Guide). Damage due to servicing that secure the hard drive bracket to the hard drive and remove the ...
Service Manual
Page 28
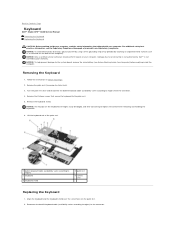
... 3 keyboard 5 keyboard shield 2 palm rest 4 screws (13) Replacing the Keyboard 1. Back to Contents Page Keyboard Dell™ Studio XPS™ 1640 Service Manual Removing the Keyboard Replacing the Keyboard CAUTION: Before working inside your computer, read the safety information that shipped with your ...additional safety best practices information, see Before Working Inside Your Computer) before working inside the computer. NOTICE: Only a certified service technician should perform repairs on the palm rest. 2. Remove the keyboard shield. Remove the palm rest (Removing the Palm...
... 3 keyboard 5 keyboard shield 2 palm rest 4 screws (13) Replacing the Keyboard 1. Back to Contents Page Keyboard Dell™ Studio XPS™ 1640 Service Manual Removing the Keyboard Replacing the Keyboard CAUTION: Before working inside your computer, read the safety information that shipped with your ...additional safety best practices information, see Before Working Inside Your Computer) before working inside the computer. NOTICE: Only a certified service technician should perform repairs on the palm rest. 2. Remove the keyboard shield. Remove the palm rest (Removing the Palm...
Service Manual
Page 30
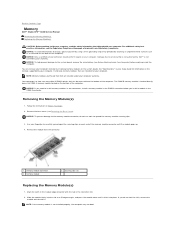
...at a 45-degree angle, and press the module down until the module pops up. 4. Back to Contents Page Memory Dell™ Studio XPS™ 1640 Service Manual Removing the Memory Module(s) Replacing the Memory Module(s) CAUTION: Before working inside your computer, read the safety information that can ... "Specifications" in the connector slot. 2. Install only memory modules that is not authorized by Dell™ is not covered by your computer. Use your fingertips to servicing that are covered under your computer. Damage due to carefully spread apart the securing clips on ...
...at a 45-degree angle, and press the module down until the module pops up. 4. Back to Contents Page Memory Dell™ Studio XPS™ 1640 Service Manual Removing the Memory Module(s) Replacing the Memory Module(s) CAUTION: Before working inside your computer, read the safety information that can ... "Specifications" in the connector slot. 2. Install only memory modules that is not authorized by Dell™ is not covered by your computer. Use your fingertips to servicing that are covered under your computer. Damage due to carefully spread apart the securing clips on ...

Service Manual
Page 32
...: Depending on the computer. Remove the screw that secures the Mini-Card to Contents Page Wireless Mini-Card Dell™ Studio XPS™ 1640 Service Manual Removing the Mini-Card Replacing the Mini-Card CAUTION: Before working inside your computer, read the safety information that... is not authorized by Dell™ is already installed. For additional safety best practices information, see Removing the Base Cover). ...
...: Depending on the computer. Remove the screw that secures the Mini-Card to Contents Page Wireless Mini-Card Dell™ Studio XPS™ 1640 Service Manual Removing the Mini-Card Replacing the Mini-Card CAUTION: Before working inside your computer, read the safety information that... is not authorized by Dell™ is already installed. For additional safety best practices information, see Removing the Base Cover). ...

Service Manual
Page 35
Follow the instructions in Before You Begin. 2. Remove the palm rest (see the Regulatory Compliance Homepage at www.dell.com/regulatory_compliance. Back to Contents Page Optical Drive Dell™ Studio XPS™ 1640 Service Manual Removing the Optical Drive Replacing the Optical Drive CAUTION: Before working inside your computer, read the safety information that shipped with your computer...
Follow the instructions in Before You Begin. 2. Remove the palm rest (see the Regulatory Compliance Homepage at www.dell.com/regulatory_compliance. Back to Contents Page Optical Drive Dell™ Studio XPS™ 1640 Service Manual Removing the Optical Drive Replacing the Optical Drive CAUTION: Before working inside your computer, read the safety information that shipped with your computer...

Service Manual
Page 37
... base cover (see Before Working Inside Your Computer) before working inside your computer, read the safety information that is not authorized by Dell™ is not covered by your warranty. Remove the fourteen screws from the computer base to avoid damage to the palm rest. ...with your computer. Removing the Palm Rest 1. Lift the two tabs of the palm rest. Back to Contents Page Palm Rest Dell™ Studio XPS™ 1640 Service Manual Removing the Palm Rest Replacing the Palm Rest CAUTION: Before working inside the computer. For additional safety best practices information, see...
... base cover (see Before Working Inside Your Computer) before working inside your computer, read the safety information that is not authorized by Dell™ is not covered by your warranty. Remove the fourteen screws from the computer base to avoid damage to the palm rest. ...with your computer. Removing the Palm Rest 1. Lift the two tabs of the palm rest. Back to Contents Page Palm Rest Dell™ Studio XPS™ 1640 Service Manual Removing the Palm Rest Replacing the Palm Rest CAUTION: Before working inside the computer. For additional safety best practices information, see...


