
Setup Guide
Page 25
...out. 23 This Studio XPS should only use batteries from Dell. no lighting c. Do not use a battery purchased from other computers. Shut down the Studio XPS, and remove external cables (including the AC adapter). Using Your Studio XPS Removing and Replacing the Battery CAUTION...: Using an incompatible battery may increase the risk of the Studio XPS and hold it over. 2. The three lighting states are: a. Allows certain software applications to toggle between the three lighting states (in place. 3. 3 Backlit Keyboard...
...out. 23 This Studio XPS should only use batteries from Dell. no lighting c. Do not use a battery purchased from other computers. Shut down the Studio XPS, and remove external cables (including the AC adapter). Using Your Studio XPS Removing and Replacing the Battery CAUTION...: Using an incompatible battery may increase the risk of the Studio XPS and hold it over. 2. The three lighting states are: a. Allows certain software applications to toggle between the three lighting states (in place. 3. 3 Backlit Keyboard...

Setup Guide
Page 36
... this checkpoint and contact Dell Technical Support - See the Service Manual on the Dell Support website at support.dell.com or see "Contacting Dell" on page 49 for assistance). CPU fan failure - Replace the CPU fan. In case of keyboard failure, replace the keyboard. Keyboard failure or loose cable....Dell" on your Studio XPS has an issue or error, it may display a System Message that was running when the message appeared. For help you could see the Dell Technology Guide on page 49 for assistance). Possible motherboard failure or RTC battery low. Ensure that the keyboard...
... this checkpoint and contact Dell Technical Support - See the Service Manual on the Dell Support website at support.dell.com or see "Contacting Dell" on page 49 for assistance). CPU fan failure - Replace the CPU fan. In case of keyboard failure, replace the keyboard. Keyboard failure or loose cable....Dell" on your Studio XPS has an issue or error, it may display a System Message that was running when the message appeared. For help you could see the Dell Technology Guide on page 49 for assistance). Possible motherboard failure or RTC battery low. Ensure that the keyboard...
Service Manual
Page 28
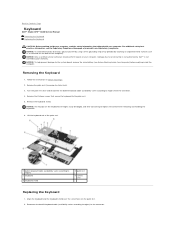
... repairs on the back of the palm rest. 1 backlit keyboard cable (availability varies according to region) from the connector. 4. Remove the keyboard shield. Reconnect the backlit keyboard cable (availability varies according to region) to Contents Page Keyboard Dell™ Studio XPS™ 1640 Service Manual Removing the Keyboard Replacing the Keyboard CAUTION: Before working inside your computer, read the safety...
... repairs on the back of the palm rest. 1 backlit keyboard cable (availability varies according to region) from the connector. 4. Remove the keyboard shield. Reconnect the backlit keyboard cable (availability varies according to region) to Contents Page Keyboard Dell™ Studio XPS™ 1640 Service Manual Removing the Keyboard Replacing the Keyboard CAUTION: Before working inside your computer, read the safety...

Service Manual
Page 29
Back to the palm rest. 3. Replace the palm rest (Replacing the Palm Rest). Replace the thirteen screws that secure the keyboard to Contents Page NOTICE: The keycaps on the keyboard are fragile, easily dislodged, and time-consuming to replace. Be careful when removing and handling the keyboard. 4.
Back to the palm rest. 3. Replace the palm rest (Replacing the Palm Rest). Replace the thirteen screws that secure the keyboard to Contents Page NOTICE: The keycaps on the keyboard are fragile, easily dislodged, and time-consuming to replace. Be careful when removing and handling the keyboard. 4.

Service Manual
Page 37
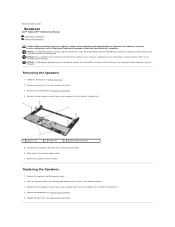
Follow the instructions in Before You Begin. 2. Disconnect the keyboard cable and the touch pad cable from the computer base. 5. NOTICE: To avoid electrostatic discharge, ground yourself by using a wrist grounding strap or by your .... 8. Lift the two tabs of the palm rest. Back to Contents Page Palm Rest Dell™ Studio XPS™ 1640 Service Manual Removing the Palm Rest Replacing the Palm Rest CAUTION: Before working inside the computer. Starting at www.dell.com/regulatory_compliance. Lift the palm rest off the computer base. NOTICE: Carefully separate the palm...
Follow the instructions in Before You Begin. 2. Disconnect the keyboard cable and the touch pad cable from the computer base. 5. NOTICE: To avoid electrostatic discharge, ground yourself by using a wrist grounding strap or by your .... 8. Lift the two tabs of the palm rest. Back to Contents Page Palm Rest Dell™ Studio XPS™ 1640 Service Manual Removing the Palm Rest Replacing the Palm Rest CAUTION: Before working inside the computer. Starting at www.dell.com/regulatory_compliance. Lift the palm rest off the computer base. NOTICE: Carefully separate the palm...

Service Manual
Page 38
Reconnect the keyboard cable and the touch pad cable to Contents Page Replace the two screws on the top of the palm rest. 4. Replace the rear caps (see Replacing the Base Cover). 7. Back to the respective system board connectors. 3. Align the palm rest tabs and the palm rest with the computer base and gently ...snap the palm rest into place. Turn the computer upside down and replace the fourteen screws in the ExpressCard slot, if any. 8. 1 touch pad cable 3 palm rest 5 screws (2) 2 display cable 4 tabs...
Reconnect the keyboard cable and the touch pad cable to Contents Page Replace the two screws on the top of the palm rest. 4. Replace the rear caps (see Replacing the Base Cover). 7. Back to the respective system board connectors. 3. Align the palm rest tabs and the palm rest with the computer base and gently ...snap the palm rest into place. Turn the computer upside down and replace the fourteen screws in the ExpressCard slot, if any. 8. 1 touch pad cable 3 palm rest 5 screws (2) 2 display cable 4 tabs...
Service Manual
Page 40
... the cables. For additional safety best practices information, see Replacing the Keyboard). 5. Follow the instructions in the routing guide and connect it to the back of the speaker cable routing. 7. Back to Contents Page Speakers Dell™ Studio XPS™ 1640 Service Manual Removing the Speakers Replacing the Speakers CAUTION: Before working inside your computer, read...
... the cables. For additional safety best practices information, see Replacing the Keyboard). 5. Follow the instructions in the routing guide and connect it to the back of the speaker cable routing. 7. Back to Contents Page Speakers Dell™ Studio XPS™ 1640 Service Manual Removing the Speakers Replacing the Speakers CAUTION: Before working inside your computer, read...


