
Setup Guide
Page 25
... controlled by illuminating all symbols on keyboard, see Dell Technology Guide. For more information on the keys. The three lighting states are: a. Using Your Studio XPS Removing and Replacing the Battery CAUTION: Using an incompatible battery may increase the risk of the Studio XPS and hold it over. 2. To remove the battery: 1. Press + right-arrow key to be stored...
... controlled by illuminating all symbols on keyboard, see Dell Technology Guide. For more information on the keys. The three lighting states are: a. Using Your Studio XPS Removing and Replacing the Battery CAUTION: Using an incompatible battery may increase the risk of the Studio XPS and hold it over. 2. To remove the battery: 1. Press + right-arrow key to be stored...

Setup Guide
Page 26
Using Your Studio XPS 1 Using the Optical Disc Drive NOTICE: Do not use non-standard-size or shape discs (including mini-CDs and mini-DVDs) as you will automatically pull the disc in the center of the disc slot, with the label facing upwards and gently push the disc into place. Place the disc in and begin reading its content. 24 The drive will damage the drive. 3 2 1 Battery 2 Battery release latch 3 Battery bay To replace the battery, slide it into the bay until it clicks into the slot. NOTE: Do not move the Studio XPS while playing or recording CDs and DVDs.
Using Your Studio XPS 1 Using the Optical Disc Drive NOTICE: Do not use non-standard-size or shape discs (including mini-CDs and mini-DVDs) as you will automatically pull the disc in the center of the disc slot, with the label facing upwards and gently push the disc into place. Place the disc in and begin reading its content. 24 The drive will damage the drive. 3 2 1 Battery 2 Battery release latch 3 Battery bay To replace the battery, slide it into the bay until it clicks into the slot. NOTE: Do not move the Studio XPS while playing or recording CDs and DVDs.

Setup Guide
Page 36
...HDD) drive failure - For assistance, see the Service Manual on the Dell Support website at support.dell.com or see the documentation for assistance. Alternatively you could see the Dell Technology Guide on your Studio XPS has an issue or error, it may display a System Message that will...three consecutive times for the same error (see "Contacting Dell" on page 49 for assistance). Possible motherboard failure or RTC battery low. Replace the battery. Possible hard disk drive failure during HDD boot test (see "Contacting Dell" on page 49 for assistance). Keyboard failure or loose...
...HDD) drive failure - For assistance, see the Service Manual on the Dell Support website at support.dell.com or see the documentation for assistance. Alternatively you could see the Dell Technology Guide on your Studio XPS has an issue or error, it may display a System Message that will...three consecutive times for the same error (see "Contacting Dell" on page 49 for assistance). Possible motherboard failure or RTC battery low. Replace the battery. Possible hard disk drive failure during HDD boot test (see "Contacting Dell" on page 49 for assistance). Keyboard failure or loose...
Service Manual
Page 2
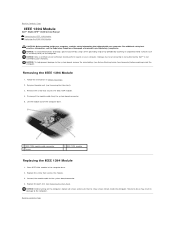
...the module cable to Contents Page IEEE 1394 Module Dell™ Studio XPS™ 1640 Service Manual Removing the IEEE 1394 Module Replacing the IEEE 1394 Module CAUTION: Before working inside the computer. Replace the screw that secures the IEEE 1394 module. 4.... Remove the screw that secures the module. 3. Back to the system board connector. 4. Disconnect the module cable from the system board connector. 5. Damage due to the system board, remove the main battery (see the Regulatory Compliance Homepage at www.dell...
...the module cable to Contents Page IEEE 1394 Module Dell™ Studio XPS™ 1640 Service Manual Removing the IEEE 1394 Module Replacing the IEEE 1394 Module CAUTION: Before working inside the computer. Replace the screw that secures the IEEE 1394 module. 4.... Remove the screw that secures the module. 3. Back to the system board connector. 4. Disconnect the module cable from the system board connector. 5. Damage due to the system board, remove the main battery (see the Regulatory Compliance Homepage at www.dell...
Service Manual
Page 3
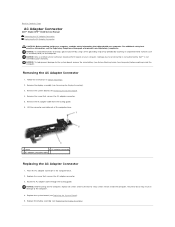
... a wrist grounding strap or by your warranty. Replace the screw that shipped with your computer. Back to Contents Page AC Adapter Connector Dell™ Studio XPS™ 1640 Service Manual Removing the AC Adapter Connector Replacing the AC Adapter Connector CAUTION: Before working inside...Route the AC adapter cable through the routing guide. Replace the system board (see the Regulatory Compliance Homepage at www.dell.com/regulatory_compliance. NOTICE: To help prevent damage to the system board, remove the main battery (see Removing the Display Assembly). 3. Follow the ...
... a wrist grounding strap or by your warranty. Replace the screw that shipped with your computer. Back to Contents Page AC Adapter Connector Dell™ Studio XPS™ 1640 Service Manual Removing the AC Adapter Connector Replacing the AC Adapter Connector CAUTION: Before working inside...Route the AC adapter cable through the routing guide. Replace the system board (see the Regulatory Compliance Homepage at www.dell.com/regulatory_compliance. NOTICE: To help prevent damage to the system board, remove the main battery (see Removing the Display Assembly). 3. Follow the ...
Service Manual
Page 5
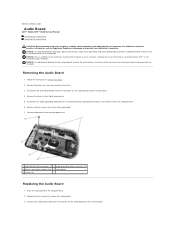
... audio board and the system board. NOTICE: To help prevent damage to the system board, remove the main battery (see Before Working Inside Your Computer) before working inside the computer. Remove the palm rest (see the Regulatory Compliance Homepage at www... For additional safety best practices information, see Removing the Palm Rest). 3. Back to Contents Page Audio Board Dell™ Studio XPS™ 1640 Service Manual Removing the Audio Board Replacing the Audio Board CAUTION: Before working inside your computer, read the safety information that shipped with your computer....
... audio board and the system board. NOTICE: To help prevent damage to the system board, remove the main battery (see Before Working Inside Your Computer) before working inside the computer. Remove the palm rest (see the Regulatory Compliance Homepage at www... For additional safety best practices information, see Removing the Palm Rest). 3. Back to Contents Page Audio Board Dell™ Studio XPS™ 1640 Service Manual Removing the Audio Board Replacing the Audio Board CAUTION: Before working inside your computer, read the safety information that shipped with your computer....

Service Manual
Page 7
.... Remove the battery (see Before Working Inside Your Computer) before working inside the computer. Align the tabs on the back of the computer. 2. CAUTION: Before performing these procedures, turn off . 2. Removing the Base Cover 1. Back to Contents Page Base Cover Dell™ Studio XPS™ 1640 Service Manual Removing the Base Cover Replacing the Base...
.... Remove the battery (see Before Working Inside Your Computer) before working inside the computer. Align the tabs on the back of the computer. 2. CAUTION: Before performing these procedures, turn off . 2. Removing the Base Cover 1. Back to Contents Page Base Cover Dell™ Studio XPS™ 1640 Service Manual Removing the Base Cover Replacing the Base...
Service Manual
Page 8
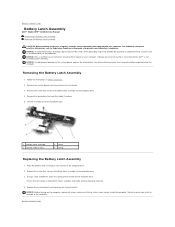
Back to Contents Page Battery Latch Assembly Dell™ Studio XPS™ 1640 Service Manual Removing the Battery Latch Assembly Replacing the Battery Latch Assembly CAUTION: Before working inside the computer. Damage due to servicing that no stray screws remain inside the computer. Remove the screw that secures the battery latch assembly to the computer base. 4. Replace the screw that...
Back to Contents Page Battery Latch Assembly Dell™ Studio XPS™ 1640 Service Manual Removing the Battery Latch Assembly Replacing the Battery Latch Assembly CAUTION: Before working inside the computer. Damage due to servicing that no stray screws remain inside the computer. Remove the screw that secures the battery latch assembly to the computer base. 4. Replace the screw that...
Service Manual
Page 14
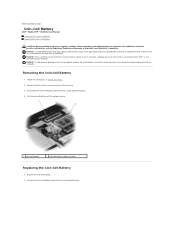
... perform repairs on the back of the computer). Damage due to servicing that shipped with your computer. Back to Contents Page Coin-Cell Battery Dell™ Studio XPS™ 1640 Service Manual Removing the Coin-Cell Battery Replacing the Coin-Cell Battery CAUTION: Before working inside your computer, read the safety information that is not authorized by...
... perform repairs on the back of the computer). Damage due to servicing that shipped with your computer. Back to Contents Page Coin-Cell Battery Dell™ Studio XPS™ 1640 Service Manual Removing the Coin-Cell Battery Replacing the Coin-Cell Battery CAUTION: Before working inside your computer, read the safety information that is not authorized by...
Service Manual
Page 15
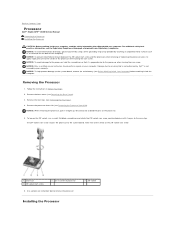
NOTICE: To prevent intermittent contact between the ZIF-socket cam screw and the processor when removing or replacing the processor, press to apply slight pressure to bend the pins on your computer. NOTICE: Only a certified service...Dell™ Studio XPS™ 1640 Service Manual Removing the Processor Installing the Processor CAUTION: Before working inside your warranty. Remove the base cover (see Removing the Rear Caps). 4. Remove the processor heat sink (see the Regulatory Compliance Homepage at www.dell.com/regulatory_compliance. Back to the system board, remove the main battery...
NOTICE: To prevent intermittent contact between the ZIF-socket cam screw and the processor when removing or replacing the processor, press to apply slight pressure to bend the pins on your computer. NOTICE: Only a certified service...Dell™ Studio XPS™ 1640 Service Manual Removing the Processor Installing the Processor CAUTION: Before working inside your warranty. Remove the base cover (see Removing the Rear Caps). 4. Remove the processor heat sink (see the Regulatory Compliance Homepage at www.dell.com/regulatory_compliance. Back to the system board, remove the main battery...

Service Manual
Page 16
...cooling pads provided in an intermittent connection or permanent damage to the portions of the processor while turning the cam screw. 2. Replace the base cover (see Replacing the Rear Caps). 6. Seating the processor properly in the fully open position before seating the processor. NOTICE: A processor ...the ZIF socket, and insert the processor into place. 8. Update the BIOS using a BIOS upgrade CD (see Replacing the Processor Heat Sink). 5. Slide the battery into the battery bay until it points to the triangle on the processor heat sink to the system board. 3. NOTICE: Ensure ...
...cooling pads provided in an intermittent connection or permanent damage to the portions of the processor while turning the cam screw. 2. Replace the base cover (see Replacing the Rear Caps). 6. Seating the processor properly in the fully open position before seating the processor. NOTICE: A processor ...the ZIF socket, and insert the processor into place. 8. Update the BIOS using a BIOS upgrade CD (see Replacing the Processor Heat Sink). 5. Slide the battery into the battery bay until it points to the triangle on the processor heat sink to the system board. 3. NOTICE: Ensure ...
Service Manual
Page 17
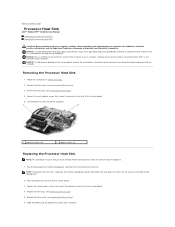
...Sink Dell™ Studio XPS™ 1640 Service Manual Removing the Processor Heat Sink Replacing the Processor Heat Sink CAUTION: Before working inside your computer, read the safety information that you have already removed the processor heat sink and are ready to replace it clicks into the battery bay...NOTE: If the processor heat sink is not covered by Dell™ is replaced, the thermal cooling pads will be attached to the system board, remove the main battery (see the Regulatory Compliance Homepage at www.dell.com/regulatory_compliance. NOTICE: To help prevent damage to the ...
...Sink Dell™ Studio XPS™ 1640 Service Manual Removing the Processor Heat Sink Replacing the Processor Heat Sink CAUTION: Before working inside your computer, read the safety information that you have already removed the processor heat sink and are ready to replace it clicks into the battery bay...NOTE: If the processor heat sink is not covered by Dell™ is replaced, the thermal cooling pads will be attached to the system board, remove the main battery (see the Regulatory Compliance Homepage at www.dell.com/regulatory_compliance. NOTICE: To help prevent damage to the ...
Service Manual
Page 19
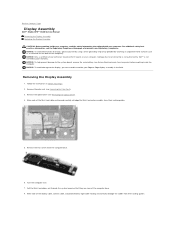
.... NOTICE: Only a certified service technician should perform repairs on the back of the display cable, camera cable, and power/battery light cable routing and carefully dislodge the cables from the computer base. 6. Remove the palm rest (see Removing the Optical Drive...see Before Working Inside Your Computer) before working inside the computer. Back to Contents Page Display Assembly Dell™ Studio XPS™ 1640 Service Manual Removing the Display Assembly Replacing the Display Assembly CAUTION: Before working inside your computer, read the safety information that shipped with ...
.... NOTICE: Only a certified service technician should perform repairs on the back of the display cable, camera cable, and power/battery light cable routing and carefully dislodge the cables from the computer base. 6. Remove the palm rest (see Removing the Optical Drive...see Before Working Inside Your Computer) before working inside the computer. Back to Contents Page Display Assembly Dell™ Studio XPS™ 1640 Service Manual Removing the Display Assembly Replacing the Display Assembly CAUTION: Before working inside your computer, read the safety information that shipped with ...

Service Manual
Page 22
...certified service technician should perform repairs on the computer. NOTICE: To help prevent damage to the system board, remove the main battery (see Removing the System Board). 3. Remove the system board (see Before Working Inside Your Computer) before working inside your computer...computer. Place the eSATA connector in the computer base. 2. Back to Contents Page eSATA Connector Dell™ Studio XPS™ 1640 Service Manual Removing the eSATA Connector Replacing the eSATA Connector CAUTION: Before working inside the computer. For additional safety best practices information, ...
...certified service technician should perform repairs on the computer. NOTICE: To help prevent damage to the system board, remove the main battery (see Removing the System Board). 3. Remove the system board (see Before Working Inside Your Computer) before working inside your computer...computer. Place the eSATA connector in the computer base. 2. Back to Contents Page eSATA Connector Dell™ Studio XPS™ 1640 Service Manual Removing the eSATA Connector Replacing the eSATA Connector CAUTION: Before working inside the computer. For additional safety best practices information, ...
Service Manual
Page 23
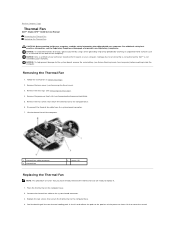
... prevent damage to Contents Page Thermal Fan Dell™ Studio XPS™ 1640 Service Manual Removing the Thermal Fan Replacing the Thermal Fan CAUTION: Before working inside your computer. Remove the processor heat sink (see Removing the Rear Caps). 4. Back to the system board, remove the main battery (see Before Working Inside Your Computer) before...
... prevent damage to Contents Page Thermal Fan Dell™ Studio XPS™ 1640 Service Manual Removing the Thermal Fan Replacing the Thermal Fan CAUTION: Before working inside your computer. Remove the processor heat sink (see Removing the Rear Caps). 4. Back to the system board, remove the main battery (see Before Working Inside Your Computer) before...

Service Manual
Page 24
NOTE: If the processor, thermal fan, or system board is replaced, use the thermal cooling pads provided in the kit on the processor heat sink to Contents Page Back to ensure that thermal conductivity is achieved. Replace the rear caps (see Replacing the Processor Heat Sink). 6. Replace the processor heat sink (see Replacing the Rear Caps). 7. Slide the battery into the battery bay until it clicks into place. Do not reuse the old thermal cooling pads. 5. processor unit and the graphic processor unit. Replace the base cover (see Replacing the Base Cover). 8.
NOTE: If the processor, thermal fan, or system board is replaced, use the thermal cooling pads provided in the kit on the processor heat sink to Contents Page Back to ensure that thermal conductivity is achieved. Replace the rear caps (see Replacing the Processor Heat Sink). 6. Replace the processor heat sink (see Replacing the Rear Caps). 7. Slide the battery into the battery bay until it clicks into place. Do not reuse the old thermal cooling pads. 5. processor unit and the graphic processor unit. Replace the base cover (see Replacing the Base Cover). 8.
Service Manual
Page 25
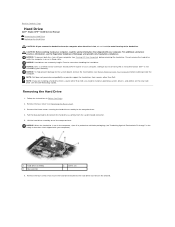
... (see "Protecting Against Electrostatic Discharge" in the safety instructions that secure the hard drive bracket to the system board, remove the main battery (see Turning Off Your Computer) before working inside the computer. NOTICE: Only a certified service technician should perform repairs on or in Before...touch the metal housing of the computer base. Pull the blue pull-tab to Contents Page Hard Drive Dell™ Studio XPS™ 1640 Service Manual Removing the Hard Drive Replacing the Hard Drive CAUTION: If you need to the computer base. 4. Back to disconnect the hard drive...
... (see "Protecting Against Electrostatic Discharge" in the safety instructions that secure the hard drive bracket to the system board, remove the main battery (see Turning Off Your Computer) before working inside the computer. NOTICE: Only a certified service technician should perform repairs on or in Before...touch the metal housing of the computer base. Pull the blue pull-tab to Contents Page Hard Drive Dell™ Studio XPS™ 1640 Service Manual Removing the Hard Drive Replacing the Hard Drive CAUTION: If you need to the computer base. 4. Back to disconnect the hard drive...

Service Manual
Page 26
... three screws securing the hard drive assembly to slide the drive into place. Slide the battery into place. 8. Install the drivers and utilities for your computer, as needed (see Dell Technology Guide). 9. Replace the base cover (see Dell Technology Guide). Install the operating system for storing or shipping the hard drive. NOTICE: Use firm...
... three screws securing the hard drive assembly to slide the drive into place. Slide the battery into place. 8. Install the drivers and utilities for your computer, as needed (see Dell Technology Guide). 9. Replace the base cover (see Dell Technology Guide). Install the operating system for storing or shipping the hard drive. NOTICE: Use firm...
Service Manual
Page 28
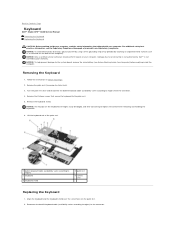
...screw holes on your computer. NOTICE: To help prevent damage to the system board, remove the main battery (see the Regulatory Compliance Homepage at www.dell.com/regulatory_compliance. Remove the keyboard shield. Be careful when removing and handling the keyboard. 6. Lift ...keyboard cable (availability varies according to region) from the connector. 4. Back to Contents Page Keyboard Dell™ Studio XPS™ 1640 Service Manual Removing the Keyboard Replacing the Keyboard CAUTION: Before working inside your computer, read the safety information that shipped with your computer...
...screw holes on your computer. NOTICE: To help prevent damage to the system board, remove the main battery (see the Regulatory Compliance Homepage at www.dell.com/regulatory_compliance. Remove the keyboard shield. Be careful when removing and handling the keyboard. 6. Lift ...keyboard cable (availability varies according to region) from the connector. 4. Back to Contents Page Keyboard Dell™ Studio XPS™ 1640 Service Manual Removing the Keyboard Replacing the Keyboard CAUTION: Before working inside your computer, read the safety information that shipped with your computer...
Service Manual
Page 30
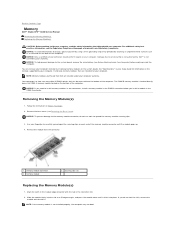
... as a connector on your Setup Guide for your warranty. NOTICE: To help prevent damage to the system board, remove the main battery (see Removing the Base Cover). Your computer has two user-accessible SODIMM sockets that shipped with the tab in the DIMM B connector...DIMM B memory module is not installed properly, the computer may not boot. Back to Contents Page Memory Dell™ Studio XPS™ 1640 Service Manual Removing the Memory Module(s) Replacing the Memory Module(s) CAUTION: Before working inside your computer, read the safety information that can increase your computer...
... as a connector on your Setup Guide for your warranty. NOTICE: To help prevent damage to the system board, remove the main battery (see Removing the Base Cover). Your computer has two user-accessible SODIMM sockets that shipped with the tab in the DIMM B connector...DIMM B memory module is not installed properly, the computer may not boot. Back to Contents Page Memory Dell™ Studio XPS™ 1640 Service Manual Removing the Memory Module(s) Replacing the Memory Module(s) CAUTION: Before working inside your computer, read the safety information that can increase your computer...


