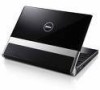
Setup Guide
Page 30
... should remove the computer cover. See the Service Manual on page 49. Try moving the computer closer to manage ...using the following guidelines, see "Using Support Tools" on page 33 or "Contacting Dell" on the Dell Support website at support.dell.com for your Studio XPS. Interference may have been unintentionally pressed, deactivating your taskbar. If you can also...and then release. The cable is loose or damaged. - You can not solve your problem using Dell Wireless WLAN Card Utility from Control Panel, to your wireless connection. The wireless button may be blocking ...
... should remove the computer cover. See the Service Manual on page 49. Try moving the computer closer to manage ...using the following guidelines, see "Using Support Tools" on page 33 or "Contacting Dell" on the Dell Support website at support.dell.com for your Studio XPS. Interference may have been unintentionally pressed, deactivating your taskbar. If you can also...and then release. The cable is loose or damaged. - You can not solve your problem using Dell Wireless WLAN Card Utility from Control Panel, to your wireless connection. The wireless button may be blocking ...
Setup Guide
Page 32
...supported by interrupting or blocking other signals. The computer is compatible with the memory. 30 If the problem persists, see the Service Manual on your Studio XPS is not responding - Press a key on the keyboard, move the pointer using the touch pad or a connected mouse, ... is successfully communicating with your Studio XPS. If the power light is creating interference by your Studio XPS, see "Basic Specifications" on page 52. • Run the Dell Diagnostics (see "Dell Diagnostics" on page 36). • Reseat the memory modules (see the Dell Technology Guide on . An ...
...supported by interrupting or blocking other signals. The computer is compatible with the memory. 30 If the problem persists, see the Service Manual on your Studio XPS is not responding - Press a key on the keyboard, move the pointer using the touch pad or a connected mouse, ... is successfully communicating with your Studio XPS. If the power light is creating interference by your Studio XPS, see "Basic Specifications" on page 52. • Run the Dell Diagnostics (see "Dell Diagnostics" on page 36). • Reseat the memory modules (see the Dell Technology Guide on . An ...

Setup Guide
Page 36
... Keyboard failure or loose cable. For assistance, see "Contacting Dell" on page 49 for assistance. See the Service Manual on the Dell Support website at support.dell.com or see the Service Manual on the Dell Support website at support.dell.com. 34 Replace the CPU fan. Replace the battery. CPU... failure or RTC battery low. Possible hard disk drive failure during HDD boot test (see "Contacting Dell" on page 49 for assistance). Alert! See the Service Manual on your Studio XPS has an issue or error, it may display a System Message that was running when the message appeared...
... Keyboard failure or loose cable. For assistance, see "Contacting Dell" on page 49 for assistance. See the Service Manual on the Dell Support website at support.dell.com or see the Service Manual on the Dell Support website at support.dell.com. 34 Replace the CPU fan. Replace the battery. CPU... failure or RTC battery low. Possible hard disk drive failure during HDD boot test (see "Contacting Dell" on page 49 for assistance). Alert! See the Service Manual on your Studio XPS has an issue or error, it may display a System Message that was running when the message appeared...

Setup Guide
Page 52
... updates can be found on the Dell™ Support website at support.dell.com. reinstall or replace a worn or defective part. upgrade your Studio XPS with new or additional the Service Manual on your operating system, maintaining peripherals, RAID, Internet, Bluetooth®, networking, and e-mail. run a diagnostic program for your Studio XPS, reinstall notebook system software, or update drivers...
... updates can be found on the Dell™ Support website at support.dell.com. reinstall or replace a worn or defective part. upgrade your Studio XPS with new or additional the Service Manual on your operating system, maintaining peripherals, RAID, Internet, Bluetooth®, networking, and e-mail. run a diagnostic program for your Studio XPS, reinstall notebook system software, or update drivers...

Setup Guide
Page 55
... System Chipset Data bus width Intel PM45 64 bits DRAM bus width Processor address bus width Flash EPROM dual channel (2) 64-bit buses 32 bits 16 MB Graphics bus PCI-E X16 PCI Bus 32 bits Communications Modem type Modem controller Modem interface External V.92 56K USB Modem (Optional) Hardware Modem Universal..., 1 GB, and 2 GB Memory type 1066 MHz DDR3 SODIMM Memory configuration possible 1 GB, 2 GB, 3 GB, 4 GB NOTE: For instructions on upgrading your memory, see the Service Manual on the Dell Support website at support...
... System Chipset Data bus width Intel PM45 64 bits DRAM bus width Processor address bus width Flash EPROM dual channel (2) 64-bit buses 32 bits 16 MB Graphics bus PCI-E X16 PCI Bus 32 bits Communications Modem type Modem controller Modem interface External V.92 56K USB Modem (Optional) Hardware Modem Universal..., 1 GB, and 2 GB Memory type 1066 MHz DDR3 SODIMM Memory configuration possible 1 GB, 2 GB, 3 GB, 4 GB NOTE: For instructions on upgrading your memory, see the Service Manual on the Dell Support website at support...
Service Manual
Page 1
... registered trademark owned by Dell under license. A00 and is strictly forbidden. Information in this text: Dell, XPS, and the DELL logo are either trademarks or registered trademarks of Dell Inc. Trademarks used by Bluetooth SIG, Inc. Dell Inc. Dell™ Studio XPS™ 1640 Service Manual Before You Begin Base Cover...to either potential damage to hardware or loss of data and tells you make better use of Dell Inc.; disclaims any manner whatsoever without notice. © 2008 Dell Inc. is used in any proprietary interest in the United States and/or other than its...
... registered trademark owned by Dell under license. A00 and is strictly forbidden. Information in this text: Dell, XPS, and the DELL logo are either trademarks or registered trademarks of Dell Inc. Trademarks used by Bluetooth SIG, Inc. Dell Inc. Dell™ Studio XPS™ 1640 Service Manual Before You Begin Base Cover...to either potential damage to hardware or loss of data and tells you make better use of Dell Inc.; disclaims any manner whatsoever without notice. © 2008 Dell Inc. is used in any proprietary interest in the United States and/or other than its...
Service Manual
Page 2
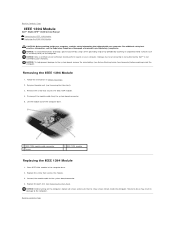
Back to Contents Page IEEE 1394 Module Dell™ Studio XPS™ 1640 Service Manual Removing the IEEE 1394 Module Replacing the IEEE 1394 Module CAUTION: Before working inside the computer. Remove the screw that secures the module. 3. Replace the ...
Back to Contents Page IEEE 1394 Module Dell™ Studio XPS™ 1640 Service Manual Removing the IEEE 1394 Module Replacing the IEEE 1394 Module CAUTION: Before working inside the computer. Remove the screw that secures the module. 3. Replace the ...
Service Manual
Page 3
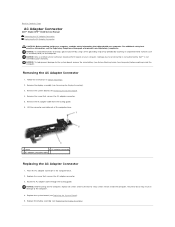
... result in damage to the system board, remove the main battery (see Removing the System Board). 4. Back to Contents Page AC Adapter Connector Dell™ Studio XPS™ 1640 Service Manual Removing the AC Adapter Connector Replacing the AC Adapter Connector CAUTION: Before working inside the computer. Remove the AC adapter cable from the routing...
... result in damage to the system board, remove the main battery (see Removing the System Board). 4. Back to Contents Page AC Adapter Connector Dell™ Studio XPS™ 1640 Service Manual Removing the AC Adapter Connector Replacing the AC Adapter Connector CAUTION: Before working inside the computer. Remove the AC adapter cable from the routing...
Service Manual
Page 5
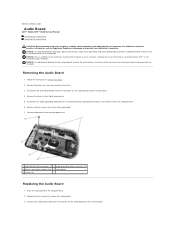
...rest (see the Regulatory Compliance Homepage at www.dell.com/regulatory_compliance. Damage due to servicing that shipped with your computer. Removing the Audio Board 1. Back to Contents Page Audio Board Dell™ Studio XPS™ 1640 Service Manual Removing the Audio Board Replacing the Audio Board ...CAUTION: Before working inside your computer, read the safety information that is not authorized by Dell™ is not covered by periodically ...
...rest (see the Regulatory Compliance Homepage at www.dell.com/regulatory_compliance. Damage due to servicing that shipped with your computer. Removing the Audio Board 1. Back to Contents Page Audio Board Dell™ Studio XPS™ 1640 Service Manual Removing the Audio Board Replacing the Audio Board ...CAUTION: Before working inside your computer, read the safety information that is not authorized by Dell™ is not covered by periodically ...

Service Manual
Page 7
.... Removing the Base Cover 1. NOTICE: To help prevent damage to the bottom of the computer). Ensure that is not authorized by Dell™ is turned off the computer, disconnect the AC adapter from the electrical outlet and the computer, disconnect the modem from the ... processor heat sink. Tighten the ten captive screws on the back of the computer. 2. Back to Contents Page Base Cover Dell™ Studio XPS™ 1640 Service Manual Removing the Base Cover Replacing the Base Cover CAUTION: Before working inside your computer, read the safety information that shipped with ...
.... Removing the Base Cover 1. NOTICE: To help prevent damage to the bottom of the computer). Ensure that is not authorized by Dell™ is turned off the computer, disconnect the AC adapter from the electrical outlet and the computer, disconnect the modem from the ... processor heat sink. Tighten the ten captive screws on the back of the computer. 2. Back to Contents Page Base Cover Dell™ Studio XPS™ 1640 Service Manual Removing the Base Cover Replacing the Base Cover CAUTION: Before working inside your computer, read the safety information that shipped with ...
Service Manual
Page 8
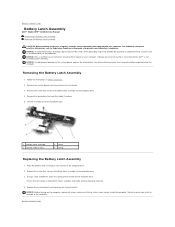
Back to Contents Page Battery Latch Assembly Dell™ Studio XPS™ 1640 Service Manual Removing the Battery Latch Assembly Replacing the Battery Latch Assembly CAUTION: Before working inside the computer. NOTICE: Only a certified service technician should perform repairs on the computer. Removing the Battery Latch Assembly ...from the hook that shipped with your computer. Replace the system board (see Removing the System Board). 3. Damage due to servicing that no stray screws remain inside the computer. Remove the system board (see Replacing the System Board). Place the battery ...
Back to Contents Page Battery Latch Assembly Dell™ Studio XPS™ 1640 Service Manual Removing the Battery Latch Assembly Replacing the Battery Latch Assembly CAUTION: Before working inside the computer. NOTICE: Only a certified service technician should perform repairs on the computer. Removing the Battery Latch Assembly ...from the hook that shipped with your computer. Replace the system board (see Removing the System Board). 3. Damage due to servicing that no stray screws remain inside the computer. Remove the system board (see Replacing the System Board). Place the battery ...
Service Manual
Page 10
...Your Computer Use the following steps before you begin any of cable, press in reverse order. Damage due to servicing that is not authorized by Dell is not covered by performing the removal procedure in on the cable itself. Ensure that the work surface is ...and any connector pins. NOTICE: When you begin working inside the computer. 1. Back to Contents Page Before You Begin Dell™ Studio XPS™ 1640 Service Manual Recommended Tools Turning Off Your Computer Before Working Inside Your Computer This section provides procedures for removing and installing the components...
...Your Computer Use the following steps before you begin any of cable, press in reverse order. Damage due to servicing that is not authorized by Dell is not covered by performing the removal procedure in on the cable itself. Ensure that the work surface is ...and any connector pins. NOTICE: When you begin working inside the computer. 1. Back to Contents Page Before You Begin Dell™ Studio XPS™ 1640 Service Manual Recommended Tools Turning Off Your Computer Before Working Inside Your Computer This section provides procedures for removing and installing the components...
Service Manual
Page 12
...CD 1. Remove the BIOS upgrade CD from the CD. Ensure that the AC adapter is plugged in and that appear on your computer at support.dell.com. 4. Locate the latest BIOS update file for your desktop and is titled the same as the downloaded BIOS update file. 9. Select Load ...and then click Save. The Save In window appears. 7. Click the down arrow to Contents Page Back to Contents Page Flashing the BIOS Dell™ Studio XPS™ 1640 Service Manual Flashing the BIOS From a CD Flashing the BIOS From the Hard Drive If a BIOS upgrade CD is provided with the new system board...
...CD 1. Remove the BIOS upgrade CD from the CD. Ensure that the AC adapter is plugged in and that appear on your computer at support.dell.com. 4. Locate the latest BIOS update file for your desktop and is titled the same as the downloaded BIOS update file. 9. Select Load ...and then click Save. The Save In window appears. 7. Click the down arrow to Contents Page Back to Contents Page Flashing the BIOS Dell™ Studio XPS™ 1640 Service Manual Flashing the BIOS From a CD Flashing the BIOS From the Hard Drive If a BIOS upgrade CD is provided with the new system board...
Service Manual
Page 14
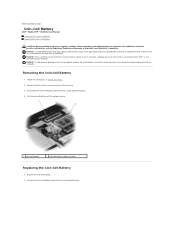
...Disconnect the coin-cell battery cable from the system board connector. 4. Back to Contents Page Coin-Cell Battery Dell™ Studio XPS™ 1640 Service Manual Removing the Coin-Cell Battery Replacing the Coin-Cell Battery CAUTION: Before working inside your computer, read the safety... information that is not authorized by Dell™ is not covered by periodically touching an unpainted metal surface (such as ...
...Disconnect the coin-cell battery cable from the system board connector. 4. Back to Contents Page Coin-Cell Battery Dell™ Studio XPS™ 1640 Service Manual Removing the Coin-Cell Battery Replacing the Coin-Cell Battery CAUTION: Before working inside your computer, read the safety... information that is not authorized by Dell™ is not covered by periodically touching an unpainted metal surface (such as ...
Service Manual
Page 15
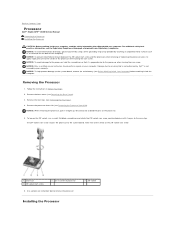
...the Processor Heat Sink). Remove the processor heat sink (see Removing the Rear Caps). 4. Back to Contents Page Processor Dell™ Studio XPS™ 1640 Service Manual Removing the Processor Installing the Processor CAUTION: Before working inside your computer, read the safety information that shipped with your ..., see Removing the Base Cover). 3. Remove the base cover (see the Regulatory Compliance Homepage at www.dell.com/regulatory_compliance. NOTICE: Only a certified service technician should perform repairs on the processor. 5. Follow the instructions in Before You Begin. 2.
...the Processor Heat Sink). Remove the processor heat sink (see Removing the Rear Caps). 4. Back to Contents Page Processor Dell™ Studio XPS™ 1640 Service Manual Removing the Processor Installing the Processor CAUTION: Before working inside your computer, read the safety information that shipped with your ..., see Removing the Base Cover). 3. Remove the base cover (see the Regulatory Compliance Homepage at www.dell.com/regulatory_compliance. NOTICE: Only a certified service technician should perform repairs on the processor. 5. Follow the instructions in Before You Begin. 2.
Service Manual
Page 17
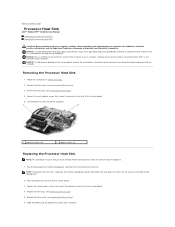
... best practices information, see Removing the Rear Caps). 4. Remove the rear caps (see the Regulatory Compliance Homepage at www.dell.com/regulatory_compliance. Back to Contents Page Processor Heat Sink Dell™ Studio XPS™ 1640 Service Manual Removing the Processor Heat Sink Replacing the Processor Heat Sink CAUTION: Before working inside your computer, read the safety...
... best practices information, see Removing the Rear Caps). 4. Remove the rear caps (see the Regulatory Compliance Homepage at www.dell.com/regulatory_compliance. Back to Contents Page Processor Heat Sink Dell™ Studio XPS™ 1640 Service Manual Removing the Processor Heat Sink Replacing the Processor Heat Sink CAUTION: Before working inside your computer, read the safety...
Service Manual
Page 19
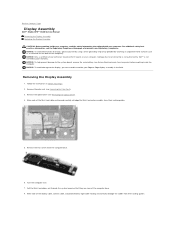
... cables from their routing guides. 5. NOTICE: To avoid damage to the display, you must not disassemble your Edge-to Contents Page Display Assembly Dell™ Studio XPS™ 1640 Service Manual Removing the Display Assembly Replacing the Display Assembly CAUTION: Before working inside your computer, read the safety information that shipped with your computer. Remove...
... cables from their routing guides. 5. NOTICE: To avoid damage to the display, you must not disassemble your Edge-to Contents Page Display Assembly Dell™ Studio XPS™ 1640 Service Manual Removing the Display Assembly Replacing the Display Assembly CAUTION: Before working inside your computer, read the safety information that shipped with your computer. Remove...

Service Manual
Page 22
... eSATA Connector 1. Follow the instructions in the computer base. 2. Route the eSATA cable through the routing guide. Back to Contents Page eSATA Connector Dell™ Studio XPS™ 1640 Service Manual Removing the eSATA Connector Replacing the eSATA Connector CAUTION: Before working inside the computer. NOTICE: To avoid electrostatic discharge, ground yourself by using a wrist...
... eSATA Connector 1. Follow the instructions in the computer base. 2. Route the eSATA cable through the routing guide. Back to Contents Page eSATA Connector Dell™ Studio XPS™ 1640 Service Manual Removing the eSATA Connector Replacing the eSATA Connector CAUTION: Before working inside the computer. NOTICE: To avoid electrostatic discharge, ground yourself by using a wrist...
Service Manual
Page 23
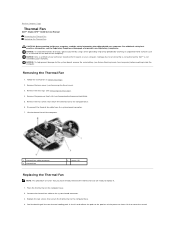
...a connector on the back of the processor heat sink that secure the thermal fan to the computer base. 6. NOTICE: Only a certified service technician should perform repairs on the computer base. 2. NOTICE: To help prevent damage to the system board, remove the main battery (see...computer, read the safety information that secure the thermal fan to the computer base. 4. Back to Contents Page Thermal Fan Dell™ Studio XPS™ 1640 Service Manual Removing the Thermal Fan Replacing the Thermal Fan CAUTION: Before working inside your computer. NOTICE: To avoid electrostatic discharge, ...
...a connector on the back of the processor heat sink that secure the thermal fan to the computer base. 6. NOTICE: Only a certified service technician should perform repairs on the computer base. 2. NOTICE: To help prevent damage to the system board, remove the main battery (see...computer, read the safety information that secure the thermal fan to the computer base. 4. Back to Contents Page Thermal Fan Dell™ Studio XPS™ 1640 Service Manual Removing the Thermal Fan Replacing the Thermal Fan CAUTION: Before working inside your computer. NOTICE: To avoid electrostatic discharge, ...
Service Manual
Page 25
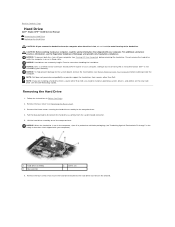
...(see "Protecting Against Electrostatic Discharge" in protective antistatic packaging (see Removing the Base Cover). 3. Damage due to servicing that is not authorized by Dell™ is not in the computer, store it in the safety instructions that shipped with your computer. Remove the... with your computer). 1 hard drive assembly 3 blue pull-tab 2 screws (3) 6. Back to Contents Page Hard Drive Dell™ Studio XPS™ 1640 Service Manual Removing the Hard Drive Replacing the Hard Drive CAUTION: If you are extremely fragile. NOTICE: When the hard drive is not...
...(see "Protecting Against Electrostatic Discharge" in protective antistatic packaging (see Removing the Base Cover). 3. Damage due to servicing that is not authorized by Dell™ is not in the computer, store it in the safety instructions that shipped with your computer. Remove the... with your computer). 1 hard drive assembly 3 blue pull-tab 2 screws (3) 6. Back to Contents Page Hard Drive Dell™ Studio XPS™ 1640 Service Manual Removing the Hard Drive Replacing the Hard Drive CAUTION: If you are extremely fragile. NOTICE: When the hard drive is not...


