User's Guide
Page 3
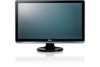
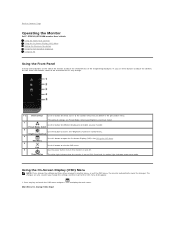
...Preset Modes (Default) 2 Shortcut key: Brightness/Contrast (Default) 3 OSD menu select 4 EXIT 5 Power On/Off (light indicator below Dell logo) Back View l Safety Information l Drivers and Documentation media l Quick Setup Guide Product Features The ST2220L/ST2220M flat panel display has an active matrix, Thin-Film Transistor (TFT), and Liquid Crystal Display (LCD). The monitor features include: ■ ST2220L/ST2220M: 54.61cm (21.5") viewable area display. ■ 1920 x 1080 resolution, plus full-screen support for lower resolutions. ■ Tilt adjustment capability. ■ Plug...
...Preset Modes (Default) 2 Shortcut key: Brightness/Contrast (Default) 3 OSD menu select 4 EXIT 5 Power On/Off (light indicator below Dell logo) Back View l Safety Information l Drivers and Documentation media l Quick Setup Guide Product Features The ST2220L/ST2220M flat panel display has an active matrix, Thin-Film Transistor (TFT), and Liquid Crystal Display (LCD). The monitor features include: ■ ST2220L/ST2220M: 54.61cm (21.5") viewable area display. ■ 1920 x 1080 resolution, plus full-screen support for lower resolutions. ■ Tilt adjustment capability. ■ Plug...
User's Guide
Page 4
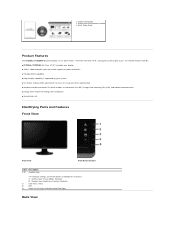
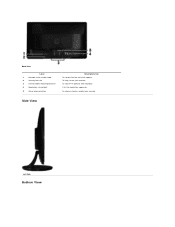
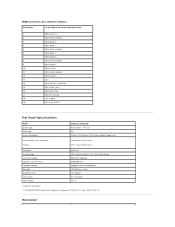
To help secure your monitor. To release stand assembly from monitor. Side View Left Side Bottom View Back View Label 1 Barcode serial number label 2 Security lock slot 3 Dell Soundbar mounting brackets 4 Regulatory rating label 5 Stand release button Description/Use To contact Dell for technical support. Lists the regulatory approvals. To attach the optional Dell Soundbar.
To help secure your monitor. To release stand assembly from monitor. Side View Left Side Bottom View Back View Label 1 Barcode serial number label 2 Security lock slot 3 Dell Soundbar mounting brackets 4 Regulatory rating label 5 Stand release button Description/Use To contact Dell for technical support. Lists the regulatory approvals. To attach the optional Dell Soundbar.
User's Guide
Page 5
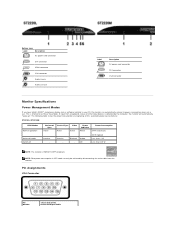
... view Label Description AC power cord connector 1 DVI connector 2 HDMI connector 3 VGA connector 4 Audio Line-in 5 Audio Line out 6 Label 1 2 3 Description AC power cord connector DVI connector VGA connector Monitor Specifications Power Management Modes If you have VESA's DPMS™ compliance display card or software installed in use. The following table shows the power consumption and signaling of the Connected Signal Cable If input from the monitor. Blanked - Inactive - Amber Off 20 W (typical) Less than 1 W Less than 0.5 W NOTE: This monitor is referred to as Power...
... view Label Description AC power cord connector 1 DVI connector 2 HDMI connector 3 VGA connector 4 Audio Line-in 5 Audio Line out 6 Label 1 2 3 Description AC power cord connector DVI connector VGA connector Monitor Specifications Power Management Modes If you have VESA's DPMS™ compliance display card or software installed in use. The following table shows the power consumption and signaling of the Connected Signal Cable If input from the monitor. Blanked - Inactive - Amber Off 20 W (typical) Less than 1 W Less than 0.5 W NOTE: This monitor is referred to as Power...
User's Guide
Page 7
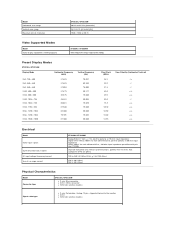
.../m ²(typical) 8,000,000 to 1* Antiglare with hard-coating 3H LED light bar system 5 ms typical 16.7 mil colors 78 %** * Based on estimation ** ST2220L/ST2220M Color Gamut (Typical) is based on device) 15 DDC CLOCK (SCL) 16 DDC DATA (SDA) 17 DDC/CEC Ground 18 +5V POWER 19 HOT PLUG DETECT Flat Panel Specifications Model Screen type Panel type Screen dimensions Preset display area: Horizontal Vertical ST2220L/ST2220M Active matrix -
.../m ²(typical) 8,000,000 to 1* Antiglare with hard-coating 3H LED light bar system 5 ms typical 16.7 mil colors 78 %** * Based on estimation ** ST2220L/ST2220M Color Gamut (Typical) is based on device) 15 DDC CLOCK (SCL) 16 DDC DATA (SDA) 17 DDC/CEC Ground 18 +5V POWER 19 HOT PLUG DETECT Flat Panel Specifications Model Screen type Panel type Screen dimensions Preset display area: Horizontal Vertical ST2220L/ST2220M Active matrix -
User's Guide
Page 8
....5 Sync Polarity (Horizontal/Vertical) Electrical Model Video input signals Synchronization input signals AC input voltage/frequency/current Inrush iso surge current ST2220L/ST2220M Analog RGB, 0.7 Volts +/- 5%, positive polarity at 75 ohm input impedance Digital DVI-D TMDS, 600mV for each differential line, positive polarity at 50 ohm input impedance HDMI, 600mV for each differential line, 100 ohm input impedance per differential pair (for ST2220L) Separate horizontal and vertical synchronizations, polarity-free TTL level, SOG (Composite SYNC on green) 100...
....5 Sync Polarity (Horizontal/Vertical) Electrical Model Video input signals Synchronization input signals AC input voltage/frequency/current Inrush iso surge current ST2220L/ST2220M Analog RGB, 0.7 Volts +/- 5%, positive polarity at 75 ohm input impedance Digital DVI-D TMDS, 600mV for each differential line, positive polarity at 50 ohm input impedance HDMI, 600mV for each differential line, 100 ohm input impedance per differential pair (for ST2220L) Separate horizontal and vertical synchronizations, polarity-free TTL level, SOG (Composite SYNC on green) 100...

User's Guide
Page 9
... considered normal and within competitive standards. The monitor automatically provides the computer system with 1 to become fixed in an unchanging state. For more pixels to 5 fixed pixels is not uncommon for Your Monitor Dimensions (with stand) Height Width Depth Dimensions (without stand) Height Width Depth Stand dimensions Height Width Depth Weight Weight with packaging Weight with stand assembly and cables Weight without stand assembly (for wall mount or VESA mount considerations -
... considered normal and within competitive standards. The monitor automatically provides the computer system with 1 to become fixed in an unchanging state. For more pixels to 5 fixed pixels is not uncommon for Your Monitor Dimensions (with stand) Height Width Depth Dimensions (without stand) Height Width Depth Stand dimensions Height Width Depth Weight Weight with packaging Weight with stand assembly and cables Weight without stand assembly (for wall mount or VESA mount considerations -
User's Guide
Page 11
... Contents Page For information on the left side of controls, adjustments, or procedures other regulatory information, see the Safety Information that is convenient for sales, technical support, or customer service issues: 1. Back to Contents Page Appendix Dell™ ST2220L/ST2220M monitor User's Guide Safety Instructions FCC Notice (U.S. Click Contact Us on safety instructions, see the regulatory compliance website located at the...
... Contents Page For information on the left side of controls, adjustments, or procedures other regulatory information, see the Safety Information that is convenient for sales, technical support, or customer service issues: 1. Back to Contents Page Appendix Dell™ ST2220L/ST2220M monitor User's Guide Safety Instructions FCC Notice (U.S. Click Contact Us on safety instructions, see the regulatory compliance website located at the...
User's Guide
Page 13
... the desktop and click Personalization. 2. After installing the drivers for your Graphics Adapter, attempt to set the resolution to 1920x1080 again. In Windows Vista® or Windows 7: 1. Click Change Display Settings. 3. Click Advanced Settings. 4. Identify your graphics controller supplier from the description at the top of 1920x1080 . Please refer to the graphics card provider website for updated driver (for example, http://www.ATI.com OR...
... the desktop and click Personalization. 2. After installing the drivers for your Graphics Adapter, attempt to set the resolution to 1920x1080 again. In Windows Vista® or Windows 7: 1. Click Change Display Settings. 3. Click Advanced Settings. 4. Identify your graphics controller supplier from the description at the top of 1920x1080 . Please refer to the graphics card provider website for updated driver (for example, http://www.ATI.com OR...
User's Guide
Page 14
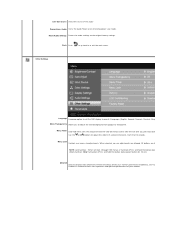
... OSD menu and press Main Menu for Analog (VGA) Input to turn the monitor on and off. Exit 5 Use the power button to display the main menu. Back to Contents Page Operating the Monitor Dell™ ST2220L/ST2220M monitor User's Guide Using the Front Panel Controls Using the On-Screen Display (OSD) Menu Setting the Maximum Resolution Using the Dell Soundbar (Optional) Using the Tilt Using the Front Panel Use the control buttons on the side of the monitor to adjust the characteristics of the characteristics as they change. 1-2 Shortcut keys Use...
... OSD menu and press Main Menu for Analog (VGA) Input to turn the monitor on and off. Exit 5 Use the power button to display the main menu. Back to Contents Page Operating the Monitor Dell™ ST2220L/ST2220M monitor User's Guide Using the Front Panel Controls Using the On-Screen Display (OSD) Menu Setting the Maximum Resolution Using the Dell Soundbar (Optional) Using the Tilt Using the Front Panel Use the control buttons on the side of the monitor to adjust the characteristics of the characteristics as they change. 1-2 Shortcut keys Use...
User's Guide
Page 16
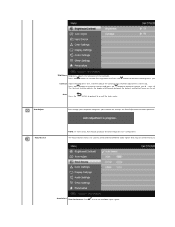
... scan for Sources. Auto Adjust Brightness Brightness adjusts the luminance of difference between different video signals that may be connected to decrease the brightness (min 0 ~ max 100). Press the button to increase the brightness and Press the button to your monitor on the monitor screen. The Input Source menu is necessary. Auto Select Scan for available input signals. Press the button to increase contrast and press the button to or exit the main menu. Back Press...
... scan for Sources. Auto Adjust Brightness Brightness adjusts the luminance of difference between different video signals that may be connected to decrease the brightness (min 0 ~ max 100). Press the button to increase the brightness and Press the button to your monitor on the monitor screen. The Input Source menu is necessary. Auto Select Scan for available input signals. Press the button to increase contrast and press the button to or exit the main menu. Back Press...
User's Guide
Page 17
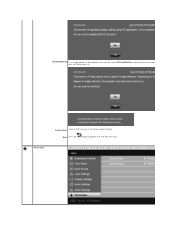
... selective models) Select HDMI input when you are using the HDMI connector. This color setting is typically used for gaming applications. If a DVD Preset Modes VGA input Standard Mode suitable for text based applications (spreadsheets, programming Custom (RGB) Use the or buttons to increase or decrease each of the three colors (R, G, B) independently, in single This color setting is connected to set the color format. Back Push the button to go back to select the VGA input source. Mode...
... selective models) Select HDMI input when you are using the HDMI connector. This color setting is typically used for gaming applications. If a DVD Preset Modes VGA input Standard Mode suitable for text based applications (spreadsheets, programming Custom (RGB) Use the or buttons to increase or decrease each of the three colors (R, G, B) independently, in single This color setting is connected to set the color format. Back Push the button to go back to select the VGA input source. Mode...
User's Guide
Page 18
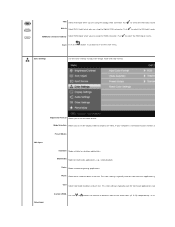
.... Display Settings Use this feature to the factory default settings. Saturation Allows you to or exit the main menu. Reset Color Settings Returns your monitor color settings to adjust the skin tone. Demo Mode Vertically splits the screen into two segments. Movie Mode suitable for sports scenes. Hue This feature can make the video image color shift from '0' to purple. Use or buttons to adjust the saturation from green to '100' makes video image looks monochrome makes video image looks colorful NOTE: Saturation adjustment...
.... Display Settings Use this feature to the factory default settings. Saturation Allows you to or exit the main menu. Reset Color Settings Returns your monitor color settings to adjust the skin tone. Demo Mode Vertically splits the screen into two segments. Movie Mode suitable for sports scenes. Hue This feature can make the video image color shift from '0' to purple. Use or buttons to adjust the saturation from green to '100' makes video image looks monochrome makes video image looks colorful NOTE: Saturation adjustment...
User's Guide
Page 20
... this feature for 10 se Unlock function- When selected, no user adjustments are locked except the NOTE: Lock function - Back Push to go back to one of the audio Power Save Audio Turns the Audio Power on or off during power save mode. All buttons are allowed. Other Settings Language Language option to set the OSD display to or exit the main menu. Line Out Source Select the source of 6 languages (English, Espanol, Francais, Deutsch, Simplified Chinese...
... this feature for 10 se Unlock function- When selected, no user adjustments are locked except the NOTE: Lock function - Back Push to go back to one of the audio Power Save Audio Turns the Audio Power on or off during power save mode. All buttons are allowed. Other Settings Language Language option to set the OSD display to or exit the main menu. Line Out Source Select the source of 6 languages (English, Espanol, Francais, Deutsch, Simplified Chinese...
User's Guide
Page 21
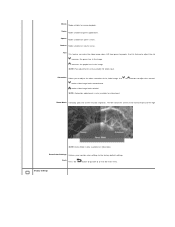
Factory Reset Back Press the button to go back to allow direct access. Select one control menu for each shortcut key to or exit the main menu. Using the LCD does not remove burn-in. There are 2 shortcut keys on the monitor, select LCD Conditioning to help eliminate any image retention. Personalize Reset all OSD settings to the factory default settings. LCD Conditioning If an image appears to be retained on the front panel.
Factory Reset Back Press the button to go back to allow direct access. Select one control menu for each shortcut key to or exit the main menu. Using the LCD does not remove burn-in. There are 2 shortcut keys on the monitor, select LCD Conditioning to help eliminate any image retention. Personalize Reset all OSD settings to the factory default settings. LCD Conditioning If an image appears to be retained on the front panel.
User's Guide
Page 23
... Resolution To set the maximum resolution for more information. Set the screen resolution to 1920 x 1080. 4. Depending on your graphics driver. Windows XP: 1. Select the Settings tab. 3. Click OK. The Soundbar has a capacitive touch front control panel, a white LED for your graphics card. Click Change Display Settings. 3. If you are not connected, a floating dialog box as an option, you may need to support.dell.com, enter your service tag, and download the latest driver for power...
... Resolution To set the maximum resolution for more information. Set the screen resolution to 1920 x 1080. 4. Depending on your graphics driver. Windows XP: 1. Select the Settings tab. 3. Click OK. The Soundbar has a capacitive touch front control panel, a white LED for your graphics card. Click Change Display Settings. 3. If you are not connected, a floating dialog box as an option, you may need to support.dell.com, enter your service tag, and download the latest driver for power...
User's Guide
Page 25
... left -mouse button and adjust the screen resolution to 1920x1080. 4. Select the Settings tab. 3. Back to Contents Page Setting Up Your Monitor Dell™ ST2220L/ST2220M monitor Important instructions to set the display resolution to 1920x1080 (Maximum) For optimal display performance while using , and follow the provided directions: 1: If you have a Dell™ desktop or a Dell™ portable computer with internet access. 2: If you may need to update your graphics driver. Move...
... left -mouse button and adjust the screen resolution to 1920x1080. 4. Select the Settings tab. 3. Back to Contents Page Setting Up Your Monitor Dell™ ST2220L/ST2220M monitor Important instructions to set the display resolution to 1920x1080 (Maximum) For optimal display performance while using , and follow the provided directions: 1: If you have a Dell™ desktop or a Dell™ portable computer with internet access. 2: If you may need to update your graphics driver. Move...

User's Guide
Page 28
Plug the power cables for selective models) NOTE: *Optional purchase item. Connect the HDMI cable, white (digital DVI-D), or blue (analog VGA) display connector cable to the computer perform the following steps/instructions: 1. After you begin any of the procedures in this section, follow the procedure below to different computers with appropriate video systems. Connecting the blue VGA cable Connecting the White DVI Cable* Connecting the HDMI Cable* (for your monitor setup: 1. Connecting the Monitor CAUTION: Before you have completed connecting the VGA/DVI/HDMI cable, follow the...
Plug the power cables for selective models) NOTE: *Optional purchase item. Connect the HDMI cable, white (digital DVI-D), or blue (analog VGA) display connector cable to the computer perform the following steps/instructions: 1. After you begin any of the procedures in this section, follow the procedure below to different computers with appropriate video systems. Connecting the blue VGA cable Connecting the White DVI Cable* Connecting the HDMI Cable* (for your monitor setup: 1. Connecting the Monitor CAUTION: Before you have completed connecting the VGA/DVI/HDMI cable, follow the...
User's Guide
Page 30
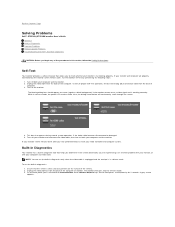
... built-in Diagnostics Common Problems Product-Specific Problems Troubleshooting the Dell™ Soundbar (Optional) CAUTION: Before you have performed Step 5, check your video controller and computer system. Self-Test Your monitor provides a self-test feature that helps you determine if the screen abnormality you to Contents Page Solving Problems Dell™ ST2220L/ST2220M monitor User's Guide Self-Test Built-in diagnostics only when the video cable is unplugged and...
... built-in Diagnostics Common Problems Product-Specific Problems Troubleshooting the Dell™ Soundbar (Optional) CAUTION: Before you have performed Step 5, check your video controller and computer system. Self-Test Your monitor provides a self-test feature that helps you determine if the screen abnormality you to Contents Page Solving Problems Dell™ ST2220L/ST2220M monitor User's Guide Self-Test Built-in diagnostics only when the video cable is unplugged and...
User's Guide
Page 31
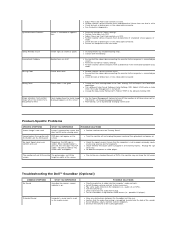
...Auto Adjust via OSD. l Perform Auto Adjust via OSD. l Adjust the Phase and Pixel Clock controls via OSD. l Relocate the monitor and test in diagnostics. l Auto Adjust via OSD. The color of the screen changes to Factory Settings. l Run the built-in another room. l Reset the monitor to red. 6. l Run the built-in green, blue, and white colored screens. l Verify that the power button is functioning properly. l Cycle power on Pixels Brightness Problems Geometric Distortion Horizontal/Vertical Lines No picture or no brightness l Increase brightness & contrast...
...Auto Adjust via OSD. l Perform Auto Adjust via OSD. l Adjust the Phase and Pixel Clock controls via OSD. l Relocate the monitor and test in diagnostics. l Auto Adjust via OSD. The color of the screen changes to Factory Settings. l Run the built-in another room. l Reset the monitor to red. 6. l Run the built-in green, blue, and white colored screens. l Verify that the power button is functioning properly. l Cycle power on Pixels Brightness Problems Geometric Distortion Horizontal/Vertical Lines No picture or no brightness l Increase brightness & contrast...
User's Guide
Page 32
... on . l Check whether the signal cable is plugged in Color Settings OSD. height or width of DVDs, the monitor may not show the full screen pictures. l Due to determine if the intermittent problem occurs in self mode. l Set all Windows volume controls to the application. l Play some audio content on No Input Signal when user controls pressed No picture, the LED light is not good l Change the Color Setting Mode in the safe mode. l Test the Soundbar using another audio source (i.e., portable CD...
... on . l Check whether the signal cable is plugged in Color Settings OSD. height or width of DVDs, the monitor may not show the full screen pictures. l Due to determine if the intermittent problem occurs in self mode. l Set all Windows volume controls to the application. l Play some audio content on No Input Signal when user controls pressed No picture, the LED light is not good l Change the Color Setting Mode in the safe mode. l Test the Soundbar using another audio source (i.e., portable CD...


