

Dell Outline Drawing
Page 1
SE2416H Outline Dimensions Nominal Dimensions Unit: mm/(inch) Z= 0 55.0 (2.17) 16.0 (0.63) 556.6 (21.91) 528.6 (20.81) 14.0, 2X (0.55) Back view of Monitor without stand Tilt 15.0 (0.59) 330.1 (13.00) 298.0 (11.74) 423.1 (16.66) 408.0 (16.06) 100.1 (3.95) 15.5 (0.61) 151.0 (5.95) 177.0 (6.97) 1.5 (0.06) 110.0 (4.33) 17.0 (0.67) 250.0 (9.84) 60.2 (2.37) 179.9 (7.08)
SE2416H Outline Dimensions Nominal Dimensions Unit: mm/(inch) Z= 0 55.0 (2.17) 16.0 (0.63) 556.6 (21.91) 528.6 (20.81) 14.0, 2X (0.55) Back view of Monitor without stand Tilt 15.0 (0.59) 330.1 (13.00) 298.0 (11.74) 423.1 (16.66) 408.0 (16.06) 100.1 (3.95) 15.5 (0.61) 151.0 (5.95) 177.0 (6.97) 1.5 (0.06) 110.0 (4.33) 17.0 (0.67) 250.0 (9.84) 60.2 (2.37) 179.9 (7.08)

Dell Quick Start Guide
Page 1
.... l rights reserved. 2 7 5° 21° Drivers and Documentation Dell™ SE2416H Monitor J55PMA00 Contents: • Device drivers • Quick Setup Guide • User's Guide • Dell Display Manager Software P/N J55PM Rev. Al 1 4 5 6 2015 l rights reserved. Al Q41G78S170047A (DELL P/N:75WYW rev.A00) SE2416H 3 Drivers and Documentation Dell™ SE2416H Monitor J55PMA00 Contents: • Device drivers • Quick Setup Guide •...
.... l rights reserved. 2 7 5° 21° Drivers and Documentation Dell™ SE2416H Monitor J55PMA00 Contents: • Device drivers • Quick Setup Guide • User's Guide • Dell Display Manager Software P/N J55PM Rev. Al 1 4 5 6 2015 l rights reserved. Al Q41G78S170047A (DELL P/N:75WYW rev.A00) SE2416H 3 Drivers and Documentation Dell™ SE2416H Monitor J55PMA00 Contents: • Device drivers • Quick Setup Guide •...
Dell Users Guide
Page 3
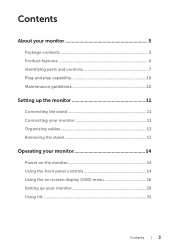
Contents .About your monitor 5 Package contents 5 Product features 6 Identifying parts and controls 7 Plug and play capability 10 Maintenance guidelines 10 .Setting up the monitor 11 Connecting the stand 11 Connecting your monitor 11 Organizing cables 12 Removing the stand 13 .Operating your monitor 14 Power on the monitor 14 Using the front panel controls 14 Using the on-screen display (OSD) menu 16 Setting up your monitor 29 Using tilt 31 Contents | 3
Contents .About your monitor 5 Package contents 5 Product features 6 Identifying parts and controls 7 Plug and play capability 10 Maintenance guidelines 10 .Setting up the monitor 11 Connecting the stand 11 Connecting your monitor 11 Organizing cables 12 Removing the stand 13 .Operating your monitor 14 Power on the monitor 14 Using the front panel controls 14 Using the on-screen display (OSD) menu 16 Setting up your monitor 29 Using tilt 31 Contents | 3

Dell Users Guide
Page 4
.Troubleshooting 32 Self-Test 32 Built-in diagnostics 33 Common problems 34 Product-specific problems 36 Appendix 37 FCC notices (U.S. Only) and other regulatory information...........37 Contacting Dell 37 .Monitor specifications 38 Flat panel specifications 38 Resolution specifications 38 Supported video modes 39 Preset display modes 39 Electrical specifications 39 Physical characteristics 40 Environmental characteristics 41 Power management modes 41 Pin assignments 43 4 |
.Troubleshooting 32 Self-Test 32 Built-in diagnostics 33 Common problems 34 Product-specific problems 36 Appendix 37 FCC notices (U.S. Only) and other regulatory information...........37 Contacting Dell 37 .Monitor specifications 38 Flat panel specifications 38 Resolution specifications 38 Supported video modes 39 Preset display modes 39 Electrical specifications 39 Physical characteristics 40 Environmental characteristics 41 Power management modes 41 Pin assignments 43 4 |

Dell Users Guide
Page 5
... stand setup guide for more information if something is missing. Ensure that you have received all the components and see Contacting Dell for setup instructions. ∞∞ Monitor ∞∞ Stand riser ∞∞ Stand base ∞∞ Power Cable (Varies by Countries) ∞∞... VGA Cable About your monitor. NOTE: Some items may be optional and may not be available in certain countries. Some features or media may not ship with the components shown below. About your monitor Package contents Your monitor ships with your...
... stand setup guide for more information if something is missing. Ensure that you have received all the components and see Contacting Dell for setup instructions. ∞∞ Monitor ∞∞ Stand riser ∞∞ Stand base ∞∞ Power Cable (Varies by Countries) ∞∞... VGA Cable About your monitor. NOTE: Some items may be optional and may not be available in certain countries. Some features or media may not ship with the components shown below. About your monitor Package contents Your monitor ships with your...
Dell Users Guide
Page 6
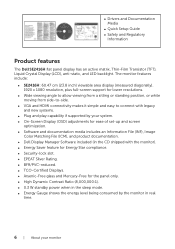
... an Information File (INF), Image Color Matching File (ICM), and product documentation. ∞∞ Dell Display Manager Software included (in the CD shipped with the monitor). ∞∞ Energy Saver feature for Energy Star compliance. ∞∞ Security-lock slot. ...the energy level being consumed by the monitor in real time. 6 | About your monitor DellTM SE2416H Monitor ∞∞ Drivers and Documentation Media ∞∞ Quick Setup Guide ∞∞ Safety and Regulatory Information Product features The Dell SE2416H flat panel display has an active matrix...
... an Information File (INF), Image Color Matching File (ICM), and product documentation. ∞∞ Dell Display Manager Software included (in the CD shipped with the monitor). ∞∞ Energy Saver feature for Energy Star compliance. ∞∞ Security-lock slot. ...the energy level being consumed by the monitor in real time. 6 | About your monitor DellTM SE2416H Monitor ∞∞ Drivers and Documentation Media ∞∞ Quick Setup Guide ∞∞ Safety and Regulatory Information Product features The Dell SE2416H flat panel display has an active matrix...

Dell Users Guide
Page 7
About your monitor) 2 Power On/Off button NOTE: For displays with glossy bezels the user should consider the placement of the display as the bezel may cause disturbing reflections from surrounding light and bright surfaces. Identifying parts and controls Front view 1 2 Front panel controls Label Description 1 Function buttons (For more information, see Operating your monitor | 7
About your monitor) 2 Power On/Off button NOTE: For displays with glossy bezels the user should consider the placement of the display as the bezel may cause disturbing reflections from surrounding light and bright surfaces. Identifying parts and controls Front view 1 2 Front panel controls Label Description 1 Function buttons (For more information, see Operating your monitor | 7

Dell Users Guide
Page 8
.... Refer to this label if you need to organize cables by placing them through the slot. 8 | About your monitor Uses to contact Dell for records of Mfg Back View without monitor stand Back View with monitor stand Label Description 1 Security-lock slot 2 Barcode serial number and Service Tag label 3 Cable management slot Use Secures...
.... Refer to this label if you need to organize cables by placing them through the slot. 8 | About your monitor Uses to contact Dell for records of Mfg Back View without monitor stand Back View with monitor stand Label Description 1 Security-lock slot 2 Barcode serial number and Service Tag label 3 Cable management slot Use Secures...

Dell Users Guide
Page 9
... computer with VGA cable. L'appareil doit être branché sur une prise de courant munie d'une mise à la terre. Connect your monitor | 9 XXXXXX-XX 1 4 2 3 Bottom view without monitor stand Label Description 1 Power port 2 HDMI port 3 VGA port 4 Regulatory label Use Connect the power cable. Lists the regulatory approvals. About your...
... computer with VGA cable. L'appareil doit être branché sur une prise de courant munie d'une mise à la terre. Connect your monitor | 9 XXXXXX-XX 1 4 2 3 Bottom view without monitor stand Label Description 1 Power port 2 HDMI port 3 VGA port 4 Regulatory label Use Connect the power cable. Lists the regulatory approvals. About your...
Dell Users Guide
Page 10
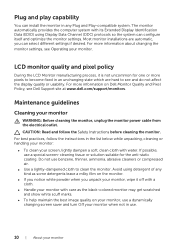
... get scratched and show white scuff marks. ∞∞ To help maintain the best image quality on Dell Monitor Quality and Pixel Policy, see Operating your monitor when not in an unchanging state which are automatic, you unpack your screen, lightly dampen a soft, clean cloth with water. Do not use a dynamically changing ...
... get scratched and show white scuff marks. ∞∞ To help maintain the best image quality on Dell Monitor Quality and Pixel Policy, see Operating your monitor when not in an unchanging state which are automatic, you unpack your screen, lightly dampen a soft, clean cloth with water. Do not use a dynamically changing ...

Dell Users Guide
Page 11
...stand in this section, follow the Safety Instructions. To connect your monitor WARNING: Before you connect them to the computer. Setting up the monitor Connecting the stand NOTE: The stand is detached when the monitor is recommend to route the cables through the cable-management slot ...cable. Connect the VGA/HDMI cable from the factory. Turn Off your monitor to the monitor. To attach the monitor stand: 1. Place the monitor on the back of the procedures in to the computer: 1. Setting up the monitor | 11 NOTE: Do not connect all cables to the computer at the...
...stand in this section, follow the Safety Instructions. To connect your monitor WARNING: Before you connect them to the computer. Setting up the monitor Connecting the stand NOTE: The stand is detached when the monitor is recommend to route the cables through the cable-management slot ...cable. Connect the VGA/HDMI cable from the factory. Turn Off your monitor to the monitor. To attach the monitor stand: 1. Place the monitor on the back of the procedures in to the computer: 1. Setting up the monitor | 11 NOTE: Do not connect all cables to the computer at the...

Dell Users Guide
Page 12
Connecting the VGA cable Connecting the HDMI cable (sold separately) Organizing cables 12 | Setting up the monitor
Connecting the VGA cable Connecting the HDMI cable (sold separately) Organizing cables 12 | Setting up the monitor
Dell Users Guide
Page 13
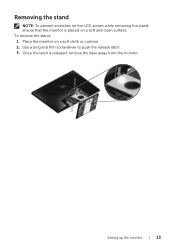
Place the monitor on a soft and clean surface. Once the latch is placed on a soft cloth or cushion. 2. To remove the stand: 1. Use a long and thin screwdriver to push the release latch. 3. Removing the stand NOTE: To prevent scratches on the LCD screen while removing the stand, ensure that the monitor is released, remove the base away from the monitor. 2 2 3 Setting up the monitor | 13
Place the monitor on a soft and clean surface. Once the latch is placed on a soft cloth or cushion. 2. To remove the stand: 1. Use a long and thin screwdriver to push the release latch. 3. Removing the stand NOTE: To prevent scratches on the LCD screen while removing the stand, ensure that the monitor is released, remove the base away from the monitor. 2 2 3 Setting up the monitor | 13

Dell Users Guide
Page 14
... to directly access the Brightness/ Contrast menu. Using the front panel controls Use the control buttons on the monitor. Operating your monitor Shortcut key/Preset Modes 2 Use this button to choose from a list of the monitor to adjust the image being displayed. 1 2 3 4 5 The following table describes the front panel buttons: Front Panel ... 1 Use this button to launch the On-Screen Display (OSD) and select the OSD Menu. See Accessing the Menu OSD menu. 14 | Operating your monitor Power on the monitor Press the button to turn on the front of preset modes.
... to directly access the Brightness/ Contrast menu. Using the front panel controls Use the control buttons on the monitor. Operating your monitor Shortcut key/Preset Modes 2 Use this button to choose from a list of the monitor to adjust the image being displayed. 1 2 3 4 5 The following table describes the front panel buttons: Front Panel ... 1 Use this button to launch the On-Screen Display (OSD) and select the OSD Menu. See Accessing the Menu OSD menu. 14 | Operating your monitor Power on the monitor Press the button to turn on the front of preset modes.

Dell Users Guide
Page 15
OSD controls Use the buttons on and off. Down 3 Use the OK button to confirm your monitor | 15 4 Use this button to go back to the previous menu. Blinking white light indicates the ...up in a menu. Back Operating your selection in a menu. Exit 5 Use the Power button to turn the monitor on the front of the monitor to adjust the image settings. 1 2 34 Front Panel Button Description 1 Use the Up button to the main menu...increase values or move down in a menu. Power (with power light ) Solid white light indicates the monitor is On and fully functional.
OSD controls Use the buttons on and off. Down 3 Use the OK button to confirm your monitor | 15 4 Use this button to go back to the previous menu. Blinking white light indicates the ...up in a menu. Back Operating your selection in a menu. Exit 5 Use the Power button to turn the monitor on the front of the monitor to adjust the image settings. 1 2 34 Front Panel Button Description 1 Use the Up button to the main menu...increase values or move down in a menu. Power (with power light ) Solid white light indicates the monitor is On and fully functional.

Dell Users Guide
Page 16
... Input Source Color Display Audio Energy Menu Personalize Others Resolution: 1024x768, 60Hz Energy Use 75 75 Maximum: 1920x1080, 60Hz 16 | Operating your monitor Main Menu for analog (VGA) input Dell SE2416H Brightness / Contrast Auto Adjust Input Source Color Display Audio Energy Menu Personalize Others Resolution: 1024x768, 60Hz Energy Use 75 75 Maximum: 1920x1080...
... Input Source Color Display Audio Energy Menu Personalize Others Resolution: 1024x768, 60Hz Energy Use 75 75 Maximum: 1920x1080, 60Hz 16 | Operating your monitor Main Menu for analog (VGA) input Dell SE2416H Brightness / Contrast Auto Adjust Input Source Color Display Audio Energy Menu Personalize Others Resolution: 1024x768, 60Hz Energy Use 75 75 Maximum: 1920x1080...
Dell Users Guide
Page 17
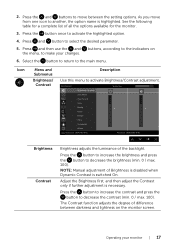
Press and then use the and buttons, according to the indicators on the monitor screen. Operating your changes. 6. See the following table for a complete list of difference between the setting options. Press the button once to... Contrast function adjusts the degree of all the options available for the monitor. 3. NOTE: Manual adjustment of the backlight. Icon Menu and Submenus Brightness/ Contrast Description Use this menu to decrease the brightness (min. 0 / max. 100). Dell SE2416H Brightness / Contrast Auto Adjust Input Source Color Display Audio Energy Menu ...
Press and then use the and buttons, according to the indicators on the monitor screen. Operating your changes. 6. See the following table for a complete list of difference between the setting options. Press the button once to... Contrast function adjusts the degree of all the options available for the monitor. 3. NOTE: Manual adjustment of the backlight. Icon Menu and Submenus Brightness/ Contrast Description Use this menu to decrease the brightness (min. 0 / max. 100). Dell SE2416H Brightness / Contrast Auto Adjust Input Source Color Display Audio Energy Menu ...
Dell Users Guide
Page 18
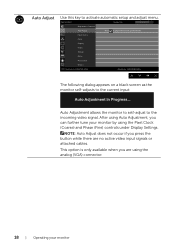
...Audio Energy Menu Personalize Others Resolution: 1024x768, 60Hz Maximum: 1920x1080, 60Hz The following dialog appears on a black screen as the monitor self-adjusts to activate automatic setup and adjust menu. NOTE: Auto Adjust does not occur if you press the button while there...the current input: Auto Adjustment in Progress... Auto Adjustment allows the monitor to self-adjust to adjust the screen automatically. After using Auto Adjustment, you are no active video input signals or attached cables. Dell SE2416H Energy Use Brightness / Contrast Auto Adjust Press to the incoming ...
...Audio Energy Menu Personalize Others Resolution: 1024x768, 60Hz Maximum: 1920x1080, 60Hz The following dialog appears on a black screen as the monitor self-adjusts to activate automatic setup and adjust menu. NOTE: Auto Adjust does not occur if you press the button while there...the current input: Auto Adjustment in Progress... Auto Adjustment allows the monitor to self-adjust to adjust the screen automatically. After using Auto Adjustment, you are no active video input signals or attached cables. Dell SE2416H Energy Use Brightness / Contrast Auto Adjust Press to the incoming ...

Dell Users Guide
Page 19
... Use Input Color Format Preset Modes Reset Color Settings RGB Standard Maximum: 1920x1080, 60Hz Operating your monitor. Select the HDMI input when you are using the VGA connector. Use Color to select the VGA input source. Dell SE2416H Brightness / Contrast Auto Adjust Input Source Color Display Audio Energy Menu Personalize Others Resolution: 1024x768...
... Use Input Color Format Preset Modes Reset Color Settings RGB Standard Maximum: 1920x1080, 60Hz Operating your monitor. Select the HDMI input when you are using the VGA connector. Use Color to select the VGA input source. Dell SE2416H Brightness / Contrast Auto Adjust Input Source Color Display Audio Energy Menu Personalize Others Resolution: 1024x768...

Dell Users Guide
Page 20
Dell SE2416H Brightness / Contrast Auto Adjust Input Source Color Display Audio Energy Menu Personalize Others Resolution: 1024x768, 60Hz Energy Use Input Color Format Preset Modes Reset Color Settings RGB YPbPr Maximum: 1920x1080, 60Hz 20 | Operating your monitor YPbPr: Select this option if your monitor is not RGB. Input Color Format Allows ...you to set the video input mode to: RGB: Select this option if your monitor is connected to a DVD player by YPbPr using the VGA cable or HDMI cable, or if the DVD color output setting is connected...
Dell SE2416H Brightness / Contrast Auto Adjust Input Source Color Display Audio Energy Menu Personalize Others Resolution: 1024x768, 60Hz Energy Use Input Color Format Preset Modes Reset Color Settings RGB YPbPr Maximum: 1920x1080, 60Hz 20 | Operating your monitor YPbPr: Select this option if your monitor is not RGB. Input Color Format Allows ...you to set the video input mode to: RGB: Select this option if your monitor is connected to a DVD player by YPbPr using the VGA cable or HDMI cable, or if the DVD color output setting is connected...


