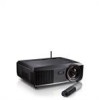
User Guide
Page 3
... Dell Projector 6 About Your Projector 7 2 Connecting Your Projector 9 Installing the Antenna 10 Connecting to a Computer 11 Connecting a Computer Using a VGA Cable . . . . 11 Monitor Loop-Through Connection Using VGA Cables 12 Connecting a Computer Using an RS232 cable . . . 13 Connecting a Computer Using an USB Display . . . 14 Connecting a Computer Using Wireless 15 Connecting a DVD Player 16 Connecting a DVD Player Using an S-Video Cable . 16 Connecting...
... Dell Projector 6 About Your Projector 7 2 Connecting Your Projector 9 Installing the Antenna 10 Connecting to a Computer 11 Connecting a Computer Using a VGA Cable . . . . 11 Monitor Loop-Through Connection Using VGA Cables 12 Connecting a Computer Using an RS232 cable . . . 13 Connecting a Computer Using an USB Display . . . 14 Connecting a Computer Using Wireless 15 Connecting a DVD Player 16 Connecting a DVD Player Using an S-Video Cable . 16 Connecting...
User Guide
Page 10
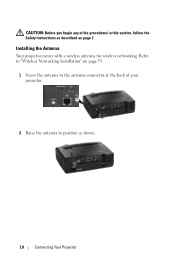
Installing the Antenna Your projector comes with a wireless antenna for wireless networking. Refer to "Wireless Networking Installation" on page 7. CAUTION: Before you begin any of the procedures in this section, follow the Safety Instructions as described on page 55. 1 Screw the antenna to the antenna connector at the back of your projector. 2 Raise the antenna to position as shown. 10 Connecting Your Projector
Installing the Antenna Your projector comes with a wireless antenna for wireless networking. Refer to "Wireless Networking Installation" on page 7. CAUTION: Before you begin any of the procedures in this section, follow the Safety Instructions as described on page 55. 1 Screw the antenna to the antenna connector at the back of your projector. 2 Raise the antenna to position as shown. 10 Connecting Your Projector
User Guide
Page 15
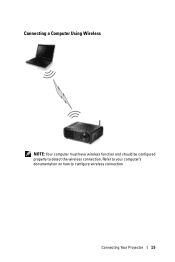
Connecting Your Projector 15 Connecting a Computer Using Wireless NOTE: Your computer must have wireless function and should be configured properly to configure wireless connection. Refer to your computer's documentation on how to detect the wireless connection.
Connecting Your Projector 15 Connecting a Computer Using Wireless NOTE: Your computer must have wireless function and should be configured properly to configure wireless connection. Refer to your computer's documentation on how to detect the wireless connection.
User Guide
Page 46
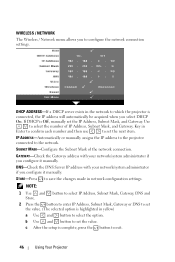
WIRELESS / NETWORK The Wireless / Network menu allows you select DHCP On. Key in Enter to confirm each number and then use to configure the network connection settings. c After the setup is connected, the IP address will automatically be acquired when you to set the value. (The selected option is Off, ... Gateway, DNS and Store. 2 Press the button to enter IP Address, Subnet Mask, Gateway or DNS to select the number of the network connection. b Use and button to select the option. SUBNET MASK-Configure the Subnet Mask of IP Address, Subnet Mask, and Gateway. If DHCP is...
WIRELESS / NETWORK The Wireless / Network menu allows you select DHCP On. Key in Enter to confirm each number and then use to configure the network connection settings. c After the setup is connected, the IP address will automatically be acquired when you to set the value. (The selected option is Off, ... Gateway, DNS and Store. 2 Press the button to enter IP Address, Subnet Mask, Gateway or DNS to select the number of the network connection. b Use and button to select the option. SUBNET MASK-Configure the Subnet Mask of IP Address, Subnet Mask, and Gateway. If DHCP is...
User Guide
Page 47
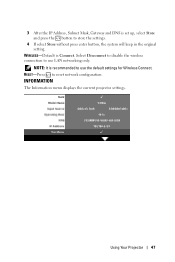
INFORMATION The Information menu displays the current projector settings. Select Disconnect to disable the wireless connection to store the settings. 4 If select Store without press enter button, the system will keep in the original setting. RESET-Press to use LAN networking only. WIRELESS-Default is set up, select Store and press the button to use the default settings for Wireless Connect. 3 After the IP Address, Subnet Mask, Gateway and DNS is Connect. NOTE: It is recommended to reset network configuration. Using Your Projector 47
INFORMATION The Information menu displays the current projector settings. Select Disconnect to disable the wireless connection to store the settings. 4 If select Store without press enter button, the system will keep in the original setting. RESET-Press to use LAN networking only. WIRELESS-Default is set up, select Store and press the button to use the default settings for Wireless Connect. 3 After the IP Address, Subnet Mask, Gateway and DNS is Connect. NOTE: It is recommended to reset network configuration. Using Your Projector 47
User Guide
Page 55
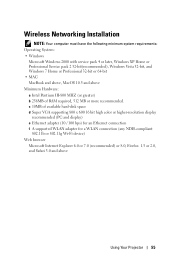
Wireless Networking Installation NOTE: Your computer must have the following minimum system requirements: Operating System: • Windows Microsoft Windows 2000 with service pack 4 or later, Windows ... supporting 800 x 600 16 bit high color or higher-resolution display recommended (PC and display) e Ethernet adapter (10 / 100 bps) for an Ethernet connection f A supported WLAN adapter for a WLAN connection (any NDIS-compliant 802.11b or 802.11g Wi-Fi device) Web browser Microsoft Internet Explorer 6.0 or 7.0 (recommended) or 8.0, Firefox 1.5 or 2.0, and...
Wireless Networking Installation NOTE: Your computer must have the following minimum system requirements: Operating System: • Windows Microsoft Windows 2000 with service pack 4 or later, Windows ... supporting 800 x 600 16 bit high color or higher-resolution display recommended (PC and display) e Ethernet adapter (10 / 100 bps) for an Ethernet connection f A supported WLAN adapter for a WLAN connection (any NDIS-compliant 802.11b or 802.11g Wi-Fi device) Web browser Microsoft Internet Explorer 6.0 or 7.0 (recommended) or 8.0, Firefox 1.5 or 2.0, and...
User Guide
Page 56
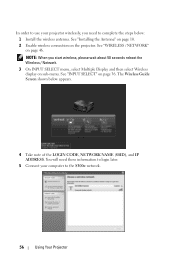
... page 46. See "Installing the Antenna" on page 10. 2 Enable wireless connection on sub-menu. The Wireless Guide Screen shown below : 1 Install the wireless antenna. NOTE: When you need these information to login later. 5 Connect your projector wirelessly, you start wireless, please wait about 50 seconds reboot the Wireless / Network. 3 On INPUT SELECT menu, select Multiple Display and...
... page 46. See "Installing the Antenna" on page 10. 2 Enable wireless connection on sub-menu. The Wireless Guide Screen shown below : 1 Install the wireless antenna. NOTE: When you need these information to login later. 5 Connect your projector wirelessly, you start wireless, please wait about 50 seconds reboot the Wireless / Network. 3 On INPUT SELECT menu, select Multiple Display and...
User Guide
Page 57
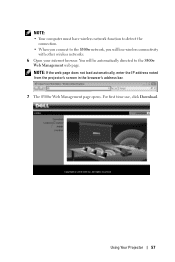
NOTE: • Your computer must have wireless network function to detect the connection. • When you will be automatically directed to the S300w network, you connect to the S300w Web Management web page. Using Your Projector 57 For first time use, click Download. You will lose wireless connectivity with other wireless networks. 6 Open your internet browser. NOTE: If the web page does not load automatically, enter the IP address noted from the projector's screen in the browser's address bar. 7 The S300w Web Management page opens.
NOTE: • Your computer must have wireless network function to detect the connection. • When you will be automatically directed to the S300w network, you connect to the S300w Web Management web page. Using Your Projector 57 For first time use, click Download. You will lose wireless connectivity with other wireless networks. 6 Open your internet browser. NOTE: If the web page does not load automatically, enter the IP address noted from the projector's screen in the browser's address bar. 7 The S300w Web Management page opens.
User Guide
Page 61
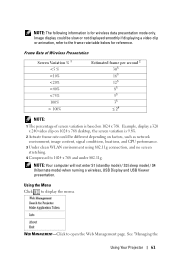
Frame Rate of Wireless Presentation Screen Variation % 1 NOTE: The following information is for reference. Image display could be slow or not displayed smoothly if displaying a video clip or animation, refer to the frame rate table below for wireless data presentation mode only.
Frame Rate of Wireless Presentation Screen Variation % 1 NOTE: The following information is for reference. Image display could be slow or not displayed smoothly if displaying a video clip or animation, refer to the frame rate table below for wireless data presentation mode only.
User Guide
Page 62
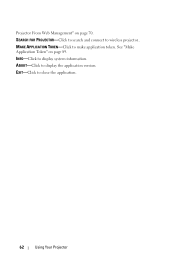
INFO-Click to close the application. 62 Using Your Projector Projector From Web Management" on page 89. See "Make Application Token" on page 70. EXIT-Click to display system information. MAKE APPLICATION TOKEN-Click to display the application version. ABOUT-Click to make application token. SEARCH FOR PROJECTOR-Click to search and connect to wireless projector..
INFO-Click to close the application. 62 Using Your Projector Projector From Web Management" on page 89. See "Make Application Token" on page 70. EXIT-Click to display system information. MAKE APPLICATION TOKEN-Click to display the application version. ABOUT-Click to make application token. SEARCH FOR PROJECTOR-Click to search and connect to wireless projector..
User Guide
Page 63
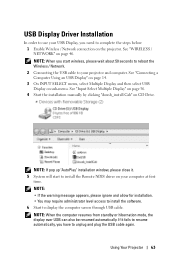
...resume automatically, you have to unplug and plug the USB cable again. If it . 5 System will start wireless, please wait about 50 seconds to reboot the Wireless / Network. 2 Connecting the USB cable to your projector and computer. NOTE: When you start to install the Remote NDIS driver ..." on the projector. USB Display Driver Installation In order to use your USB Display, you need to complete the steps below: 1 Enable Wireless / Network connection on CD Drive. NOTE: • If the warning message appears, please ignore and allow for installation. • You may require administrator ...
...resume automatically, you have to unplug and plug the USB cable again. If it . 5 System will start wireless, please wait about 50 seconds to reboot the Wireless / Network. 2 Connecting the USB cable to your projector and computer. NOTE: When you start to install the Remote NDIS driver ..." on the projector. USB Display Driver Installation In order to use your USB Display, you need to complete the steps below: 1 Enable Wireless / Network connection on CD Drive. NOTE: • If the warning message appears, please ignore and allow for installation. • You may require administrator ...
User Guide
Page 64
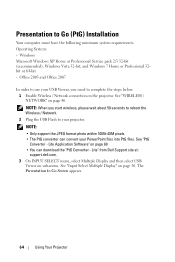
...to Go (PtG) Installation Your computer must have the following minimum system requirements. The Presentation to complete the steps below: 1 Enable Wireless / Network connection on the projector. See "PtG Converter - Windows Microsoft Windows XP Home or Professional Service pack 2/3 32-bit (recommended), Windows ...appears. 64 Using Your Projector Presentation to your projector. See "WIRELESS / NETWORK" on page 69 • You can convert your PowerPoint files into PtG files. Lite" from Dell Support site at: support.dell.com. 3 On INPUT SELECT menu, select Multiple Display and ...
...to Go (PtG) Installation Your computer must have the following minimum system requirements. The Presentation to complete the steps below: 1 Enable Wireless / Network connection on the projector. See "PtG Converter - Windows Microsoft Windows XP Home or Professional Service pack 2/3 32-bit (recommended), Windows ...appears. 64 Using Your Projector Presentation to your projector. See "WIRELESS / NETWORK" on page 69 • You can convert your PowerPoint files into PtG files. Lite" from Dell Support site at: support.dell.com. 3 On INPUT SELECT menu, select Multiple Display and ...
User Guide
Page 70
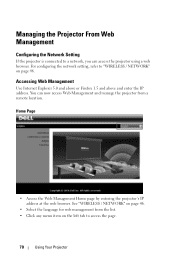
... network setting, refer to access the page. 70 Using Your Projector Managing the Projector From Web Management Configuring the Network Setting If the projector is connected to a network, you can now access Web Management and manage the projector from the list. • Click any menu item on the left ...tab to "WIRELESS / NETWORK" on page 46. Accessing Web Management Use Internet Explorer 5.0 and above or Firefox 1.5 and above and enter the IP address. You can ...
... network setting, refer to access the page. 70 Using Your Projector Managing the Projector From Web Management Configuring the Network Setting If the projector is connected to a network, you can now access Web Management and manage the projector from the list. • Click any menu item on the left ...tab to "WIRELESS / NETWORK" on page 46. Accessing Web Management Use Internet Explorer 5.0 and above or Firefox 1.5 and above and enter the IP address. You can ...

User Guide
Page 76
... • There are 3 options: All Pass: Allow users to access all office network via wireless projector. Click the Apply button to Encryption mode you selected. Internet Only: Block users from office network but still reserve Internet connection capability. Key: If Encryption is enabled, you have to set key value according to save... key or select one of 32 characters. SSID: Up to take effect. 76 Using Your Projector All Block: Block users to access office network via wireless projector.
... • There are 3 options: All Pass: Allow users to access all office network via wireless projector. Click the Apply button to Encryption mode you selected. Internet Only: Block users from office network but still reserve Internet connection capability. Key: If Encryption is enabled, you have to set key value according to save... key or select one of 32 characters. SSID: Up to take effect. 76 Using Your Projector All Block: Block users to access office network via wireless projector.
User Guide
Page 100
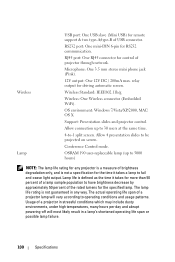
...DIN 6-pin for driving automatic screen. Microphone: One 3.5 mm stereo mini phone jack (Pink). 12V output: One 12V DC / 200mA max. Wireless Standard: IEEE802.11b/g Wireless: One Wireless connector (Embedded WiFi). The actual operating life span of a projector in a lamp's shortened operating life span or possible lamp failure. 100 Specifications Usage... hours per day and abrupt powering-off will vary according to 5000 hours) NOTE: The lamp life rating for any way. Allow connection up to operating conditions and usage patterns. Allow 4 presentation slides to -1 split screen.
...DIN 6-pin for driving automatic screen. Microphone: One 3.5 mm stereo mini phone jack (Pink). 12V output: One 12V DC / 200mA max. Wireless Standard: IEEE802.11b/g Wireless: One Wireless connector (Embedded WiFi). The actual operating life span of a projector in a lamp's shortened operating life span or possible lamp failure. 100 Specifications Usage... hours per day and abrupt powering-off will vary according to 5000 hours) NOTE: The lamp life rating for any way. Allow connection up to operating conditions and usage patterns. Allow 4 presentation slides to -1 split screen.
User Guide
Page 106
... from a fixed distance. WXGA - Zoom Lens - NTSC - North American standard for each of sending color information. Feature that allows operator to connect. are backwards. typically used to identify the particular wireless LAN to which a user wants to move the view in a normal forward projection environment text, graphics, etc. S-Video - A French and international...
... from a fixed distance. WXGA - Zoom Lens - NTSC - North American standard for each of sending color information. Feature that allows operator to connect. are backwards. typically used to identify the particular wireless LAN to which a user wants to move the view in a normal forward projection environment text, graphics, etc. S-Video - A French and international...


