
User Guide
Page 1
... names may be used in trademarks and trade names other countries. disclaims any manner whatsoever without notice. © 2012 Dell Inc. Dell™ S2240M/S2340M Monitor User's Guide About Your Monitor Setting Up the Monitor Operating the Monitor Troubleshooting Appendix Notes, Cautions, Warnings NOTE: A NOTE indicates important information that this product meets the ENERGY STAR guidelines for...
... names may be used in trademarks and trade names other countries. disclaims any manner whatsoever without notice. © 2012 Dell Inc. Dell™ S2240M/S2340M Monitor User's Guide About Your Monitor Setting Up the Monitor Operating the Monitor Troubleshooting Appendix Notes, Cautions, Warnings NOTE: A NOTE indicates important information that this product meets the ENERGY STAR guidelines for...
User Guide
Page 2
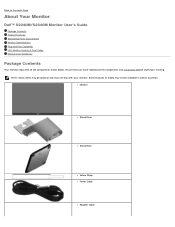
...;if anything is missing. Back to Contents Page About Your Monitor Dell™ S2240M/S2340M Monitor User's Guide Package Contents Product Features Identifying Parts and Controls Monitor Specifications Plug and Play Capability LCD Monitor Quality & Pixel Policy Maintenance Guidelines Package Contents Your monitor ships with your monitor. Some features or media may not be optional and may be...
...;if anything is missing. Back to Contents Page About Your Monitor Dell™ S2240M/S2340M Monitor User's Guide Package Contents Product Features Identifying Parts and Controls Monitor Specifications Plug and Play Capability LCD Monitor Quality & Pixel Policy Maintenance Guidelines Package Contents Your monitor ships with your monitor. Some features or media may not be optional and may be...
User Guide
Page 3
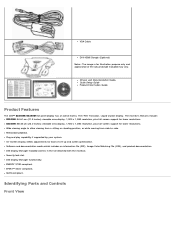
...S2340M: 58.42 cm (23.0 inches) viewable area display. 1,920 x 1,080 resolution, plus full-screen support for lower resolutions. Removable pedestal. On-Screen Display (OSD) adjustments for ease of the actual dongle included may vary. Dell Display Manager included (comes in the CD attached with the monitor... File (ICM), and product documentation. Drivers and Documentation media Quick Setup Guide Product Information Guide Product Features The Dell™ S2240M/S2340M flat panel display has an active matrix, Thin-Film Transistor, Liquid Crystal Display. Plug and play capability if ...
...S2340M: 58.42 cm (23.0 inches) viewable area display. 1,920 x 1,080 resolution, plus full-screen support for lower resolutions. Removable pedestal. On-Screen Display (OSD) adjustments for ease of the actual dongle included may vary. Dell Display Manager included (comes in the CD attached with the monitor... File (ICM), and product documentation. Drivers and Documentation media Quick Setup Guide Product Information Guide Product Features The Dell™ S2240M/S2340M flat panel display has an active matrix, Thin-Film Transistor, Liquid Crystal Display. Plug and play capability if ...
User Guide
Page 4
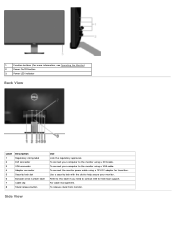
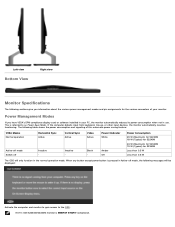
... Security lock slot Barcode serial number label Cable clip Stand release button Use Lists the regulatory approvals. Use a security lock with the slot to contact Dell for transition. 1. Refer to this label if you need to help secure your computer to the monitor using a 12V DC adapter for technical support.
... Security lock slot Barcode serial number label Cable clip Stand release button Use Lists the regulatory approvals. Use a security lock with the slot to contact Dell for transition. 1. Refer to this label if you need to help secure your computer to the monitor using a 12V DC adapter for technical support.
User Guide
Page 5
NOTE: Dell S2240M/S2340M monitor is pressed in Active-off Horizontal Sync Active Inactive - The following table shows the power consumption and signaling of your PC, the monitor automatically reduces its power consumption when not in use. Vertical Sync Active Video Active Inactive - Power Indicator ...Management Modes If you information about the various power management modes and pin assignments for S2340M Less than 0.5 W Less than 0.5 W The OSD will be displayed: Activate the computer and monitor to gain access to as Power Save Mode. This is referred to the OSD....
NOTE: Dell S2240M/S2340M monitor is pressed in Active-off Horizontal Sync Active Inactive - The following table shows the power consumption and signaling of your PC, the monitor automatically reduces its power consumption when not in use. Vertical Sync Active Video Active Inactive - Power Indicator ...Management Modes If you information about the various power management modes and pin assignments for S2340M Less than 0.5 W Less than 0.5 W The OSD will be displayed: Activate the computer and monitor to gain access to as Power Save Mode. This is referred to the OSD....
User Guide
Page 6
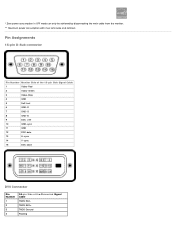
Pin Assignments 15-pin D-Sub connector Pin Number Monitor Side of the Connected Signal Cable TMDS RX2TMDS RX2+ TMDS Ground Floating * Zero power consumption in OFF mode can only be achieved by disconnecting the main cable from the monitor. ** Maximum power consumption with max luminance and contrast. sync 14 V-sync 15 DDC clock DVI Connector Pin Number 1 2 3 4 24-pin Side of the 15-pin Side Signal Cable 1 Video-Red 2 Video-Green 3 Video-Blue 4 GND 5 Self-test 6 GND-R 7 GND-G 8 GND-B 9 DDC +5V 10 GND-sync 11 GND 12 DDC data 13 H -
Pin Assignments 15-pin D-Sub connector Pin Number Monitor Side of the Connected Signal Cable TMDS RX2TMDS RX2+ TMDS Ground Floating * Zero power consumption in OFF mode can only be achieved by disconnecting the main cable from the monitor. ** Maximum power consumption with max luminance and contrast. sync 14 V-sync 15 DDC clock DVI Connector Pin Number 1 2 3 4 24-pin Side of the 15-pin Side Signal Cable 1 Video-Red 2 Video-Green 3 Video-Blue 4 GND 5 Self-test 6 GND-R 7 GND-G 8 GND-B 9 DDC +5V 10 GND-sync 11 GND 12 DDC data 13 H -
User Guide
Page 7
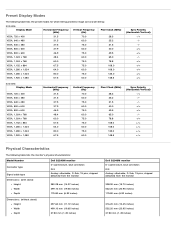
... provides the computer with hard-coating 3H Dell S2340M monitor Active matrix - You can install the monitor in any Plug and Play compatible system. Flat Panel Specifications Model number Screen type Panel Type Screen dimensions Preset display area: Horizontal Vertical Dell S2240M monitor Active matrix - TFT LCD IPS 54.61 cm (21.5 ... 17 TMDS RX0- 18 TMDS RX0+ 19 TMDS Ground 20 Floating 21 Floating 22 TMDS Ground 23 TMDS Clock+ 24 TMDS Clock- Most monitor installations are automatic. TFT LCD IPS 58.42 cm (23 inches) (23-inch wide viewable image size) 509.18 mm (20.05 ...
... provides the computer with hard-coating 3H Dell S2340M monitor Active matrix - You can install the monitor in any Plug and Play compatible system. Flat Panel Specifications Model number Screen type Panel Type Screen dimensions Preset display area: Horizontal Vertical Dell S2240M monitor Active matrix - TFT LCD IPS 54.61 cm (21.5 ... 17 TMDS RX0- 18 TMDS RX0+ 19 TMDS Ground 20 Floating 21 Floating 22 TMDS Ground 23 TMDS Clock+ 24 TMDS Clock- Most monitor installations are automatic. TFT LCD IPS 58.42 cm (23 inches) (23-inch wide viewable image size) 509.18 mm (20.05 ...
User Guide
Page 8
... 83 kHz (automatic) 56 Hz to 76 Hz (automatic) 1,920 x 1,080 at 60 Hz Dell S2340M monitor 30 kHz to 83 kHz (automatic) 56 Hz to 76 Hz (automatic) 1,920 x 1,080 at 60 Hz Electrical Specifications Model number Dell S2240M monitor Dell S2340M monitor Video input signals Analog RGB: 0.7 Volts +/- 5 %, 75 ohm input impedance Analog RGB: 0.7 Volts +/- 5 %, 75...
... 83 kHz (automatic) 56 Hz to 76 Hz (automatic) 1,920 x 1,080 at 60 Hz Dell S2340M monitor 30 kHz to 83 kHz (automatic) 56 Hz to 76 Hz (automatic) 1,920 x 1,080 at 60 Hz Electrical Specifications Model number Dell S2240M monitor Dell S2340M monitor Video input signals Analog RGB: 0.7 Volts +/- 5 %, 75 ohm input impedance Analog RGB: 0.7 Volts +/- 5 %, 75...
User Guide
Page 9
...297.60 mm (11.72 inches) 499.10 mm (19.65 inches) 37.80 mm (1.49 inches) Dell S2340M monitor D-subminiature, blue connector; Preset Display Modes The following table lists the preset modes for which Dell guarantees image size and centering: S2240M: Display Mode VESA, 720 x 400 VESA, 640 x 480 VESA, 640....0 60.0 75.0 75.0 60.0 75.0 60.0 Pixel Clock (MHz) 28.3 25.2 31.5 40.0 49.5 65.0 78.8 108.0 108.0 135.0 148.5 Sync Polarity (Horizontal/Vertical) S2340M: Display Mode VESA, 720 x 400 VESA, 640 x 480 VESA, 640 x 480 VESA, 800 x 600 VESA, 800 x 600 VESA, 1,024 x 768 VESA, 1,024 x 768 ...
...297.60 mm (11.72 inches) 499.10 mm (19.65 inches) 37.80 mm (1.49 inches) Dell S2340M monitor D-subminiature, blue connector; Preset Display Modes The following table lists the preset modes for which Dell guarantees image size and centering: S2240M: Display Mode VESA, 720 x 400 VESA, 640 x 480 VESA, 640....0 60.0 75.0 75.0 60.0 75.0 60.0 Pixel Clock (MHz) 28.3 25.2 31.5 40.0 49.5 65.0 78.8 108.0 108.0 135.0 148.5 Sync Polarity (Horizontal/Vertical) S2340M: Display Mode VESA, 720 x 400 VESA, 640 x 480 VESA, 640 x 480 VESA, 800 x 600 VESA, 800 x 600 VESA, 1,024 x 768 VESA, 1,024 x 768 ...
User Guide
Page 10
...electrical outlet. Avoid using detergent of any kind as a darker-colored monitor may scratch and show white scuff marks more pixels to see Dell Support site at: support.dell.com. To help maintain the best image quality on the plastics....best practices, follow the safety instructions before cleaning the monitor. Handle your monitor, wipe it off your monitor when not in the list below while unpacking, cleaning, or handling your monitor: To clean your monitor: Model Number Temperature Operating Non-operating Dell S2240M monitor Dell S2340M monitor 0 ° C to 40 ° C (...
...electrical outlet. Avoid using detergent of any kind as a darker-colored monitor may scratch and show white scuff marks more pixels to see Dell Support site at: support.dell.com. To help maintain the best image quality on the plastics....best practices, follow the safety instructions before cleaning the monitor. Handle your monitor, wipe it off your monitor when not in the list below while unpacking, cleaning, or handling your monitor: To clean your monitor: Model Number Temperature Operating Non-operating Dell S2240M monitor Dell S2340M monitor 0 ° C to 40 ° C (...

User Guide
Page 11
Back to the monitor: a. Attach the stand assembly to Contents Page Setting Up the Monitor Dell™ S2240M/S2340M Monitor User's Guide Attaching the Stand Connecting Your Monitor Organizing Your Cables Removing the Monitor Stand Attaching the Stand NOTE: The stand base and stand riser are detached when the monitor is shipped from the factory. 1. b. Tighten the screw clockwise located on the base. 2. Attach the stand riser to stand base. Assemble the stand riser to the stand base.
Back to the monitor: a. Attach the stand assembly to Contents Page Setting Up the Monitor Dell™ S2240M/S2340M Monitor User's Guide Attaching the Stand Connecting Your Monitor Organizing Your Cables Removing the Monitor Stand Attaching the Stand NOTE: The stand base and stand riser are detached when the monitor is shipped from the factory. 1. b. Tighten the screw clockwise located on the base. 2. Attach the stand riser to stand base. Assemble the stand riser to the stand base.
User Guide
Page 12
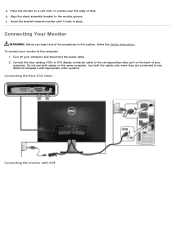
...cloth or cushion near the edge of desk. Do not use both the cables only when they are connected to the monitor groove. Turn off your monitor to the corresponding video port on the back of the procedures in place. Align the stand assembly bracket to two different... computers with appropriate video systems. Connecting the Blue VGA Cable Connecting the monitor with DVI c. To connect your computer and disconnect the power cable. 2. Place the monitor on the same computer. Connect the blue (analog VGA) or DVI display connector cable to the ...
...cloth or cushion near the edge of desk. Do not use both the cables only when they are connected to the monitor groove. Turn off your monitor to the corresponding video port on the back of the procedures in place. Align the stand assembly bracket to two different... computers with appropriate video systems. Connecting the Blue VGA Cable Connecting the monitor with DVI c. To connect your computer and disconnect the power cable. 2. Place the monitor on the same computer. Connect the blue (analog VGA) or DVI display connector cable to the ...

User Guide
Page 13
Organizing Your Cables After attaching all cables as shown below: 1. Insert cables into cable clip. 2. Tie the cables together using the velcro strap that shipped with your monitor and computer, organize all necessary cables to your monitor.
Organizing Your Cables After attaching all cables as shown below: 1. Insert cables into cable clip. 2. Tie the cables together using the velcro strap that shipped with your monitor and computer, organize all necessary cables to your monitor.
User Guide
Page 14
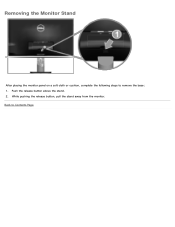
Removing the Monitor Stand After placing the monitor panel on a soft cloth or cushion, complete the following steps to Contents Page Push the release button above the stand. 2. Back to remove the base: 1. While pushing the release button, pull the stand away from the monitor.
Removing the Monitor Stand After placing the monitor panel on a soft cloth or cushion, complete the following steps to Contents Page Push the release button above the stand. 2. Back to remove the base: 1. While pushing the release button, pull the stand away from the monitor.
User Guide
Page 15
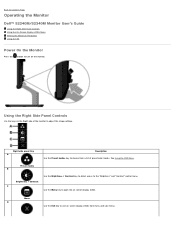
.... Menu D Use the Exit key to turn on the monitor. Using the Right Side Panel Controls Use the keys on the Right side of preset color modes. Back to Contents Page Operating the Monitor Dell™ S2240M/S2340M Monitor User's Guide Using the Right Side Panel Controls Using the ...On-Screen Display (OSD) Menu Setting the Maximum Resolution Using the Tilt Power On the Monitor Press the button to exit on-screen display (OSD)...
.... Menu D Use the Exit key to turn on the monitor. Using the Right Side Panel Controls Use the keys on the Right side of preset color modes. Back to Contents Page Operating the Monitor Dell™ S2240M/S2340M Monitor User's Guide Using the Right Side Panel Controls Using the ...On-Screen Display (OSD) Menu Setting the Maximum Resolution Using the Tilt Power On the Monitor Press the button to exit on-screen display (OSD)...
User Guide
Page 16
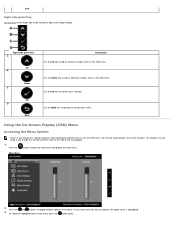
... Use the keys on the menu press the button again. To select the highlighted item on the Right side of the monitor to another menu or exit the OSD menu, the monitor automatically saves those changes. Use the Down key to confirm your selection. Use the OK key to adjust (decrease ranges...
... Use the keys on the menu press the button again. To select the highlighted item on the Right side of the monitor to another menu or exit the OSD menu, the monitor automatically saves those changes. Use the Down key to confirm your selection. Use the OK key to adjust (decrease ranges...

User Guide
Page 17
...After using the Pixel Clock (Coarse) and Phase (Fine) controls under Image Settings. Brightness Contrast AUTO ADJUST Allows you to your monitor by the monitor in real time. Icon Menu and Submenus Energy Use Description This meter shows the energy level being consumed by using Auto Adjustment,... and their functions. Use this key to decrease contrast (min 0 ~ max 100). Allows you can further tune your monitor. The following dialog appears on the monitor screen. Press the key to increase brightness and press the key to the incoming video signal. 4. NOTE: Auto Adjust ...
...After using the Pixel Clock (Coarse) and Phase (Fine) controls under Image Settings. Brightness Contrast AUTO ADJUST Allows you to your monitor by the monitor in real time. Icon Menu and Submenus Energy Use Description This meter shows the energy level being consumed by using Auto Adjustment,... and their functions. Use this key to decrease contrast (min 0 ~ max 100). Allows you can further tune your monitor. The following dialog appears on the monitor screen. Press the key to increase brightness and press the key to the incoming video signal. 4. NOTE: Auto Adjust ...

User Guide
Page 18
Select VGA input when you are using the Digital (DVI) connector. Push to adjust the monitor's color settings. Select DVI input when you are using the analog (VGA) connector. Push Use the Color Setting menu to select the VGA input source. ... Select to scan for most gaming applications. Input Color Format Preset Modes Allows you to choose from a list of preset color modes. Standard: Loads the monitor's default color settings. Text: Loads color settings ideal for office environment. Allows you to set the video input mode to select the DVI input source...
Select VGA input when you are using the Digital (DVI) connector. Push to adjust the monitor's color settings. Select DVI input when you are using the analog (VGA) connector. Push Use the Color Setting menu to select the VGA input source. ... Select to scan for most gaming applications. Input Color Format Preset Modes Allows you to choose from a list of preset color modes. Standard: Loads the monitor's default color settings. Text: Loads color settings ideal for office environment. Allows you to set the video input mode to select the DVI input source...

User Guide
Page 19
...'0' to adjust image left and right. Use the or buttons to '100'. Minimum is '100' (+). Press the and keys to adjust the monitor's display settings. DISPLAY SETTINGS Use the Displays Settings menu to adjust the Red, Green, and Blue values and create your... monitor's color settings to identify the monitor display difference between Normal and Enhanced. Maximum is '0' (-). This feature can launch the Demo Mode to the factory defaults. Use or to...
...'0' to adjust image left and right. Use the or buttons to '100'. Minimum is '100' (+). Press the and keys to adjust the monitor's display settings. DISPLAY SETTINGS Use the Displays Settings menu to adjust the Red, Green, and Blue values and create your... monitor's color settings to identify the monitor display difference between Normal and Enhanced. Maximum is '0' (-). This feature can launch the Demo Mode to the factory defaults. Use or to...

User Guide
Page 20
... Japanese. Allows you to set the time for 10 seconds) Unlock function- Enable (Default): Optimizes the performance of your computer to adjust the monitor display settings like the brightness, color balance etc. NOTE: Dynamic Contrast is selected, no user adjustments are allowed. Allows you press a key ...and keys to adjust the slider in Energy Smart modes. Disable: Disables the DDC/CI option and the following message appears on the monitor. Use or image quality. Reset Display Settings Select this option to 60 seconds. Phase The Phase and Pixel Clock adjustments allow you ...
... Japanese. Allows you to set the time for 10 seconds) Unlock function- Enable (Default): Optimizes the performance of your computer to adjust the monitor display settings like the brightness, color balance etc. NOTE: Dynamic Contrast is selected, no user adjustments are allowed. Allows you press a key ...and keys to adjust the slider in Energy Smart modes. Disable: Disables the DDC/CI option and the following message appears on the monitor. Use or image quality. Reset Display Settings Select this option to 60 seconds. Phase The Phase and Pixel Clock adjustments allow you ...


