
User Guide
Page 1
... whatsoever without notice. © 2012 Dell Inc. ENERGY STAR is strictly forbidden. Dell™ S2240M/S2340M Monitor User's Guide About Your Monitor Setting Up the Monitor Operating the Monitor Troubleshooting Appendix Notes, Cautions, Warnings NOTE: A NOTE indicates important information that this product meets the ENERGY STAR guidelines for property damage, personal injury, or death. Trademarks used in this document to refer to...
... whatsoever without notice. © 2012 Dell Inc. ENERGY STAR is strictly forbidden. Dell™ S2240M/S2340M Monitor User's Guide About Your Monitor Setting Up the Monitor Operating the Monitor Troubleshooting Appendix Notes, Cautions, Warnings NOTE: A NOTE indicates important information that this product meets the ENERGY STAR guidelines for property damage, personal injury, or death. Trademarks used in this document to refer to...
User Guide
Page 3
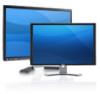
...-screen support for ease of the actual dongle included may vary. Software and documentation media which includes an information file (INF), Image Color Matching File (ICM), and product documentation. Dell Display Manager included (comes in the CD attached with the monitor). VGA Cable DVI-HDMI Dongle (Optional) Notes: The image is for lower resolutions. Drivers and Documentation media Quick Setup Guide Product Information Guide Product Features The Dell™ S2240M/S2340M flat panel display...
...-screen support for ease of the actual dongle included may vary. Software and documentation media which includes an information file (INF), Image Color Matching File (ICM), and product documentation. Dell Display Manager included (comes in the CD attached with the monitor). VGA Cable DVI-HDMI Dongle (Optional) Notes: The image is for lower resolutions. Drivers and Documentation media Quick Setup Guide Product Information Guide Product Features The Dell™ S2240M/S2340M flat panel display...
User Guide
Page 4
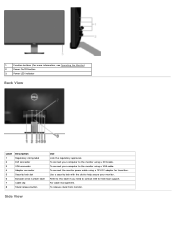
... connect the monitor power cable using a DVI cable. Refer to this label if you need to contact Dell for transition. For cable management. Power On/Off button 3. Use a security lock with the slot to help secure your computer to the monitor using a 12V DC adapter for technical support. To connect your monitor. Function buttons (For more information, see Operating the Monitor) 2. Power LED indicator Back View Label 1 2 3 4 5 6 7 8 Description Regulatory rating label DVI connector VGA connector Adapter connector Security lock slot Barcode serial number label Cable...
... connect the monitor power cable using a DVI cable. Refer to this label if you need to contact Dell for transition. For cable management. Power On/Off button 3. Use a security lock with the slot to help secure your computer to the monitor using a 12V DC adapter for technical support. To connect your monitor. Function buttons (For more information, see Operating the Monitor) 2. Power LED indicator Back View Label 1 2 3 4 5 6 7 8 Description Regulatory rating label DVI connector VGA connector Adapter connector Security lock slot Barcode serial number label Cable...
User Guide
Page 5
... the various connectors of this automatic power saving feature: VESA Modes Normal operation Active-off mode Switch off mode, the following sections give you have VESA's DPM compliance display card or software installed in your monitor. Vertical Sync Active Video Active Inactive - The following table shows the power consumption and signaling of your PC, the monitor automatically reduces its power consumption when not in use. NOTE: Dell S2240M/S2340M monitor is referred to the OSD. If...
... the various connectors of this automatic power saving feature: VESA Modes Normal operation Active-off mode Switch off mode, the following sections give you have VESA's DPM compliance display card or software installed in your monitor. Vertical Sync Active Video Active Inactive - The following table shows the power consumption and signaling of your PC, the monitor automatically reduces its power consumption when not in use. NOTE: Dell S2240M/S2340M monitor is referred to the OSD. If...
User Guide
Page 7
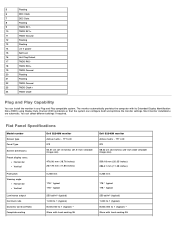
... output Contrast ratio Dynamic Contrast Ratio Faceplate coating 250 cd/m² (typical) 1,000 to 1 (typical) 8,000,000 to 1 (typical) * Glare with hard-coating 3H Plug and Play Capability You can select different settings if required. Flat Panel Specifications Model number Screen type Panel Type Screen dimensions Preset display area: Horizontal Vertical Dell S2240M monitor Active matrix - Most monitor installations are automatic. TFT LCD IPS 58.42 cm (23 inches) (23-inch wide viewable image size) 509...
... output Contrast ratio Dynamic Contrast Ratio Faceplate coating 250 cd/m² (typical) 1,000 to 1 (typical) 8,000,000 to 1 (typical) * Glare with hard-coating 3H Plug and Play Capability You can select different settings if required. Flat Panel Specifications Model number Screen type Panel Type Screen dimensions Preset display area: Horizontal Vertical Dell S2240M monitor Active matrix - Most monitor installations are automatic. TFT LCD IPS 58.42 cm (23 inches) (23-inch wide viewable image size) 509...
User Guide
Page 8
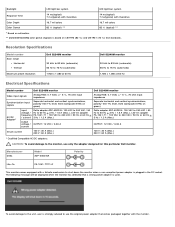
... power adapter is plugged in the DC socket. The following message will be displayed when the monitor has detected that comes packaged together with a failsafe mechanism to 76 Hz (automatic) 1,920 x 1,080 at 60 Hz Electrical Specifications Model number Dell S2240M monitor Dell S2340M monitor Video input signals Analog RGB: 0.7 Volts +/- 5 %, 75 ohm input impedance Analog RGB: 0.7 Volts +/- 5 %, 75 ohm input impedance Synchronization input signals Separate horizontal and vertical synchronizations, polarity-free TTL level, SOG (Composite SYNC on green...
... power adapter is plugged in the DC socket. The following message will be displayed when the monitor has detected that comes packaged together with a failsafe mechanism to 76 Hz (automatic) 1,920 x 1,080 at 60 Hz Electrical Specifications Model number Dell S2240M monitor Dell S2340M monitor Video input signals Analog RGB: 0.7 Volts +/- 5 %, 75 ohm input impedance Analog RGB: 0.7 Volts +/- 5 %, 75 ohm input impedance Synchronization input signals Separate horizontal and vertical synchronizations, polarity-free TTL level, SOG (Composite SYNC on green...
User Guide
Page 9
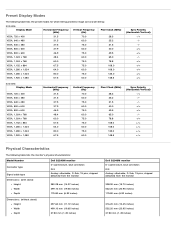
....9 46.9 48.4 60.0 67.5 64.0 80.0 67.5 Vertical Frequency (Hz) 70.0 60.0 75.0 60.0 75.0 60.0 75.0 75.0 60.0 75.0 60.0 Pixel Clock (MHz) 28.3 25.2 31.5 40.0 49.5 65.0 78.8 108.0 108.0 135.0 148.5 Sync Polarity (Horizontal/Vertical) Physical Characteristics The following table lists the monitor's physical characteristics: Model Number Connector type Signal cable type Dimensions: (with stand) Height Width Depth Dell S2240M monitor D-subminiature, blue connector;
....9 46.9 48.4 60.0 67.5 64.0 80.0 67.5 Vertical Frequency (Hz) 70.0 60.0 75.0 60.0 75.0 60.0 75.0 75.0 60.0 75.0 60.0 Pixel Clock (MHz) 28.3 25.2 31.5 40.0 49.5 65.0 78.8 108.0 108.0 135.0 148.5 Sync Polarity (Horizontal/Vertical) Physical Characteristics The following table lists the monitor's physical characteristics: Model Number Connector type Signal cable type Dimensions: (with stand) Height Width Depth Dell S2240M monitor D-subminiature, blue connector;
User Guide
Page 10
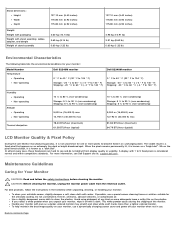
...: support.dell.com. If possible, use benzene, thinner, ammonia, abrasive cleaners, or compressed air. When the pixel remains permanently lit, it is a fixed pixel that appears as a "bright dot". CAUTION: Before cleaning the monitor, unplug the monitor power cable from display quality or usability. Handle your antistatic screen, slightly dampen a soft, clean cloth with a cloth. Do not use a special screen-cleaning tissue or solution suitable for your monitor: Model Number Temperature...
...: support.dell.com. If possible, use benzene, thinner, ammonia, abrasive cleaners, or compressed air. When the pixel remains permanently lit, it is a fixed pixel that appears as a "bright dot". CAUTION: Before cleaning the monitor, unplug the monitor power cable from display quality or usability. Handle your antistatic screen, slightly dampen a soft, clean cloth with a cloth. Do not use a special screen-cleaning tissue or solution suitable for your monitor: Model Number Temperature...
User Guide
Page 12
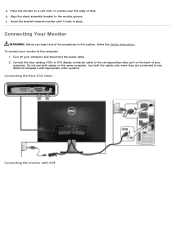
... Blue VGA Cable Connecting the monitor with DVI c. Use both cables on a soft cloth or cushion near the edge of desk. Align the stand assembly bracket to the computer: 1. Do not use both the cables only when they are connected to the corresponding video port on the back of the procedures in place. To connect your computer and disconnect the power cable. 2. Insert the bracket towards monitor until it locks...
... Blue VGA Cable Connecting the monitor with DVI c. Use both cables on a soft cloth or cushion near the edge of desk. Align the stand assembly bracket to the computer: 1. Do not use both the cables only when they are connected to the corresponding video port on the back of the procedures in place. To connect your computer and disconnect the power cable. 2. Insert the bracket towards monitor until it locks...
User Guide
Page 15
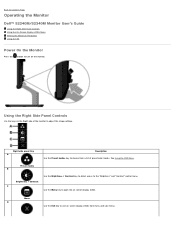
... to turn on the monitor. Menu D Use the Exit key to exit on-screen display (OSD) from a list of the monitor to open the on the Right side of preset color modes. Back to Contents Page Operating the Monitor Dell™ S2240M/S2340M Monitor User's Guide Using the Right Side Panel Controls Using the On-Screen Display (OSD) Menu Setting the Maximum Resolution Using the Tilt Power On the Monitor Press the button to the "Brightness" and "Contrast" control menu. See Using the OSD Menu. Using the Right Side Panel Controls Use the...
... to turn on the monitor. Menu D Use the Exit key to exit on-screen display (OSD) from a list of the monitor to open the on the Right side of preset color modes. Back to Contents Page Operating the Monitor Dell™ S2240M/S2340M Monitor User's Guide Using the Right Side Panel Controls Using the On-Screen Display (OSD) Menu Setting the Maximum Resolution Using the Tilt Power On the Monitor Press the button to the "Brightness" and "Contrast" control menu. See Using the OSD Menu. Using the Right Side Panel Controls Use the...
User Guide
Page 16
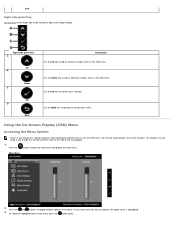
... side panel Key Use the keys on the menu press the button again. Using the On-Screen Display (OSD) Menu Accessing the Menu System NOTE: If you change the settings and then wait for the OSD menu to open the OSD menu and display the main menu. Press the and buttons to the previous menu. As you change the settings and then either proceed to another menu or exit the OSD menu, the monitor automatically saves those changes. To...
... side panel Key Use the keys on the menu press the button again. Using the On-Screen Display (OSD) Menu Accessing the Menu System NOTE: If you change the settings and then wait for the OSD menu to open the OSD menu and display the main menu. Press the and buttons to the previous menu. As you change the settings and then either proceed to another menu or exit the OSD menu, the monitor automatically saves those changes. To...

User Guide
Page 17
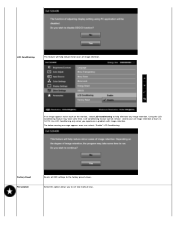
... on a black screen as the monitor self-adjusts to the current input: INPUT SOURCE Auto Adjustment allows the monitor to self-adjust to adjust the brightness or luminance of all the OSD menu options and their functions. Brightness Contrast AUTO ADJUST Allows you to the incoming video signal. Select the and buttons to make your changes. button to enter the slide bar and then use the or buttons, according to the indicators on the monitor screen. Adjust brightness first, and adjust contrast only...
... on a black screen as the monitor self-adjusts to the current input: INPUT SOURCE Auto Adjustment allows the monitor to self-adjust to adjust the brightness or luminance of all the OSD menu options and their functions. Brightness Contrast AUTO ADJUST Allows you to the incoming video signal. Select the and buttons to make your changes. button to enter the slide bar and then use the or buttons, according to the indicators on the monitor screen. Adjust brightness first, and adjust contrast only...

User Guide
Page 18
... applications. Auto Select VGA DVI COLOR SETTINGS Select Auto Select to scan for movies. This is connected to : RGB: Select this option if your monitor is the default preset mode. Movie: Loads color settings ideal for available input signals. Select VGA input when you to select the DVI input source. Input Color Format Preset Modes Allows you are using the Digital (DVI) connector. Select DVI input when you to set the video input mode to a computer or DVD player using the DVI cable. Text: Loads color settings ideal...
... applications. Auto Select VGA DVI COLOR SETTINGS Select Auto Select to scan for movies. This is connected to : RGB: Select this option if your monitor is the default preset mode. Movie: Loads color settings ideal for available input signals. Select VGA input when you to select the DVI input source. Input Color Format Preset Modes Allows you are using the Digital (DVI) connector. Select DVI input when you to set the video input mode to a computer or DVD player using the DVI cable. Text: Loads color settings ideal...

User Guide
Page 19
... image. Use or to adjust the saturation from '0' to manually adjust the color settings. Aspect Ratio Horizontal Position Vertical Position Sharpness Pixel Clock Adjusts the image ratio as Wide 16:9, 4:3, or 5:4. Use the or buttons to '100'. The screen appears warmer with a blue tint. Minimum is not required at maximum preset resolution 1920 x 1080. Minimum is '0' (-). Custom Color: Allows you to '100'. Cool: Decreases the color temperature. Reset Color Settings Resets your own preset color mode. Use or to adjust...
... image. Use or to adjust the saturation from '0' to manually adjust the color settings. Aspect Ratio Horizontal Position Vertical Position Sharpness Pixel Clock Adjusts the image ratio as Wide 16:9, 4:3, or 5:4. Use the or buttons to '100'. The screen appears warmer with a blue tint. Minimum is not required at maximum preset resolution 1920 x 1080. Minimum is '0' (-). Custom Color: Allows you to '100'. Cool: Decreases the color temperature. Reset Color Settings Resets your own preset color mode. Use or to adjust...

User Guide
Page 20
... adjust the monitor display settings like the brightness, color balance etc. Controls user access to transparent. Use the and keys to adjust the slider in Energy Smart modes. Enable (Default): Optimizes the performance of six languages: English, Spanish, French, German, Simplified Chinese, or Japanese. NOTE: Dynamic Contrast is selected, no user adjustments are locked. NOTE: Lock function - Either soft lock (through the OSD menu) or hard lock (press and hold the button above the power button for...
... adjust the monitor display settings like the brightness, color balance etc. Controls user access to transparent. Use the and keys to adjust the slider in Energy Smart modes. Enable (Default): Optimizes the performance of six languages: English, Spanish, French, German, Simplified Chinese, or Japanese. NOTE: Dynamic Contrast is selected, no user adjustments are locked. NOTE: Lock function - Either soft lock (through the OSD menu) or hard lock (press and hold the button above the power button for...
User Guide
Page 21
... time. Factory Reset Personalize Resets all OSD settings to set two shortcut keys. The below warning message appears once user selects "Enable" LCD Conditioning. Select this option allows you experience a problem with image retention. LCD Conditioning feature cannot remove severe cases of image retention. LCD Conditioning This feature will help eliminate any image retention. If an image appears to be stuck on the monitor, select LCD Conditioning to help reduce...
... time. Factory Reset Personalize Resets all OSD settings to set two shortcut keys. The below warning message appears once user selects "Enable" LCD Conditioning. Select this option allows you experience a problem with image retention. LCD Conditioning feature cannot remove severe cases of image retention. LCD Conditioning This feature will help eliminate any image retention. If an image appears to be stuck on the monitor, select LCD Conditioning to help reduce...
User Guide
Page 24
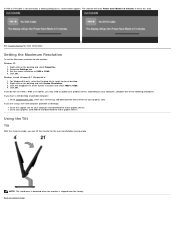
... information. Using the Tilt Tilt With the stand assembly, you are using a non-Dell computer (portable or desktop): Go to 1920 x 1080. 4. Set the screen resolution to the support site for your graphics card. For Windows® 8 only, select the Desktop tile to switch to support.dell.com, enter your service tag, and download the latest driver for the monitor: Windows XP: 1. NOTE: The stand base is detached when the monitor is not connected, a floating...
... information. Using the Tilt Tilt With the stand assembly, you are using a non-Dell computer (portable or desktop): Go to 1920 x 1080. 4. Set the screen resolution to the support site for your graphics card. For Windows® 8 only, select the Desktop tile to switch to support.dell.com, enter your service tag, and download the latest driver for the monitor: Windows XP: 1. NOTE: The stand base is detached when the monitor is not connected, a floating...
User Guide
Page 25
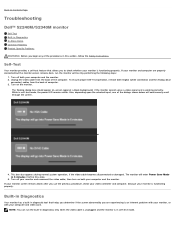
... turn on both Digital (white connector) and the Analog (blue connector) cables from the back of the procedures in Diagnostics In-Store Demo Common Problems Product Specific Problems WARNING: Before you to Contents Page Troubleshooting Dell™ S2240M/S2340M monitor Self-Test Built-in this state. 5. Self-Test Your monitor provides a self-test feature that helps you determine if the screen abnormality you use the previous procedure, check your video controller and...
... turn on both Digital (white connector) and the Analog (blue connector) cables from the back of the procedures in Diagnostics In-Store Demo Common Problems Product Specific Problems WARNING: Before you to Contents Page Troubleshooting Dell™ S2240M/S2340M monitor Self-Test Built-in this state. 5. Self-Test Your monitor provides a self-test feature that helps you determine if the screen abnormality you use the previous procedure, check your video controller and...

User Guide
Page 26
... controls via OSD. Pixel that can occur in LCD technology. Carefully inspect the screen for bent or broken pins in green, blue, black, white, and text screens. Cycle power on -off . Perform monitor self-test feature check. Change the video resolution to inspect the display in the video cable connector. A gray screen appears. 4. Inspect the display for 2 seconds. Press and hold the Button 1 and Button 4 on the right side panel simultaneously for any screen abnormalities upon using...
... controls via OSD. Pixel that can occur in LCD technology. Carefully inspect the screen for bent or broken pins in green, blue, black, white, and text screens. Cycle power on -off . Perform monitor self-test feature check. Change the video resolution to inspect the display in the video cable connector. A gray screen appears. 4. Inspect the display for 2 seconds. Press and hold the Button 1 and Button 4 on the right side panel simultaneously for any screen abnormalities upon using...

User Guide
Page 27
... picture cannot fill the height or width of DVDs, the monitor may display in self-test mode. Perform Auto Adjust via OSD. Adjust R/G/B value in diagnostics. Contact Dell immediately. Ensure that the video cable connecting the monitor to the computer is properly connected and is secured. Turn off the monitor, unplug the power cord, plug back, and then turn on the screen Use the Power Management feature to Factory Settings. Check the signal source. Adjust brightness & contrast controls via OSD. NOTE: When choosing DVI-D mode, the Auto Adjust...
... picture cannot fill the height or width of DVDs, the monitor may display in self-test mode. Perform Auto Adjust via OSD. Adjust R/G/B value in diagnostics. Contact Dell immediately. Ensure that the video cable connecting the monitor to the computer is properly connected and is secured. Turn off the monitor, unplug the power cord, plug back, and then turn on the screen Use the Power Management feature to Factory Settings. Check the signal source. Adjust brightness & contrast controls via OSD. NOTE: When choosing DVI-D mode, the Auto Adjust...


