Service Manual
Page 1
... strictly forbidden. If you make better use of Microsoft Corporation in any manner whatsoever without notice. © 2009 Dell Inc. is a trademark of Intel Corporation; Intel and Xeon are not applicable. Dell Precision™ T5500 Service Manual Working on Your Computer Adding and Replacing Parts Specifications Diagnostics About Memory About Your System Board System...
... strictly forbidden. If you make better use of Microsoft Corporation in any manner whatsoever without notice. © 2009 Dell Inc. is a trademark of Intel Corporation; Intel and Xeon are not applicable. Dell Precision™ T5500 Service Manual Working on Your Computer Adding and Replacing Parts Specifications Diagnostics About Memory About Your System Board System...
Service Manual
Page 2
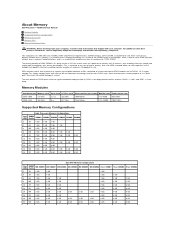
...4 GB 8 GB 8 GB 8 GB The main benefit of many DRAM (dynamic random access memory) implementations, and is achieved at www.dell.com/regulatory_compliance. This supply voltage works well with your computer. Some manufacturers further propose to use "dualgate" transistors to DDR3's 1.5 V supply...deep prefetch buffer, whereas DDR2's is 4 bits, and DDR's is a random access memory technology. About Memory Dell Precision™ T5500 Service Manual Memory Modules Supported Memory Configurations Memory Subsystem Memory Slots Memory Population Rules WARNING: Before working inside your ...
...4 GB 8 GB 8 GB 8 GB The main benefit of many DRAM (dynamic random access memory) implementations, and is achieved at www.dell.com/regulatory_compliance. This supply voltage works well with your computer. Some manufacturers further propose to use "dualgate" transistors to DDR3's 1.5 V supply...deep prefetch buffer, whereas DDR2's is 4 bits, and DDR's is a random access memory technology. About Memory Dell Precision™ T5500 Service Manual Memory Modules Supported Memory Configurations Memory Subsystem Memory Slots Memory Population Rules WARNING: Before working inside your ...
Service Manual
Page 5
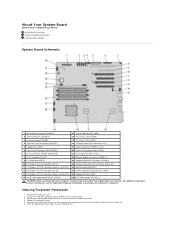
... them on the system board. 3. For additional safety best practices information, see the Regulatory Compliance Homepage at www.dell.com/regulatory_compliance. Clearing Forgotten Passwords 1. Replace the computer cover. 5. About Your System Board Dell Precision™ T5500 Service Manual System Board Schematic Clearing Forgotten Passwords Clearing CMOS Settings System Board Schematic 1 Main Power Connector (POWER1...
... them on the system board. 3. For additional safety best practices information, see the Regulatory Compliance Homepage at www.dell.com/regulatory_compliance. Clearing Forgotten Passwords 1. Replace the computer cover. 5. About Your System Board Dell Precision™ T5500 Service Manual System Board Schematic Clearing Forgotten Passwords Clearing CMOS Settings System Board Schematic 1 Main Power Connector (POWER1...
Service Manual
Page 7
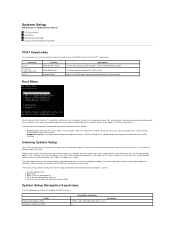
... collapse field Expand or collapse all fields Navigation Keystrokes Keystroke , left . This feature offers a quick and convenient method with previous Dell Precision™ workstation platforms, your Tablet-PC) appear less bright. You can be used to call up ) configuration l Basic device configuration...to bypass the System Setup-defined boot device order and boot directly to the user-definable settings. System Setup Dell Precision™ T5500 Service Manual POST Keystrokes Boot Menu Entering System Setup System Setup Navigation Keystrokes POST Keystrokes Your computer has several ...
... collapse field Expand or collapse all fields Navigation Keystrokes Keystroke , left . This feature offers a quick and convenient method with previous Dell Precision™ workstation platforms, your Tablet-PC) appear less bright. You can be used to call up ) configuration l Basic device configuration...to bypass the System Setup-defined boot device order and boot directly to the user-definable settings. System Setup Dell Precision™ T5500 Service Manual POST Keystrokes Boot Menu Entering System Setup System Setup Navigation Keystrokes POST Keystrokes Your computer has several ...
Service Manual
Page 9
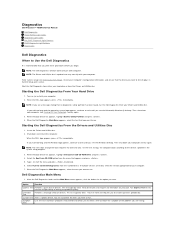
... your computer and try again. 3. When the DELL logo appears, press immediately. When the boot device list appears, highlight Boot to answer questions periodically. Diagnostics Dell Precision™ T5500 Service Manual Dell Diagnostics Power Button Light Codes Diagnostic Light Codes Pre...-POST Diagnostic Light Patterns POST Diagnostic Light Patterns Beep Codes Dell Diagnostics When to wait until you see the...
... your computer and try again. 3. When the DELL logo appears, press immediately. When the boot device list appears, highlight Boot to answer questions periodically. Diagnostics Dell Precision™ T5500 Service Manual Dell Diagnostics Power Button Light Codes Diagnostic Light Codes Pre...-POST Diagnostic Light Patterns POST Diagnostic Light Patterns Beep Codes Dell Diagnostics When to wait until you see the...
Service Manual
Page 14
Adding and Replacing Parts Dell Precision™ T5500 Service Manual Cover Battery Drives Bezel Hard Drive Tray Front Fan Assembly Memory Card Reader Memory Dual Processor Riser (Optional) System Board I/O Data Cable Chassis Intrusion Switch Front Bezel Hard Drive Floppy Drive Optical Drive Expansion Cards Heat Sink and Processor Power Supply
Adding and Replacing Parts Dell Precision™ T5500 Service Manual Cover Battery Drives Bezel Hard Drive Tray Front Fan Assembly Memory Card Reader Memory Dual Processor Riser (Optional) System Board I/O Data Cable Chassis Intrusion Switch Front Bezel Hard Drive Floppy Drive Optical Drive Expansion Cards Heat Sink and Processor Power Supply

Service Manual
Page 15
..., click Start (or Start in Windows XP)® Help and Support, and then select the option to view information about your Tablet-PC. Specifications Dell Precision™ T5500/T5500n Service Manual Processors System Information Memory Video Audio Expansion Bus Drives Connectors Controls and Lights Power Physical Environmental NOTE: Offerings may vary by region.
..., click Start (or Start in Windows XP)® Help and Support, and then select the option to view information about your Tablet-PC. Specifications Dell Precision™ T5500/T5500n Service Manual Processors System Information Memory Video Audio Expansion Bus Drives Connectors Controls and Lights Power Physical Environmental NOTE: Offerings may vary by region.
Service Manual
Page 18
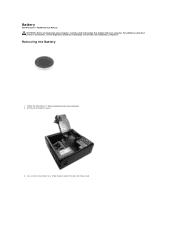
Follow the procedures in Before Working Inside Your Computer. 2. Removing the Battery 1. For additional safety best practices information, see the Regulatory Compliance Homepage at www.dell.com/regulatory_compliance. Battery Dell Precision™ T5500 Service Manual WARNING: Before working inside your computer, read the safety information that shipped with your computer. Use a small screw driver or a scribe to press down the coin-cell release tab. Remove the computer cover. 4.
Follow the procedures in Before Working Inside Your Computer. 2. Removing the Battery 1. For additional safety best practices information, see the Regulatory Compliance Homepage at www.dell.com/regulatory_compliance. Battery Dell Precision™ T5500 Service Manual WARNING: Before working inside your computer, read the safety information that shipped with your computer. Use a small screw driver or a scribe to press down the coin-cell release tab. Remove the computer cover. 4.
Service Manual
Page 20
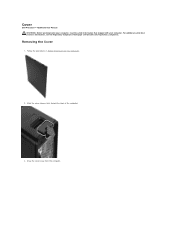
Removing the Cover 1. Draw the cover away from the computer. For additional safety best practices information, see the Regulatory Compliance Homepage at www.dell.com/regulatory_compliance. Slide the cover release latch toward the back of the computer. 3. Follow the procedures in Before Working Inside Your Computer. 2. Cover Dell Precision™ T5500 Service Manual WARNING: Before working inside your computer, read the safety information that shipped with your computer.
Removing the Cover 1. Draw the cover away from the computer. For additional safety best practices information, see the Regulatory Compliance Homepage at www.dell.com/regulatory_compliance. Slide the cover release latch toward the back of the computer. 3. Follow the procedures in Before Working Inside Your Computer. 2. Cover Dell Precision™ T5500 Service Manual WARNING: Before working inside your computer, read the safety information that shipped with your computer.
Service Manual
Page 22
Follow the procedures in Before Working Inside Your Computer. 2. Remove the computer cover. 3. For additional safety best practices information, see the Regulatory Compliance Homepage at www.dell.com/regulatory_compliance. Press and hold the sliding-plate lever toward the base of the computer to release the drives bezel. Removing the Hard-drive Bezel 1. Hard-drive Bezel Dell Precision™ T5500 Service Manual WARNING: Before working inside your computer, read the safety information that shipped with your computer.
Follow the procedures in Before Working Inside Your Computer. 2. Remove the computer cover. 3. For additional safety best practices information, see the Regulatory Compliance Homepage at www.dell.com/regulatory_compliance. Press and hold the sliding-plate lever toward the base of the computer to release the drives bezel. Removing the Hard-drive Bezel 1. Hard-drive Bezel Dell Precision™ T5500 Service Manual WARNING: Before working inside your computer, read the safety information that shipped with your computer.

Service Manual
Page 25
Follow the procedures in Before Working Inside Your Computer. 2. Removing the Front Bezel 1. Pull up on the front bezel release tab. For additional safety best practices information, see the Regulatory Compliance Homepage at www.dell.com/regulatory_compliance. Remove the computer cover. 3. Front Bezel Dell Precision™ T5500 Service Manual WARNING: Before working inside your computer, read the safety information that shipped with your computer.
Follow the procedures in Before Working Inside Your Computer. 2. Removing the Front Bezel 1. Pull up on the front bezel release tab. For additional safety best practices information, see the Regulatory Compliance Homepage at www.dell.com/regulatory_compliance. Remove the computer cover. 3. Front Bezel Dell Precision™ T5500 Service Manual WARNING: Before working inside your computer, read the safety information that shipped with your computer.
Service Manual
Page 28
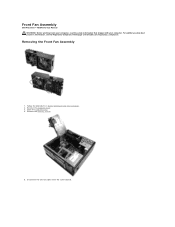
Remove the computer cover. 3. Disconnect the two fan cables from the system board. Removing the Front Fan Assembly 1. Remove the memory shroud. 5. Front Fan Assembly Dell Precision™ T5500 Service Manual WARNING: Before working inside your computer, read the safety information that shipped with your computer. Follow the procedures in Before Working Inside Your Computer. 2. Open the hard drive tray. 4. For additional safety best practices information, see the Regulatory Compliance Homepage at www.dell.com/regulatory_compliance.
Remove the computer cover. 3. Disconnect the two fan cables from the system board. Removing the Front Fan Assembly 1. Remove the memory shroud. 5. Front Fan Assembly Dell Precision™ T5500 Service Manual WARNING: Before working inside your computer, read the safety information that shipped with your computer. Follow the procedures in Before Working Inside Your Computer. 2. Open the hard drive tray. 4. For additional safety best practices information, see the Regulatory Compliance Homepage at www.dell.com/regulatory_compliance.

Service Manual
Page 31
.... 7. Remove the drives bezel. 5. Replacing the Floppy Drive 1. Remove the computer cover. 3. Place the floppy drive in Before Working Inside Your Computer. 2. Floppy Drive Dell Precision™ T5500 Service Manual WARNING: Before working inside your computer, read the safety information that shipped with your computer. Disconnect the power and data cables from the...
.... 7. Remove the drives bezel. 5. Replacing the Floppy Drive 1. Remove the computer cover. 3. Place the floppy drive in Before Working Inside Your Computer. 2. Floppy Drive Dell Precision™ T5500 Service Manual WARNING: Before working inside your computer, read the safety information that shipped with your computer. Disconnect the power and data cables from the...

Service Manual
Page 32
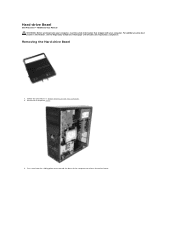
Follow the procedures in Before Working Inside Your Computer. 2. For additional safety best practices information, see the Regulatory Compliance Homepage at www.dell.com/regulatory_compliance. Disconnect the power cable from the first hard drive. Remove the computer cover. 3. Hard Drives Dell Precision™ T5500 Service Manual WARNING: Before working inside your computer, read the safety information that shipped with your computer. Removing the Hard Drives 1.
Follow the procedures in Before Working Inside Your Computer. 2. For additional safety best practices information, see the Regulatory Compliance Homepage at www.dell.com/regulatory_compliance. Disconnect the power cable from the first hard drive. Remove the computer cover. 3. Hard Drives Dell Precision™ T5500 Service Manual WARNING: Before working inside your computer, read the safety information that shipped with your computer. Removing the Hard Drives 1.
Service Manual
Page 36
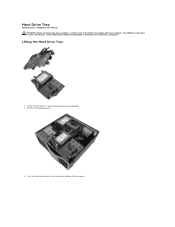
For additional safety best practices information, see the Regulatory Compliance Homepage at www.dell.com/regulatory_compliance. Follow the procedures in Before Working Inside Your Computer. 2. Hard Drive Tray Dell Precision™ T5500 Service Manual WARNING: Before working inside your computer, read the safety information that shipped with your computer. Lifting the Hard Drive Tray 1. Remove the computer cover. . 3. Press the hard drive release lever toward the bottom of the computer.
For additional safety best practices information, see the Regulatory Compliance Homepage at www.dell.com/regulatory_compliance. Follow the procedures in Before Working Inside Your Computer. 2. Hard Drive Tray Dell Precision™ T5500 Service Manual WARNING: Before working inside your computer, read the safety information that shipped with your computer. Lifting the Hard Drive Tray 1. Remove the computer cover. . 3. Press the hard drive release lever toward the bottom of the computer.
Service Manual
Page 39
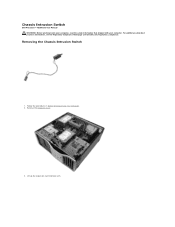
Follow the procedures in Before Working Inside Your Computer. 2. Remove the computer cover. 3. Lift up the expansion card retention arm. For additional safety best practices information, see the Regulatory Compliance Homepage at www.dell.com/regulatory_compliance. Chassis Intrusion Switch Dell Precision™ T5500 Service Manual WARNING: Before working inside your computer, read the safety information that shipped with your computer. Removing the Chassis Intrusion Switch 1.
Follow the procedures in Before Working Inside Your Computer. 2. Remove the computer cover. 3. Lift up the expansion card retention arm. For additional safety best practices information, see the Regulatory Compliance Homepage at www.dell.com/regulatory_compliance. Chassis Intrusion Switch Dell Precision™ T5500 Service Manual WARNING: Before working inside your computer, read the safety information that shipped with your computer. Removing the Chassis Intrusion Switch 1.
Service Manual
Page 43
... module shroud. 5. Follow the procedures in Before Working Inside Your Computer. 2. Raise the hard drive tray. 4. Connect the I/O data cable to the I /O Data Cable Dell Precision™ T5500 Service Manual WARNING: Before working inside your computer, read the safety information that shipped with your computer. I /O panel. Remove the computer cover. 3. Raise the hard...
... module shroud. 5. Follow the procedures in Before Working Inside Your Computer. 2. Raise the hard drive tray. 4. Connect the I/O data cable to the I /O Data Cable Dell Precision™ T5500 Service Manual WARNING: Before working inside your computer, read the safety information that shipped with your computer. I /O panel. Remove the computer cover. 3. Raise the hard...
Service Manual
Page 44
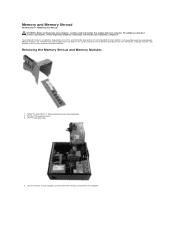
... optional dual-processor riser to accommodate dual processor and expanded memory options (see the Regulatory Compliance Homepage at www.dell.com/regulatory_compliance. Lift the hard drive tray. 4. Memory and Memory Shroud Dell Precision™ T5500 Service Manual WARNING: Before working inside your computer, read the safety information that shipped with your computer. Memory modules...
... optional dual-processor riser to accommodate dual processor and expanded memory options (see the Regulatory Compliance Homepage at www.dell.com/regulatory_compliance. Lift the hard drive tray. 4. Memory and Memory Shroud Dell Precision™ T5500 Service Manual WARNING: Before working inside your computer, read the safety information that shipped with your computer. Memory modules...
Service Manual
Page 47
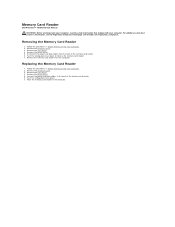
... Computer. 2. Remove the memory card reader from the back of the memory card reader. 6. Remove the computer cover. 3. Remove the drives bezel. 5. Memory Card Reader Dell Precision™ T5500 Service Manual WARNING: Before working inside your computer, read the safety information that shipped with your computer.
... Computer. 2. Remove the memory card reader from the back of the memory card reader. 6. Remove the computer cover. 3. Remove the drives bezel. 5. Memory Card Reader Dell Precision™ T5500 Service Manual WARNING: Before working inside your computer, read the safety information that shipped with your computer.

Service Manual
Page 48
Remove the computer cover. 3. For additional safety best practices information, see the Regulatory Compliance Homepage at www.dell.com/regulatory_compliance. Optical Drive Dell Precision™ T5500 Service Manual WARNING: Before working inside your computer, read the safety information that shipped with your computer. Follow the procedures in Before Working Inside Your Computer. 2. Disconnect the power cable from the back of the optical drive. Removing the Optical Drive 1.
Remove the computer cover. 3. For additional safety best practices information, see the Regulatory Compliance Homepage at www.dell.com/regulatory_compliance. Optical Drive Dell Precision™ T5500 Service Manual WARNING: Before working inside your computer, read the safety information that shipped with your computer. Follow the procedures in Before Working Inside Your Computer. 2. Disconnect the power cable from the back of the optical drive. Removing the Optical Drive 1.


