Service Manual
Page 1
... if instructions are trademarks of the Blu-ray Disc Association; Model DCTA September 2009 Rev. A01 Trademarks used in this text: Dell, the DELL logo, and Dell Precision are not followed. Dell Precision™ T5500 Service Manual Working on Your Computer Adding and Replacing Parts Specifications Diagnostics About Memory About Your System Board System Setup Notes, Cautions...
... if instructions are trademarks of the Blu-ray Disc Association; Model DCTA September 2009 Rev. A01 Trademarks used in this text: Dell, the DELL logo, and Dell Precision are not followed. Dell Precision™ T5500 Service Manual Working on Your Computer Adding and Replacing Parts Specifications Diagnostics About Memory About Your System Board System Setup Notes, Cautions...
Service Manual
Page 2
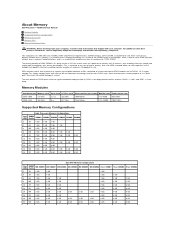
... DDR3 chips. Memory Modules Standard name Memory clock Cycle time I /O bus at four times the speed of maximum 16 gigabyte in size. About Memory Dell Precision™ T5500 Service Manual Memory Modules Supported Memory Configurations Memory Subsystem Memory Slots Memory Population Rules WARNING: Before working inside your computer. Your computer uses 1066 MHz...'s 8 bit deep prefetch buffer, whereas DDR2's is 4 bits, and DDR's is a random access memory technology. The primary benefit of current. This is achieved at www.dell.com/regulatory_compliance.
... DDR3 chips. Memory Modules Standard name Memory clock Cycle time I /O bus at four times the speed of maximum 16 gigabyte in size. About Memory Dell Precision™ T5500 Service Manual Memory Modules Supported Memory Configurations Memory Subsystem Memory Slots Memory Population Rules WARNING: Before working inside your computer. Your computer uses 1066 MHz...'s 8 bit deep prefetch buffer, whereas DDR2's is 4 bits, and DDR's is a random access memory technology. The primary benefit of current. This is achieved at www.dell.com/regulatory_compliance.
Service Manual
Page 5
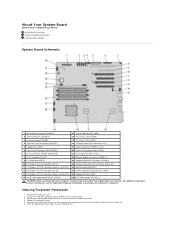
About Your System Board Dell Precision™ T5500 Service Manual System Board Schematic Clearing Forgotten Passwords Clearing CMOS Settings System Board Schematic 1 Main Power Connector (POWER1) 15 Type A USB Port (INT_USB2) 2 SATA Connectors...on . 6. After the operating system loads, turn them on the system board. 3. For additional safety best practices information, see the Regulatory Compliance Homepage at www.dell.com/regulatory_compliance. Replace the computer cover. 5. Remove the computer cover. 2. Remove the 2-pin jumper plug from pins 3 and 4 and set the jumper plug aside...
About Your System Board Dell Precision™ T5500 Service Manual System Board Schematic Clearing Forgotten Passwords Clearing CMOS Settings System Board Schematic 1 Main Power Connector (POWER1) 15 Type A USB Port (INT_USB2) 2 SATA Connectors...on . 6. After the operating system loads, turn them on the system board. 3. For additional safety best practices information, see the Regulatory Compliance Homepage at www.dell.com/regulatory_compliance. Replace the computer cover. 5. Remove the computer cover. 2. Remove the 2-pin jumper plug from pins 3 and 4 and set the jumper plug aside...
Service Manual
Page 7
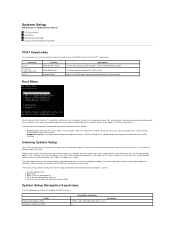
This feature offers a quick and convenient method with previous Dell Precision™ workstation platforms, your computer, such as follows: l Easier access-Although the keystroke still exists and can be used to call up ) ... System Setup Press to enter System Setup and change any settings. The lower-right corner displays information about the computer. System Setup Dell Precision™ T5500 Service Manual POST Keystrokes Boot Menu Entering System Setup System Setup Navigation Keystrokes POST Keystrokes Your computer has several keystroke options available during system...
This feature offers a quick and convenient method with previous Dell Precision™ workstation platforms, your computer, such as follows: l Easier access-Although the keystroke still exists and can be used to call up ) ... System Setup Press to enter System Setup and change any settings. The lower-right corner displays information about the computer. System Setup Dell Precision™ T5500 Service Manual POST Keystrokes Boot Menu Entering System Setup System Setup Navigation Keystrokes POST Keystrokes Your computer has several keystroke options available during system...
Service Manual
Page 9
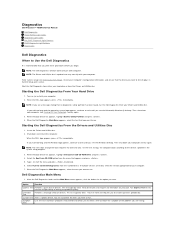
...), and try again. When the boot device list appears, highlight Boot to run . Select the Boot from CD-ROM option from the numbered list. Diagnostics Dell Precision™ T5500 Service Manual Dell Diagnostics Power Button Light Codes Diagnostic Light Codes Pre-POST Diagnostic Light Patterns POST Diagnostic Light Patterns Beep Codes...
...), and try again. When the boot device list appears, highlight Boot to run . Select the Boot from CD-ROM option from the numbered list. Diagnostics Dell Precision™ T5500 Service Manual Dell Diagnostics Power Button Light Codes Diagnostic Light Codes Pre-POST Diagnostic Light Patterns POST Diagnostic Light Patterns Beep Codes...
Service Manual
Page 14
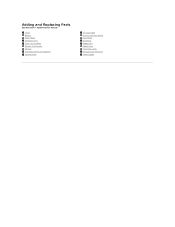
Adding and Replacing Parts Dell Precision™ T5500 Service Manual Cover Battery Drives Bezel Hard Drive Tray Front Fan Assembly Memory Card Reader Memory Dual Processor Riser (Optional) System Board I/O Data Cable Chassis Intrusion Switch Front Bezel Hard Drive Floppy Drive Optical Drive Expansion Cards Heat Sink and Processor Power Supply
Adding and Replacing Parts Dell Precision™ T5500 Service Manual Cover Battery Drives Bezel Hard Drive Tray Front Fan Assembly Memory Card Reader Memory Dual Processor Riser (Optional) System Board I/O Data Cable Chassis Intrusion Switch Front Bezel Hard Drive Floppy Drive Optical Drive Expansion Cards Heat Sink and Processor Power Supply

Service Manual
Page 15
... riser PCI Express 2.0 x16 (two slots) NOTE: Support for two full height, full length graphics cards using the PCIe x16 graphics card slot. Specifications Dell Precision™ T5500/T5500n Service Manual Processors System Information Memory Video Audio Expansion Bus Drives Connectors Controls and Lights Power Physical Environmental NOTE: Offerings may vary by region.
... riser PCI Express 2.0 x16 (two slots) NOTE: Support for two full height, full length graphics cards using the PCIe x16 graphics card slot. Specifications Dell Precision™ T5500/T5500n Service Manual Processors System Information Memory Video Audio Expansion Bus Drives Connectors Controls and Lights Power Physical Environmental NOTE: Offerings may vary by region.
Service Manual
Page 18
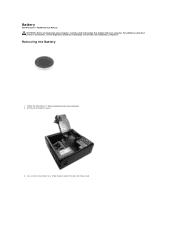
Follow the procedures in Before Working Inside Your Computer. 2. Use a small screw driver or a scribe to press down the coin-cell release tab. Removing the Battery 1. Remove the computer cover. 4. For additional safety best practices information, see the Regulatory Compliance Homepage at www.dell.com/regulatory_compliance. Battery Dell Precision™ T5500 Service Manual WARNING: Before working inside your computer, read the safety information that shipped with your computer.
Follow the procedures in Before Working Inside Your Computer. 2. Use a small screw driver or a scribe to press down the coin-cell release tab. Removing the Battery 1. Remove the computer cover. 4. For additional safety best practices information, see the Regulatory Compliance Homepage at www.dell.com/regulatory_compliance. Battery Dell Precision™ T5500 Service Manual WARNING: Before working inside your computer, read the safety information that shipped with your computer.
Service Manual
Page 20
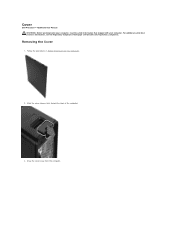
Follow the procedures in Before Working Inside Your Computer. 2. Slide the cover release latch toward the back of the computer. 3. Removing the Cover 1. Draw the cover away from the computer. For additional safety best practices information, see the Regulatory Compliance Homepage at www.dell.com/regulatory_compliance. Cover Dell Precision™ T5500 Service Manual WARNING: Before working inside your computer, read the safety information that shipped with your computer.
Follow the procedures in Before Working Inside Your Computer. 2. Slide the cover release latch toward the back of the computer. 3. Removing the Cover 1. Draw the cover away from the computer. For additional safety best practices information, see the Regulatory Compliance Homepage at www.dell.com/regulatory_compliance. Cover Dell Precision™ T5500 Service Manual WARNING: Before working inside your computer, read the safety information that shipped with your computer.
Service Manual
Page 22
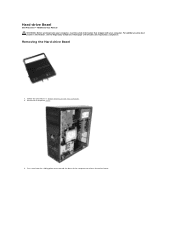
Removing the Hard-drive Bezel 1. Follow the procedures in Before Working Inside Your Computer. 2. Remove the computer cover. 3. Press and hold the sliding-plate lever toward the base of the computer to release the drives bezel. For additional safety best practices information, see the Regulatory Compliance Homepage at www.dell.com/regulatory_compliance. Hard-drive Bezel Dell Precision™ T5500 Service Manual WARNING: Before working inside your computer, read the safety information that shipped with your computer.
Removing the Hard-drive Bezel 1. Follow the procedures in Before Working Inside Your Computer. 2. Remove the computer cover. 3. Press and hold the sliding-plate lever toward the base of the computer to release the drives bezel. For additional safety best practices information, see the Regulatory Compliance Homepage at www.dell.com/regulatory_compliance. Hard-drive Bezel Dell Precision™ T5500 Service Manual WARNING: Before working inside your computer, read the safety information that shipped with your computer.

Service Manual
Page 25
Follow the procedures in Before Working Inside Your Computer. 2. Remove the computer cover. 3. Front Bezel Dell Precision™ T5500 Service Manual WARNING: Before working inside your computer, read the safety information that shipped with your computer. Pull up on the front bezel release tab. Removing the Front Bezel 1. For additional safety best practices information, see the Regulatory Compliance Homepage at www.dell.com/regulatory_compliance.
Follow the procedures in Before Working Inside Your Computer. 2. Remove the computer cover. 3. Front Bezel Dell Precision™ T5500 Service Manual WARNING: Before working inside your computer, read the safety information that shipped with your computer. Pull up on the front bezel release tab. Removing the Front Bezel 1. For additional safety best practices information, see the Regulatory Compliance Homepage at www.dell.com/regulatory_compliance.
Service Manual
Page 28
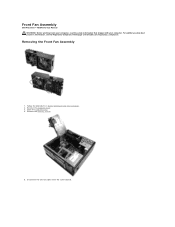
Follow the procedures in Before Working Inside Your Computer. 2. Disconnect the two fan cables from the system board. Remove the computer cover. 3. Front Fan Assembly Dell Precision™ T5500 Service Manual WARNING: Before working inside your computer, read the safety information that shipped with your computer. Open the hard drive tray. 4. For additional safety best practices information, see the Regulatory Compliance Homepage at www.dell.com/regulatory_compliance. Removing the Front Fan Assembly 1. Remove the memory shroud. 5.
Follow the procedures in Before Working Inside Your Computer. 2. Disconnect the two fan cables from the system board. Remove the computer cover. 3. Front Fan Assembly Dell Precision™ T5500 Service Manual WARNING: Before working inside your computer, read the safety information that shipped with your computer. Open the hard drive tray. 4. For additional safety best practices information, see the Regulatory Compliance Homepage at www.dell.com/regulatory_compliance. Removing the Front Fan Assembly 1. Remove the memory shroud. 5.

Service Manual
Page 31
... Floppy Drive 1. Remove the computer cover. 3. Push the sliding plate lever down . 7. Follow the procedures in the computer. Remove the front bezel. 4. Floppy Drive Dell Precision™ T5500 Service Manual WARNING: Before working inside your computer, read the safety information that shipped with your computer. Removing the Floppy Drive 1. Remove the front bezel...
... Floppy Drive 1. Remove the computer cover. 3. Push the sliding plate lever down . 7. Follow the procedures in the computer. Remove the front bezel. 4. Floppy Drive Dell Precision™ T5500 Service Manual WARNING: Before working inside your computer, read the safety information that shipped with your computer. Removing the Floppy Drive 1. Remove the front bezel...

Service Manual
Page 32
Hard Drives Dell Precision™ T5500 Service Manual WARNING: Before working inside your computer, read the safety information that shipped with your computer. Disconnect the power cable from the first hard drive. Removing the Hard Drives 1. Remove the computer cover. 3. Follow the procedures in Before Working Inside Your Computer. 2. For additional safety best practices information, see the Regulatory Compliance Homepage at www.dell.com/regulatory_compliance.
Hard Drives Dell Precision™ T5500 Service Manual WARNING: Before working inside your computer, read the safety information that shipped with your computer. Disconnect the power cable from the first hard drive. Removing the Hard Drives 1. Remove the computer cover. 3. Follow the procedures in Before Working Inside Your Computer. 2. For additional safety best practices information, see the Regulatory Compliance Homepage at www.dell.com/regulatory_compliance.
Service Manual
Page 36
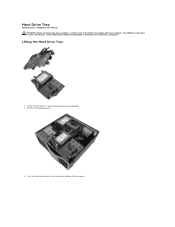
Hard Drive Tray Dell Precision™ T5500 Service Manual WARNING: Before working inside your computer, read the safety information that shipped with your computer. For additional safety best practices information, see the Regulatory Compliance Homepage at www.dell.com/regulatory_compliance. Press the hard drive release lever toward the bottom of the computer. Follow the procedures in Before Working Inside Your Computer. 2. Remove the computer cover. . 3. Lifting the Hard Drive Tray 1.
Hard Drive Tray Dell Precision™ T5500 Service Manual WARNING: Before working inside your computer, read the safety information that shipped with your computer. For additional safety best practices information, see the Regulatory Compliance Homepage at www.dell.com/regulatory_compliance. Press the hard drive release lever toward the bottom of the computer. Follow the procedures in Before Working Inside Your Computer. 2. Remove the computer cover. . 3. Lifting the Hard Drive Tray 1.
Service Manual
Page 39
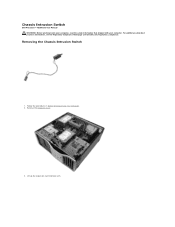
Removing the Chassis Intrusion Switch 1. Lift up the expansion card retention arm. Follow the procedures in Before Working Inside Your Computer. 2. Remove the computer cover. 3. Chassis Intrusion Switch Dell Precision™ T5500 Service Manual WARNING: Before working inside your computer, read the safety information that shipped with your computer. For additional safety best practices information, see the Regulatory Compliance Homepage at www.dell.com/regulatory_compliance.
Removing the Chassis Intrusion Switch 1. Lift up the expansion card retention arm. Follow the procedures in Before Working Inside Your Computer. 2. Remove the computer cover. 3. Chassis Intrusion Switch Dell Precision™ T5500 Service Manual WARNING: Before working inside your computer, read the safety information that shipped with your computer. For additional safety best practices information, see the Regulatory Compliance Homepage at www.dell.com/regulatory_compliance.
Service Manual
Page 43
I /O panel. Remove the computer cover. 3. Remove the front fan assembly. 6. Remove the front fan assembly. 6. Disconnect the I/O data cable from the I /O Data Cable Dell Precision™ T5500 Service Manual WARNING: Before working inside your computer, read the safety information that shipped with your computer. For additional safety best practices information, see the ...
I /O panel. Remove the computer cover. 3. Remove the front fan assembly. 6. Remove the front fan assembly. 6. Disconnect the I/O data cable from the I /O Data Cable Dell Precision™ T5500 Service Manual WARNING: Before working inside your computer, read the safety information that shipped with your computer. For additional safety best practices information, see the ...
Service Manual
Page 44
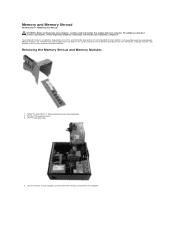
... optional dual-processor riser to accommodate dual processor and expanded memory options (see the Regulatory Compliance Homepage at www.dell.com/regulatory_compliance. Memory modules are illustrated below. Memory and Memory Shroud Dell Precision™ T5500 Service Manual WARNING: Before working inside your computer, read the safety information that shipped with your computer. Follow the...
... optional dual-processor riser to accommodate dual processor and expanded memory options (see the Regulatory Compliance Homepage at www.dell.com/regulatory_compliance. Memory modules are illustrated below. Memory and Memory Shroud Dell Precision™ T5500 Service Manual WARNING: Before working inside your computer, read the safety information that shipped with your computer. Follow the...
Service Manual
Page 47
... cables from the computer. For additional safety best practices information, see the Regulatory Compliance Homepage at www.dell.com/regulatory_compliance. Follow the procedures in the computer. Remove the drives bezel. 5. Memory Card Reader Dell Precision™ T5500 Service Manual WARNING: Before working inside your computer, read the safety information that shipped with your computer...
... cables from the computer. For additional safety best practices information, see the Regulatory Compliance Homepage at www.dell.com/regulatory_compliance. Follow the procedures in the computer. Remove the drives bezel. 5. Memory Card Reader Dell Precision™ T5500 Service Manual WARNING: Before working inside your computer, read the safety information that shipped with your computer...

Service Manual
Page 48
Remove the computer cover. 3. Removing the Optical Drive 1. For additional safety best practices information, see the Regulatory Compliance Homepage at www.dell.com/regulatory_compliance. Follow the procedures in Before Working Inside Your Computer. 2. Optical Drive Dell Precision™ T5500 Service Manual WARNING: Before working inside your computer, read the safety information that shipped with your computer. Disconnect the power cable from the back of the optical drive.
Remove the computer cover. 3. Removing the Optical Drive 1. For additional safety best practices information, see the Regulatory Compliance Homepage at www.dell.com/regulatory_compliance. Follow the procedures in Before Working Inside Your Computer. 2. Optical Drive Dell Precision™ T5500 Service Manual WARNING: Before working inside your computer, read the safety information that shipped with your computer. Disconnect the power cable from the back of the optical drive.


