Replacing the Hard-Drive Tray
Page 3
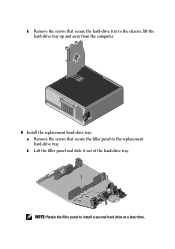
lift the hard-drive tray up and away from the computer. 6 Install the replacement hard-drive tray: a Remove the screws that secure the hard-drive tray to the replacement hard-drive tray. b Lift the filler panel and slide it out of the hard-drive tray. b Remove the screws that secure the filler panel to the chassis; NOTE: Retain the filler panel to install a second hard drive at a later time.
lift the hard-drive tray up and away from the computer. 6 Install the replacement hard-drive tray: a Remove the screws that secure the hard-drive tray to the replacement hard-drive tray. b Lift the filler panel and slide it out of the hard-drive tray. b Remove the screws that secure the filler panel to the chassis; NOTE: Retain the filler panel to install a second hard drive at a later time.
Service Manual
Page 10
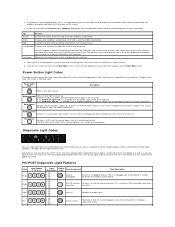
...system board, or control panel not connected to your computer. Normal System is blank. To exit the Dell Diagnostics and restart the computer, close the Main Menu screen. Power Light State Off Power is off,...POST Diagnostic Light Patterns State Pb0a Pb0b Pb0c Pb1 Light Pattern ( 1 2 3 4 ) Light Description 1- If the Hard Drive light is off as the BIOS hands over control to serve as you run a test from the Drivers and Utilities disc... Blinking Amber Initial state of all the components installed on the screen. 3. Off 4- System plugged in, but either S1 or S3.
...system board, or control panel not connected to your computer. Normal System is blank. To exit the Dell Diagnostics and restart the computer, close the Main Menu screen. Power Light State Off Power is off,...POST Diagnostic Light Patterns State Pb0a Pb0b Pb0c Pb1 Light Pattern ( 1 2 3 4 ) Light Description 1- If the Hard Drive light is off as the BIOS hands over control to serve as you run a test from the Drivers and Utilities disc... Blinking Amber Initial state of all the components installed on the screen. 3. Off 4- System plugged in, but either S1 or S3.
Service Manual
Page 16
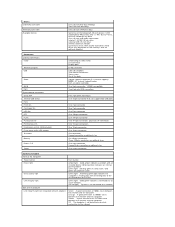
blinking amber indicates an internal power problem Green light Blinking green in 5.25 inch bays with an installed device; solid green for power-on video card) DVI connector Display port RJ-45 connector USB 2.0 compliant Two internal connectors Two in front Six ... the computer Yellow A good connection at the back Stereo support integrated (5.1 channel support) NOTE: 5.1 channel support comes from or writing data to the SATA hard drive or CD/DVD Green light Solid green indicates a connection to an active network Off (no light) System is not detecting a physical connection to the network...
blinking amber indicates an internal power problem Green light Blinking green in 5.25 inch bays with an installed device; solid green for power-on video card) DVI connector Display port RJ-45 connector USB 2.0 compliant Two internal connectors Two in front Six ... the computer Yellow A good connection at the back Stereo support integrated (5.1 channel support) NOTE: 5.1 channel support comes from or writing data to the SATA hard drive or CD/DVD Green light Solid green indicates a connection to an active network Off (no light) System is not detecting a physical connection to the network...

Service Manual
Page 34
6. Repeat these steps for any other installed hard drives. Remove the first hard drive assembly from the computer. Lift the two blue hard drive release tabs. 7.
6. Repeat these steps for any other installed hard drives. Remove the first hard drive assembly from the computer. Lift the two blue hard drive release tabs. 7.
Service Manual
Page 44
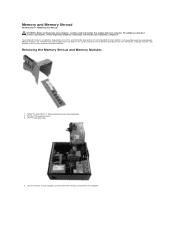
...the Regulatory Compliance Homepage at www.dell.com/regulatory_compliance. Follow the procedures in Before Working Inside Your Computer. 2. Lift the hard drive tray. 4. Memory and Memory Shroud Dell Precision™ T5500 Service Manual WARNING: Before working ...inside your computer, read the safety information that shipped with your computer. Memory modules are removed from the computer. Lift the memory shroud straight up and remove the memory shroud from and installed...
...the Regulatory Compliance Homepage at www.dell.com/regulatory_compliance. Follow the procedures in Before Working Inside Your Computer. 2. Lift the hard drive tray. 4. Memory and Memory Shroud Dell Precision™ T5500 Service Manual WARNING: Before working ...inside your computer, read the safety information that shipped with your computer. Memory modules are removed from the computer. Lift the memory shroud straight up and remove the memory shroud from and installed...


