Interoperability Guide
Page 2
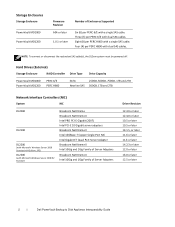
...PERC 6/E with a single SAS cable. Hard Drives (External) Storage Enclosure RAID Controller Drive Type Drive Capacity PowerVault MD1000 PowerVault MD1200 PERC 6/E PERC H800 SATA 250GB, 500GB, 750GB, 1TB and 2TB Nearline SAS 500GB, 1TB and 2TB Network Interface Controllers (NIC) System NIC DL2000 DL2100 DL2200 (with Microsoft Windows Server 2008 Standard x64 Edition, SP2) DL2200 (with dual SAS cables. Storage Enclosures Storage Enclosure PowerVault MD1000 PowerVault MD1200 Firmware Revision A04 or later 1.0.1 or later Number of Server Adapters Driver Revision 12.4.0 or...
...PERC 6/E with a single SAS cable. Hard Drives (External) Storage Enclosure RAID Controller Drive Type Drive Capacity PowerVault MD1000 PowerVault MD1200 PERC 6/E PERC H800 SATA 250GB, 500GB, 750GB, 1TB and 2TB Nearline SAS 500GB, 1TB and 2TB Network Interface Controllers (NIC) System NIC DL2000 DL2100 DL2200 (with Microsoft Windows Server 2008 Standard x64 Edition, SP2) DL2200 (with dual SAS cables. Storage Enclosures Storage Enclosure PowerVault MD1000 PowerVault MD1200 Firmware Revision A04 or later 1.0.1 or later Number of Server Adapters Driver Revision 12.4.0 or...
Interoperability Guide
Page 4
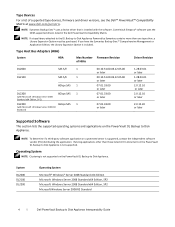
... Symantec Backup Exec™ Comprehensive Management or Application Edition, the Library Expansion Option is supported, contact the independent software vendor (ISV) distributing the application. CommVault Simpana® software uses the OEM-supported drivers listed in this document on the PowerVault DL Backup to Disk Appliance. Operating System NOTE: Clustering is not supported. Tape Host Bus Adapters (HBA) System HBA Max Number Firmware Revision of supported tape devices, firmware and driver versions, see the Dell™ PowerVault™ Compatibility Matrix...
... Symantec Backup Exec™ Comprehensive Management or Application Edition, the Library Expansion Option is supported, contact the independent software vendor (ISV) distributing the application. CommVault Simpana® software uses the OEM-supported drivers listed in this document on the PowerVault DL Backup to Disk Appliance. Operating System NOTE: Clustering is not supported. Tape Host Bus Adapters (HBA) System HBA Max Number Firmware Revision of supported tape devices, firmware and driver versions, see the Dell™ PowerVault™ Compatibility Matrix...

Hardware Owner's Manual
Page 28
... there has been an error in PCI "Troubleshooting configuration space at bus ##, device ##, function ##. Remove AC power to determine its origin. See on a component that the problem persists, see resides in the system, but is faulty. Table 1-1. LCD Status Messages (continued) Code Text Cause Corrective Actions E1711 PCI parity error on Bus ## Device ## Function ## The system BIOS has reported a PCI parity error on Slot #.
... there has been an error in PCI "Troubleshooting configuration space at bus ##, device ##, function ##. Remove AC power to determine its origin. See on a component that the problem persists, see resides in the system, but is faulty. Table 1-1. LCD Status Messages (continued) Code Text Cause Corrective Actions E1711 PCI parity error on Bus ## Device ## Function ## The system BIOS has reported a PCI parity error on Slot #.

Hardware Owner's Manual
Page 40
... Memory Module Installation Guidelines." If a problem is loose or improperly connected. Please ensure compatible bootable media is set in BIOS. Ensure that mouse and keyboard are installed in management tools. Ensure that the memory modules are securely attached to boot because UEFI boot mode is enabled in BIOS and the boot operating system is set in a valid configuration. The memory module configuration for NIC settings. Check the system management software or the System Setup...
... Memory Module Installation Guidelines." If a problem is loose or improperly connected. Please ensure compatible bootable media is set in BIOS. Ensure that mouse and keyboard are installed in management tools. Ensure that the memory modules are securely attached to boot because UEFI boot mode is enabled in BIOS and the boot operating system is set in a valid configuration. The memory module configuration for NIC settings. Check the system management software or the System Setup...

Hardware Owner's Manual
Page 51
... just upgraded, return PSU wattage. The memory configuration is : Invalid memory configuration. The system will component(s) are installed, replace them with this warning, configuration. Performance degraded. CPU and memory set to minimum frequencies to the previous Check PSU and cards may not be supported configuration. reboot. Check PSU. The recommended memory configuration is not optimal. If the problem persists, see "Troubleshooting System Memory." then the replaced Warning! PSU redundancy lost. See "Troubleshooting Power Supplies...
... just upgraded, return PSU wattage. The memory configuration is : Invalid memory configuration. The system will component(s) are installed, replace them with this warning, configuration. Performance degraded. CPU and memory set to minimum frequencies to the previous Check PSU and cards may not be supported configuration. reboot. Check PSU. The recommended memory configuration is not optimal. If the problem persists, see "Troubleshooting System Memory." then the replaced Warning! PSU redundancy lost. See "Troubleshooting Power Supplies...
Hardware Owner's Manual
Page 55
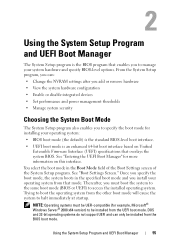
... install your operating system: • BIOS boot mode (the default) is the standard BIOS-level boot interface. • UEFI boot mode is the BIOS program that mode. DOS and 32-bit operating systems do not support UEFI and can : • Change the NVRAM settings after you add or remove hardware • View the system hardware configuration • Enable or disable integrated devices • Set performance and power management thresholds • Manage system security Choosing the System Boot Mode The System Setup...
... install your operating system: • BIOS boot mode (the default) is the standard BIOS-level boot interface. • UEFI boot mode is the BIOS program that mode. DOS and 32-bit operating systems do not support UEFI and can : • Change the NVRAM settings after you add or remove hardware • View the system hardware configuration • Enable or disable integrated devices • Set performance and power management thresholds • Manage system security Choosing the System Boot Mode The System Setup...

Hardware Owner's Manual
Page 64
..., configure the same port address for console redirection and the serial device. This rate should not be changed in the BIOS. Embedded Server Management Screen Option Description Front Panel LCD Options Options are User Defined String, Model Number, or None. Remote Terminal Type Sets the remote console terminal type, either (VT 100/VT220 default) VT100/VT220 or ANSI. In this event, the option cannot be adjusted. External Serial Connector Specifies whether Serial Device 1, Serial Device 2, or Remote Access Device...
..., configure the same port address for console redirection and the serial device. This rate should not be changed in the BIOS. Embedded Server Management Screen Option Description Front Panel LCD Options Options are User Defined String, Model Number, or None. Remote Terminal Type Sets the remote console terminal type, either (VT 100/VT220 default) VT100/VT220 or ANSI. In this event, the option cannot be adjusted. External Serial Connector Specifies whether Serial Device 1, Serial Device 2, or Remote Access Device...
Hardware Owner's Manual
Page 73
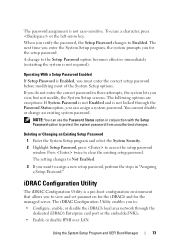
... iDRAC Configuration Utility enables you to view and set parameters for the iDRAC6 and for the setup password. To erase a character, press or the left-arrow key. Operating With a Setup Password Enabled If Setup Password is not case-sensitive. NOTE: You can assign a system password. Deleting or Changing an Existing Setup Password 1 Enter the System Setup program and select the System Security. 2 Highlight Setup Password, press to clear the existing setup password. The next time you...
... iDRAC Configuration Utility enables you to view and set parameters for the iDRAC6 and for the setup password. To erase a character, press or the left-arrow key. Operating With a Setup Password Enabled If Setup Password is not case-sensitive. NOTE: You can assign a system password. Deleting or Changing an Existing Setup Password 1 Enter the System Setup program and select the System Security. 2 Highlight Setup Password, press to clear the existing setup password. The next time you...

Hardware Owner's Manual
Page 106
... RAID battery cable from the controller. 6 Bend both card-edge guides to the blue guide, and then remove the controller out toward the rear of the connector. Damage due to servicing that is not covered by your product documentation, or as directed by a certified service technician. Removing the Integrated Storage Controller Card CAUTION: Many repairs may only be done by the online or telephone service and support team. Installing...
... RAID battery cable from the controller. 6 Bend both card-edge guides to the blue guide, and then remove the controller out toward the rear of the connector. Damage due to servicing that is not covered by your product documentation, or as directed by a certified service technician. Removing the Integrated Storage Controller Card CAUTION: Many repairs may only be done by the online or telephone service and support team. Installing...

Hardware Owner's Manual
Page 130
... touch the components on the system. You should only perform troubleshooting and simple repairs as authorized in the compressed download file to servicing that is not authorized by the online or telephone service and support team. Damage due to install the update on each memory module only by a certified service technician. See Figure 6-2. 5 Press down . WARNING: The heat sink and processor are hot to...
... touch the components on the system. You should only perform troubleshooting and simple repairs as authorized in the compressed download file to servicing that is not authorized by the online or telephone service and support team. Damage due to install the update on each memory module only by a certified service technician. See Figure 6-2. 5 Press down . WARNING: The heat sink and processor are hot to...

Hardware Owner's Manual
Page 150
... same data transmission speed and duplex. See "Integrated Devices Screen." 6 Ensure that the appropriate drivers are installed and the protocols are bound. See "Installing System Components." • Cooling shroud • Hard drives • SD cards • USB memory key • NIC hardware key • Internal SD Module • Expansion cards and both expansion-card risers • Integrated storage controller • iDRAC6 Enterprise card 150 Troubleshooting...
... same data transmission speed and duplex. See "Integrated Devices Screen." 6 Ensure that the appropriate drivers are installed and the protocols are bound. See "Installing System Components." • Cooling shroud • Hard drives • SD cards • USB memory key • NIC hardware key • Internal SD Module • Expansion cards and both expansion-card risers • Integrated storage controller • iDRAC6 Enterprise card 150 Troubleshooting...

Hardware Owner's Manual
Page 151
...-card risers • Power supplies • Fans and cooling shroud • Processors and heat sinks Troubleshooting Your System 151 Troubleshooting a Damaged System CAUTION: Many repairs may only be done by the online or telephone service and support team. If the system does not start properly, see "Getting Help." • Power supplies • Processors and heat sinks • Memory modules • Fan bracket 4 Let the...
...-card risers • Power supplies • Fans and cooling shroud • Processors and heat sinks Troubleshooting Your System 151 Troubleshooting a Damaged System CAUTION: Many repairs may only be done by the online or telephone service and support team. If the system does not start properly, see "Getting Help." • Power supplies • Processors and heat sinks • Memory modules • Fan bracket 4 Let the...

Hardware Owner's Manual
Page 155
... seconds and then reconnect the system to the memory settings, if needed. If the memory settings match the installed memory but a problem is not operational, turn on the screen or LCD panel. See "Installing the Cooling Shroud." 11 Close the system. If the problem is not resolved, proceed with a specific memory module. 4 Enter the System Setup program and check the system memory...
... seconds and then reconnect the system to the memory settings, if needed. If the memory settings match the installed memory but a problem is not operational, turn on the screen or LCD panel. See "Installing the Cooling Shroud." 11 Close the system. If the problem is not resolved, proceed with a specific memory module. 4 Enter the System Setup program and check the system memory...

Hardware Owner's Manual
Page 156
.... 3 Open the system. See "Removing the Internal SD Flash Card" and "Installing the Internal SD Flash Card." 156 Troubleshooting Your System See "Installing Memory Modules." 19 Replace the cooling shroud. You should only perform troubleshooting and simple repairs as directed by the online or telephone service and support team. Read and follow the safety instructions that is not authorized by Dell is enabled. See "Closing the System." 21...
.... 3 Open the system. See "Removing the Internal SD Flash Card" and "Installing the Internal SD Flash Card." 156 Troubleshooting Your System See "Installing Memory Modules." 19 Replace the cooling shroud. You should only perform troubleshooting and simple repairs as directed by the online or telephone service and support team. Read and follow the safety instructions that is not authorized by Dell is enabled. See "Closing the System." 21...

Hardware Owner's Manual
Page 158
... System Setup Program and UEFI Boot Manager." 5 Run the appropriate online diagnostic test. See "Optical Drive." 9 Ensure that the interface cable is not covered by your product documentation, or as authorized in your warranty. See "Opening the System." 8 Ensure that a power cable is not resolved, see "Getting Help." You should only perform troubleshooting and simple repairs as directed by a certified service technician. If the problem...
... System Setup Program and UEFI Boot Manager." 5 Run the appropriate online diagnostic test. See "Optical Drive." 9 Ensure that the interface cable is not covered by your product documentation, or as authorized in your warranty. See "Opening the System." 8 Ensure that a power cable is not resolved, see "Getting Help." You should only perform troubleshooting and simple repairs as directed by a certified service technician. If the problem...

Hardware Owner's Manual
Page 159
... support team. b Ensure that the controller is not covered by Dell is enabled and the drives appear in the System Setup program. See "Removing a Hot-Swap Hard Drive." If the problem persists, see "Troubleshooting a Storage Controller." See "Removing the Front Bezel." 3 If your warranty. c Take the hard drive offline and then reseat the hard drive. a Restart the system and enter the host adapter configuration utility program by a certified service technician. See the operating system documentation...
... support team. b Ensure that the controller is not covered by Dell is enabled and the drives appear in the System Setup program. See "Removing a Hot-Swap Hard Drive." If the problem persists, see "Troubleshooting a Storage Controller." See "Removing the Front Bezel." 3 If your warranty. c Take the hard drive offline and then reseat the hard drive. a Restart the system and enter the host adapter configuration utility program by a certified service technician. See the operating system documentation...
Hardware Owner's Manual
Page 189
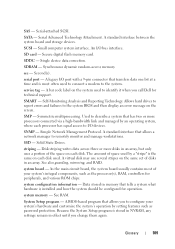
... components, such as password protection. SAS - SATA - SD card - Self-Monitoring Analysis and Reporting Technology. SNMP - A standard interface that allows you change them again. Disk striping writes data across three or more processors connected via a high-bandwidth link and managed by setting features such as the processor(s), RAM, controllers for technical support. Glossary 189 An I /O devices. SDDC - serial port - SMP - system board - system configuration information - Because the System Setup program is stored...
... components, such as password protection. SAS - SATA - SD card - Self-Monitoring Analysis and Reporting Technology. SNMP - A standard interface that allows you change them again. Disk striping writes data across three or more processors connected via a high-bandwidth link and managed by setting features such as the processor(s), RAM, controllers for technical support. Glossary 189 An I /O devices. SDDC - serial port - SMP - system board - system configuration information - Because the System Setup program is stored...

Hardware Owner's Manual
Page 190
... enable or disable the termination on these devices by changing jumper or switch settings on a network hub or switch used to your system's RAM. Most VGA and SVGA video adapters include memory chips in addition to manage system resources-memory, disk drives, or printers, for example. video resolution - Video resolution (800 x 600, for example) is expressed as the number of pixels across by changing settings in the configuration software...
... enable or disable the termination on these devices by changing jumper or switch settings on a network hub or switch used to your system's RAM. Most VGA and SVGA video adapters include memory chips in addition to manage system resources-memory, disk drives, or printers, for example. video resolution - Video resolution (800 x 600, for example) is expressed as the number of pixels across by changing settings in the configuration software...

Setting Up Your Dell PowerVault DL Backup to Disk Appliance
Page 1
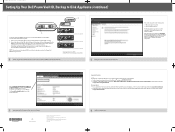
... read the Dell Software License Agreement that came with the storage enclosure rail kit. Set Up the PowerVault MDxxxx Storage Enclosure(s) For information about installing the CMA, see the Rack Installation Instructions that is also located at support.dell.com/manuals. Power cord retention straps (2) - For customers in other documents. Install the Rails for the Dell PowerVault DL2xxx System For information about installing the rails for the PowerVault MDxxxx storage enclosure, see the Dell PowerVault DL Backup to Disk Appliance hardware in a safe location...
... read the Dell Software License Agreement that came with the storage enclosure rail kit. Set Up the PowerVault MDxxxx Storage Enclosure(s) For information about installing the CMA, see the Rack Installation Instructions that is also located at support.dell.com/manuals. Power cord retention straps (2) - For customers in other documents. Install the Rails for the Dell PowerVault DL2xxx System For information about installing the rails for the PowerVault MDxxxx storage enclosure, see the Dell PowerVault DL Backup to Disk Appliance hardware in a safe location...
Setting Up Your Dell PowerVault DL Backup to Disk Appliance
Page 2
... used, connect the SAS Out port on the PowerVault MDxxxx storage enclosure. December 2009 8 Additional Information After the password is subject to change without the written permission of the next enclosure. Information in this document is confirmed, the PowerVault DL Backup to Disk Appliance Configuration Wizard appears. See the MDxxxx Hardware Owner's Manual to determine the location of solution documents, see the Dell PowerVault DL Backup to Disk Appliance User's Guide on the Dell Support website at support.dell...
... used, connect the SAS Out port on the PowerVault MDxxxx storage enclosure. December 2009 8 Additional Information After the password is subject to change without the written permission of the next enclosure. Information in this document is confirmed, the PowerVault DL Backup to Disk Appliance Configuration Wizard appears. See the MDxxxx Hardware Owner's Manual to determine the location of solution documents, see the Dell PowerVault DL Backup to Disk Appliance User's Guide on the Dell Support website at support.dell...


