
Information Update - Intel Xeon 5600 Series Processors
Page 1
... iDRAC firmware for the Intel Xeon 5600 series processor at support.dell.com. NOTE: The modular systems, PowerEdge M610 and M710, support the 130 W Intel Xeon X5680 only in the 130 W processor category. R610 - T710 - NOTE: The PowerEdge R610 and M710 systems need specific heat sinks to support Intel Xeon 5600 series processor (less than 130 W). December...
... iDRAC firmware for the Intel Xeon 5600 series processor at support.dell.com. NOTE: The modular systems, PowerEdge M610 and M710, support the 130 W Intel Xeon X5680 only in the 130 W processor category. R610 - T710 - NOTE: The PowerEdge R610 and M710 systems need specific heat sinks to support Intel Xeon 5600 series processor (less than 130 W). December...
Information Update - Processor Installation
Page 3
...the system has been powered down (thermal grease side facing up). The heat sink is recommended that came with the system. 1 Prior to upgrading your system, download the latest system BIOS version from support.dell.com and follow the instructions included in the interior of the system. 3... Open the system. See your system. 2 Turn off of the processor and set the heat sink aside upside down . CAUTION: Never remove the heat sink from a processor unless you always ...
...the system has been powered down (thermal grease side facing up). The heat sink is recommended that came with the system. 1 Prior to upgrading your system, download the latest system BIOS version from support.dell.com and follow the instructions included in the interior of the system. 3... Open the system. See your system. 2 Turn off of the processor and set the heat sink aside upside down . CAUTION: Never remove the heat sink from a processor unless you always ...
Information Update - Processor Installation
Page 4
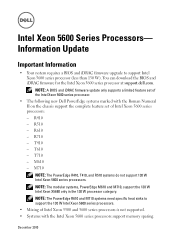
... 1-1. See Figure 1-2. 10 Use the tab on the processor shield to rotate shield upward and out of the way. Installing and Removing the Heat Sink 2 1 1 heat sink 2 release lever (2) NOTE: Your heat sink may appear differently than the one shown above. Rotate the lever 90 degrees upward until the processor is held in its socket under...
... 1-1. See Figure 1-2. 10 Use the tab on the processor shield to rotate shield upward and out of the way. Installing and Removing the Heat Sink 2 1 1 heat sink 2 release lever (2) NOTE: Your heat sink may appear differently than the one shown above. Rotate the lever 90 degrees upward until the processor is held in its socket under...
Information Update - Processor Installation
Page 5
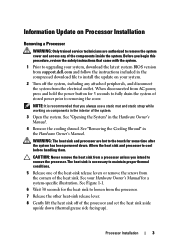
... board. 11 Carefully, lift the processor out of the processor. Processor Installation 5 If you are permanently removing the processor, you must install a processor blank and a heat-sink blank in an antistatic container for the new processor. Do not touch the bottom of the socket and leave the release lever up so that...
... board. 11 Carefully, lift the processor out of the processor. Processor Installation 5 If you are permanently removing the processor, you must install a processor blank and a heat-sink blank in an antistatic container for the new processor. Do not touch the bottom of the socket and leave the release lever up so that...
Information Update - Processor Installation
Page 8
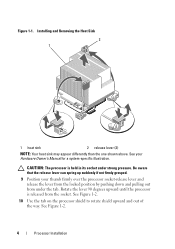
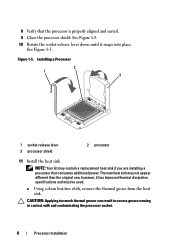
Installing a Processor 2 1 3 1 socket-release lever 3 processor shield 2 processor 11 Install the heat sink. See Figure 1-5. 10 Rotate the socket-release lever down until it has improved thermal dissipation specifications and must be...with and contaminating the processor socket. 8 Processor Installation a Using a clean lint-free cloth, remove the thermal grease from the heat sink. Figure 1-5. The new heat sink may contain a replacement heat sink if you are installing a processor that the processor is properly aligned and seated. 9 Close the processor shield. See Figure 1-5....
Installing a Processor 2 1 3 1 socket-release lever 3 processor shield 2 processor 11 Install the heat sink. See Figure 1-5. 10 Rotate the socket-release lever down until it has improved thermal dissipation specifications and must be...with and contaminating the processor socket. 8 Processor Installation a Using a clean lint-free cloth, remove the thermal grease from the heat sink. Figure 1-5. The new heat sink may contain a replacement heat sink if you are installing a processor that the processor is properly aligned and seated. 9 Close the processor shield. See Figure 1-5....
Information Update - Processor Installation
Page 9
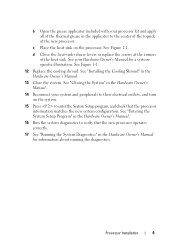
... See "Closing the System" in the Hardware Owner's Manual. 13 Close the system. See Figure 1-1. 12 Replace the cooling shroud. d Close the heat-sink release levers or replace the screws at the corners of the new processor. See your system and peripherals to the center of the topside of... included with your processor kit and apply all of the thermal grease in the Hardware Owner's Manual for a systemspecific illustration. c Place the heat sink on the system. 15 Press to enter the System Setup program, and check that the new processor operates correctly. 17 See "Running the ...
... See "Closing the System" in the Hardware Owner's Manual. 13 Close the system. See Figure 1-1. 12 Replace the cooling shroud. d Close the heat-sink release levers or replace the screws at the corners of the new processor. See your system and peripherals to the center of the topside of... included with your processor kit and apply all of the thermal grease in the Hardware Owner's Manual for a systemspecific illustration. c Place the heat sink on the system. 15 Press to enter the System Setup program, and check that the new processor operates correctly. 17 See "Running the ...

Hardware Owner's Manual
Page 26
heating. Remove AC power to the type Check CPU or described in the BIOS microprocessor technical revision. Specified processor is Ensure that the specified missing or ... risk of specified fan in an unsupported installed. See configuration. E1418 CPU # not detected. specifications outlined in an Ensure that the processor exceeding acceptable temperature heat sinks are in your CPU unsupported configuration. If the problem persists, see "Getting Help." Table 1-1. See failure would put the "Troubleshooting a Fan." Check CPU is no...
heating. Remove AC power to the type Check CPU or described in the BIOS microprocessor technical revision. Specified processor is Ensure that the specified missing or ... risk of specified fan in an unsupported installed. See configuration. E1418 CPU # not detected. specifications outlined in an Ensure that the processor exceeding acceptable temperature heat sinks are in your CPU unsupported configuration. If the problem persists, see "Getting Help." Table 1-1. See failure would put the "Troubleshooting a Fan." Check CPU is no...

Hardware Owner's Manual
Page 78
... 10 9 2 3 4 5 6 7 1 power supply bays (2) 3 iDRAC6 Enterprise card 5 memory modules (12) 7 SAS backplane 9 optical drive 11 Internal SD Module 8 2 expansion-card riser (2) 4 integrated storage controller card 6 heat sink/processor (2) 8 hard drives (6) 10 RAID battery (PERC only) 12 fans (5 or 6) Removing and Replacing the Optional Front Bezel 1 Unlock the keylock at the left end...
... 10 9 2 3 4 5 6 7 1 power supply bays (2) 3 iDRAC6 Enterprise card 5 memory modules (12) 7 SAS backplane 9 optical drive 11 Internal SD Module 8 2 expansion-card riser (2) 4 integrated storage controller card 6 heat sink/processor (2) 8 hard drives (6) 10 RAID battery (PERC only) 12 fans (5 or 6) Removing and Replacing the Optional Front Bezel 1 Unlock the keylock at the left end...

Hardware Owner's Manual
Page 123
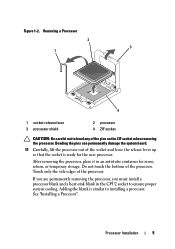
...dell.com. CAUTION: Never remove the heat sink from a processor unless you intend to loosen from the electrical outlet. 3 Open the system. See Figure 3-19. Installing and Removing the Heat Sink 1 2 1 heat sink 2 heat-sink retention latch (2) 5 Wait 30 seconds for the heat sink to remove the processor. support team. The heat sink...safety instructions that is not authorized by Dell is necessary to upgrading your system. 2 Turn off the system, including any attached peripherals, and disconnect the system from the processor. 6 Open the other heat-sink retention latch. Figure 3-19.
...dell.com. CAUTION: Never remove the heat sink from a processor unless you intend to loosen from the electrical outlet. 3 Open the system. See Figure 3-19. Installing and Removing the Heat Sink 1 2 1 heat sink 2 heat-sink retention latch (2) 5 Wait 30 seconds for the heat sink to remove the processor. support team. The heat sink...safety instructions that is not authorized by Dell is necessary to upgrading your system. 2 Turn off the system, including any attached peripherals, and disconnect the system from the processor. 6 Open the other heat-sink retention latch. Figure 3-19.

Hardware Owner's Manual
Page 124
... blanks is held in its socket under strong pressure. NOTE: In single-processor configurations, a processor must install a processor blank and a heat-sink blank to bend any of the way. Install the blanks in socket CPU1. CAUTION: The processor is similar to adding a processor. 7 Gently... lift the heat sink off of the processor and set the heat sink aside upside down (thermal grease side facing up so that the release lever can permanently damage the system board. ...
... blanks is held in its socket under strong pressure. NOTE: In single-processor configurations, a processor must install a processor blank and a heat-sink blank to bend any of the way. Install the blanks in socket CPU1. CAUTION: The processor is similar to adding a processor. 7 Gently... lift the heat sink off of the processor and set the heat sink aside upside down (thermal grease side facing up so that the release lever can permanently damage the system board. ...

Hardware Owner's Manual
Page 126
...center of the top of the processor socket. CAUTION: Positioning the processor incorrectly can cause grease to seat the processor. c Place the heat sink on the ZIF socket. See "Entering the System Setup Program." 126 Installing System Components If the processor has already been used previously. ...the processor with the socket keys on the processor. Removing the blanks is positioned correctly, it engages easily into place. 6 Install the heat sink. a With the release lever on the processor socket in the open position, align the processor with the processor kit and apply a ...
...center of the top of the processor socket. CAUTION: Positioning the processor incorrectly can cause grease to seat the processor. c Place the heat sink on the ZIF socket. See "Entering the System Setup Program." 126 Installing System Components If the processor has already been used previously. ...the processor with the socket keys on the processor. Removing the blanks is positioned correctly, it engages easily into place. 6 Install the heat sink. a With the release lever on the processor socket in the open position, align the processor with the processor kit and apply a ...

Hardware Owner's Manual
Page 138
... is inserted in the order listed below (see Figure 6-1 for the locations of the system board into the chassis. See Figure 1-1. 3 Transfer the processors and heat sinks to the same locations on the new board. See Figure 3-24. See "Removing Memory Modules" and "Installing Memory Modules." 5 Install the new system board: a Holding...
... is inserted in the order listed below (see Figure 6-1 for the locations of the system board into the chassis. See Figure 1-1. 3 Transfer the processors and heat sinks to the same locations on the new board. See Figure 3-24. See "Removing Memory Modules" and "Installing Memory Modules." 5 Install the new system board: a Holding...

Hardware Owner's Manual
Page 145
...installed: • Expansion cards and both expansion-card risers • Power supplies • Fans • Processors and heat sinks Troubleshooting Your System 145 You should only perform troubleshooting and simple repairs as authorized in your warranty. • Fan assembly •... Processors and heat sinks • Memory modules 4 Let the system dry thoroughly for at least 24 hours. 5 Reinstall the processors and heat sinks, memory modules, power supplies, and fan assembly. See "Opening the System." 3 Ensure that is not authorized by Dell is not covered by ...
...installed: • Expansion cards and both expansion-card risers • Power supplies • Fans • Processors and heat sinks Troubleshooting Your System 145 You should only perform troubleshooting and simple repairs as authorized in your warranty. • Fan assembly •... Processors and heat sinks • Memory modules 4 Let the system dry thoroughly for at least 24 hours. 5 Reinstall the processors and heat sinks, memory modules, power supplies, and fan assembly. See "Opening the System." 3 Ensure that is not authorized by Dell is not covered by ...

Hardware Owner's Manual
Page 147
...; The expansion card installation restrictions have not been observed. Troubleshooting System Cooling Problems CAUTION: Many repairs may only be done by Dell is functioning properly. Damage due to an Energy Smart configuration or vice versa, you must power down the system. 2 Reseat ...it . Troubleshooting Your System 147 CAUTION: If troubleshooting a PSU mismatch error, replace only the power supply with a single power supply), heat sink blank (in single processor configurations), or front or back filler panel. • Ambient temperature is too high. • External airflow is...
...; The expansion card installation restrictions have not been observed. Troubleshooting System Cooling Problems CAUTION: Many repairs may only be done by Dell is functioning properly. Damage due to an Energy Smart configuration or vice versa, you must power down the system. 2 Reseat ...it . Troubleshooting Your System 147 CAUTION: If troubleshooting a PSU mismatch error, replace only the power supply with a single power supply), heat sink blank (in single processor configurations), or front or back filler panel. • Ambient temperature is too high. • External airflow is...

Hardware Owner's Manual
Page 157
... the System." See "Closing the System." e Run the appropriate diagnostic test. Damage due to servicing that each processor and heat sink are properly installed. See "Opening the System." 4 Ensure that is not authorized by Dell is still indicated, see "Getting Help." See "Removing a Processor." If your system only has one processor and a problem...
... the System." See "Closing the System." e Run the appropriate diagnostic test. Damage due to servicing that each processor and heat sink are properly installed. See "Opening the System." 4 Ensure that is not authorized by Dell is still indicated, see "Getting Help." See "Removing a Processor." If your system only has one processor and a problem...

Hardware Owner's Manual
Page 180
diagnostics advanced testing options, 161 testing options, 161 using Dell PowerEdge Diagnostics, 159 when to use, 160 DIMMs See memory modules (DIMMs). drive blank installing, 83 removing, 82 drive carrier hard drive, 85 E error messages, 58...F front-panel features, 12 G guidelines expansion card installation, 89 memory installation, 116 180 Index H hard drive drive carrier, 85 installing, 84 removing, 83 troubleshooting, 152 heat sink, 123 I iDRAC card installing, 101 system port, 19 iDRAC Configuration Utility, 76 indicators back-panel, 19 front-panel, 12 NIC, 22 power, 12, 21 information...
diagnostics advanced testing options, 161 testing options, 161 using Dell PowerEdge Diagnostics, 159 when to use, 160 DIMMs See memory modules (DIMMs). drive blank installing, 83 removing, 82 drive carrier hard drive, 85 E error messages, 58...F front-panel features, 12 G guidelines expansion card installation, 89 memory installation, 116 180 Index H hard drive drive carrier, 85 installing, 84 removing, 83 troubleshooting, 152 heat sink, 123 I iDRAC card installing, 101 system port, 19 iDRAC Configuration Utility, 76 indicators back-panel, 19 front-panel, 12 NIC, 22 power, 12, 21 information...


