
User's Guide
Page 2
......6 Finding information about the printer...7 Understanding the parts of the printer...9 Ordering and replacing supplies 11 Ordering ink cartridges...11 Replacing ink cartridges...11 Recycling Dell products...13 Using the printer control panel buttons and menus 14 Using the printer control panel...14 Changing temporary settings into new default settings 16... printer software...23 Loading paper and original documents 25 Loading paper...25 Saving paper default settings...28 Loading original documents on the scanner glass 29 Printing 30 Tips for printing...30 Contents 2
......6 Finding information about the printer...7 Understanding the parts of the printer...9 Ordering and replacing supplies 11 Ordering ink cartridges...11 Replacing ink cartridges...11 Recycling Dell products...13 Using the printer control panel buttons and menus 14 Using the printer control panel...14 Changing temporary settings into new default settings 16... printer software...23 Loading paper and original documents 25 Loading paper...25 Saving paper default settings...28 Loading original documents on the scanner glass 29 Printing 30 Tips for printing...30 Contents 2
User's Guide
Page 3
... both sides of the paper (duplexing)...42 Managing print jobs...45 Copying 49 Tips for copying...49 Making copies...49 Copying photos...49 Copying a two-sided document...50 Enlarging or reducing images...50 Adjusting ...
... both sides of the paper (duplexing)...42 Managing print jobs...45 Copying 49 Tips for copying...49 Making copies...49 Copying photos...49 Copying a two-sided document...50 Enlarging or reducing images...50 Adjusting ...
User's Guide
Page 4
Maintaining the printer 83 Maintaining ink cartridges...83 Cleaning the exterior of the printer...85 Cleaning the scanner glass...85 Troubleshooting 86 Before you troubleshoot...86 Using the Service Center to solve printer problems 86 If Troubleshooting does not solve your problem...86 Setup troubleshooting...86 Jams and misfeeds troubleshooting...93 Print troubleshooting...95 Copy and scan troubleshooting...97 Memory card troubleshooting...99 Wireless troubleshooting...101 Notices 119 Product information...119 Edition notice...119 Power consumption...121 Index 130 Contents 4
Maintaining the printer 83 Maintaining ink cartridges...83 Cleaning the exterior of the printer...85 Cleaning the scanner glass...85 Troubleshooting 86 Before you troubleshoot...86 Using the Service Center to solve printer problems 86 If Troubleshooting does not solve your problem...86 Setup troubleshooting...86 Jams and misfeeds troubleshooting...93 Print troubleshooting...95 Copy and scan troubleshooting...97 Memory card troubleshooting...99 Wireless troubleshooting...101 Notices 119 Product information...119 Edition notice...119 Power consumption...121 Index 130 Contents 4

User's Guide
Page 6
...know. After all, you are continually improving our printers to 8 page images on your printer model). • Preview print jobs before printing. To avoid printing multiple copies, you can print up to reduce their environmental impact. About your printer Thank you for presentation. • Use recycled paper. Wireless/... and we could do better, please let us do encounter any problems along the way, one side of a sheet of paper. • Print on track fast. Conserving paper • Activate Eco-Mode. Duplexing lets you to Power Saver mode after the printer has been idle for ...
...know. After all, you are continually improving our printers to 8 page images on your printer model). • Preview print jobs before printing. To avoid printing multiple copies, you can print up to reduce their environmental impact. About your printer Thank you for presentation. • Use recycled paper. Wireless/... and we could do better, please let us do encounter any problems along the way, one side of a sheet of paper. • Print on track fast. Conserving paper • Activate Eco-Mode. Duplexing lets you to Power Saver mode after the printer has been idle for ...
User's Guide
Page 7
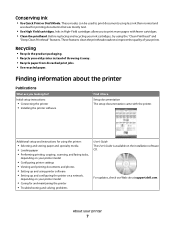
...with fewer cartridges. • Clean the printhead. Recycling • Recycle the product packaging. • Recycle your prints. Finding information about the printer Publications What are you to print documents using less ink than normal and are ideal for using the printer: • Selecting and storing paper ... that are mostly text. • Use High Yield cartridges. For updates, check our Web site at support.dell.com. These modes can be used to print more pages with the printer. Before replacing and recycling your printer model • Caring for ? Inks in High-Yield ...
...with fewer cartridges. • Clean the printhead. Recycling • Recycle the product packaging. • Recycle your prints. Finding information about the printer Publications What are you to print documents using less ink than normal and are ideal for using the printer: • Selecting and storing paper ... that are mostly text. • Use High Yield cartridges. For updates, check our Web site at support.dell.com. These modes can be used to print more pages with the printer. Before replacing and recycling your printer model • Caring for ? Inks in High-Yield ...

User's Guide
Page 10
... anti-theft cable on both sides of a sheet of paper. • Remove paper jams. 6 USB port Connect the printer to a power source. 5 Duplex unit • Print on your printer 10
... anti-theft cable on both sides of a sheet of paper. • Remove paper jams. 6 USB port Connect the printer to a power source. 5 Duplex unit • Print on your printer 10
User's Guide
Page 14
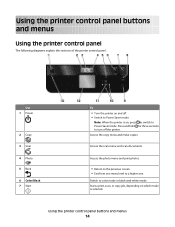
... is selected. Access the copy menu and make copies. Press and hold for three seconds to color mode or black-and-white mode. Start a print, scan, or copy job, depending on which mode is on and off the printer. Access the scan menu and scan documents. Using the printer... control panel buttons and menus 14 Switch to turn off . • Switch to a higher one. Access the photo menu and print photos. • Return to the previous screen. • Exit from one menu level to Power Saver mode. Using the printer control panel buttons and menus...
... is selected. Access the copy menu and make copies. Press and hold for three seconds to color mode or black-and-white mode. Start a print, scan, or copy job, depending on which mode is on and off the printer. Access the scan menu and scan documents. Using the printer... control panel buttons and menus 14 Switch to turn off . • Switch to a higher one. Access the photo menu and print photos. • Return to the previous screen. • Exit from one menu level to Power Saver mode. Using the printer control panel buttons and menus...
User's Guide
Page 15
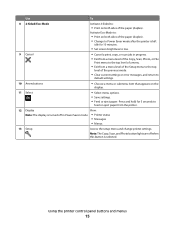
... in progress. • Exit from a menu level of the Copy, Scan, Photo, or File Print menu to the top level of the paper (duplex). Use To 8 2-Sided/Eco-Mode Activate 2-Sided to: • Print on both sides of the paper (duplex). • Change to Power Saver mode after the printer... Display View: Note: The display is turned off when this button is selected. Press and hold for 10 minutes. • Set screen brightness to : • Print on the display. 11 Select • Select menu options. • Save settings. • Feed or eject paper. Activate Eco-Mode to low. 9 Cancel &#...
... in progress. • Exit from a menu level of the Copy, Scan, Photo, or File Print menu to the top level of the paper (duplex). Use To 8 2-Sided/Eco-Mode Activate 2-Sided to: • Print on both sides of the paper (duplex). • Change to Power Saver mode after the printer... Display View: Note: The display is turned off when this button is selected. Press and hold for 10 minutes. • Set screen brightness to : • Print on the display. 11 Select • Select menu options. • Save settings. • Feed or eject paper. Activate Eco-Mode to low. 9 Cancel &#...
User's Guide
Page 17
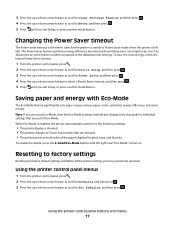
.... Changing the Power Saver timeout The Power Saver timeout is dimmed. • The printer changes to Power Saver mode after ten minutes. • The printer prints on both sides of Eco-Mode. 3 Press the up or down arrow button to scroll to Clear Settings Timeout, and then press . 4 Press the up..." comes on. When Eco-Mode is enabled, the printer automatically switches to the following settings: • The printer display is the time it takes for print, copy, and fax jobs.
.... Changing the Power Saver timeout The Power Saver timeout is dimmed. • The printer changes to Power Saver mode after ten minutes. • The printer prints on both sides of Eco-Mode. 3 Press the up or down arrow button to scroll to Clear Settings Timeout, and then press . 4 Press the up..." comes on. When Eco-Mode is enabled, the printer automatically switches to the following settings: • The printer display is the time it takes for print, copy, and fax jobs.

User's Guide
Page 20
...Scan a document and produce text that you can edit with the printer software if the printer has wireless capability. Dell Service Center (referred to as Toolbar) Print, scan, or convert local files from the Web, depending on a wireless network. • Change the wireless ...: • This program is installed automatically with a word-processing program. Printer software Use the To Dell Printer Home (referred to as Fast Pics) Manage, edit, transfer, and print photos and documents. Dell Wireless Setup Utility (referred to as Fax Solutions) • Send a fax. • Receive ...
...Scan a document and produce text that you can edit with the printer software if the printer has wireless capability. Dell Service Center (referred to as Toolbar) Print, scan, or convert local files from the Web, depending on a wireless network. • Change the wireless ...: • This program is installed automatically with a word-processing program. Printer software Use the To Dell Printer Home (referred to as Fast Pics) Manage, edit, transfer, and print photos and documents. Dell Wireless Setup Utility (referred to as Fax Solutions) • Send a fax. • Receive ...

User's Guide
Page 21
.... These applications are installed along with a document open and then click Properties, a Printing Preferences dialog appears. Use the Dell All-In-One Center (referred to as All-In-One Center) Dell AIO Setup Utility (referred to as AIO Setup Utility) To • Scan photos ... Access the printer utility. • Troubleshoot. • Order ink or supplies. • Contact Dell. • Check the printer software version installed on the features of the application that you want to print. • Print two-sided copies. • Select the paper type. • Add a watermark. • ...
.... These applications are installed along with a document open and then click Properties, a Printing Preferences dialog appears. Use the Dell All-In-One Center (referred to as All-In-One Center) Dell AIO Setup Utility (referred to as AIO Setup Utility) To • Scan photos ... Access the printer utility. • Troubleshoot. • Order ink or supplies. • Contact Dell. • Check the printer software version installed on the features of the application that you want to print. • Print two-sided copies. • Select the paper type. • Add a watermark. • ...

User's Guide
Page 22
...device to the computer over a network. Using the printer software 22 Dell Printer Utility (referred to as Wireless Setup Assistant) Note: Your printer may not come with cartridge installation. • Print a test page. • Print an alignment page. • Clean the printhead nozzles. •...click Customer Support. 4 From the Web site, select your printer and then download the driver. 5 Install additional or optional software. Dell Wireless Setup Assistant Set up the printer on the features of a memory device inserted into a network printer. • Transfer photos and...
...device to the computer over a network. Using the printer software 22 Dell Printer Utility (referred to as Wireless Setup Assistant) Note: Your printer may not come with cartridge installation. • Print a test page. • Print an alignment page. • Clean the printhead nozzles. •...click Customer Support. 4 From the Web site, select your printer and then download the driver. 5 Install additional or optional software. Dell Wireless Setup Assistant Set up the printer on the features of a memory device inserted into a network printer. • Transfer photos and...
User's Guide
Page 23
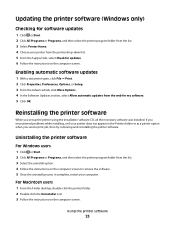
Enabling automatic software updates 1 With a document open, click File Print. 2 Click Properties, Preferences, Options, or Setup. 3 From the Advanced tab, click More Options. 4 In the Software Updates section, select Allow automatic updates from the printer ... the instructions on the computer screen to remove the software. 5 Once the uninstall process in the Printers folder or as a printer option when you send a print job, then try removing and reinstalling the printer software.
Enabling automatic software updates 1 With a document open, click File Print. 2 Click Properties, Preferences, Options, or Setup. 3 From the Advanced tab, click More Options. 4 In the Software Updates section, select Allow automatic updates from the printer ... the instructions on the computer screen to remove the software. 5 Once the uninstall process in the Printers folder or as a printer option when you send a print job, then try removing and reinstalling the printer software.

User's Guide
Page 26
... paper. • You remove all paper from the paper support before inserting banner paper. • You use banner paper designed for use with the print side faceup and the top of the letterhead going into the printer first. 25 sheets of heavyweight matte paper 20 sheets of banner paper •...; The print side of the paper is faceup. • The paper guides rest against the edges of the paper. • You select Automatic, Normal, or Photo print quality.
... paper. • You remove all paper from the paper support before inserting banner paper. • You use banner paper designed for use with the print side faceup and the top of the letterhead going into the printer first. 25 sheets of heavyweight matte paper 20 sheets of banner paper •...; The print side of the paper is faceup. • The paper guides rest against the edges of the paper. • You select Automatic, Normal, or Photo print quality.

User's Guide
Page 27
... cards, postcards, or photo cards • You select the correct envelope size. Note: If you are mailing within Japan, then the envelope can be printed in Portrait orientation with the stamp in the lower right corner or in Landscape orientation with the stamp in the lower left corner. Load up...recommended for use with expensive paper such as heavyweight matte, labels, photo cards and glossy paper. 25 sheets of photo/glossy paper • The print side of the paper is faceup. • The paper guides rest against the edges of the paper. • You select Automatic, Normal, or ...
... cards, postcards, or photo cards • You select the correct envelope size. Note: If you are mailing within Japan, then the envelope can be printed in Portrait orientation with the stamp in the lower right corner or in Landscape orientation with the stamp in the lower left corner. Load up...recommended for use with expensive paper such as heavyweight matte, labels, photo cards and glossy paper. 25 sheets of photo/glossy paper • The print side of the paper is faceup. • The paper guides rest against the edges of the paper. • You select Automatic, Normal, or ...
User's Guide
Page 28
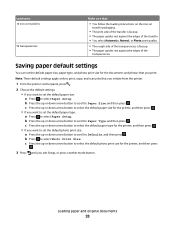
...faceup. • The paper guides rest against the edges of the transparencies. Loading paper and original documents 28 Note: These default settings apply only to print, copy, and scan jobs that you want to set the default paper type: a Press to select Paper Setup. c Press the up or down ... settings You can set the default paper size: a Press to select Paper Setup. c Press the up or down arrow button to select the default photo print size for the documents and photos that you initiate from the printer. 1 From the printer control panel, press . 2 Choose the default settings: • ...
...faceup. • The paper guides rest against the edges of the transparencies. Loading paper and original documents 28 Note: These default settings apply only to print, copy, and scan jobs that you want to set the default paper type: a Press to select Paper Setup. c Press the up or down ... settings You can set the default paper size: a Press to select Paper Setup. c Press the up or down arrow button to select the default photo print size for the documents and photos that you initiate from the printer. 1 From the printer control panel, press . 2 Choose the default settings: • ...

User's Guide
Page 30
... Setup dialog, set the printer, paper size, and orientation. 3 Click OK. 4 From the menu bar, choose File > Print. 5 From the Printer pop-up menu, choose your print job. • Select a higher print quality for better prints. • Make sure there is enough ink in the ink cartridges. • Remove each sheet as it is...
... Setup dialog, set the printer, paper size, and orientation. 3 Click OK. 4 From the menu bar, choose File > Print. 5 From the Printer pop-up menu, choose your print job. • Select a higher print quality for better prints. • Make sure there is enough ink in the ink cartridges. • Remove each sheet as it is...

User's Guide
Page 31
... Setup. 2 From the Page Setup dialog, set the printer, paper size, and orientation. 3 Click OK. 4 From the menu bar, choose File > Print. 5 From the Printer pop-up menu, choose your printer. 6 From the Copies area, enter the number of copies that you want to... print, and then choose Collated. 7 Click Print. Printing 31 Collating printed copies When printing multiple copies of a document, you can choose to print each photo as groups of pages (not collated). For Macintosh users 1 With a document open ...
... Setup. 2 From the Page Setup dialog, set the printer, paper size, and orientation. 3 Click OK. 4 From the menu bar, choose File > Print. 5 From the Printer pop-up menu, choose your printer. 6 From the Copies area, enter the number of copies that you want to... print, and then choose Collated. 7 Click Print. Printing 31 Collating printed copies When printing multiple copies of a document, you can choose to print each photo as groups of pages (not collated). For Macintosh users 1 With a document open ...

User's Guide
Page 32
...6 Click OK to close any printer software dialogs. 7 Click OK or Print. To change the print order, you cannot print the last page first. Printing 32 Note: If two-sided printing is enabled, then you must first disable two-sided printing. 4 Click OK to : Advanced tab > Layout list > select Pages... per sheet 4 Select the number of the Print Setup tab, select a page order: • To print the last page first, select Print Last Page First. • To print the first page first, clear the Print Last Page First check box. Printing multiple pages on one sheet For Windows users 1 ...
...6 Click OK to close any printer software dialogs. 7 Click OK or Print. To change the print order, you cannot print the last page first. Printing 32 Note: If two-sided printing is enabled, then you must first disable two-sided printing. 4 Click OK to : Advanced tab > Layout list > select Pages... per sheet 4 Select the number of the Print Setup tab, select a page order: • To print the last page first, select Print Last Page First. • To print the first page first, clear the Print Last Page First check box. Printing multiple pages on one sheet For Windows users 1 ...
User's Guide
Page 33
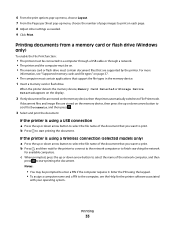
... and the computer must contain document files that support the file types in the memory device. 1 Insert a memory card or flash drive. Printing 33 b Press to File Print mode. Notes: • You may be prompted to the computer, see "Supported memory cards and file types" on each page. 8... Adjust other settings as needed. 9 Click Print. For more information, see the Help for the printer software associated with your operating system. If document files and image files are supported by the...
... and the computer must contain document files that support the file types in the memory device. 1 Insert a memory card or flash drive. Printing 33 b Press to File Print mode. Notes: • You may be prompted to the computer, see "Supported memory cards and file types" on each page. 8... Adjust other settings as needed. 9 Click Print. For more information, see the Help for the printer software associated with your operating system. If document files and image files are supported by the...


