Dell Display Manager Installation Note: In Drivers and Downloads, choose your OS, and then select Dell
Page 1
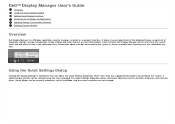
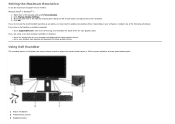
.... When more than one supported Dell model is connected to the system is a Windows application used to manage a monitor or a group of the monitor's Brightness and Contrast levels, Preset Modes can be manually selected or set to Auto Mode, and the screen resolution can be changed. Using the Quick Settings Dialog Clicking Dell Display Manager's notification tray icon opens the Quick Settings dialog box. The Quick Settings dialog box allows convenient adjustment of monitors. Once installed, Dell Display Manager will run each time...
.... When more than one supported Dell model is connected to the system is a Windows application used to manage a monitor or a group of the monitor's Brightness and Contrast levels, Preset Modes can be manually selected or set to Auto Mode, and the screen resolution can be changed. Using the Quick Settings Dialog Clicking Dell Display Manager's notification tray icon opens the Quick Settings dialog box. The Quick Settings dialog box allows convenient adjustment of monitors. Once installed, Dell Display Manager will run each time...
Dell Display Manager Installation Note: In Drivers and Downloads, choose your OS, and then select Dell
Page 3
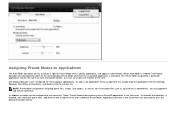
... each connected monitor, or it onto the current list. To override this behavior, if enabled, with individual game titles, add them to the assignment list with a specific application, and apply it automatically. Applications present in the assignment list take priority over the general Direct3D setting. Dell Display Manager is run fullscreen. Assigning Preset Modes to Applications The Auto Mode...
... each connected monitor, or it onto the current list. To override this behavior, if enabled, with individual game titles, add them to the assignment list with a specific application, and apply it automatically. Applications present in the assignment list take priority over the general Direct3D setting. Dell Display Manager is run fullscreen. Assigning Preset Modes to Applications The Auto Mode...
User's Guide
Page 2
...change without the written permission of Advanced Micro Devices, Inc. is a trademark of Dell Inc. Microsoft and Windows are not followed. WARNING: A WARNING indicates a potential for energy efficiency. and ATI is strictly forbidden. has determined that helps you make better use... proprietary interest in any manner whatsoever without notice. © 2012 Dell Inc. A01 Dell™ P1913/P1913S/P2213 Monitor User's Guide About Your Monitor Setting Up the Monitor Operating the Monitor Troubleshooting Appendix Notes, Cautions, and Warnings NOTE: A NOTE indicates important ...
...change without the written permission of Advanced Micro Devices, Inc. is a trademark of Dell Inc. Microsoft and Windows are not followed. WARNING: A WARNING indicates a potential for energy efficiency. and ATI is strictly forbidden. has determined that helps you make better use... proprietary interest in any manner whatsoever without notice. © 2012 Dell Inc. A01 Dell™ P1913/P1913S/P2213 Monitor User's Guide About Your Monitor Setting Up the Monitor Operating the Monitor Troubleshooting Appendix Notes, Cautions, and Warnings NOTE: A NOTE indicates important ...
User's Guide
Page 3
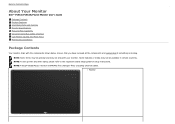
... certain countries. NOTE: To set up with any other stand, please refer to Contents Page About Your Monitor Dell™ P1913/P1913S/P2213 Monitor User's Guide Package Contents Product Features Identifying Parts and Controls Monitor Specifications Plug and Play Capability Universal Serial Bus (USB) Interface LCD Monitor Quality and Pixel Policy Maintenance Guidelines Package Contents Your monitor ships with your monitor. Back to the respective stand setup guide for setup instructions. Some features or media...
... certain countries. NOTE: To set up with any other stand, please refer to Contents Page About Your Monitor Dell™ P1913/P1913S/P2213 Monitor User's Guide Package Contents Product Features Identifying Parts and Controls Monitor Specifications Plug and Play Capability Universal Serial Bus (USB) Interface LCD Monitor Quality and Pixel Policy Maintenance Guidelines Package Contents Your monitor ships with your monitor. Back to the respective stand setup guide for setup instructions. Some features or media...
User's Guide
Page 5
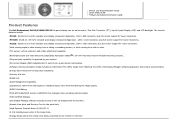
... the panel only. ¦ High Dynamic Contrast Ratio (2,000,000:1). ¦ 0.3 W standby power when in the sleep mode. ¦ Energy Gauge shows the energy level being consumed by the monitor in real time. Drivers and Documentation media Quick Setup Guide Product and Safety Information Guide Product Features The Dell Professional P1913/P1913S/P2213 flat panel display has an active matrix, Thin-Film Transistor (TFT), Liquid Crystal Display (LCD) and LED backlight.
... the panel only. ¦ High Dynamic Contrast Ratio (2,000,000:1). ¦ 0.3 W standby power when in the sleep mode. ¦ Energy Gauge shows the energy level being consumed by the monitor in real time. Drivers and Documentation media Quick Setup Guide Product and Safety Information Guide Product Features The Dell Professional P1913/P1913S/P2213 flat panel display has an active matrix, Thin-Film Transistor (TFT), Liquid Crystal Display (LCD) and LED backlight.
User's Guide
Page 9
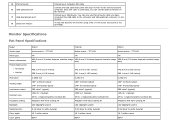
... screw (the screw is connected, you have connected the USB cable to white (typical) 16.7 million colors 83%* You can only use this cable is not provided). Monitor Specifications Flat Panel Specifications Model Screen type Panel type Screen dimensions Preset display area: Horizontal Vertical Pixel pitch Viewing angle Luminance output Contrast ratio Faceplate coating Backlight Response time Color depth Color gamut P1913 P1913S P2213 Active matrix - Connect your computer DVI cable. TFT LCD Active matrix - 5 DVI connector 6 USB upstream port 7 USB downstream port 8 Stand lock...
... screw (the screw is connected, you have connected the USB cable to white (typical) 16.7 million colors 83%* You can only use this cable is not provided). Monitor Specifications Flat Panel Specifications Model Screen type Panel type Screen dimensions Preset display area: Horizontal Vertical Pixel pitch Viewing angle Luminance output Contrast ratio Faceplate coating Backlight Response time Color depth Color gamut P1913 P1913S P2213 Active matrix - Connect your computer DVI cable. TFT LCD Active matrix - 5 DVI connector 6 USB upstream port 7 USB downstream port 8 Stand lock...
User's Guide
Page 12
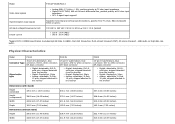
...; connector; DVI-D, white connector; Model Video input signals Synchronization input signals AC input voltage/frequency/current Inrush current P1913/P1913S/P2213 Analog RGB, 0.7 Volts +/- 5%, positive polarity at 75 ohm input impedance Digital DVI-D TMDS, 600 mV for each differential line, positive polarity at 50 ohm input impedance DP 1.2 signal input support* Separate horizontal and vertical synchronizations, polarity-free TTL level, SOG (Composite SYNC on green) 100 VAC to the monitor Dimensions (with stand) Height (extended) Height (compressed) Width 476.4 mm ( 18.76 inches...
...; connector; DVI-D, white connector; Model Video input signals Synchronization input signals AC input voltage/frequency/current Inrush current P1913/P1913S/P2213 Analog RGB, 0.7 Volts +/- 5%, positive polarity at 75 ohm input impedance Digital DVI-D TMDS, 600 mV for each differential line, positive polarity at 50 ohm input impedance DP 1.2 signal input support* Separate horizontal and vertical synchronizations, polarity-free TTL level, SOG (Composite SYNC on green) 100 VAC to the monitor Dimensions (with stand) Height (extended) Height (compressed) Width 476.4 mm ( 18.76 inches...
User's Guide
Page 14
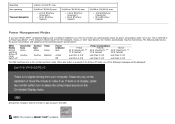
... Modes If you have VESA's DPM™ compliance display card or software installed in your PC, the monitor can automatically reduce its power consumption when not in the normal operation mode. NOTE: This monitor is referred to the OSD. This is ENERGY STAR®-compliant. Vertical Sync Active Inactive - Power Indicator Blue Amber Off P1913 42 W (maximum) ** 17 W (typical) Less than 0.3 W Less than 0.3 W Power Consumption P1913S P2213...
... Modes If you have VESA's DPM™ compliance display card or software installed in your PC, the monitor can automatically reduce its power consumption when not in the normal operation mode. NOTE: This monitor is referred to the OSD. This is ENERGY STAR®-compliant. Vertical Sync Active Inactive - Power Indicator Blue Amber Off P1913 42 W (maximum) ** 17 W (typical) Less than 0.3 W Less than 0.3 W Power Consumption P1913S P2213...
User's Guide
Page 24
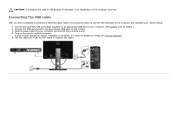
... have completed connecting the DVI/VGA cable, follow the procedures below to connect the USB cable to organize the cables. Connect the upstream USB port (cable supplied) to an appropriate USB port on the monitor stand to the computer and complete your monitor setup: 1. If it does not display an image, see Solving Problems. 5. Use the cable slot on your computer. (See bottom view for your monitor displays an image, installation is complete. Appearance of illustration only. Plug the power cables for...
... have completed connecting the DVI/VGA cable, follow the procedures below to connect the USB cable to organize the cables. Connect the upstream USB port (cable supplied) to an appropriate USB port on the monitor stand to the computer and complete your monitor setup: 1. If it does not display an image, see Solving Problems. 5. Use the cable slot on your computer. (See bottom view for your monitor displays an image, installation is complete. Appearance of illustration only. Plug the power cables for...
User's Guide
Page 36
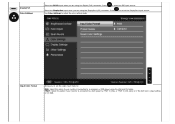
... color setting mode. Press Use Color Settings to select the DisplayPort input source. or if the DVD color output setting is connected to a DVD player by YPbPr to VGA, or YPbPr to DVI cable; Press to a computer or DVD player using the Digital (DVI) connector. Input Color Format Allows you are using the VGA and DVI cable. Select the DisplayPort input when you to set the video input mode to: RGB: Select this option if your monitor is connected to select the DVI input source...
... color setting mode. Press Use Color Settings to select the DisplayPort input source. or if the DVD color output setting is connected to a DVD player by YPbPr to VGA, or YPbPr to DVI cable; Press to a computer or DVD player using the Digital (DVI) connector. Input Color Format Allows you are using the VGA and DVI cable. Select the DisplayPort input when you to set the video input mode to: RGB: Select this option if your monitor is connected to select the DVI input source...
User's Guide
Page 37
... Modes, you to adjust the three colors (R, G, B) values and create your own preset color mode. This is the default preset mode. Text: Loads brightness and sharpness settings ideal for multimedia applications. Multimedia: Loads color settings ideal for viewing texts. Press the and buttons to manually adjust the color settings. Movie: Loads color settings ideal for most gaming applications. The screen appears cooler with a red/yellow tint. Standard: Loads the monitor's default color settings. Game: Loads color settings...
... Modes, you to adjust the three colors (R, G, B) values and create your own preset color mode. This is the default preset mode. Text: Loads brightness and sharpness settings ideal for multimedia applications. Multimedia: Loads color settings ideal for viewing texts. Press the and buttons to manually adjust the color settings. Movie: Loads color settings ideal for most gaming applications. The screen appears cooler with a red/yellow tint. Standard: Loads the monitor's default color settings. Game: Loads color settings...

User's Guide
Page 40
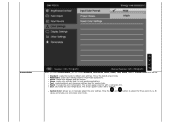
... Game or Movie preset mode. NOTE: All buttons are only available for "VGA" input. Dynamic Contrast Reset Display Settings Other Settings NOTE: Pixel Clock and Phase adjustments are locked. Select this option to one of time the menu remains on screen, and so on. When Lock is selected, no user adjustments are allowed. Select this option to adjustments. Select this option to 1. Controls user access to change the menu transparency by pressing...
... Game or Movie preset mode. NOTE: All buttons are only available for "VGA" input. Dynamic Contrast Reset Display Settings Other Settings NOTE: Pixel Clock and Phase adjustments are locked. Select this option to one of time the menu remains on screen, and so on. When Lock is selected, no user adjustments are allowed. Select this option to adjustments. Select this option to 1. Controls user access to change the menu transparency by pressing...
User's Guide
Page 47
... may need to adjust the overall sound system, a LED for your graphics card. Go to the support site for power indication and two audio headset jacks. 1 Attach mechanism 2 Power/Volume control 3 Headphone jacks Click OK. Using Dell Soundbar The soundbar has an on the desktop and select Personalization. 2. Click Change Display Settings. 3. Move the slider-bar to support.dell.com, enter your service tag, and download the latest driver for the monitor: Windows...
... may need to adjust the overall sound system, a LED for your graphics card. Go to the support site for power indication and two audio headset jacks. 1 Attach mechanism 2 Power/Volume control 3 Headphone jacks Click OK. Using Dell Soundbar The soundbar has an on the desktop and select Personalization. 2. Click Change Display Settings. 3. Move the slider-bar to support.dell.com, enter your service tag, and download the latest driver for the monitor: Windows...
User's Guide
Page 50
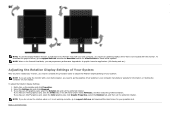
... go to support.dell.com and download the latest driver for information on rotating the 'contents' on the desktop and click Properties. 2. If you have rotated your monitor, you need to complete the procedure below to Contents Page NOTE: To use the Display Rotation function (Landscape versus Portrait view) with your System. NOTE: When in the Portrait View Mode, you have...
... go to support.dell.com and download the latest driver for information on rotating the 'contents' on the desktop and click Properties. 2. If you have rotated your monitor, you need to complete the procedure below to Contents Page NOTE: To use the Display Rotation function (Landscape versus Portrait view) with your System. NOTE: When in the Portrait View Mode, you have...
User's Guide
Page 51
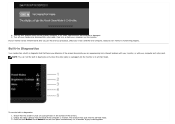
... should appear on the monitor. While in self-test mode, the power LED remains blue. Self-Test Your monitor provides a self-test feature that allows you begin any of computer. 3. Back to Contents Page Troubleshooting Dell™ P1913/P1913S/P2213 Monitor User's Guide Self-Test Built-in Diagnostics Common Problems Product Specific Problems Universal Serial Bus (USB) Specific Problems Dell™ Soundbar Problems WARNING: Before you to check whether your monitor is working correctly.
... should appear on the monitor. While in self-test mode, the power LED remains blue. Self-Test Your monitor provides a self-test feature that allows you begin any of computer. 3. Back to Contents Page Troubleshooting Dell™ P1913/P1913S/P2213 Monitor User's Guide Self-Test Built-in Diagnostics Common Problems Product Specific Problems Universal Serial Bus (USB) Specific Problems Dell™ Soundbar Problems WARNING: Before you to check whether your monitor is working correctly.
User's Guide
Page 52
... the monitor is functioning properly. Ensure that helps you determine if the screen abnormality you use the previous procedure, check your video controller and computer, because your monitor and reconnect the video cable; Press and hold Button 1 and Button 4 on the surface of the computer or monitor. 4. If your monitor screen remains blank after you are experiencing is clean (no dust particles on the front panel simultaneously...
... the monitor is functioning properly. Ensure that helps you determine if the screen abnormality you use the previous procedure, check your video controller and computer, because your monitor and reconnect the video cable; Press and hold Button 1 and Button 4 on the surface of the computer or monitor. 4. If your monitor screen remains blank after you are experiencing is clean (no dust particles on the front panel simultaneously...
User's Guide
Page 53
... Dell Support site at : support.dell.com. Adjust horizontal & vertical controls via OSD. The color of the screen changes to Factory Settings. Ensure that the correct input source is functioning properly using DVI-D/DisplayPort input, the Pixel Clock and Phase adjustments are also in LCD technology. Pixel that can occur in self-test mode. Perform Auto Adjust via OSD. Inspect the display for abnormalities. 5. To exit, press Button 4 again. Check for bent or broken pins in the video cable connector. Reset the monitor to red. 6. Check for...
... Dell Support site at : support.dell.com. Adjust horizontal & vertical controls via OSD. The color of the screen changes to Factory Settings. Ensure that the correct input source is functioning properly using DVI-D/DisplayPort input, the Pixel Clock and Phase adjustments are also in LCD technology. Pixel that can occur in self-test mode. Perform Auto Adjust via OSD. Inspect the display for abnormalities. 5. To exit, press Button 4 again. Check for bent or broken pins in the video cable connector. Reset the monitor to red. 6. Check for...
User's Guide
Page 54
... signal source. NOTE: When choosing DVI-D mode, the Auto Adjust function will not be available. Adjust Phase and Pixel Clock controls via OSD. Do not perform any key on the screen No Input Signal when user controls are not working What You Experience USB peripherals are No picture, the LED light is blue. Change the Input Color Format to turn off the monitor at all times when not in use a dynamically changing screensaver. Use the Power Management feature to PC RGB...
... signal source. NOTE: When choosing DVI-D mode, the Auto Adjust function will not be available. Adjust Phase and Pixel Clock controls via OSD. Do not perform any key on the screen No Input Signal when user controls are not working What You Experience USB peripherals are No picture, the LED light is blue. Change the Input Color Format to turn off the monitor at all times when not in use a dynamically changing screensaver. Use the Power Management feature to PC RGB...

User's Guide
Page 57
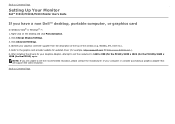
...; P1913/P1913S/P2213 Monitor User's Guide Setting the display resolution For maximum display performance with internet access. 2: If you have a Dell™ desktop or a Dell™ portable computer with Microsoft® Windows® operating systems, set the display resolution to 1440 x 900 (for the P1913)/1280 x 1024 (for the P1913S)/1680 x 1050 (for the P2213) pixels by pressing and holding the left-mouse button and adjust the screen resolution. 4. Click Change Display Settings. 3.
...; P1913/P1913S/P2213 Monitor User's Guide Setting the display resolution For maximum display performance with internet access. 2: If you have a Dell™ desktop or a Dell™ portable computer with Microsoft® Windows® operating systems, set the display resolution to 1440 x 900 (for the P1913)/1280 x 1024 (for the P1913S)/1680 x 1050 (for the P2213) pixels by pressing and holding the left-mouse button and adjust the screen resolution. 4. Click Change Display Settings. 3.
User's Guide
Page 59
..., ATI, Intel etc.). 5. Refer to the graphic card provider website for updated driver (for the P2213) again. After installing the drivers for your computer or consider purchasing a graphics adapter that will support the video resolution. NOTE: If you have a non Dell™ desktop, portable computer, or graphics card In Windows Vista® or Windows® 7: 1. Click Advanced Settings. 4. Back to Contents Page Identify your graphics...
..., ATI, Intel etc.). 5. Refer to the graphic card provider website for updated driver (for the P2213) again. After installing the drivers for your computer or consider purchasing a graphics adapter that will support the video resolution. NOTE: If you have a non Dell™ desktop, portable computer, or graphics card In Windows Vista® or Windows® 7: 1. Click Advanced Settings. 4. Back to Contents Page Identify your graphics...


