
BIOS for Intel Optane Memory Pre-Installation Guide
Page 3
Contents 1 Dell BIOS for Intel Optane Memory Pre-Installation 4 2 Additional preparations for systems built before June 2017 5 3 Downloading the Partition Tweak Script...6 4 Running the Partition Tweak Script...7 5 Installing the Intel Rapid Storage Technology (IRST 8 6 Getting help...12 Contacting Dell...12 Contents 3
Contents 1 Dell BIOS for Intel Optane Memory Pre-Installation 4 2 Additional preparations for systems built before June 2017 5 3 Downloading the Partition Tweak Script...6 4 Running the Partition Tweak Script...7 5 Installing the Intel Rapid Storage Technology (IRST 8 6 Getting help...12 Contacting Dell...12 Contents 3

BIOS for Intel Optane Memory Pre-Installation Guide
Page 4
...for Intel Optane Memory Pre-Installation NOTE: There is Windows 10 Anniversary Update, Redstone 1 (RS1) Version 1607, or later. The softwares can be installed over the Intel IRST driver. Dell system names Dell Product Name OptiPlex 3050 OptiPlex 5050 OptiPlex 7050 OptiPlex 3050 AIO OptiPlex 5250 AIO OptiPlex 7450 AIO OS... check the IRST driver version1) and upgrade to latest: LinkLink NOTE: There are two versions of 12.5 GB 4 Dell BIOS for Intel Optane Memory installation. This software cannot be downloaded from: Link • How to check the BIOS version and upgrade to be ...
...for Intel Optane Memory Pre-Installation NOTE: There is Windows 10 Anniversary Update, Redstone 1 (RS1) Version 1607, or later. The softwares can be installed over the Intel IRST driver. Dell system names Dell Product Name OptiPlex 3050 OptiPlex 5050 OptiPlex 7050 OptiPlex 3050 AIO OptiPlex 5250 AIO OptiPlex 7450 AIO OS... check the IRST driver version1) and upgrade to latest: LinkLink NOTE: There are two versions of 12.5 GB 4 Dell BIOS for Intel Optane Memory installation. This software cannot be downloaded from: Link • How to check the BIOS version and upgrade to be ...

BIOS for Intel Optane Memory Pre-Installation Guide
Page 5
... boot loader in the Intel Optane Memory will already have the proper IRST driver installed. Recovery Image modification (Recommended Optional Step) For systems shipped prior to use it after June/20/2017 will be created. Please visit www.dell.com/support/home and enter the system...recovery image does not have the un-allocated partition preserved and do not remove the module without properly disabling Intel Optane Memory. Dell systems shipped after Intel Optane Memory enablement. Refer the following Intel website for the set up. If the shipping date is enabled, do not require...
... boot loader in the Intel Optane Memory will already have the proper IRST driver installed. Recovery Image modification (Recommended Optional Step) For systems shipped prior to use it after June/20/2017 will be created. Please visit www.dell.com/support/home and enter the system...recovery image does not have the un-allocated partition preserved and do not remove the module without properly disabling Intel Optane Memory. Dell systems shipped after Intel Optane Memory enablement. Refer the following Intel website for the set up. If the shipping date is enabled, do not require...

BIOS for Intel Optane Memory Pre-Installation Guide
Page 6
..., you can download the Partition Tweak Script from the Dell Support site to the correct download page. Dell will encounter the following error messages when enabling Intel Optane Memory: Error Message: ISDI_0xA001004C: Last volume is protected from Dell. YOU WILL BE SOLELY RESPONSIBLE FOR ANY DAMAGE TO ... utility in other platforms OR running this utility without the Intel Optane Memory Customer Kit from shrinking the volume to shrink the partition for such data losses. Go to Dell.com/support and enter your OptiPlex system from Recovery to Basic Data Partition GUID to create a 5...
..., you can download the Partition Tweak Script from the Dell Support site to the correct download page. Dell will encounter the following error messages when enabling Intel Optane Memory: Error Message: ISDI_0xA001004C: Last volume is protected from Dell. YOU WILL BE SOLELY RESPONSIBLE FOR ANY DAMAGE TO ... utility in other platforms OR running this utility without the Intel Optane Memory Customer Kit from shrinking the volume to shrink the partition for such data losses. Go to Dell.com/support and enter your OptiPlex system from Recovery to Basic Data Partition GUID to create a 5...

BIOS for Intel Optane Memory Pre-Installation Guide
Page 8
5 Installing the Intel Rapid Storage Technology (IRST) Carry out the following steps to run the Intel Rapid Storage Technology driver: 1 Open the Intel Rapid Storage Technology (IRST) from the start menu tile. 2 Click Intel Optane Memory to access the configuration options. 8 Installing the Intel Rapid Storage Technology (IRST)
5 Installing the Intel Rapid Storage Technology (IRST) Carry out the following steps to run the Intel Rapid Storage Technology driver: 1 Open the Intel Rapid Storage Technology (IRST) from the start menu tile. 2 Click Intel Optane Memory to access the configuration options. 8 Installing the Intel Rapid Storage Technology (IRST)

BIOS for Intel Optane Memory Pre-Installation Guide
Page 9
3 Click Enable in the IRST interface to pair the Intel Optane Memory module with the SATA 3.0 drive. 4 You will see a pop-up showing the Intel Optane Memory device and the system drive that the memory device will pair with. Click Yes. Installing the Intel Rapid Storage Technology (IRST) 9
3 Click Enable in the IRST interface to pair the Intel Optane Memory module with the SATA 3.0 drive. 4 You will see a pop-up showing the Intel Optane Memory device and the system drive that the memory device will pair with. Click Yes. Installing the Intel Rapid Storage Technology (IRST) 9

BIOS for Intel Optane Memory Pre-Installation Guide
Page 10
5 Once the pairing is enabled. 10 Installing the Intel Rapid Storage Technology (IRST) You will now see that the hyperlink option is now "Disable", indicating that the SATA Drive and the Intel Optane Memory device are now shown as an Optane Memory Array. 6 After the system restarts, you will also note that Intel Optane Memory is complete, click the Reboot to complete the Intel Optane Memory configuration. If you click the Intel Optane Memory tab, you can open the Intel Rapid Storage Technology application from the top of the start menu.
5 Once the pairing is enabled. 10 Installing the Intel Rapid Storage Technology (IRST) You will now see that the hyperlink option is now "Disable", indicating that the SATA Drive and the Intel Optane Memory device are now shown as an Optane Memory Array. 6 After the system restarts, you will also note that Intel Optane Memory is complete, click the Reboot to complete the Intel Optane Memory configuration. If you click the Intel Optane Memory tab, you can open the Intel Rapid Storage Technology application from the top of the start menu.

BIOS for Intel Optane Memory Pre-Installation Guide
Page 11
NOTE: For any error code encountered when installing the Intel Optane Memory, please see the Intel website for decoding and solutions: Error Codes and Messages While Enabling and Disabling Intel® Optane™ Memory Installing the Intel Rapid Storage Technology (IRST) 11
NOTE: For any error code encountered when installing the Intel Optane Memory, please see the Intel website for decoding and solutions: Error Codes and Messages While Enabling and Disabling Intel® Optane™ Memory Installing the Intel Rapid Storage Technology (IRST) 11

Micro Owners Manual
Page 3
... M.2 PCIe SSD ...13 System fan...13 Removing system fan...13 Installing system fan...14 Speaker...14 Removing speaker...14 Installing speaker...15 Memory module...15 Removing memory module...15 Installing memory module...16 Heat sink...16 Removing heat sink...16 Installing heat sink...17 Processor...17 Removing processor...17 Installing processor...18 System...
... M.2 PCIe SSD ...13 System fan...13 Removing system fan...13 Installing system fan...14 Speaker...14 Removing speaker...14 Installing speaker...15 Memory module...15 Removing memory module...15 Installing memory module...16 Heat sink...16 Removing heat sink...16 Installing heat sink...17 Processor...17 Removing processor...17 Installing processor...18 System...

Micro Owners Manual
Page 4
... 16 GB...22 Overview...22 Intel®OptaneTM Memory Module Driver Requirements 22 M.2 Intel Optane Memory Module 16 GB...22 Product specifications...24 Environmental Conditions...25 Troubleshooting...26 4 Technology and components...27 USB features...27 USB 3.0/USB 3.1 Gen 1 (SuperSpeed USB......44 Diagnostic power LED codes...44 Power LED issue...45 Diagnostic error messages...45 System error messages...48 8 Technical specifications...49 Processor specifications...49 Memory specifications...50 Video specifications...50 Audio specifications...50 Communication specifications...51 4 Contents
... 16 GB...22 Overview...22 Intel®OptaneTM Memory Module Driver Requirements 22 M.2 Intel Optane Memory Module 16 GB...22 Product specifications...24 Environmental Conditions...25 Troubleshooting...26 4 Technology and components...27 USB features...27 USB 3.0/USB 3.1 Gen 1 (SuperSpeed USB......44 Diagnostic power LED codes...44 Power LED issue...45 Diagnostic error messages...45 System error messages...48 8 Technical specifications...49 Processor specifications...49 Memory specifications...50 Video specifications...50 Audio specifications...50 Communication specifications...51 4 Contents

Micro Owners Manual
Page 15
... 1 Follow the procedure in After working inside your computer. 2 Remove the: a cover b system fan 3 To remove the memory module: a Pull the securing clips from the memory module until the memory module pops up [1]. Installing speaker 1 Align the slots on the speaker with the slots on the system fan. 2 Tighten the M2.5X4 screws...
... 1 Follow the procedure in After working inside your computer. 2 Remove the: a cover b system fan 3 To remove the memory module: a Pull the securing clips from the memory module until the memory module pops up [1]. Installing speaker 1 Align the slots on the speaker with the slots on the system fan. 2 Tighten the M2.5X4 screws...

Micro Owners Manual
Page 16
... with the tab on the system board [2]. b Remove the memory module from the socket on the memory module connector. 2 Insert the memory module into the memory module socket and press it until it clicks into place. 3 Install the: a system fan b cover 4 Follow the procedure in Before working inside your computer. Heat ...
... with the tab on the system board [2]. b Remove the memory module from the socket on the memory module connector. 2 Insert the memory module into the memory module socket and press it until it clicks into place. 3 Install the: a system fan b cover 4 Follow the procedure in Before working inside your computer. Heat ...

Micro Owners Manual
Page 21
System board layout 1 CPU socket connector 3 Internal speaker connector 5 M.2 WLAN connector 7 Hard drive connector 9 Coin cell battery 11 Clear password jumper 13 DP/VGA connector (optional) 2 CPU fan connector 4 Memory module connectors 6 Power switch connector 8 M.2 SSD connector 10 Service Mode Jumper 12 Clear CMOS jumper 14 PS/2 serial connector (optional) Removing and installing components 21
System board layout 1 CPU socket connector 3 Internal speaker connector 5 M.2 WLAN connector 7 Hard drive connector 9 Coin cell battery 11 Clear password jumper 13 DP/VGA connector (optional) 2 CPU fan connector 4 Memory module connectors 6 Power switch connector 8 M.2 SSD connector 10 Service Mode Jumper 12 Clear CMOS jumper 14 PS/2 serial connector (optional) Removing and installing components 21
Micro Owners Manual
Page 22
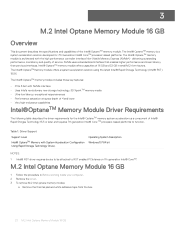
...document describes the specifications and capabilities of service. delivering outstanding performance, low latency and quality of the Intel® OptaneTM memory module. NVMe uses a standardized interface that enables higher performance and lower latency than pervious interfaces. exceptional responsiveness • ...Performance saturation at queue depth of 4 and lower • Very high endurance capabilities Intel®OptaneTM Memory Module Driver Requirements The following table describes the driver requirements for 7th Generation Intel® CoreTM processor-based platforms. The...
...document describes the specifications and capabilities of service. delivering outstanding performance, low latency and quality of the Intel® OptaneTM memory module. NVMe uses a standardized interface that enables higher performance and lower latency than pervious interfaces. exceptional responsiveness • ...Performance saturation at queue depth of 4 and lower • Very high endurance capabilities Intel®OptaneTM Memory Module Driver Requirements The following table describes the driver requirements for 7th Generation Intel® CoreTM processor-based platforms. The...

Micro Owners Manual
Page 23
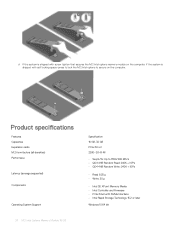
b Place the thermal pad on the thermal pad. M.2 Intel Optane Memory Module 16 GB 23 c Place the M.2 Intel optane memory module into the slot on the SSD slot and remove the white adhesive tape.
b Place the thermal pad on the thermal pad. M.2 Intel Optane Memory Module 16 GB 23 c Place the M.2 Intel optane memory module into the slot on the SSD slot and remove the white adhesive tape.
Micro Owners Manual
Page 24
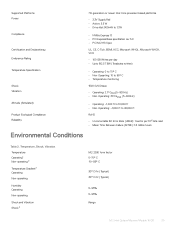
...Product specifications Features Capacities Expansion cards M.2 form factors (all densities) Performace Latency (average sequential) Components Operating System Support 24 M.2 Intel Optane Memory Module 16 GB Specification 16 GB, 32 GB PCIe 3.0 x 2 2280-S3-B-M • Seq R/W: Up to secure on the computer...; Read 8.25 µ • Write: 30 µ • Intel 3D XPoint Memory Media • Intel Controller and Firmware • PCIe 3.0x2 with screw tighten that secures the M.2 Intel optane memory module on the computer. If the system is shipped with NVMe Interface • Intel Rapid ...
...Product specifications Features Capacities Expansion cards M.2 form factors (all densities) Performace Latency (average sequential) Components Operating System Support 24 M.2 Intel Optane Memory Module 16 GB Specification 16 GB, 32 GB PCIe 3.0 x 2 2280-S3-B-M • Seq R/W: Up to secure on the computer...; Read 8.25 µ • Write: 30 µ • Intel 3D XPoint Memory Media • Intel Controller and Firmware • PCIe 3.0x2 with screw tighten that secures the M.2 Intel optane memory module on the computer. If the system is shipped with NVMe Interface • Intel Rapid ...
Micro Owners Manual
Page 25
... Shock and Vibration Shock 4 M.2 2280 form factor 0-70º C -10-85º C 30º C/hr (Typical) 30º C/hr (Typical) 5-95% 5-95% Range M.2 Intel Optane Memory Module 16 GB 25
... Shock and Vibration Shock 4 M.2 2280 form factor 0-70º C -10-85º C 30º C/hr (Typical) 30º C/hr (Typical) 5-95% 5-95% Range M.2 Intel Optane Memory Module 16 GB 25

Micro Owners Manual
Page 26
... value. Stimulus may be applied in the Intel Rapid Storage Technology user interface; It's working as below screen shot after shutdown. Troubleshooting 1 The Intel Optane Memory model name "NVME INTEL MEMPEK1W01" in Device Manager does not match in the X, Y, or Z axis. Operating Non-operating Vibration5 Operating Non-operating 1500 G / 0.5 ms ...specification assume the device is mounted securely with the input vibration applied to the drive-mounting screws. it only shows a part of the Intel Optane Memory. Stimulus may be applied in following boot ups. 26 M.2 Intel Optane...
... value. Stimulus may be applied in the Intel Rapid Storage Technology user interface; It's working as below screen shot after shutdown. Troubleshooting 1 The Intel Optane Memory model name "NVME INTEL MEMPEK1W01" in Device Manager does not match in the X, Y, or Z axis. Operating Non-operating Vibration5 Operating Non-operating 1500 G / 0.5 ms ...specification assume the device is mounted securely with the input vibration applied to the drive-mounting screws. it only shows a part of the Intel Optane Memory. Stimulus may be applied in following boot ups. 26 M.2 Intel Optane...

Micro Owners Manual
Page 33
...: • System Information: Displays BIOS Version, Service Tag, Asset Tag, Ownership Tag, Ownership Date, Manufacture Date, and the Express Service Code. • Memory Information: Displays Memory Installed, Memory Available, Memory Speed, Memory Channel Mode, Memory Technology, DIMM 1 Size,, and DIMM 2 Size. • PCI Information: Displays SLOT1_M.2, SLOT2_M.2 • Processor Information: Displays Processor Type, Core Count, Processor...
...: • System Information: Displays BIOS Version, Service Tag, Asset Tag, Ownership Tag, Ownership Date, Manufacture Date, and the Express Service Code. • Memory Information: Displays Memory Installed, Memory Available, Memory Speed, Memory Channel Mode, Memory Technology, DIMM 1 Size,, and DIMM 2 Size. • PCI Information: Displays SLOT1_M.2, SLOT2_M.2 • Processor Information: Displays Processor Type, Core Count, Processor...

Micro Owners Manual
Page 36
...key to a user-selected file • Replace from a user-selected file • Delete- Table 10. Resets to set the Intel SGX Enclave Reserve Memory Size. • 32 MB • 64 MB (Disabled by default) • 128 MB (Disabled by default. Performance Option Multi Core Support Intel ...8226; dbx If you to enable or disable the Intel SpeedStep mode of the main operating system. • Disabled (default) • Enabled Enclave Memory Size Allows you to default setting • Delete All Keys- Replaces the current key with a key from a user-selected file • Append from ...
...key to a user-selected file • Replace from a user-selected file • Delete- Table 10. Resets to set the Intel SGX Enclave Reserve Memory Size. • 32 MB • 64 MB (Disabled by default) • 128 MB (Disabled by default. Performance Option Multi Core Support Intel ...8226; dbx If you to enable or disable the Intel SpeedStep mode of the main operating system. • Disabled (default) • Enabled Enclave Memory Size Allows you to default setting • Delete All Keys- Replaces the current key with a key from a user-selected file • Append from ...


