
BIOS for Intel Optane Memory Pre-Installation Guide
Page 4
... system has a SATA 3.0 hard disk drive (HDD) as a primary drive. Dell installs the Intel IRST User application from the Intel website. 1 Dell BIOS for Intel Optane Memory PreInstallation To add an Intel® Optane™ Memory module to your existing Dell system, you will need to be un-installed first. Dell recommends Intel RST SW/Driver Package Installation version 15.5.1051 or above. NOTE: There is Windows 10 Anniversary Update, Redstone 1 (RS1...
... system has a SATA 3.0 hard disk drive (HDD) as a primary drive. Dell installs the Intel IRST User application from the Intel website. 1 Dell BIOS for Intel Optane Memory PreInstallation To add an Intel® Optane™ Memory module to your existing Dell system, you will need to be un-installed first. Dell recommends Intel RST SW/Driver Package Installation version 15.5.1051 or above. NOTE: There is Windows 10 Anniversary Update, Redstone 1 (RS1...

BIOS for Intel Optane Memory Pre-Installation Guide
Page 5
... June/20/2017, please refer Downloading Partition Tweak Script and Running Partition Tweak Scriptfor the procedures to use it after June/20/2017 will be created. The user needs to install the correct driver into the recovery image: • Video • Intel Installation Guide section 3 of the corresponding Optane Memory module. Please refer to be lost. Dell systems shipped after Intel Optane Memory enablement. Refer the following Intel...
... June/20/2017, please refer Downloading Partition Tweak Script and Running Partition Tweak Scriptfor the procedures to use it after June/20/2017 will be created. The user needs to install the correct driver into the recovery image: • Video • Intel Installation Guide section 3 of the corresponding Optane Memory module. Please refer to be lost. Dell systems shipped after Intel Optane Memory enablement. Refer the following Intel...

Micro Owners Manual
Page 6
... reverse order. WARNING: Before working inside the computer, replace all power sources before connecting to servicing that shipped with the product. CAUTION: Handle components and cards with locking tabs; NOTE: The color of cable, press in this document assumes that the following conditions exist: • You have connectors with care. 1 Working on your computer Safety instructions Use the following safety guidelines to...
... reverse order. WARNING: Before working inside the computer, replace all power sources before connecting to servicing that shipped with the product. CAUTION: Handle components and cards with locking tabs; NOTE: The color of cable, press in this document assumes that the following conditions exist: • You have connectors with care. 1 Working on your computer Safety instructions Use the following safety guidelines to...

Micro Owners Manual
Page 7
... computer and attached devices did not automatically turn off when you shut down your operating system, press and hold the power button for about 6 seconds to your computer. 1 Replace the cover. 2 Connect any replacement procedure, ensure that the computer works correctly by running ePSA diagnostics. Windows 7 CAUTION: To avoid losing data, save and close all open files and exit all open programs before turning on your...
... computer and attached devices did not automatically turn off when you shut down your operating system, press and hold the power button for about 6 seconds to your computer. 1 Replace the cover. 2 Connect any replacement procedure, ensure that the computer works correctly by running ePSA diagnostics. Windows 7 CAUTION: To avoid losing data, save and close all open files and exit all open programs before turning on your...

Micro Owners Manual
Page 21
System board layout 1 CPU socket connector 3 Internal speaker connector 5 M.2 WLAN connector 7 Hard drive connector 9 Coin cell battery 11 Clear password jumper 13 DP/VGA connector (optional) 2 CPU fan connector 4 Memory module connectors 6 Power switch connector 8 M.2 SSD connector 10 Service Mode Jumper 12 Clear CMOS jumper 14 PS/2 serial connector (optional) Removing and installing components 21
System board layout 1 CPU socket connector 3 Internal speaker connector 5 M.2 WLAN connector 7 Hard drive connector 9 Coin cell battery 11 Clear password jumper 13 DP/VGA connector (optional) 2 CPU fan connector 4 Memory module connectors 6 Power switch connector 8 M.2 SSD connector 10 Service Mode Jumper 12 Clear CMOS jumper 14 PS/2 serial connector (optional) Removing and installing components 21

Micro Owners Manual
Page 28
We will likely see a real-world maximum rate of the available SuperSpeed USB 3.0/USB 3.1 Gen 1 products: • External Desktop USB 3.0/USB 3.1 Gen 1 Hard Drives • Portable USB 3.0/USB 3.1 Gen 1 Hard Drives • USB 3.0/USB 3.1 Gen 1 Drive Docks & Adapters • USB 3.0/USB 3.1 Gen 1 Flash Drives & Readers • USB 3.0/USB 3.1 Gen 1 Solid-state Drives • USB 3.0/USB 3.1 Gen 1 RAIDs • Optical Media Drives • Multimedia Devices • Networking • USB 3.0/USB 3.1 Gen 1 Adapter Cards & Hubs 28 Technology and components With its way into some products ...
We will likely see a real-world maximum rate of the available SuperSpeed USB 3.0/USB 3.1 Gen 1 products: • External Desktop USB 3.0/USB 3.1 Gen 1 Hard Drives • Portable USB 3.0/USB 3.1 Gen 1 Hard Drives • USB 3.0/USB 3.1 Gen 1 Drive Docks & Adapters • USB 3.0/USB 3.1 Gen 1 Flash Drives & Readers • USB 3.0/USB 3.1 Gen 1 Solid-state Drives • USB 3.0/USB 3.1 Gen 1 RAIDs • Optical Media Drives • Multimedia Devices • Networking • USB 3.0/USB 3.1 Gen 1 Adapter Cards & Hubs 28 Technology and components With its way into some products ...

Micro Owners Manual
Page 29
... protocols for major 3D video formats, paving the way for HDMI TVs, and DVD players. Adds support for USB 3.0/USB 3.1 Gen 1 controllers. Compatibility The good news is remote. It is in many commercial movie theaters • HDMI Micro Connector - Microsoft has confirmed this happening is that USB 3.0/USB 3.1 Gen 1 has been carefully planned from the start to require separate drivers for additional color models used in contrast to...
... protocols for major 3D video formats, paving the way for HDMI TVs, and DVD players. Adds support for USB 3.0/USB 3.1 Gen 1 controllers. Compatibility The good news is remote. It is in many commercial movie theaters • HDMI Micro Connector - Microsoft has confirmed this happening is that USB 3.0/USB 3.1 Gen 1 has been carefully planned from the start to require separate drivers for additional color models used in contrast to...

Micro Owners Manual
Page 31
...; Change the NVRAM settings after you add or remove hardware • View the system hardware configuration • Enable or disable integrated devices • Set performance and power management thresholds • Manage your computer security Topics: • Boot Sequence • Navigation Keys • System and setup password • System Setup options • Updating the BIOS in Windows • Enabling smart power on Self Test (POST), when the Dell logo appears. From the System Setup, you can boot from including the diagnostic option...
...; Change the NVRAM settings after you add or remove hardware • View the system hardware configuration • Enable or disable integrated devices • Set performance and power management thresholds • Manage your computer security Topics: • Boot Sequence • Navigation Keys • System and setup password • System Setup options • Updating the BIOS in Windows • Enabling smart power on Self Test (POST), when the Dell logo appears. From the System Setup, you can boot from including the diagnostic option...

Micro Owners Manual
Page 33
... screen, select System Security and press Enter. General Option System Information Boot Sequence Advanced Boot Options Date/Time Description Displays the following information: • System Information: Displays BIOS Version, Service Tag, Asset Tag, Ownership Tag, Ownership Date, Manufacture Date, and the Express Service Code. • Memory Information: Displays Memory Installed, Memory Available, Memory Speed, Memory Channel Mode, Memory Technology, DIMM 1 Size,, and DIMM 2 Size. • PCI Information: Displays SLOT1_M.2, SLOT2_M.2 • Processor Information: Displays Processor Type...
... screen, select System Security and press Enter. General Option System Information Boot Sequence Advanced Boot Options Date/Time Description Displays the following information: • System Information: Displays BIOS Version, Service Tag, Asset Tag, Ownership Tag, Ownership Date, Manufacture Date, and the Express Service Code. • Memory Information: Displays Memory Installed, Memory Available, Memory Speed, Memory Channel Mode, Memory Technology, DIMM 1 Size,, and DIMM 2 Size. • PCI Information: Displays SLOT1_M.2, SLOT2_M.2 • Processor Information: Displays Processor Type...

Micro Owners Manual
Page 34
.... The option Enable Audio is disabled by default) Allows you to enable or disable the various drives on-board: • SATA-0 (enabled by default) • M.2 PCIe SSD-0 This field controls whether hard drive errors for : • Enable Boot Support • Enable Front USB Ports • Enable Rear USB Ports All the options are : • Disabled • Enabled • Enabled w/PXE (default) NOTE: Depending on -board LAN controller. The Enable Smart Reporting option is selected by default. • Enable Microphone • Enable Internal Speaker Both the options are reported...
.... The option Enable Audio is disabled by default) Allows you to enable or disable the various drives on-board: • SATA-0 (enabled by default) • M.2 PCIe SSD-0 This field controls whether hard drive errors for : • Enable Boot Support • Enable Front USB Ports • Enable Rear USB Ports All the options are : • Disabled • Enabled • Enabled w/PXE (default) NOTE: Depending on -board LAN controller. The Enable Smart Reporting option is selected by default. • Enable Microphone • Enable Internal Speaker Both the options are reported...

Micro Owners Manual
Page 35
... Disable Commands • Disabled • Enabled (default) Computrace This field lets you to enter Setup when an Administrative password is set , change , and delete the computer's internal HDD. Enables or disables the optional Computrace service designed for passwords on any module bay HDDs that may be present. This option is disabled by default. Table 8. The range of the optional Computrace Service from services such as Microsoft Windows Update and Linux Vendor Firmware Service (LVFS) Allows you to control...
... Disable Commands • Disabled • Enabled (default) Computrace This field lets you to enter Setup when an Administrative password is set , change , and delete the computer's internal HDD. Enables or disables the optional Computrace service designed for passwords on any module bay HDDs that may be present. This option is disabled by default. Table 8. The range of the optional Computrace Service from services such as Microsoft Windows Update and Linux Vendor Firmware Service (LVFS) Allows you to control...

Micro Owners Manual
Page 38
... Behavior Option Numlock LED Keyboard Errors Fast Boot Description Allows you to the previous versions. Virtualization Support Option Virtualization Description This option specifies whether a Virtual Machine Monitor (VMM) can speed up the boot process by default. Maintenance Option Service Tag Asset Tag SERR Messages BIOS Downgrade Description Displays the Service Tag of the system firmware to enable or disable the Numlock feature when your computer. The system boots quickly, unless the BIOS has been updated, memory changed...
... Behavior Option Numlock LED Keyboard Errors Fast Boot Description Allows you to the previous versions. Virtualization Support Option Virtualization Description This option specifies whether a Virtual Machine Monitor (VMM) can speed up the boot process by default. Maintenance Option Service Tag Asset Tag SERR Messages BIOS Downgrade Description Displays the Service Tag of the system firmware to enable or disable the Numlock feature when your computer. The system boots quickly, unless the BIOS has been updated, memory changed...

Micro Owners Manual
Page 39
... updating the system BIOS, and then re-enabled after the BIOS update is recommended to install the updated BIOS settings on the primary hard drive. The File Download window appears. 11 Click Save to save the file on Next Boot is recommended not to : • Clear Log • Mark all products. 4 Choose the Products category from the list. The option BIOS Recovery from all the available internal storages, such as HDD...
... updating the system BIOS, and then re-enabled after the BIOS update is recommended to install the updated BIOS settings on the primary hard drive. The File Download window appears. 11 Click Save to save the file on Next Boot is recommended not to : • Clear Log • Mark all products. 4 Choose the Products category from the list. The option BIOS Recovery from all the available internal storages, such as HDD...

Micro Owners Manual
Page 44
... power protection devices, power strips, and power extension cables to verify that the power strip is plugged into an electrical outlet and is in the On state. Computer is turned on . 44 Troubleshooting your computer using indicators like diagnostic lights, and error messages during the operation of the sleep mode. • Ensure all power cables are securely connected to the system board. • Ensure the main power cable and front panel cable are connected to...
... power protection devices, power strips, and power extension cables to verify that the power strip is plugged into an electrical outlet and is in the On state. Computer is turned on . 44 Troubleshooting your computer using indicators like diagnostic lights, and error messages during the operation of the sleep mode. • Ensure all power cables are securely connected to the system board. • Ensure the main power cable and front panel cable are connected to...

Micro Owners Manual
Page 45
... 2-2 Do not replace any hardware, it works as the diagnostic indicator. Diagnostic error messages Error messages AUXILIARY DEVICE FAILURE BAD COMMAND OR FILE NAME CACHE DISABLED DUE TO FAILURE CD DRIVE CONTROLLER FAILURE DATA ERROR DECREASING AVAILABLE MEMORY DISK C: FAILED INITIALIZATION DRIVE NOT READY ERROR READING PCMCIA CARD EXTENDED MEMORY SIZE HAS CHANGED Description The touchpad or external mouse may be faulty or improperly seated. Enable the Pointing Device option in the computer. The hard drive cannot read the...
... 2-2 Do not replace any hardware, it works as the diagnostic indicator. Diagnostic error messages Error messages AUXILIARY DEVICE FAILURE BAD COMMAND OR FILE NAME CACHE DISABLED DUE TO FAILURE CD DRIVE CONTROLLER FAILURE DATA ERROR DECREASING AVAILABLE MEMORY DISK C: FAILED INITIALIZATION DRIVE NOT READY ERROR READING PCMCIA CARD EXTENDED MEMORY SIZE HAS CHANGED Description The touchpad or external mouse may be faulty or improperly seated. Enable the Pointing Device option in the computer. The hard drive cannot read the...

Micro Owners Manual
Page 47
.... The computer cannot find a specific track on the hard drive. Run the System Set tests in Dell Diagnostics. If the message reappears, Contact Dell. Dell MediaDirect cannot verify the Digital Rights Management (DRM) restrictions on the hard drive. The optional ROM has failed. Reinstall the memory module or, if necessary, replace it . Run the Windows error-checking utility to run is installed, properly seated, and partitioned as a boot device. Run the Stuck Key test in Dell Diagnostics. A memory module may be faulty...
.... The computer cannot find a specific track on the hard drive. Run the System Set tests in Dell Diagnostics. If the message reappears, Contact Dell. Dell MediaDirect cannot verify the Digital Rights Management (DRM) restrictions on the hard drive. The optional ROM has failed. Reinstall the memory module or, if necessary, replace it . Run the Windows error-checking utility to run is installed, properly seated, and partitioned as a boot device. Run the Stuck Key test in Dell Diagnostics. A memory module may be faulty...

Micro Owners Manual
Page 48
...does not solve the problem, replace the keyboard. X:\ IS NOT ACCESSIBLE. System fan failure System fan has failed. Keyboard failure Keyboard failure or loose cable. S.M.A.R.T error, possible hard disk drive failure. 48 Troubleshooting your computer to an electrical outlet to complete the boot routine three consecutive have failed at booting this checkpoint and contact Dell Technical Support CMOS checksum error RTC is correct. Connect your computer Run the System Memory tests and the Keyboard Controller test in Dell Diagnostics. resolving this problem, please note this...
...does not solve the problem, replace the keyboard. X:\ IS NOT ACCESSIBLE. System fan failure System fan has failed. Keyboard failure Keyboard failure or loose cable. S.M.A.R.T error, possible hard disk drive failure. 48 Troubleshooting your computer to an electrical outlet to complete the boot routine three consecutive have failed at booting this checkpoint and contact Dell Technical Support CMOS checksum error RTC is correct. Connect your computer Run the System Memory tests and the Keyboard Controller test in Dell Diagnostics. resolving this problem, please note this...

Micro Owners Manual
Page 50
... HD 510 Graphics [with Intel 6th Generation CPUs or 7th Generation Celeron dual core CPU, the maximum MHz this product is 2400 MHz. Memory specifications Feature Type Specification DDR4 SDRAM 2133 MHz / 2400 MHz NOTE: If this product can achieve is 2133, though the memory material used is purchased with 6th Generation Pentium CPU-GPU combo] Audio specifications Feature Controller Internal speaker amplifier Specification Realtek ALC3234...
... HD 510 Graphics [with Intel 6th Generation CPUs or 7th Generation Celeron dual core CPU, the maximum MHz this product is 2400 MHz. Memory specifications Feature Type Specification DDR4 SDRAM 2133 MHz / 2400 MHz NOTE: If this product can achieve is 2133, though the memory material used is purchased with 6th Generation Pentium CPU-GPU combo] Audio specifications Feature Controller Internal speaker amplifier Specification Realtek ALC3234...
Micro Quick Start Guide - Windows 10
Page 1
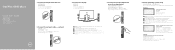
...display to the discrete graphics card 5 Finish operating system setup Windows Connect to your network NOTE: If you are connecting to a secured wireless network, enter the password for the wireless network access when prompted Sign in to your Microsoft account or create a local account Microsoft Microsoft Microsoft Microsoft Ubuntu Follow the instructions on the screen to finish setup OptiPlex 5050 Micro Quick Start Guide 1 Connect the keyboard and mouse 3 Connect the display 4 Connect the power adapter and press the power button 2 Connect the network cable...
...display to the discrete graphics card 5 Finish operating system setup Windows Connect to your network NOTE: If you are connecting to a secured wireless network, enter the password for the wireless network access when prompted Sign in to your Microsoft account or create a local account Microsoft Microsoft Microsoft Microsoft Ubuntu Follow the instructions on the screen to finish setup OptiPlex 5050 Micro Quick Start Guide 1 Connect the keyboard and mouse 3 Connect the display 4 Connect the power adapter and press the power button 2 Connect the network cable...

Micro Quick Start Guide - Windows 7
Page 1
OptiPlex 5050 Micro Quick Start Guide 1 Connect the keyboard and mouse 3 Connect the display 4 Connect the power adapter and press the power button 2 Connect the network cable - optional Connect the network cable - optional NOTE: If you ordered your computer with a discrete graphics card, connect the display to the discrete graphics card 5 Finish operating system setup Windows 7 Set a password for Windows 设置 Windows Windows 密碼 Windows Windows Connect to your network NOTE: If you are connecting to a secured wireless network, ...
OptiPlex 5050 Micro Quick Start Guide 1 Connect the keyboard and mouse 3 Connect the display 4 Connect the power adapter and press the power button 2 Connect the network cable - optional Connect the network cable - optional NOTE: If you ordered your computer with a discrete graphics card, connect the display to the discrete graphics card 5 Finish operating system setup Windows 7 Set a password for Windows 设置 Windows Windows 密碼 Windows Windows Connect to your network NOTE: If you are connecting to a secured wireless network, ...


