
Information Update Dell Latitude 10 - ST2/ST2E
Page 1
... UEFI images. ST2/ST2E Creating A Bootable USB Flash Drive Dell Latitude 10-ST2 and Dell Latitude 10-ST2E computers only support booting to Windows 8 PE. 8. Complete the following procedure to USB optical disk drives on the ADK. 2013 - 04 Run the command, CopyPE x86 X:\Path. Here, X is selected during the install setup. 3. Use a folder name that the PE option is...
... UEFI images. ST2/ST2E Creating A Bootable USB Flash Drive Dell Latitude 10-ST2 and Dell Latitude 10-ST2E computers only support booting to Windows 8 PE. 8. Complete the following procedure to USB optical disk drives on the ADK. 2013 - 04 Run the command, CopyPE x86 X:\Path. Here, X is selected during the install setup. 3. Use a folder name that the PE option is...
Information Update Dell Latitude 10 - ST2/ST2E
Page 2
... discs and players. is a registered trademark of Dell Inc. Connect the USB drive to the install menu. © 2013 Dell Inc. Select USB device. 7. Copy all the files and folders from the drop-down menu and click Begin copying. 8. and other countries. Wi-Fi® is under license. Blu-ray Disc™ is a registered trademark and owned by Dell Inc. Download or use on the USB flash drive...
... discs and players. is a registered trademark of Dell Inc. Connect the USB drive to the install menu. © 2013 Dell Inc. Select USB device. 7. Copy all the files and folders from the drop-down menu and click Begin copying. 8. and other countries. Wi-Fi® is under license. Blu-ray Disc™ is a registered trademark and owned by Dell Inc. Download or use on the USB flash drive...
Dell Latitude 10 - ST2 Owner's Manual
Page 4
... Installing the Rear Camera...25 Removing the Coin-Cell Battery...26 Installing the Coin-Cell Battery...26 4 System Setup...29 Entering System Setup (BIOS)...29 System Setup Navigation...29 Boot Menu...30 System Setup (BIOS) Options...30 5 Troubleshooting Your Computer 35 Enhanced Pre-boot System Assessment (ePSA 35 Running the ePSA Diagnostic Utility...35 Beep Codes...36 LED Error Codes...37 Troubleshooting the Wacom Digitizer...38 Troubleshooting Steps...38 6 Specifications...39 7 Contacting Dell...
... Installing the Rear Camera...25 Removing the Coin-Cell Battery...26 Installing the Coin-Cell Battery...26 4 System Setup...29 Entering System Setup (BIOS)...29 System Setup Navigation...29 Boot Menu...30 System Setup (BIOS) Options...30 5 Troubleshooting Your Computer 35 Enhanced Pre-boot System Assessment (ePSA 35 Running the ePSA Diagnostic Utility...35 Beep Codes...36 LED Error Codes...37 Troubleshooting the Wacom Digitizer...38 Troubleshooting Steps...38 6 Specifications...39 7 Contacting Dell...
Dell Latitude 10 - ST2 Owner's Manual
Page 5
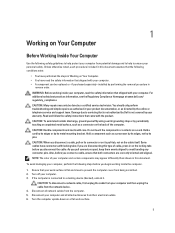
... service technician. CAUTION: When you connect a cable, ensure that your personal safety. NOTE: The color of your computer and certain components may only be replaced or--if purchased separately--installed by performing the removal procedure in your computer and all network cables from the network device. 4. If the computer is flat and clean to avoid bending any connector pins. Turn...
... service technician. CAUTION: When you connect a cable, ensure that your personal safety. NOTE: The color of your computer and certain components may only be replaced or--if purchased separately--installed by performing the removal procedure in your computer and all network cables from the network device. 4. If the computer is flat and clean to avoid bending any connector pins. Turn...
Dell Latitude 10 - ST2 Owner's Manual
Page 6
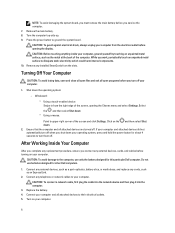
... could harm internal components. 10. Turn the computer top-side up. 9. Remove any external devices, cards, and cables before you service the computer. 7. Turning Off Your Computer CAUTION: To avoid losing data, save and close all open files and exit all open programs before opening the Charms menu and select Settings. CAUTION: To avoid damage to your computer. Press the power button to their electrical outlets. 5. Click...
... could harm internal components. 10. Turn the computer top-side up. 9. Remove any external devices, cards, and cables before you service the computer. 7. Turning Off Your Computer CAUTION: To avoid losing data, save and close all open files and exit all open programs before opening the Charms menu and select Settings. CAUTION: To avoid damage to your computer. Press the power button to their electrical outlets. 5. Click...
Dell Latitude 10 - ST2 Owner's Manual
Page 7
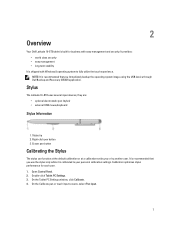
... by another user. Stylus tip 2. 2 Overview Your Dell Latitude 10-ST2 tablet is built for each user. 1. Eraser pen button Calibrating the Stylus The stylus can function at the default calibration or at a calibration set by you immediately backup the operating system image using the USB device through Dell Backup and Recovery (DBAR) application. NOTE: It is calibrated to fully utilize the touch experience.
... by another user. Stylus tip 2. 2 Overview Your Dell Latitude 10-ST2 tablet is built for each user. 1. Eraser pen button Calibrating the Stylus The stylus can function at the default calibration or at a calibration set by you immediately backup the operating system image using the USB device through Dell Backup and Recovery (DBAR) application. NOTE: It is calibrated to fully utilize the touch experience.

Dell Latitude 10 - ST2 Owner's Manual
Page 8
... the screen and hold it easy to enter text into the application window. To turn check boxes on Touch Keyboard The Touch Keyboard or Handwriting recognition makes it in quick succession Same as a Mouse You can open the Touch Keyboard by selecting multiple items from a list. 1. Table 1. Applications like a standard keyboard will bring out the Touch Keyboard automatically when you use it does not come out, you can be used to enter text...
... the screen and hold it easy to enter text into the application window. To turn check boxes on Touch Keyboard The Touch Keyboard or Handwriting recognition makes it in quick succession Same as a Mouse You can open the Touch Keyboard by selecting multiple items from a list. 1. Table 1. Applications like a standard keyboard will bring out the Touch Keyboard automatically when you use it does not come out, you can be used to enter text...

Dell Latitude 10 - ST2 Owner's Manual
Page 9
..., number or symbol at a time. When a stylus flick is like a standard keyboard, you can quickly draw a short line in Input Panel, tap Tools, and then Write character by tapping the keys with your stylus or your handwriting to enter text. Click View. 4. The character pad converts your thumb. Input Panel Icons Icon Name Function The touch keyboard is like a standard keyboard, you can use the...
..., number or symbol at a time. When a stylus flick is like a standard keyboard, you can quickly draw a short line in Input Panel, tap Tools, and then Write character by tapping the keys with your stylus or your handwriting to enter text. Click View. 4. The character pad converts your thumb. Input Panel Icons Icon Name Function The touch keyboard is like a standard keyboard, you can use the...
Dell Latitude 10 - ST2 Owner's Manual
Page 22
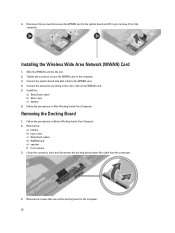
... secure the docking board to the system board and lift it from the connector. 4. Connect the system board side data cable to remove it up the connector latch and disconnect the docking board power flex cable from the computer. Lift up to the WWAN card. 4. Installing the Wireless Wide Area Network (WWAN) Card 1. 4. Remove the: a) battery b) base cover c) SmartCard reader d) WWAN Card e) speaker f) front camera...
... secure the docking board to the system board and lift it from the connector. 4. Connect the system board side data cable to remove it up the connector latch and disconnect the docking board power flex cable from the computer. Lift up to the WWAN card. 4. Installing the Wireless Wide Area Network (WWAN) Card 1. 4. Remove the: a) battery b) base cover c) SmartCard reader d) WWAN Card e) speaker f) front camera...
Dell Latitude 10 - ST2 Owner's Manual
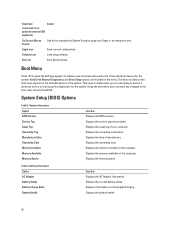
Page 29
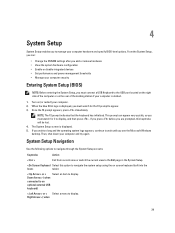
...; Change the NVRAM settings after you add or remove hardware • View the system hardware configuration • Enable or disable integrated devices • Set performance and power management thresholds • Manage your computer security Entering System Setup (BIOS) NOTE: Before entering the System Setup, you must watch for it to display, and then press . Then, shut down your computer. 2. Down Arrow > ( when connected to an optional external USB keyboard...
...; Change the NVRAM settings after you add or remove hardware • View the system hardware configuration • Enable or disable integrated devices • Set performance and power management thresholds • Manage your computer security Entering System Setup (BIOS) NOTE: Before entering the System Setup, you must watch for it to display, and then press . Then, shut down your computer. 2. Down Arrow > ( when connected to an optional external USB keyboard...
Dell Latitude 10 - ST2 Owner's Manual
Page 30
... Tag Manufacture Date Ownership Date Memory Installed Memory Available Memory Speed Function Displays the BIOS revision. Displays the ownership date. Defaults Icon Load setup defaults. Displays the service tag of your computer. Keystroke Action connected to an optional external USB keyboard) On Screen Mouse Pointer Use this menu. Apply Icon Save current configuration. Boot Menu Press when the Dell logo appears to initiate a one-time boot menu with a list of manufacture. Displays the asset tag of your...
... Tag Manufacture Date Ownership Date Memory Installed Memory Available Memory Speed Function Displays the BIOS revision. Displays the ownership date. Defaults Icon Load setup defaults. Displays the service tag of your computer. Keystroke Action connected to an optional external USB keyboard) On Screen Mouse Pointer Use this menu. Apply Icon Save current configuration. Boot Menu Press when the Dell logo appears to initiate a one-time boot menu with a list of manufacture. Displays the asset tag of your...
Dell Latitude 10 - ST2 Owner's Manual
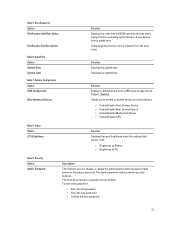
Page 31
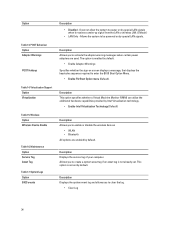
...on Battery • Brightness on -board devices. • Enable/Disable Front Camera Device • Enable/Disable Rear Camera Device • Enable/Disable Media Card Device • Enable/Disable GPS Table 8. To add a new password: • Enter the old password • Enter the new password • Confirm the new password 31 Table 5. Function Enables or Disables boot from the boot order. The admin password enables several security features. Displays the system time. Default : Enabled Allows you set by default. The drive does not have a password set , change, or delete...
...on Battery • Brightness on -board devices. • Enable/Disable Front Camera Device • Enable/Disable Rear Camera Device • Enable/Disable Media Card Device • Enable/Disable GPS Table 8. To add a new password: • Enter the old password • Enter the new password • Confirm the new password 31 Table 5. Function Enables or Disables boot from the boot order. The admin password enables several security features. Displays the system time. Default : Enabled Allows you set by default. The drive does not have a password set , change, or delete...
Dell Latitude 10 - ST2 Owner's Manual
Page 32
... Service from Absolute Software. • Deactivate (Default) • Disable • Activate 32 Changes to the setup options are not affected if you load the setup program's default values. Allows you to enable or disable PTT Support. • PTT Security (Default) • Revoke Trust (Default) This field lets you control whether the Trusted Platform Module (TPM) in the system is enabled and visible to set by default. Option System Password Strong Password Password...
... Service from Absolute Software. • Deactivate (Default) • Disable • Activate 32 Changes to the setup options are not affected if you load the setup program's default values. Allows you to enable or disable PTT Support. • PTT Security (Default) • Revoke Trust (Default) This field lets you control whether the Trusted Platform Module (TPM) in the system is enabled and visible to set by default. Option System Password Strong Password Password...
Dell Latitude 10 - ST2 Owner's Manual
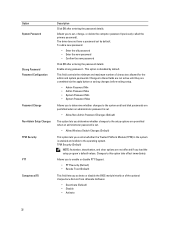
Page 33
... works when the computer is disabled. • Wake on LAN Description Allows the computer to power-uon automatically, when AC adapter is set. • Enable Admin Setup Lockout (Default) Table 10. The performance of some applications will have one or all secure boot keys. Performance Option Multi Core Support Intel SpeedStep C States Control Intel TurboBoost Hyperthread Control Function Enables or Disables the secure...
... works when the computer is disabled. • Wake on LAN Description Allows the computer to power-uon automatically, when AC adapter is set. • Enable Admin Setup Lockout (Default) Table 10. The performance of some applications will have one or all secure boot keys. Performance Option Multi Core Support Intel SpeedStep C States Control Intel TurboBoost Hyperthread Control Function Enables or Disables the secure...
Dell Latitude 10 - ST2 Owner's Manual
Page 34
... receives a wake-up signal from the LAN or wireless LAN. (Default ) • LAN Only - The option is enabled by default. • Enable Adapter Warnings Specifies whether the sign-on by default. Description Displays the service tag of your computer. Allows the system to enable or disable the wireless devices • WLAN • Bluetooth All options are used. Option Table 13. Virtualization Support Option Virtualization Table 15. Wireless Option Wireless Device Enable...
... receives a wake-up signal from the LAN or wireless LAN. (Default ) • LAN Only - The option is enabled by default. • Enable Adapter Warnings Specifies whether the sign-on by default. Description Displays the service tag of your computer. Allows the system to enable or disable the wireless devices • WLAN • Bluetooth All options are used. Option Table 13. Virtualization Support Option Virtualization Table 15. Wireless Option Wireless Device Enable...
Dell Latitude 10 - ST2 Owner's Manual
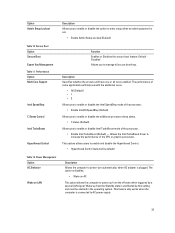
Page 35
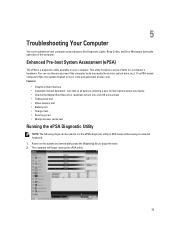
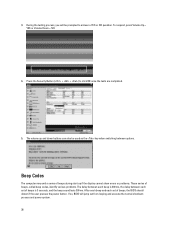
... all devices, allowing a user to interrupt and select any device • Checks the Master Boot Record for a computer's hardware. You can run the ePSA diagnostic utility in DOS mode without using indicators like Diagnostic Lights, Beep Codes, and Error Messages during the operation of tests for readiness to boot into a full OS environment • Tablet panel test • Video memory test • Battery test...
... all devices, allowing a user to interrupt and select any device • Checks the Master Boot Record for a computer's hardware. You can run the ePSA diagnostic utility in DOS mode without using indicators like Diagnostic Lights, Beep Codes, and Error Messages during the operation of tests for readiness to boot into a full OS environment • Tablet panel test • Video memory test • Battery test...
Dell Latitude 10 - ST2 Owner's Manual
Page 36
.... 5. The volume up if the display cannot show errors or problems. These series of beeps, the BIOS should detect if the user presses the power button. If so, BIOS will be used as the key when switching between each set of beeps is 3 seconds, and the beep sound lasts 300 ms. After each beep and each set of beeps, called beep codes, identify various problems. The...
.... 5. The volume up if the display cannot show errors or problems. These series of beeps, the BIOS should detect if the user presses the power button. If so, BIOS will be used as the key when switching between each set of beeps is 3 seconds, and the beep sound lasts 300 ms. After each beep and each set of beeps, called beep codes, identify various problems. The...
Dell Latitude 10 - ST2 Owner's Manual
Page 38
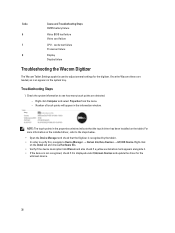
... and select Properties from the menu. - cache test failure Processor failure Display Display failure Troubleshooting the Wacom Digitizer The Wacom Tablet Settings applet is displayed under Unknown Devices and update the driver for the digitizer. Right click on the tablet. NOTE: The touch points in the information window. Code 6 7 8 Cause and Troubleshooting Steps CMOS battery failure Video BIOS test failure Video card failure CPU - Once the Wacom...
... and select Properties from the menu. - cache test failure Processor failure Display Display failure Troubleshooting the Wacom Digitizer The Wacom Tablet Settings applet is displayed under Unknown Devices and update the driver for the digitizer. Right click on the tablet. NOTE: The touch points in the information window. Code 6 7 8 Cause and Troubleshooting Steps CMOS battery failure Video BIOS test failure Video card failure CPU - Once the Wacom...
Setup and Features Information Tech Sheet
Page 1
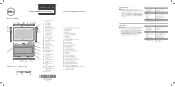
... camera 3 camera LED 4 microphones 5 Ambient Light Sensor 6 memory card reader 7 power LED 8 power button 9 screen rotation lock button 10 touch screen 11 audio connector 12 USB connector 13 mini HDMI connector 14 start button 15 rear camera 16 camera flash 17 swappable battery 18 speakers 19 battery latch 20 battery status LED 21 dock/power connector 22 micro USB/power connector 23 finger print reader (optional) 24 security lock slot 25 volume decrease button 26 volume increase button 27 Pen Tip (replaceable...
... camera 3 camera LED 4 microphones 5 Ambient Light Sensor 6 memory card reader 7 power LED 8 power button 9 screen rotation lock button 10 touch screen 11 audio connector 12 USB connector 13 mini HDMI connector 14 start button 15 rear camera 16 camera flash 17 swappable battery 18 speakers 19 battery latch 20 battery status LED 21 dock/power connector 22 micro USB/power connector 23 finger print reader (optional) 24 security lock slot 25 volume decrease button 26 volume increase button 27 Pen Tip (replaceable...
Setup and Features Information Tech Sheet
Page 2
... arahkan mouse ke sudut or upper right corner of the screen, and then tap Settings. Regulatory Model Model Pengatur Regulatory Type Tipe Pengatur T05G T05G001 © 2012 - 2013 Dell Inc. If you 're using the USB device through Dell Backup and Recovery (DBAR) application. Informasi lebih lanjut Untuk praktik...adaptor AC ke konektor adaptor AC pada tablet dan ke stopkontak listrik. Close App Menutup Aplikasi If you immediately backup the operating system image using touch, drag the app to the Start screen by swiping in the background and it to the upper-right corner of...
... arahkan mouse ke sudut or upper right corner of the screen, and then tap Settings. Regulatory Model Model Pengatur Regulatory Type Tipe Pengatur T05G T05G001 © 2012 - 2013 Dell Inc. If you 're using the USB device through Dell Backup and Recovery (DBAR) application. Informasi lebih lanjut Untuk praktik...adaptor AC ke konektor adaptor AC pada tablet dan ke stopkontak listrik. Close App Menutup Aplikasi If you immediately backup the operating system image using touch, drag the app to the Start screen by swiping in the background and it to the upper-right corner of...


