User Manual
Page 10
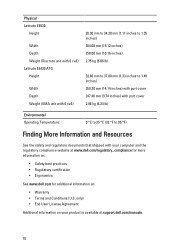
only) • End User License Agreement Additional information on : • Warranty • Terms and Conditions (U.S. Physical Latitude E6530 Height Width Depth Weight (Discrete unit with 6 cell) Latitude E6430 ATG Height Width Depth Weight (UMA unit with 6 cell) 28.30 mm to 34.20 mm (1.11 inches... with port cover 2.88 kg (6.34 lb) Environmental Operating Temperature: 0 °C to 35 °C (32 °F to 95 °F) Finding More Information and Resources See the safety and regulatory documents that shipped with your computer and the regulatory compliance website at www.dell.com/...
only) • End User License Agreement Additional information on : • Warranty • Terms and Conditions (U.S. Physical Latitude E6530 Height Width Depth Weight (Discrete unit with 6 cell) Latitude E6430 ATG Height Width Depth Weight (UMA unit with 6 cell) 28.30 mm to 34.20 mm (1.11 inches... with port cover 2.88 kg (6.34 lb) Environmental Operating Temperature: 0 °C to 35 °C (32 °F to 95 °F) Finding More Information and Resources See the safety and regulatory documents that shipped with your computer and the regulatory compliance website at www.dell.com/...

Latitude E-Family Re-Imaging Guide
Page 40
Dell Latitude E-Family & Mobile Precision Reimage "How-To" Guide a. It is the Client System Update application? It is found under System Management > Client System Update, this utility first after re-imaging your system. The tool is a dual eSATA / USB combo port. What is important to install this is primarily targeted at Customers who want...
Dell Latitude E-Family & Mobile Precision Reimage "How-To" Guide a. It is the Client System Update application? It is found under System Management > Client System Update, this utility first after re-imaging your system. The tool is a dual eSATA / USB combo port. What is important to install this is primarily targeted at Customers who want...

Owners Manual
Page 4
...-Cell Battery...30 Installing the Coin-Cell Battery...31 Removing the ExpressCard Cage...31 Installing the ExpressCard Cage...32 Removing the Power-Connector Port...32 Installing the Power-Connector Port...33 Removing the Power LED Board...34 Installing the Power LED Board...35 Removing the Input/Output (I/O) Board...35 Installing the Input... the Camera...58 Installing the Camera...58 Removing the LVDS and Camera Cable...59 Installing the LVDS and Camera Cable...60 3 Additional Information...61 Docking Port Information...61 4 System Setup...63
...-Cell Battery...30 Installing the Coin-Cell Battery...31 Removing the ExpressCard Cage...31 Installing the ExpressCard Cage...32 Removing the Power-Connector Port...32 Installing the Power-Connector Port...33 Removing the Power LED Board...34 Installing the Power LED Board...35 Removing the Input/Output (I/O) Board...35 Installing the Input... the Camera...58 Installing the Camera...58 Removing the LVDS and Camera Cable...59 Installing the LVDS and Camera Cable...60 3 Additional Information...61 Docking Port Information...61 4 System Setup...63

Owners Manual
Page 9
...such as an ExpressCard. 2. CAUTION: To avoid damage to their electrical outlets. 5. Connect your computer. Connect any cards, such as a port replicator, battery slice, or media base, and replace any telephone or network cables to your computer and all attached devices to the computer, use... batteries designed for this particular Dell computer. Do not use only the battery designed for other Dell computers. 1. After Working Inside Your Computer After you complete any replacement procedure, ensure you connect ...
...such as an ExpressCard. 2. CAUTION: To avoid damage to their electrical outlets. 5. Connect your computer. Connect any cards, such as a port replicator, battery slice, or media base, and replace any telephone or network cables to your computer and all attached devices to the computer, use... batteries designed for this particular Dell computer. Do not use only the battery designed for other Dell computers. 1. After Working Inside Your Computer After you complete any replacement procedure, ensure you connect ...

Owners Manual
Page 32
... After Working Inside Your Computer. Remove the ExpressCard cage from the system board. 32 Place the ExpressCard cage into its compartment. 2. Removing the Power-Connector Port 1. Follow the procedures in Before Working Inside Your Computer. 2. Tighten the screws to secure the ExpressCard cage to the computer. 3. 4. Install: a) palmrest b) display assembly c) keyboard...
... After Working Inside Your Computer. Remove the ExpressCard cage from the system board. 32 Place the ExpressCard cage into its compartment. 2. Removing the Power-Connector Port 1. Follow the procedures in Before Working Inside Your Computer. 2. Tighten the screws to secure the ExpressCard cage to the computer. 3. 4. Install: a) palmrest b) display assembly c) keyboard...

Owners Manual
Page 33
Remove the power-connector bracket from the computer. Installing the Power-Connector Port 1. Connect the power-connector cable to the computer. 5. Install: a) base cover b) battery 6. Remove the screw that secures the power-connector bracket to the system board. 5. ...
Remove the power-connector bracket from the computer. Installing the Power-Connector Port 1. Connect the power-connector cable to the computer. 5. Install: a) base cover b) battery 6. Remove the screw that secures the power-connector bracket to the system board. 5. ...

Owners Manual
Page 44
Lift the system board from the ports and connectors. 14. Tighten the screws to secure the system board to the system board: a) WiFi-switch board b) speaker c) coin-cell battery d) LVDS 4. Connect the ...
Lift the system board from the ports and connectors. 14. Tighten the screws to secure the system board to the system board: a) WiFi-switch board b) speaker c) coin-cell battery d) LVDS 4. Connect the ...

Owners Manual
Page 61
Docking Port 61 Docking Port Information The docking port is used for the additional features that are part of your computer. 3 Additional Information This section provides information for connecting the laptop to a docking station (optional). 1.
Docking Port 61 Docking Port Information The docking port is used for the additional features that are part of your computer. 3 Additional Information This section provides information for connecting the laptop to a docking station (optional). 1.

Owners Manual
Page 65
You can set the serial port to: • Disabled • COM1 (Default Setting) • COM2 • COM3 • COM4 NOTE: The operating system may allocate resources even if the setting is ...-4 • SATA-5 Default Setting: All drives are reported during system startup. You can set the parallel port to: • Disabled • AT • PS2 • ECP Identifies and defines the serial port settings. Option Parallel Port Serial Port SATA Operation Drives SMART Reporting Description • Enabled • Enabled w/PXE (Default Setting) Allows you to...
You can set the serial port to: • Disabled • COM1 (Default Setting) • COM2 • COM3 • COM4 NOTE: The operating system may allocate resources even if the setting is ...-4 • SATA-5 Default Setting: All drives are reported during system startup. You can set the parallel port to: • Disabled • AT • PS2 • ECP Identifies and defines the serial port settings. Option Parallel Port Serial Port SATA Operation Drives SMART Reporting Description • Enabled • Enabled w/PXE (Default Setting) Allows you to...

Owners Manual
Page 66
...to configure the behavior of the keyboard illumination feature. The options are: • Enable Boot Support • Enable External USB Port Default Setting: both the options are enabled This option is disabled by default. • Enable Stealth Mode Allows you enable or... Devices 66 Description • Enable SMART Reporting - The options are: • Enable Internal Modem • Enable Microphone • Enable eSATA Ports • Enable Hard Drive Free Fall Protection • Enable Module Bay • Enable ExpressCard • Enable Camera • Enable Media Card...
...to configure the behavior of the keyboard illumination feature. The options are: • Enable Boot Support • Enable External USB Port Default Setting: both the options are enabled This option is disabled by default. • Enable Stealth Mode Allows you enable or... Devices 66 Description • Enable SMART Reporting - The options are: • Enable Internal Modem • Enable Microphone • Enable eSATA Ports • Enable Hard Drive Free Fall Protection • Enable Module Bay • Enable ExpressCard • Enable Camera • Enable Media Card...
Owners Manual
Page 81
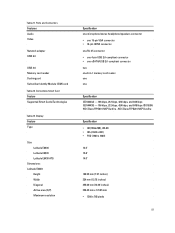
Contactless Smart Card Feature Supported Smart Cards/Technologies Table 23. Table 21. Display Feature Type Size Latitude E6430 Latitude E6530 Latitude E6430 ATG Dimensions: Latitude E6430: Height Width Diagonal Active area (X/Y) Maximum resolution Specification one microphone/stereo headphone/speakers connector • one 15-pin VGA connector • 19-pin HDMI ... mm (7.57 inches) 324 mm (12.75 inches) 355.60 mm (14.00 inches) 309.40 mm x 173.95 mm • 1366 x 768 pixels 81 Ports and Connectors Features Audio Video Network adapter USB 2.0 USB 3.0 Memory card reader Docking...
Contactless Smart Card Feature Supported Smart Cards/Technologies Table 23. Table 21. Display Feature Type Size Latitude E6430 Latitude E6530 Latitude E6430 ATG Dimensions: Latitude E6430: Height Width Diagonal Active area (X/Y) Maximum resolution Specification one microphone/stereo headphone/speakers connector • one 15-pin VGA connector • 19-pin HDMI ... mm (7.57 inches) 324 mm (12.75 inches) 355.60 mm (14.00 inches) 309.40 mm x 173.95 mm • 1366 x 768 pixels 81 Ports and Connectors Features Audio Video Network adapter USB 2.0 USB 3.0 Memory card reader Docking...
Owners Manual
Page 84
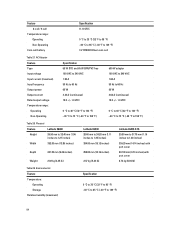
... 1.27 inches) Width 352.00 mm (13.86 inches) Depth 241.00 mm (9.49 inches) Weight 2.02 kg (4.45 lb) Latitude E6530 28.40 mm to 34.20 mm (1.11 inches to 1.35 inches) 384.00 mm (15.12 inches) 258.00 mm (10....16 inches) 2.47 kg (5.44 lb) Latitude E6430 ATG 29.50 mm to 37.70 mm (1.16 inches to 158 °F) Table 28. AC Adapter Feature Type Input voltage...104 °F) -40 °C to 70 °C (-40 °F to 1.48 inches) 359.20 mm (14.14 inches) with port cover 247.40 mm (9.74 inches) with port cover 2.74 kg (6.04 lb) Table 29.
... 1.27 inches) Width 352.00 mm (13.86 inches) Depth 241.00 mm (9.49 inches) Weight 2.02 kg (4.45 lb) Latitude E6530 28.40 mm to 34.20 mm (1.11 inches to 1.35 inches) 384.00 mm (15.12 inches) 258.00 mm (10....16 inches) 2.47 kg (5.44 lb) Latitude E6430 ATG 29.50 mm to 37.70 mm (1.16 inches to 158 °F) Table 28. AC Adapter Feature Type Input voltage...104 °F) -40 °C to 70 °C (-40 °F to 1.48 inches) 359.20 mm (14.14 inches) with port cover 247.40 mm (9.74 inches) with port cover 2.74 kg (6.04 lb) Table 29.


