Statement of Volatility
Page 2
No memory - Hard drive User Non-volatile magnetic Yes replaceable media, various sizes in off state. N/A N/A NA Low-level format Low-level format/erase CAUTION: All other components on -board coin-cell battery. S3 is read/write by mode. Dell systems will be able to go to the working ...Designator Volatility Description RTC CMOS UH4 Non-volatile memory 256 bytes. systems use gDDR5 (UV3-UV6) for frame buffer. DVD/ DVD+RW/ Diskette Drives Enter S3-S5 state below. Linux, Win 2K and Win XP support S3 state. There is no system context is maintained. In this state...
No memory - Hard drive User Non-volatile magnetic Yes replaceable media, various sizes in off state. N/A N/A NA Low-level format Low-level format/erase CAUTION: All other components on -board coin-cell battery. S3 is read/write by mode. Dell systems will be able to go to the working ...Designator Volatility Description RTC CMOS UH4 Non-volatile memory 256 bytes. systems use gDDR5 (UV3-UV6) for frame buffer. DVD/ DVD+RW/ Diskette Drives Enter S3-S5 state below. Linux, Win 2K and Win XP support S3 state. There is no system context is maintained. In this state...
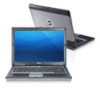
Owner's Manual
Page 3
... Installing the Battery...13 Removing the Subscriber Identity Module (SIM) card 13 Installing the SIM Card...14 Removing the Hard Drive...14 Installing the Hard Drive...15 Removing the Optical Drive...16 Installing the Optical Drive...17 Removing the Base Cover...18 Installing the Base Cover...18 Removing the Keyboard Trim...18 Installing the Keyboard Trim...
... Installing the Battery...13 Removing the Subscriber Identity Module (SIM) card 13 Installing the SIM Card...14 Removing the Hard Drive...14 Installing the Hard Drive...15 Removing the Optical Drive...16 Installing the Optical Drive...17 Removing the Base Cover...18 Installing the Base Cover...18 Removing the Keyboard Trim...18 Installing the Keyboard Trim...
Owner's Manual
Page 14
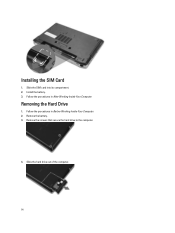
Install the battery. 3. Remove the battery. 3. Removing the Hard Drive 1. Remove the screws that secure the hard drive to the computer. 4. Installing the SIM Card 1. Slide the SIM card into its compartment. 2. Slide the hard drive out of the computer. 14 Follow the procedures in Before Working Inside Your Computer. 2. Follow the procedures in After Working Inside Your Computer.
Install the battery. 3. Remove the battery. 3. Removing the Hard Drive 1. Remove the screws that secure the hard drive to the computer. 4. Installing the SIM Card 1. Slide the SIM card into its compartment. 2. Slide the hard drive out of the computer. 14 Follow the procedures in Before Working Inside Your Computer. 2. Follow the procedures in After Working Inside Your Computer.

Owner's Manual
Page 15
... hard-drive bracket to the hard drive. 4. Install the hard-drive isolations on the hard drive. 2. Attach the hard-drive bracket to the computer. 6. Install the battery. 7. Remove the hard-drive isolations from the hard drive. Tighten the screws to secure the hard drive to the hard drive. 3. Follow the procedures in After Working Inside Your Computer. 15 Pull the hard-drive bracket out of the hard drive. 7. Slide and insert the hard drive...
... hard-drive bracket to the hard drive. 4. Install the hard-drive isolations on the hard drive. 2. Attach the hard-drive bracket to the computer. 6. Install the battery. 7. Remove the hard-drive isolations from the hard drive. Tighten the screws to secure the hard drive to the hard drive. 3. Follow the procedures in After Working Inside Your Computer. 15 Pull the hard-drive bracket out of the hard drive. 7. Slide and insert the hard drive...

Owner's Manual
Page 16
Follow the procedures in the eject handle on the optical drive to the optical drive. 6. Push in Before Working Inside Your Computer. 2. Remove the battery. 3. Slide and remove the hard drive out of the computer. 5. Removing the Optical Drive 1. Remove the drive latch from the optical drive. 16 Remove the screw that secures the drive latch to release it. 4.
Follow the procedures in the eject handle on the optical drive to the optical drive. 6. Push in Before Working Inside Your Computer. 2. Remove the battery. 3. Slide and remove the hard drive out of the computer. 5. Removing the Optical Drive 1. Remove the drive latch from the optical drive. 16 Remove the screw that secures the drive latch to release it. 4.
Owner's Manual
Page 25
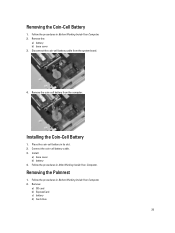
.... 2. Remove the coin-cell battery from the system board. 4. Place the coin-cell battery in Before Working Inside Your Computer. 2. Remove: a) SD card b) ExpressCard c) battery d) hard drive 25 Follow the procedures in Before Working Inside Your Computer. 2. Removing the Palmrest 1. Connect the coin-cell battery cable. 3. Removing the Coin-Cell Battery 1. Follow...
.... 2. Remove the coin-cell battery from the system board. 4. Place the coin-cell battery in Before Working Inside Your Computer. 2. Remove: a) SD card b) ExpressCard c) battery d) hard drive 25 Follow the procedures in Before Working Inside Your Computer. 2. Removing the Palmrest 1. Connect the coin-cell battery cable. 3. Removing the Coin-Cell Battery 1. Follow...

Owner's Manual
Page 28
Follow the procedures in After Working Inside Your Computer. Remove the screws that secure the media board to the computer. 5. Disconnect the media-board cable from the computer. 28 Removing the Media Board 1. Follow the procedures in Before Working Inside Your Computer. 2. Remove: a) SD card b) ExpressCard c) battery d) hard drive e) optical drive f) base cover g) keyboard trim h) keyboard i) bluetooth module j) palmrest 3. Remove the media board from the system board. 4. f) hard drive g) battery h) ExpressCard i) SD card 6.
Follow the procedures in After Working Inside Your Computer. Remove the screws that secure the media board to the computer. 5. Disconnect the media-board cable from the computer. 28 Removing the Media Board 1. Follow the procedures in Before Working Inside Your Computer. 2. Remove: a) SD card b) ExpressCard c) battery d) hard drive e) optical drive f) base cover g) keyboard trim h) keyboard i) bluetooth module j) palmrest 3. Remove the media board from the system board. 4. f) hard drive g) battery h) ExpressCard i) SD card 6.

Owner's Manual
Page 29
... system board. 4. Follow the procedures in Before Working Inside Your Computer. 2. Install: a) palmrest b) bluetooth module c) keyboard d) keyboard trim e) base cover f) optical drive g) hard drive h) battery i) ExpressCard j) SD card 5. Remove: a) SD card b) ExpressCard c) battery d) hard drive e) optical drive f) base cover g) keyboard trim h) keyboard i) bluetooth module j) palmrest 3. Place the media board in its compartment. 2. Removing the ExpressCard Cage 1.
... system board. 4. Follow the procedures in Before Working Inside Your Computer. 2. Install: a) palmrest b) bluetooth module c) keyboard d) keyboard trim e) base cover f) optical drive g) hard drive h) battery i) ExpressCard j) SD card 5. Remove: a) SD card b) ExpressCard c) battery d) hard drive e) optical drive f) base cover g) keyboard trim h) keyboard i) bluetooth module j) palmrest 3. Place the media board in its compartment. 2. Removing the ExpressCard Cage 1.

Owner's Manual
Page 30
4. Tighten the screws to secure the ExpressCard cage to the computer. 5. Remove the screws that secure the ExpressCard cage to the computer. 3. Install: a) palmrest b) bluetooth module c) keyboard d) keyboard trim e) base cover f) optical drive g) hard drive h) battery i) ExpressCard 30 Insert the ExpressCard cage into its compartment. 2. Remove the ExpressCard cage from the computer. Connect the ExpressCard cable to the system board. 4. Installing the ExpressCard Cage 1.
4. Tighten the screws to secure the ExpressCard cage to the computer. 5. Remove the screws that secure the ExpressCard cage to the computer. 3. Install: a) palmrest b) bluetooth module c) keyboard d) keyboard trim e) base cover f) optical drive g) hard drive h) battery i) ExpressCard 30 Insert the ExpressCard cage into its compartment. 2. Remove the ExpressCard cage from the computer. Connect the ExpressCard cable to the system board. 4. Installing the ExpressCard Cage 1.

Owner's Manual
Page 31
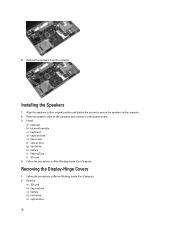
j) SD card 5. Follow the procedures in After Working Inside Your Computer. Remove the screws that secure the speakers to the computer. 31 Removing the Speakers 1. Release the speaker cable from the system board. 4. Follow the procedures in Before Working Inside Your Computer. 2. Disconnect the speaker cable from the computer. 5. Remove: a) SD card b) ExpressCard c) battery d) hard drive e) optical drive f) base cover g) keyboard trim h) keyboard i) bluetooth module j) palmrest 3.
j) SD card 5. Follow the procedures in After Working Inside Your Computer. Remove the screws that secure the speakers to the computer. 31 Removing the Speakers 1. Release the speaker cable from the system board. 4. Follow the procedures in Before Working Inside Your Computer. 2. Disconnect the speaker cable from the computer. 5. Remove: a) SD card b) ExpressCard c) battery d) hard drive e) optical drive f) base cover g) keyboard trim h) keyboard i) bluetooth module j) palmrest 3.
Owner's Manual
Page 32
Removing the Display-Hinge Covers 1. Remove: a) SD card b) ExpressCard c) battery d) hard drive e) optical drive 32 Align the speakers to their original position and tighten the screws to secure the speakers to the system board. 3. Route the speaker cable on ... in Before Working Inside Your Computer. 2. Follow the procedures in After Working Inside Your Computer. Install: a) palmrest b) bluetooth module c) keyboard d) keyboard trim e) base cover f) optical drive g) hard drive h) battery i) ExpressCard j) SD card 4. Installing the Speakers 1.
Removing the Display-Hinge Covers 1. Remove: a) SD card b) ExpressCard c) battery d) hard drive e) optical drive 32 Align the speakers to their original position and tighten the screws to secure the speakers to the system board. 3. Route the speaker cable on ... in Before Working Inside Your Computer. 2. Follow the procedures in After Working Inside Your Computer. Install: a) palmrest b) bluetooth module c) keyboard d) keyboard trim e) base cover f) optical drive g) hard drive h) battery i) ExpressCard j) SD card 4. Installing the Speakers 1.

Owner's Manual
Page 33
Tighten the screws to secure the display hinge covers to the computer. 4. Install: a) palmrest b) bluetooth module c) keyboard d) keyboard trim e) base cover f) optical drive g) hard drive h) battery i) ExpressCard j) SD card 3. Remove: 33 Follow the procedures in Before Working Inside Your Computer. 2. f) base cover g) keyboard trim h) keyboard i) bluetooth module j) palmrest 3. Remove the ...
Tighten the screws to secure the display hinge covers to the computer. 4. Install: a) palmrest b) bluetooth module c) keyboard d) keyboard trim e) base cover f) optical drive g) hard drive h) battery i) ExpressCard j) SD card 3. Remove: 33 Follow the procedures in Before Working Inside Your Computer. 2. f) base cover g) keyboard trim h) keyboard i) bluetooth module j) palmrest 3. Remove the ...

Owner's Manual
Page 34
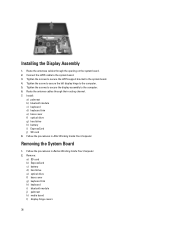
Remove the screws that secures the left display hinge to the computer. 5. a) SD card b) ExpressCard c) battery d) hard drive e) optical drive f) base cover g) keyboard trim h) keyboard i) bluetooth module j) palmrest 3. Remove the screws that secure the display assembly to the computer. 6. Release the antenna cables from their routing on the computer. 4. Remove the screw that secure the Low-Voltage Differential Signaling (LVDS) support bracket. 34
Remove the screws that secures the left display hinge to the computer. 5. a) SD card b) ExpressCard c) battery d) hard drive e) optical drive f) base cover g) keyboard trim h) keyboard i) bluetooth module j) palmrest 3. Remove the screws that secure the display assembly to the computer. 6. Release the antenna cables from their routing on the computer. 4. Remove the screw that secure the Low-Voltage Differential Signaling (LVDS) support bracket. 34
Owner's Manual
Page 36
... their routing channel. 7. Tighten the screws to secure the display assembly to the system board. 4. Install: a) palmrest b) bluetooth module c) keyboard d) keyboard trim e) base cover f) optical drive g) hard drive h) battery i) ExpressCard j) SD card 8. Route the antenna cables through the opening on the system board. 2. Tighten the screws to secure the LVDS support bracket to...
... their routing channel. 7. Tighten the screws to secure the display assembly to the system board. 4. Install: a) palmrest b) bluetooth module c) keyboard d) keyboard trim e) base cover f) optical drive g) hard drive h) battery i) ExpressCard j) SD card 8. Route the antenna cables through the opening on the system board. 2. Tighten the screws to secure the LVDS support bracket to...

Owner's Manual
Page 39
Remove: a) SD card b) ExpressCard c) battery d) hard drive e) optical drive f) base cover g) keyboard trim h) keyboard i) bluetooth module j) palmrest k) media board l) display hinge covers m) display assembly n) system board 3. Follow the procedures in After Working Inside Your ... Inside Your Computer. 2. Remove the screws that secure the heat sink to the system board. 39 Removing the Heat Sink 1. g) keyboard trim h) base cover i) optical drive j) hard drive k) battery l) ExpressCard m) SD card 5.
Remove: a) SD card b) ExpressCard c) battery d) hard drive e) optical drive f) base cover g) keyboard trim h) keyboard i) bluetooth module j) palmrest k) media board l) display hinge covers m) display assembly n) system board 3. Follow the procedures in After Working Inside Your ... Inside Your Computer. 2. Remove the screws that secure the heat sink to the system board. 39 Removing the Heat Sink 1. g) keyboard trim h) base cover i) optical drive j) hard drive k) battery l) ExpressCard m) SD card 5.

Owner's Manual
Page 40
... system board. 2. Connect the heat-sink cable to the system board 3. Remove: a) SD card b) ExpressCard c) battery d) hard drive e) optical drive f) base cover g) keyboard trim h) keyboard i) bluetooth module j) palmrest 40 5. Follow the procedures in Before Working Inside Your Computer...board b) display assembly c) display hinge covers d) media board e) palmrest f) bluetooth module g) keyboard h) keyboard trim i) base cover j) optical drive k) hard drive l) battery m) ExpressCard n) SD card 5. Tighten the screws to secure the heat sink to the system board. 4. Follow the procedures in ...
... system board. 2. Connect the heat-sink cable to the system board 3. Remove: a) SD card b) ExpressCard c) battery d) hard drive e) optical drive f) base cover g) keyboard trim h) keyboard i) bluetooth module j) palmrest 40 5. Follow the procedures in Before Working Inside Your Computer...board b) display assembly c) display hinge covers d) media board e) palmrest f) bluetooth module g) keyboard h) keyboard trim i) base cover j) optical drive k) hard drive l) battery m) ExpressCard n) SD card 5. Tighten the screws to secure the heat sink to the system board. 4. Follow the procedures in ...

Owner's Manual
Page 42
... that secures the I /O board from the computer. 42 e) palmrest f) bluetooth module g) keyboard h) keyboard trim i) base cover j) optical drive k) hard drive l) battery m) ExpressCard n) SD card 5. Remove the I /O board to the computer. 4. Remove: a) SD card b) ExpressCard c) battery d) hard drive e) optical drive f) base cover g) keyboard trim h) keyboard i) bluetooth module j) palmrest k) media board l) display hinge covers m) display assembly n) system board...
... that secures the I /O board from the computer. 42 e) palmrest f) bluetooth module g) keyboard h) keyboard trim i) base cover j) optical drive k) hard drive l) battery m) ExpressCard n) SD card 5. Remove the I /O board to the computer. 4. Remove: a) SD card b) ExpressCard c) battery d) hard drive e) optical drive f) base cover g) keyboard trim h) keyboard i) bluetooth module j) palmrest k) media board l) display hinge covers m) display assembly n) system board...

Owner's Manual
Page 43
Install: a) system board b) display assembly c) display hinge covers d) media board e) palmrest f) bluetooth module g) keyboard h) keyboard trim i) base cover j) optical drive k) hard drive l) battery m) ExpressCard n) SD card 4. Pry up the left, right and top edges of the display bezel. 4. Installing the I /O board. 3. Follow the procedures in its compartment. 2. ...
Install: a) system board b) display assembly c) display hinge covers d) media board e) palmrest f) bluetooth module g) keyboard h) keyboard trim i) base cover j) optical drive k) hard drive l) battery m) ExpressCard n) SD card 4. Pry up the left, right and top edges of the display bezel. 4. Installing the I /O board. 3. Follow the procedures in its compartment. 2. ...
Owner's Manual
Page 48
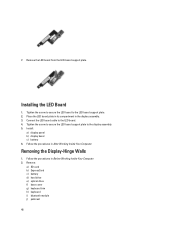
... panel b) display bezel c) battery 6. Installing the LED Board 1. Connect the LED board cable to the LED board support plate. 2. Remove: a) SD card b) ExpressCard c) battery d) hard drive e) optical drive f) base cover g) keyboard trim h) keyboard i) bluetooth module j) palmrest 48 Tighten the screw to secure the LED board to the LED board. 4. 7. Tighten the screw to...
... panel b) display bezel c) battery 6. Installing the LED Board 1. Connect the LED board cable to the LED board support plate. 2. Remove: a) SD card b) ExpressCard c) battery d) hard drive e) optical drive f) base cover g) keyboard trim h) keyboard i) bluetooth module j) palmrest 48 Tighten the screw to secure the LED board to the LED board. 4. 7. Tighten the screw to...

Owner's Manual
Page 51
Follow the procedures in Before Working Inside Your Computer. 2. Remove: a) SD card b) ExpressCard c) battery d) hard drive e) optical drive f) base cover g) keyboard trim h) keyboard i) bluetooth module j) palmrest k) media board l) display hinge covers m) display assembly n) display bezel o) display... procedures in After Working Inside Your Computer. Removing the Display Hinges 1. i) keyboard j) keyboard trim k) base cover l) optical drive m) hard drive n) battery o) ExpressCard p) SD card 5. Remove the screw that secures the left display hinge wall out of the display assembly. 51
Follow the procedures in Before Working Inside Your Computer. 2. Remove: a) SD card b) ExpressCard c) battery d) hard drive e) optical drive f) base cover g) keyboard trim h) keyboard i) bluetooth module j) palmrest k) media board l) display hinge covers m) display assembly n) display bezel o) display... procedures in After Working Inside Your Computer. Removing the Display Hinges 1. i) keyboard j) keyboard trim k) base cover l) optical drive m) hard drive n) battery o) ExpressCard p) SD card 5. Remove the screw that secures the left display hinge wall out of the display assembly. 51


