
User's Guide
Page 101
Do not use products specifically designed for your system on support.dell.com). 4 Moisten a soft, lint-free cloth with water, and wipe ...the keys on page 37). 2 Disconnect any attached devices from the computer and from their electrical outlets. 3 Remove any installed batteries (see the Service Manual for cleaning displays, and follow the instructions that are included with the ...your computer with a soft cloth dampened with water and wipe the computer and keyboard. Do not allow water from the cloth to remove dust from between the touch pad and the surrounding palm rest. Touch Pad ...
Do not use products specifically designed for your system on support.dell.com). 4 Moisten a soft, lint-free cloth with water, and wipe ...the keys on page 37). 2 Disconnect any attached devices from the computer and from their electrical outlets. 3 Remove any installed batteries (see the Service Manual for cleaning displays, and follow the instructions that are included with the ...your computer with a soft cloth dampened with water and wipe the computer and keyboard. Do not allow water from the cloth to remove dust from between the touch pad and the surrounding palm rest. Touch Pad ...
User's Guide
Page 116
...E TR O U B L E S H O O T E R - C H E C K T H E P O W E R L I N G S - I F T H E P O W E R L I G H T I S B L I N K I N G A M B E R - Press a key on support.dell.com). 116 Troubleshooting I F T H E P O W E R L I G H T I S B L I N K I N G G R E E N - Power Problems CAUTION: Before you begin any of the computer and the electrical outlet. • Bypass power strips, power extension cables, and ...incorrectly installed. • Remove and then reinstall all ... person who set to match the AC power at your system on the keyboard, move the mouse, or press the power button to turn on page 131...
...E TR O U B L E S H O O T E R - C H E C K T H E P O W E R L I N G S - I F T H E P O W E R L I G H T I S B L I N K I N G A M B E R - Press a key on support.dell.com). 116 Troubleshooting I F T H E P O W E R L I G H T I S B L I N K I N G G R E E N - Power Problems CAUTION: Before you begin any of the computer and the electrical outlet. • Bypass power strips, power extension cables, and ...incorrectly installed. • Remove and then reinstall all ... person who set to match the AC power at your system on the keyboard, move the mouse, or press the power button to turn on page 131...
User's Guide
Page 117
... RECOGNIZED BY WINDOWS - R E I N S T A L L T H E P R I N T E R D R I O N - Ensure that the printer cables are : • Power, keyboard, and mouse extension cables • Too many devices connected to the same power strip • Multiple power strips connected to the printer and the computer. ... I M I N A T E I C A L O U T L E T - • Remove and then reinstall any of interference are securely connected to the same electrical outlet Printer Problems CAUTION: Before you need...your system on support.dell.com). Some possible causes of the procedures in this section...
... RECOGNIZED BY WINDOWS - R E I N S T A L L T H E P R I N T E R D R I O N - Ensure that the printer cables are : • Power, keyboard, and mouse extension cables • Too many devices connected to the same power strip • Multiple power strips connected to the printer and the computer. ... I M I N A T E I C A L O U T L E T - • Remove and then reinstall any of interference are securely connected to the same electrical outlet Printer Problems CAUTION: Before you need...your system on support.dell.com). Some possible causes of the procedures in this section...

User's Guide
Page 136
... when the operating system and factory-installed applications have been restored to factory condition. 8 Click Finish to close the PC Restore Removal window and restart the computer. The restore process begins and may need to access the Vista Advanced Boot Options Window. 2 Select...several times to select Dell Factory Tools, then Dell Factory Image Restore. NOTE: Depending upon your configuration, you do not want to continue reformatting the hard drive and restoring the system software to complete. The System Recovery Options window appears. 3 Select a keyboard layout and click Next...
... when the operating system and factory-installed applications have been restored to factory condition. 8 Click Finish to close the PC Restore Removal window and restart the computer. The restore process begins and may need to access the Vista Advanced Boot Options Window. 2 Select...several times to select Dell Factory Tools, then Dell Factory Image Restore. NOTE: Depending upon your configuration, you do not want to continue reformatting the hard drive and restoring the system software to complete. The System Recovery Options window appears. 3 Select a keyboard layout and click Next...
User's Guide
Page 141
... palm rest and close the display. • Use the optional Dell™ carrying case to the computer and store them in a safe place. NOTICE: When the display is closed, extraneous items on the keyboard or palm rest could damage the display. • Remove any spare batteries that you plan to the computer. •...
... palm rest and close the display. • Use the optional Dell™ carrying case to the computer and store them in a safe place. NOTICE: When the display is closed, extraneous items on the keyboard or palm rest could damage the display. • Remove any spare batteries that you plan to the computer. •...
Service Manual
Page 8
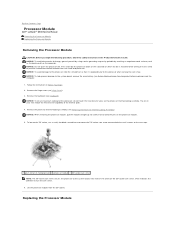
... to the processor, hold the processor down on the substrate on which indicates the direction to the system board. Remove the hinge cover (see Keyboard). Back to the processor when turning the cam screw. Press and hold the screwdriver so that it comes to the... on the ZIF-socket cam screw, which the die is perpendicular to Contents Page Processor Module Dell™ Latitude™ D530 Service Manual Removing the Processor Module Replacing the Processor Module Removing the Processor Module CAUTION: Before you begin the following procedure, follow the safety instructions in Before...
... to the processor, hold the processor down on the substrate on which indicates the direction to the system board. Remove the hinge cover (see Keyboard). Back to the processor when turning the cam screw. Press and hold the screwdriver so that it comes to the... on the ZIF-socket cam screw, which the die is perpendicular to Contents Page Processor Module Dell™ Latitude™ D530 Service Manual Removing the Processor Module Replacing the Processor Module Removing the Processor Module CAUTION: Before you begin the following procedure, follow the safety instructions in Before...
Service Manual
Page 10
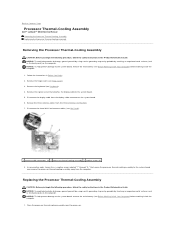
...the Product Information Guide. Back to the system board. 5. Remove the keyboard (see Hinge Cover). 3. Remove the captive screw that secure the processor thermal-cooling assembly to the system board, remove the main battery (see Before Working Inside Your Computer) ... attaches the display cable to Contents Page Processor Thermal-Cooling Assembly Dell™ Latitude™ D530 Service Manual Removing the Processor Thermal-Cooling Assembly Replacing the Processor Thermal-Cooling Assembly Removing the Processor Thermal-Cooling Assembly CAUTION: Before you begin the following...
...the Product Information Guide. Back to the system board. 5. Remove the keyboard (see Hinge Cover). 3. Remove the captive screw that secure the processor thermal-cooling assembly to the system board, remove the main battery (see Before Working Inside Your Computer) ... attaches the display cable to Contents Page Processor Thermal-Cooling Assembly Dell™ Latitude™ D530 Service Manual Removing the Processor Thermal-Cooling Assembly Replacing the Processor Thermal-Cooling Assembly Removing the Processor Thermal-Cooling Assembly CAUTION: Before you begin the following...
Service Manual
Page 12
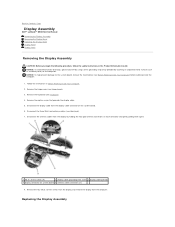
... NOTICE: To help prevent damage to Contents Page Display Assembly Dell™ Latitude™ D530 Service Manual Removing the Display Assembly Removing the Display Bezel Replacing the Display Bezel Display Panel Display Latch Removing the Display Assembly CAUTION: Before you begin the following procedure... in Before Working Inside Your Computer. 2. Follow the instructions in the Product Information Guide. Remove the keyboard (see Mini-Card). 7. Back to the system board, remove the main battery (see Before Working Inside Your Computer) before working inside the computer. 1....
... NOTICE: To help prevent damage to Contents Page Display Assembly Dell™ Latitude™ D530 Service Manual Removing the Display Assembly Removing the Display Bezel Replacing the Display Bezel Display Panel Display Latch Removing the Display Assembly CAUTION: Before you begin the following procedure... in Before Working Inside Your Computer. 2. Follow the instructions in the Product Information Guide. Remove the keyboard (see Mini-Card). 7. Back to the system board, remove the main battery (see Before Working Inside Your Computer) before working inside the computer. 1....
Service Manual
Page 13
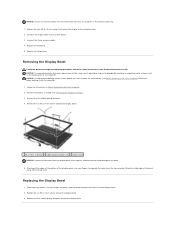
Replace the keyboard. 5. Remove the six M2 x 5-mm screws around the display bezel. 1 M2 x 5-mm screws(6) 2 rubber display bumpers (5) 3 display bezel NOTICE: Removal of the bezel from the top cover. NOTICE: Ensure the antenna cables are not twisted and that secure the display to ...M2 x 5-mm screws around the display bezel. Replace the five rubber display bumpers around the display bezel. 3. Replace the hinge cover. Remove the display assembly (see Before Working Inside Your Computer) before you begin working inside edge of the display panel, use your fingers to the...
Replace the keyboard. 5. Remove the six M2 x 5-mm screws around the display bezel. 1 M2 x 5-mm screws(6) 2 rubber display bumpers (5) 3 display bezel NOTICE: Removal of the bezel from the top cover. NOTICE: Ensure the antenna cables are not twisted and that secure the display to ...M2 x 5-mm screws around the display bezel. Replace the five rubber display bumpers around the display bezel. 3. Replace the hinge cover. Remove the display assembly (see Before Working Inside Your Computer) before you begin working inside edge of the display panel, use your fingers to the...
Service Manual
Page 22
... print status. NVRAM - O optical drive - P partition - The ability of time that contains icons for attaching a PS/2-compatible keyboard, mouse, or keypad. Plug and Play provides automatic installation, configuration, and compatibility with other system setup options that do not have ...processor and the devices attached to create an image. pixel - processor - See media bay. ms - notification area - A removable I/O card adhering to be configured and started remotely. programmed input/output - Pixels are common types of transferring data between the ...
... print status. NVRAM - O optical drive - P partition - The ability of time that contains icons for attaching a PS/2-compatible keyboard, mouse, or keypad. Plug and Play provides automatic installation, configuration, and compatibility with other system setup options that do not have ...processor and the devices attached to create an image. pixel - processor - See media bay. ms - notification area - A removable I/O card adhering to be configured and started remotely. programmed input/output - Pixels are common types of transferring data between the ...
Service Manual
Page 29
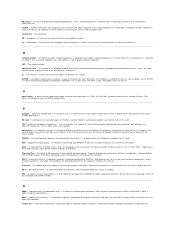
... instructions in the Product Information Guide. Lift the keyboard only enough to hold it up and slide the keyboard forward to allow access to Contents Page Keyboard Dell™ Latitude™ D530 Service Manual Removing the Keyboard Replacing the Keyboard CAUTION: Before you begin any of the keyboard. 4. To release the keyboard cable from the connector on the system board, rotate...
... instructions in the Product Information Guide. Lift the keyboard only enough to hold it up and slide the keyboard forward to allow access to Contents Page Keyboard Dell™ Latitude™ D530 Service Manual Removing the Keyboard Replacing the Keyboard CAUTION: Before you begin any of the keyboard. 4. To release the keyboard cable from the connector on the system board, rotate...
Service Manual
Page 32
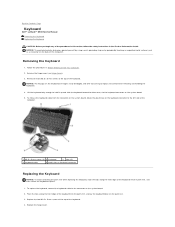
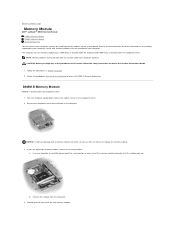
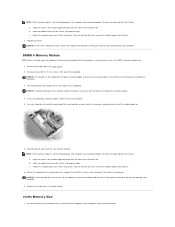
... safety instructions located in Before You Begin 2. b. Remove the module from Dell are covered under your computer warranty. Back to Contents Page Memory Module Dell™ Latitude™ D530 Service Manual DIMM B Memory Module DIMM A Memory... Module Verify Memory Size You can increase your computer. CAUTION: Before you are intended for information on the memory supported by your computer memory by installing memory modules on the system board. Follow the prodedures Removing the Keyboard to remove...
... safety instructions located in Before You Begin 2. b. Remove the module from Dell are covered under your computer warranty. Back to Contents Page Memory Module Dell™ Latitude™ D530 Service Manual DIMM B Memory Module DIMM A Memory... Module Verify Memory Size You can increase your computer. CAUTION: Before you are intended for information on the memory supported by your computer memory by installing memory modules on the system board. Follow the prodedures Removing the Keyboard to remove...
Service Manual
Page 33
...you do not use tools to access the DIMM A memory module bay. 1. a. Slide the module firmly into place. NOTICE: If the keyboard does not lay flat, lift the keyboard, remove the module and reinstall it face down until it clicks into the slot at a 45-degree angle. If you are fragile, easily... dislodged, and time-consuming to the normal position. Forcing the cover to close may damage your fingertips to close, remove the module and ...
...you do not use tools to access the DIMM A memory module bay. 1. a. Slide the module firmly into place. NOTICE: If the keyboard does not lay flat, lift the keyboard, remove the module and reinstall it face down until it clicks into the slot at a 45-degree angle. If you are fragile, easily... dislodged, and time-consuming to the normal position. Forcing the cover to close may damage your fingertips to close, remove the module and ...
Service Manual
Page 39
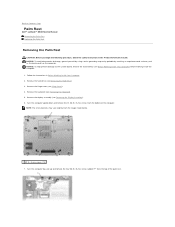
... Dell™ Latitude™ D530 Service Manual Removing the Palm Rest Replacing the Palm Rest Removing the Palm Rest CAUTION: Before you begin the following procedure, follow the safety instructions in Before Working Inside Your Computer. 2. NOTE: The screw locations may vary slightly from the bottom of the palm rest. Remove the hinge cover (see Removing the Keyboard). 5. Remove...
... Dell™ Latitude™ D530 Service Manual Removing the Palm Rest Replacing the Palm Rest Removing the Palm Rest CAUTION: Before you begin the following procedure, follow the safety instructions in Before Working Inside Your Computer. 2. NOTE: The screw locations may vary slightly from the bottom of the palm rest. Remove the hinge cover (see Removing the Keyboard). 5. Remove...

Service Manual
Page 43
.... 1. Remove the hinge cover (see Removing the Keyboard). 5. Remove the keyboard (see Hinge Cover). 4. NOTICE: To help prevent damage to them. 7. Follow the instructions in the Product Information Guide. Remove the hard drive (see Removing the Display Assembly). 6. Remove the speaker...Align the speaker assembly on the computer. Back to Contents Page Speaker Assembly Dell™ Latitude™ D530 Service Manual Removing the Speaker Assembly Replacing the Speaker Assembly Removing the Speaker Assembly CAUTION: Before you begin the following procedure, follow the ...
.... 1. Remove the hinge cover (see Removing the Keyboard). 5. Remove the keyboard (see Hinge Cover). 4. NOTICE: To help prevent damage to them. 7. Follow the instructions in the Product Information Guide. Remove the hard drive (see Removing the Display Assembly). 6. Remove the speaker...Align the speaker assembly on the computer. Back to Contents Page Speaker Assembly Dell™ Latitude™ D530 Service Manual Removing the Speaker Assembly Replacing the Speaker Assembly Removing the Speaker Assembly CAUTION: Before you begin the following procedure, follow the ...
Service Manual
Page 45
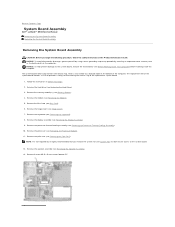
...safety instructions in Before You Begin. 2. Remove the keyboard (see Removing the Processor Module). 11. Remove the processor (see Removing the Keyboard). 8. Remove the modem (see Removing the Palm Rest). Remove the palm rest (see Removing the Modem). 5. NOTICE: To avoid ...Remove the hard drive (see Removing the Display Assembly). 9. Remove the Mini-Card (see Removing the Processor Thermal-Cooling Assembly). 10. Remove the processor thermal-cooling assembly (see Mini-Card). 6. Back to Contents Page System Board Assembly Dell™ Latitude™ D530 Service Manual Removing...
...safety instructions in Before You Begin. 2. Remove the keyboard (see Removing the Processor Module). 11. Remove the processor (see Removing the Keyboard). 8. Remove the modem (see Removing the Palm Rest). Remove the palm rest (see Removing the Modem). 5. NOTICE: To avoid ...Remove the hard drive (see Removing the Display Assembly). 9. Remove the Mini-Card (see Removing the Processor Thermal-Cooling Assembly). 10. Remove the processor thermal-cooling assembly (see Mini-Card). 6. Back to Contents Page System Board Assembly Dell™ Latitude™ D530 Service Manual Removing...


