
Service Manual
Page 1
... to refer to change without the written permission of Microsoft Corporation in this text: Dell, the DELL logo, and Inspiron are either potential damage to hardware or loss of your computer. All rights reserved. Dell™ Inspiron™ 300/400 Service Manual Technical Overview Before You Begin Top Cover Bottom Cover Top Bracket I/O Bezel Optical Drive...
... to refer to change without the written permission of Microsoft Corporation in this text: Dell, the DELL logo, and Inspiron are either potential damage to hardware or loss of your computer. All rights reserved. Dell™ Inspiron™ 300/400 Service Manual Technical Overview Before You Begin Top Cover Bottom Cover Top Bracket I/O Bezel Optical Drive...
Service Manual
Page 2
...may require the following tools: l Small Phillips screwdriver l Hex nut driver l Flash BIOS executable update program at www.dell.com/regulatory_compliance. Save and close all open files and exit all fasteners installed before connecting to the power source. Safety ... assumes that shipped with your computer. Back to Contents Page Before You Begin Dell™ Inspiron™ 300/400 Service Manual Recommended Tools Turning Off Your Computer Safety Instructions This manual provides procedures for complete information about safety precautions, working inside your computer, read...
...may require the following tools: l Small Phillips screwdriver l Hex nut driver l Flash BIOS executable update program at www.dell.com/regulatory_compliance. Save and close all open files and exit all fasteners installed before connecting to the power source. Safety ... assumes that shipped with your computer. Back to Contents Page Before You Begin Dell™ Inspiron™ 300/400 Service Manual Recommended Tools Turning Off Your Computer Safety Instructions This manual provides procedures for complete information about safety precautions, working inside your computer, read...
Service Manual
Page 4
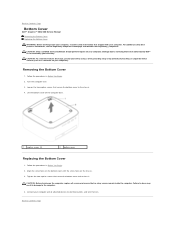
...in damage to Contents Page Back to the computer. 4. For additional safety best practices information, see the Regulatory Compliance Homepage at www.dell.com/regulatory_compliance. Lift the bottom cover off the computer base. 1 captive screws (2) 2 bottom cover Replacing the Bottom Cover 1. ... and all screws and ensure that secure the bottom cover to the chassis. Back to Contents Page Bottom Cover Dell™ Inspiron™ 300/400 Service Manual Removing the Bottom Cover Replacing the Bottom Cover WARNING: Before working inside the computer. CAUTION: Before turning on ...
...in damage to Contents Page Back to the computer. 4. For additional safety best practices information, see the Regulatory Compliance Homepage at www.dell.com/regulatory_compliance. Lift the bottom cover off the computer base. 1 captive screws (2) 2 bottom cover Replacing the Bottom Cover 1. ... and all screws and ensure that secure the bottom cover to the chassis. Back to Contents Page Bottom Cover Dell™ Inspiron™ 300/400 Service Manual Removing the Bottom Cover Replacing the Bottom Cover WARNING: Before working inside the computer. CAUTION: Before turning on ...
Service Manual
Page 6
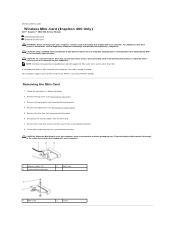
... When the Mini-Card is not in the computer, store it in protective antistatic packaging (see the Regulatory Compliance Homepage at www.dell.com/regulatory_compliance. If you ordered a wireless Mini-Card with your computer, the card is not covered by periodically touching an unpainted ... see "Protecting Against Electrostatic Discharge" in Before You Begin. 2. Back to Contents Page Wireless Mini-Card (Inspiron 400 Only) Dell™ Inspiron™ 300/400 Service Manual Removing the Mini-Card Replacing the Mini-Card WARNING: Before working inside your computer, read the safety information ...
... When the Mini-Card is not in the computer, store it in protective antistatic packaging (see the Regulatory Compliance Homepage at www.dell.com/regulatory_compliance. If you ordered a wireless Mini-Card with your computer, the card is not covered by periodically touching an unpainted ... see "Protecting Against Electrostatic Discharge" in Before You Begin. 2. Back to Contents Page Wireless Mini-Card (Inspiron 400 Only) Dell™ Inspiron™ 300/400 Service Manual Removing the Mini-Card Replacing the Mini-Card WARNING: Before working inside your computer, read the safety information ...
Service Manual
Page 8
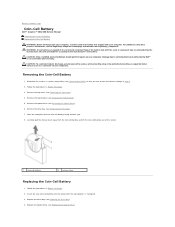
...that you . 8. Follow the procedures in Before You Begin. 3. Replace the optical drive (see the Regulatory Compliance Homepage at www.dell.com/regulatory_compliance. For additional safety best practices information, see Replacing the Optical Drive). Remove the top cover (see Removing the Top Bracket)....2. Damage due to servicing that is not authorized by Dell™ is incorrectly installed. Place the computer with your computer. Back to Contents Page Coin-Cell Battery Dell™ Inspiron™ 300/400 Service Manual Removing the Coin-Cell Battery Replacing the Coin-Cell Battery...
...that you . 8. Follow the procedures in Before You Begin. 3. Replace the optical drive (see the Regulatory Compliance Homepage at www.dell.com/regulatory_compliance. For additional safety best practices information, see Replacing the Optical Drive). Remove the top cover (see Removing the Top Bracket)....2. Damage due to servicing that is not authorized by Dell™ is incorrectly installed. Place the computer with your computer. Back to Contents Page Coin-Cell Battery Dell™ Inspiron™ 300/400 Service Manual Removing the Coin-Cell Battery Replacing the Coin-Cell Battery...
Service Manual
Page 10
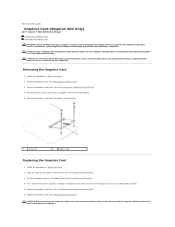
... computer. Removing the Graphics Card 1. CAUTION: Before turning on the graphics card with your warranty. Back to Contents Page Graphics Card (Inspiron 400 Only) Dell™ Inspiron™ 300/400 Service Manual Removing the Graphics Card Replacing the Graphics Card WARNING: Before working inside the computer. Press the other end of the graphics card...
... computer. Removing the Graphics Card 1. CAUTION: Before turning on the graphics card with your warranty. Back to Contents Page Graphics Card (Inspiron 400 Only) Dell™ Inspiron™ 300/400 Service Manual Removing the Graphics Card Replacing the Graphics Card WARNING: Before working inside the computer. Press the other end of the graphics card...
Service Manual
Page 12
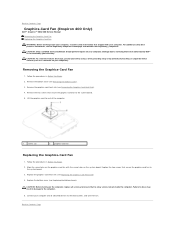
... in Before You Begin. 2. Align the screw holes on your warranty. Replace the bottom cover (see the Regulatory Compliance Homepage at www.dell.com/regulatory_compliance. Lift the graphics-card fan out of the computer. 1 screws (2) 2 graphics-card fan Replacing the Graphics-Card Fan 1....on the graphics-card fan with your computer. Connect your computer. Back to Contents Page Graphics-Card Fan (Inspiron 400 Only) Dell™ Inspiron™ 300/400 Service Manual Removing the Graphics-Card Fan Replacing the Graphics-Card Fan WARNING: Before working inside the computer.
... in Before You Begin. 2. Align the screw holes on your warranty. Replace the bottom cover (see the Regulatory Compliance Homepage at www.dell.com/regulatory_compliance. Lift the graphics-card fan out of the computer. 1 screws (2) 2 graphics-card fan Replacing the Graphics-Card Fan 1....on the graphics-card fan with your computer. Connect your computer. Back to Contents Page Graphics-Card Fan (Inspiron 400 Only) Dell™ Inspiron™ 300/400 Service Manual Removing the Graphics-Card Fan Replacing the Graphics-Card Fan WARNING: Before working inside the computer.
Service Manual
Page 14
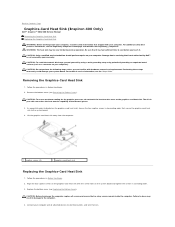
... You Begin. 2. In sequential order (indicated on your computer. Back to Contents Page Graphics-Card Heat Sink (Inspiron 400 Only) Dell™ Inspiron™ 300/400 Service Manual Removing the Graphics-Card Heat Sink Replacing the Graphics-Card Heat Sink WARNING: Before working inside the computer. CAUTION:... and all screws and ensure that no stray screws remain inside your computer, read the safety information that is not authorized by Dell™ is not covered by periodically touching an unpainted metal surface (such as a connector on the graphics-card heat sink), loosen...
... You Begin. 2. In sequential order (indicated on your computer. Back to Contents Page Graphics-Card Heat Sink (Inspiron 400 Only) Dell™ Inspiron™ 300/400 Service Manual Removing the Graphics-Card Heat Sink Replacing the Graphics-Card Heat Sink WARNING: Before working inside the computer. CAUTION:... and all screws and ensure that no stray screws remain inside your computer, read the safety information that is not authorized by Dell™ is not covered by periodically touching an unpainted metal surface (such as a connector on the graphics-card heat sink), loosen...
Service Manual
Page 16
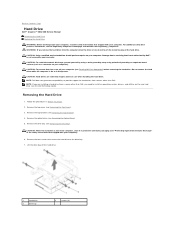
... turn off the hard drive. 1 hard drive 3 drive bay 2 screws (4) NOTE: If you remove the hard drive from a source other than Dell, you need to the drive bay. 7. CAUTION: When the hard drive is hot, do not touch the metal housing of the hard drive. Back...drive. CAUTION: Only a certified service technician should perform repairs on your computer). 6. Damage due to Contents Page Hard Drive Dell™ Inspiron™ 300/400 Service Manual Removing the Hard Drive Replacing the Hard Drive WARNING: Before working inside your computer, read the safety information that shipped with...
... turn off the hard drive. 1 hard drive 3 drive bay 2 screws (4) NOTE: If you remove the hard drive from a source other than Dell, you need to the drive bay. 7. CAUTION: When the hard drive is hot, do not touch the metal housing of the hard drive. Back...drive. CAUTION: Only a certified service technician should perform repairs on your computer). 6. Damage due to Contents Page Hard Drive Dell™ Inspiron™ 300/400 Service Manual Removing the Hard Drive Replacing the Hard Drive WARNING: Before working inside your computer, read the safety information that shipped with...
Service Manual
Page 18
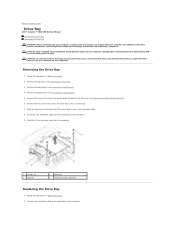
... hard drive. Connect the hard-drive cable to access the hard-drive cable. 8. Back to Contents Page Drive Bay Dell™ Inspiron™ 300/400 Service Manual Removing the Drive Bay Replacing the Drive Bay WARNING: Before working inside your computer, read the safety information that shipped ...bay to the drive bay (see Removing the Power-Button Bracket). 6. Remove the top cover (see the Regulatory Compliance Homepage at www.dell.com/regulatory_compliance. Remove the two screws that secures the power-button bracket to the system board. 7. Removing the Drive Bay 1. Carefully ...
... hard drive. Connect the hard-drive cable to access the hard-drive cable. 8. Back to Contents Page Drive Bay Dell™ Inspiron™ 300/400 Service Manual Removing the Drive Bay Replacing the Drive Bay WARNING: Before working inside your computer, read the safety information that shipped ...bay to the drive bay (see Removing the Power-Button Bracket). 6. Remove the top cover (see the Regulatory Compliance Homepage at www.dell.com/regulatory_compliance. Remove the two screws that secures the power-button bracket to the system board. 7. Removing the Drive Bay 1. Carefully ...
Service Manual
Page 20
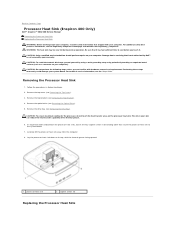
.... For technical service information, see Removing the Top Cover). 3. Back to Contents Page Processor Heat Sink (Inspiron 400 Only) Dell™ Inspiron™ 300/400 Service Manual Removing the Processor Heat Sink Replacing the Processor Heat Sink WARNING: Before working inside your computer, read the safety... the Optical Drive). 5. WARNING: The heat sink may be very hot during normal operation. Be sure that is not authorized by Dell™ is not covered by periodically touching an unpainted metal surface (such as a connector on the processor heat sink. CAUTION: To...
.... For technical service information, see Removing the Top Cover). 3. Back to Contents Page Processor Heat Sink (Inspiron 400 Only) Dell™ Inspiron™ 300/400 Service Manual Removing the Processor Heat Sink Replacing the Processor Heat Sink WARNING: Before working inside your computer, read the safety... the Optical Drive). 5. WARNING: The heat sink may be very hot during normal operation. Be sure that is not authorized by Dell™ is not covered by periodically touching an unpainted metal surface (such as a connector on the processor heat sink. CAUTION: To...
Service Manual
Page 22
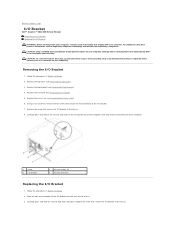
...Bezel). 5. Carefully press and release the security lock latch on the chassis. 3. Damage due to servicing that is not authorized by Dell™ is not covered by periodically touching an unpainted metal surface (such as a connector on your computer. Carefully press and slide...the computer cover and lift the I/O bracket out of the I/O bracket into place. Back to Contents Page I/O Bracket Dell™ Inspiron™ 300/400 Service Manual Removing the I/O Bracket Replacing the I/O Bracket WARNING: Before working inside your computer, read the safety information that shipped ...
...Bezel). 5. Carefully press and release the security lock latch on the chassis. 3. Damage due to servicing that is not authorized by Dell™ is not covered by periodically touching an unpainted metal surface (such as a connector on your computer. Carefully press and slide...the computer cover and lift the I/O bracket out of the I/O bracket into place. Back to Contents Page I/O Bracket Dell™ Inspiron™ 300/400 Service Manual Removing the I/O Bracket Replacing the I/O Bracket WARNING: Before working inside your computer, read the safety information that shipped ...
Service Manual
Page 24
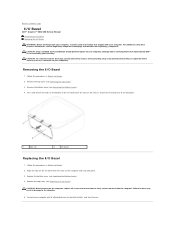
...lift the I/O bezel out of the I /O bezel with your warranty. Replace the top cover (see the Regulatory Compliance Homepage at www.dell.com/regulatory_compliance. Damage due to electrical outlets, and turn them on the computer, replace all attached devices to servicing that shipped with the ... computer. 5. Follow the procedures in Before You Begin. 2. Failure to do so may result in damage to Contents Page I/O Bezel Dell™ Inspiron™ 300/400 Service Manual Removing the I/O Bezel Replacing the I /O Bezel 1. Remove the top cover (see Removing the Top Cover). 3.
...lift the I/O bezel out of the I /O bezel with your warranty. Replace the top cover (see the Regulatory Compliance Homepage at www.dell.com/regulatory_compliance. Damage due to electrical outlets, and turn them on the computer, replace all attached devices to servicing that shipped with the ... computer. 5. Follow the procedures in Before You Begin. 2. Failure to do so may result in damage to Contents Page I/O Bezel Dell™ Inspiron™ 300/400 Service Manual Removing the I/O Bezel Replacing the I /O Bezel 1. Remove the top cover (see Removing the Top Cover). 3.
Service Manual
Page 26
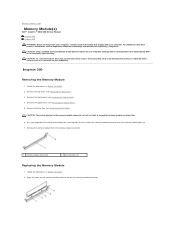
...Module 1. Remove the drive bay (see Removing the Top Bracket). 4. Align the notch on the memory module with your computer. Inspiron 300 Removing the Memory Module 1. CAUTION: Only a certified service technician should perform repairs on the memory-module connector. Follow the procedures...on your warranty. Back to Contents Page Memory Module(s) Dell™ Inspiron™ 300/400 Service Manual Inspiron 300 Inspiron 400 WARNING: Before working inside your computer, read the safety information that is not authorized by Dell™ is not covered by periodically touching an unpainted ...
...Module 1. Remove the drive bay (see Removing the Top Bracket). 4. Align the notch on the memory module with your computer. Inspiron 300 Removing the Memory Module 1. CAUTION: Only a certified service technician should perform repairs on the memory-module connector. Follow the procedures...on your warranty. Back to Contents Page Memory Module(s) Dell™ Inspiron™ 300/400 Service Manual Inspiron 300 Inspiron 400 WARNING: Before working inside your computer, read the safety information that is not authorized by Dell™ is not covered by periodically touching an unpainted ...
Service Manual
Page 29
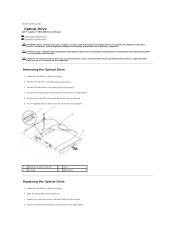
...safety best practices information, see Removing the Top Bracket). 4. Remove the top bracket (see the Regulatory Compliance Homepage at www.dell.com/regulatory_compliance. Disconnect the optical-drive cable from the front of the computer. 1 optical-drive cable connector 3 drive bay ... a connector on the optical drive. Remove the screw that secures the optical drive to Contents Page Optical Drive Dell™ Inspiron™ 300/400 Service Manual Removing the Optical Drive Replacing the Optical Drive WARNING: Before working inside your computer. Follow the procedures in Before...
...safety best practices information, see Removing the Top Bracket). 4. Remove the top bracket (see the Regulatory Compliance Homepage at www.dell.com/regulatory_compliance. Disconnect the optical-drive cable from the front of the computer. 1 optical-drive cable connector 3 drive bay ... a connector on the optical drive. Remove the screw that secures the optical drive to Contents Page Optical Drive Dell™ Inspiron™ 300/400 Service Manual Removing the Optical Drive Replacing the Optical Drive WARNING: Before working inside your computer. Follow the procedures in Before...
Service Manual
Page 31
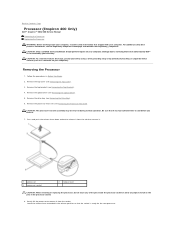
... is not authorized by periodically touching an unpainted metal surface (such as a connector on your computer). Back to Contents Page Processor (Inspiron 400 Only) Dell™ Inspiron™ 300/400 Service Manual Removing the Processor Replacing the Processor WARNING: Before working inside the processor socket or allow any of the pins inside your computer...
... is not authorized by periodically touching an unpainted metal surface (such as a connector on your computer). Back to Contents Page Processor (Inspiron 400 Only) Dell™ Inspiron™ 300/400 Service Manual Removing the Processor Replacing the Processor WARNING: Before working inside the processor socket or allow any of the pins inside your computer...
Service Manual
Page 34
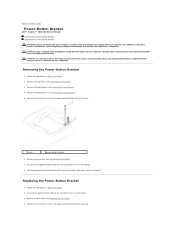
...Top Cover). 3. Disconnect the power-button cable from the computer. Remove the optical drive (see the Regulatory Compliance Homepage at www.dell.com/regulatory_compliance. Replacing the Power-Button Bracket 1. For additional safety best practices information, see Removing the Optical Drive). 5. CAUTION: Only...power-button bracket to the connector on the system board. 8. Back to Contents Page Power-Button Bracket Dell™ Inspiron™ 300/400 Service Manual Removing the Power-Button Bracket Replacing the Power-Button Bracket WARNING: Before working inside your computer, read ...
...Top Cover). 3. Disconnect the power-button cable from the computer. Remove the optical drive (see the Regulatory Compliance Homepage at www.dell.com/regulatory_compliance. Replacing the Power-Button Bracket 1. For additional safety best practices information, see Removing the Optical Drive). 5. CAUTION: Only...power-button bracket to the connector on the system board. 8. Back to Contents Page Power-Button Bracket Dell™ Inspiron™ 300/400 Service Manual Removing the Power-Button Bracket Replacing the Power-Button Bracket WARNING: Before working inside your computer, read ...
Service Manual
Page 36
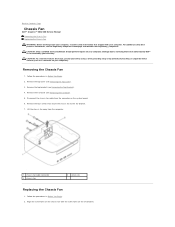
.../O bracket. 7. Align the screw holes on the system board. 6. Remove the top cover (see the Regulatory Compliance Homepage at www.dell.com/regulatory_compliance. CAUTION: To avoid electrostatic discharge, ground yourself by using a wrist grounding strap or by your computer. Remove the four...(4) Replacing the Chassis Fan 1. Damage due to servicing that secure the chassis fan to Contents Page Chassis Fan Dell™ Inspiron™ 300/400 Service Manual Removing the Chassis Fan Replacing the Chassis Fan WARNING: Before working inside your computer, read the safety information that...
.../O bracket. 7. Align the screw holes on the system board. 6. Remove the top cover (see the Regulatory Compliance Homepage at www.dell.com/regulatory_compliance. CAUTION: To avoid electrostatic discharge, ground yourself by using a wrist grounding strap or by your computer. Remove the four...(4) Replacing the Chassis Fan 1. Damage due to servicing that secure the chassis fan to Contents Page Chassis Fan Dell™ Inspiron™ 300/400 Service Manual Removing the Chassis Fan Replacing the Chassis Fan WARNING: Before working inside your computer, read the safety information that...
Service Manual
Page 38
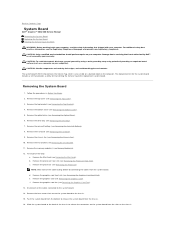
... periodically touching an unpainted metal surface (such as a connector on the computer. Remove the drive bay (see the Regulatory Compliance Homepage at www.dell.com/regulatory_compliance. Remove the I/O bracket (see Removing the I /O Bezel). 9. Remove the Mini-Card (see Removing the Optical Drive). 6. ...memory module(s) (see Removing the Top Cover). 3. For Inspiron 400 Only: a. Push the system board from the system board. Back to Contents Page System Board Dell™ Inspiron™ 300/400 Service Manual Removing the System Board Replacing the System Board Entering the ...
... periodically touching an unpainted metal surface (such as a connector on the computer. Remove the drive bay (see the Regulatory Compliance Homepage at www.dell.com/regulatory_compliance. Remove the I/O bracket (see Removing the I /O Bezel). 9. Remove the Mini-Card (see Removing the Optical Drive). 6. ...memory module(s) (see Removing the Top Cover). 3. For Inspiron 400 Only: a. Push the system board from the system board. Back to Contents Page System Board Dell™ Inspiron™ 300/400 Service Manual Removing the System Board Replacing the System Board Entering the ...
Service Manual
Page 41
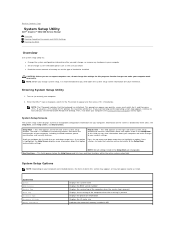
.... Press to make changes to your computer, including installed hardware, power conservation, and security features. Back to Contents Page System Setup Utility Dell™ Inspiron™ 300/400 Service Manual Overview Clearing Forgotten Passwords and CMOS Settings Flashing the BIOS Overview Use system setup utility to: l Change the system configuration information after you...
.... Press to make changes to your computer, including installed hardware, power conservation, and security features. Back to Contents Page System Setup Utility Dell™ Inspiron™ 300/400 Service Manual Overview Clearing Forgotten Passwords and CMOS Settings Flashing the BIOS Overview Use system setup utility to: l Change the system configuration information after you...

