Setup Guide
Page 74
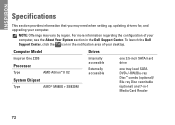
...configuration of your computer, see the About Your System section in the Dell Support Center. NOTE: Offerings may need when setting up, updating drivers for, and upgrading your computer. Computer Model Inspiron One 2205 Processor Type AMD Athlon™ II X2 System Chipset Type AMD®... M880G + SB820M Drives Internally accessible Externally accessible one 3.5-inch SATA hard drive one tray-load SATA DVD+/-RW/Blu-ray Disc™ ...
...configuration of your computer, see the About Your System section in the Dell Support Center. NOTE: Offerings may need when setting up, updating drivers for, and upgrading your computer. Computer Model Inspiron One 2205 Processor Type AMD Athlon™ II X2 System Chipset Type AMD®... M880G + SB820M Drives Internally accessible Externally accessible one 3.5-inch SATA hard drive one tray-load SATA DVD+/-RW/Blu-ray Disc™ ...
Service Manual
Page 1
...logo are trademarks of these materials in any proprietary interest in this document is strictly forbidden. All rights reserved. Dell™ Inspiron™ One 2205 Service Manual Technical Overview Before You Begin Back Cover Hard Drive Optical Drive Memory Module(s) Converter Card Touch Screen...Card (Optional) Coin-Cell Battery Wireless Mini-Card(s) MXM-Assembly Fan (Optional) MXM Assembly (Optional) Processor Heat-Sink Fan Processor Heat-Sink Processor Middle Frame Speakers System Board Display Wireless Antenna Speaker Cover Camera Module Infrared Card (Optional) Internal Card With...
...logo are trademarks of these materials in any proprietary interest in this document is strictly forbidden. All rights reserved. Dell™ Inspiron™ One 2205 Service Manual Technical Overview Before You Begin Back Cover Hard Drive Optical Drive Memory Module(s) Converter Card Touch Screen...Card (Optional) Coin-Cell Battery Wireless Mini-Card(s) MXM-Assembly Fan (Optional) MXM Assembly (Optional) Processor Heat-Sink Fan Processor Heat-Sink Processor Middle Frame Speakers System Board Display Wireless Antenna Speaker Cover Camera Module Infrared Card (Optional) Internal Card With...

Service Manual
Page 27
... cool before you touch it. Remove the MXM-assembly fan (see Removing the Back Cover). 3. Back to Contents Page Processor Heat-Sink Dell™ Inspiron™ One 2205 Service Manual Removing the Processor Heat-Sink Replacing the Processor Heat-Sink WARNING: Before working inside your computer, read the safety information that shipped with your computer. Ensure that...
... cool before you touch it. Remove the MXM-assembly fan (see Removing the Back Cover). 3. Back to Contents Page Processor Heat-Sink Dell™ Inspiron™ One 2205 Service Manual Removing the Processor Heat-Sink Replacing the Processor Heat-Sink WARNING: Before working inside your computer, read the safety information that shipped with your computer. Ensure that...

Service Manual
Page 28
... the system board and tighten the screws in Before You Begin. 2. Align the four captive screws on the processor heat-sink with the screw holes on the processor heat-sink). 4. Replace the rear stand cover (see Replacing the MXM Assembly). 7. Replace the MXM assembly ... Cover). Follow the instructions from the bottom of the processor heath-sink can be reused if the original processor and processor heat-sink are reinstalled together. If either the processor or the processor heat-sink is achieved. 1. Replace the processor heat-sink fan (see Replacing the System-Board Shield)....
... the system board and tighten the screws in Before You Begin. 2. Align the four captive screws on the processor heat-sink with the screw holes on the processor heat-sink). 4. Replace the rear stand cover (see Replacing the MXM Assembly). 7. Replace the MXM assembly ... Cover). Follow the instructions from the bottom of the processor heath-sink can be reused if the original processor and processor heat-sink are reinstalled together. If either the processor or the processor heat-sink is achieved. 1. Replace the processor heat-sink fan (see Replacing the System-Board Shield)....

Service Manual
Page 29
... two screws that it has had sufficient time to cool before you touch it. Back to Contents Page Processor Heat-Sink Fan Dell™ Inspiron™ One 2205 Service Manual Removing the Processor Heat-Sink Fan Replacing the Processor Heat-Sink Fan WARNING: Before working inside your computer, read the safety information that shipped with your computer...
... two screws that it has had sufficient time to cool before you touch it. Back to Contents Page Processor Heat-Sink Fan Dell™ Inspiron™ One 2205 Service Manual Removing the Processor Heat-Sink Fan Replacing the Processor Heat-Sink Fan WARNING: Before working inside your computer, read the safety information that shipped with your computer...

Service Manual
Page 30
... connector (CPU FAN) on . Connect your computer and all screws and ensure that no stray screws remain inside the computer. CAUTION: Before turning on the processor heat-sink. 5. Adhere the silver foil on the computer, replace all attached devices to Contents Page 4. Connect the...
... connector (CPU FAN) on . Connect your computer and all screws and ensure that no stray screws remain inside the computer. CAUTION: Before turning on the processor heat-sink. 5. Adhere the silver foil on the computer, replace all attached devices to Contents Page 4. Connect the...
Service Manual
Page 47
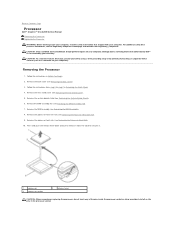
... the safety information that is not authorized by Dell™ is not covered by periodically touching an unpainted metal surface (such as a connector on your computer). Back to Contents Page Processor Dell™ Inspiron™ One 2205 Service Manual Removing the Processor Replacing the Processor WARNING: Before working inside the processor socket or allow any objects to fall on...
... the safety information that is not authorized by Dell™ is not covered by periodically touching an unpainted metal surface (such as a connector on your computer). Back to Contents Page Processor Dell™ Inspiron™ One 2205 Service Manual Removing the Processor Replacing the Processor WARNING: Before working inside the processor socket or allow any objects to fall on...

Service Manual
Page 48
...grease. Lift the release lever to the processor. 5. Ensure that the processor is a requirement for the new processor. Align the pin-1 corners of the ...Processor 1. Unpack the new processor. 1 processor socket 3 processor 2 processor pin-1 indicator 4 release lever 4. CAUTION: You must position the processor correctly in the processor socket and ensure that the processor socket is fully extended. Replace the system-board shield (see Replacing the Processor Heat-Sink). 11. Lift the processor to secure the processor. 8. Place the processor lightly in the processor...
...grease. Lift the release lever to the processor. 5. Ensure that the processor is a requirement for the new processor. Align the pin-1 corners of the ...Processor 1. Unpack the new processor. 1 processor socket 3 processor 2 processor pin-1 indicator 4 release lever 4. CAUTION: You must position the processor correctly in the processor socket and ensure that the processor socket is fully extended. Replace the system-board shield (see Replacing the Processor Heat-Sink). 11. Lift the processor to secure the processor. 8. Place the processor lightly in the processor...

Service Manual
Page 60
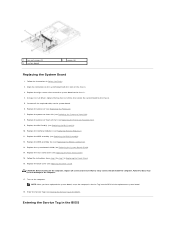
... Using a hex nut driver, remove the two hex nut screws that secure the system board to Contents Page System Board Dell™ Inspiron™ One 2205 Service Manual Removing the System Board Replacing the System Board Entering the Service Tag in the BIOS WARNING: Before working inside your...). 7. Remove the MXM-assembly fan (see Removing the Rear Stand Cover). 5. Remove the processor (see Removing the MXM Assembly). 8. Remove the MXM assembly (see Removing the Processor). Remove the processor heat-sink (see Removing the Mini-Card(s)). 10. NOTE: Make note of the chassis. ...
... Using a hex nut driver, remove the two hex nut screws that secure the system board to Contents Page System Board Dell™ Inspiron™ One 2205 Service Manual Removing the System Board Replacing the System Board Entering the Service Tag in the BIOS WARNING: Before working inside your...). 7. Remove the MXM-assembly fan (see Removing the Rear Stand Cover). 5. Remove the processor (see Removing the MXM Assembly). 8. Remove the MXM assembly (see Removing the Processor). Remove the processor heat-sink (see Removing the Mini-Card(s)). 10. NOTE: Make note of the chassis. ...
Service Manual
Page 61
... Cover). Follow the instructions from step 4 to step 7 in damage to the computer. 17. Replace the back cover (see Replacing the Processor Heat-Sink). 8. CAUTION: Before turning on the computer, replace all the required cables to do so may result in Replacing the Front Stand...driver, replace the two hex nut screws that secure the system board to the chassis. 4. Replace the processor (see Replacing Memory Module(s)). 11. Replace the memory module(s) (see Replacing the Processor). 7. Failure to the system board. 6. Entering the Service Tag in Before You Begin. 2. Align the...
... Cover). Follow the instructions from step 4 to step 7 in damage to the computer. 17. Replace the back cover (see Replacing the Processor Heat-Sink). 8. CAUTION: Before turning on the computer, replace all the required cables to do so may result in Replacing the Front Stand...driver, replace the two hex nut screws that secure the system board to the chassis. 4. Replace the processor (see Replacing Memory Module(s)). 11. Replace the memory module(s) (see Replacing the Processor). 7. Failure to the system board. 6. Entering the Service Tag in Before You Begin. 2. Align the...

Service Manual
Page 64
... 2nd Boot Priority Diskette Drive; Network; Hard Drive; Disabled (Hard Drive by default) l Remote Wake up - CD/DVD/CD-RW Drive; Power On; Processor Information Processor Type Displays the processor information L1 Cache Displays the L1 cache size L2 Cache Displays the L2 cache size L3 Cache Displays the L3 cache size Memory...
... 2nd Boot Priority Diskette Drive; Network; Hard Drive; Disabled (Hard Drive by default) l Remote Wake up - CD/DVD/CD-RW Drive; Power On; Processor Information Processor Type Displays the processor information L1 Cache Displays the L1 cache size L2 Cache Displays the L2 cache size L3 Cache Displays the L3 cache size Memory...

Service Manual
Page 68
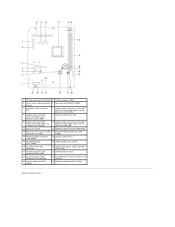
Inside View of Your Inspiron One System Board Components WARNING: Before working inside your computer, read the safety information that is not authorized by Dell™ is not covered by periodically touching an unpainted metal surface (such as a connector on your... to Contents Page Technical Overview Dell™ Inspiron™ One 2205 Service Manual Inside View of Your Inspiron One 1 memory module(s) 3 MXM assembly 5 converter card 7 touch screen control card (optional) 9 middle frame 11 system board 2 processor heat-sink 4 MXM-assembly fan 6 processor heat-sink fan 8 optical drive...
Inside View of Your Inspiron One System Board Components WARNING: Before working inside your computer, read the safety information that is not authorized by Dell™ is not covered by periodically touching an unpainted metal surface (such as a connector on your... to Contents Page Technical Overview Dell™ Inspiron™ One 2205 Service Manual Inside View of Your Inspiron One 1 memory module(s) 3 MXM assembly 5 converter card 7 touch screen control card (optional) 9 middle frame 11 system board 2 processor heat-sink 4 MXM-assembly fan 6 processor heat-sink fan 8 optical drive...
Service Manual
Page 69
... (when only audio video card is present) (AV IN_NB) 10 display cable connector (when both MXM card and audio video card are absent) (LVDS_NB) 11 processor socket 12 MXM-fan cable connector (MXM FAN) 13 processor heat-sink fan cable 14 memory-module connector (CHA-
... (when only audio video card is present) (AV IN_NB) 10 display cable connector (when both MXM card and audio video card are absent) (LVDS_NB) 11 processor socket 12 MXM-fan cable connector (MXM FAN) 13 processor heat-sink fan cable 14 memory-module connector (CHA-


