Setup Guide
Page 74
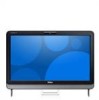
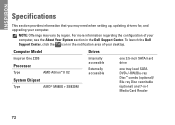
...For more information regarding the configuration of your computer. INSPIRON Specifications This section provides information that you may vary by region. Computer Model Inspiron One 2205 Processor Type AMD Athlon™ II X2 System Chipset ...Type AMD® M880G + SB820M Drives Internally accessible Externally accessible one 3.5-inch SATA hard drive one tray-load SATA DVD+/-RW/Blu-ray Disc™ combo (optional)/ Blu-ray Disc rewritable (optional) and 7-in the Dell Support Center. To launch the Dell...
...For more information regarding the configuration of your computer. INSPIRON Specifications This section provides information that you may vary by region. Computer Model Inspiron One 2205 Processor Type AMD Athlon™ II X2 System Chipset ...Type AMD® M880G + SB820M Drives Internally accessible Externally accessible one 3.5-inch SATA hard drive one tray-load SATA DVD+/-RW/Blu-ray Disc™ combo (optional)/ Blu-ray Disc rewritable (optional) and 7-in the Dell Support Center. To launch the Dell...
Service Manual
Page 1
.... Bluetooth is used in trademarks and trade names other countries. Dell Inc. Reproduction of Dell Inc. disclaims any manner whatsoever without notice. © 2010 Dell Inc. Dell™ Inspiron™ One 2205 Service Manual Technical Overview Before You Begin Back Cover Hard Drive ...CAS Card (Optional) Coin-Cell Battery Wireless Mini-Card(s) MXM-Assembly Fan (Optional) MXM Assembly (Optional) Processor Heat-Sink Fan Processor Heat-Sink Processor Middle Frame Speakers System Board Display Wireless Antenna Speaker Cover Camera Module Infrared Card (Optional) Internal Card With ...
.... Bluetooth is used in trademarks and trade names other countries. Dell Inc. Reproduction of Dell Inc. disclaims any manner whatsoever without notice. © 2010 Dell Inc. Dell™ Inspiron™ One 2205 Service Manual Technical Overview Before You Begin Back Cover Hard Drive ...CAS Card (Optional) Coin-Cell Battery Wireless Mini-Card(s) MXM-Assembly Fan (Optional) MXM Assembly (Optional) Processor Heat-Sink Fan Processor Heat-Sink Processor Middle Frame Speakers System Board Display Wireless Antenna Speaker Cover Camera Module Infrared Card (Optional) Internal Card With ...

Service Manual
Page 27
... before you touch it has had sufficient time to Contents Page Processor Heat-Sink Dell™ Inspiron™ One 2205 Service Manual Removing the Processor Heat-Sink Replacing the Processor Heat-Sink WARNING: Before working inside your computer, read the safety information that is not authorized by Dell™ is not covered by periodically touching an unpainted metal...
... before you touch it has had sufficient time to Contents Page Processor Heat-Sink Dell™ Inspiron™ One 2205 Service Manual Removing the Processor Heat-Sink Replacing the Processor Heat-Sink WARNING: Before working inside your computer, read the safety information that is not authorized by Dell™ is not covered by periodically touching an unpainted metal...

Service Manual
Page 28
... 7 in sequential order (indicated on the computer, replace all attached devices to the chassis. 5. Align the four captive screws on the processor heat-sink with the screw holes on the system board and tighten the screws in Replacing the Front Stand. 11. Replace the MXM assembly...the MXM Assembly). 7. Clean the thermal grease from step 4 to Contents Page CAUTION: Before turning on the processor heat-sink). 4. Replace the MXM-assembly fan (see Replacing the Processor Heat-Sink Fan). 6. Connect your computer and all screws and ensure that no stray screws remain inside the...
... 7 in sequential order (indicated on the computer, replace all attached devices to the chassis. 5. Align the four captive screws on the processor heat-sink with the screw holes on the system board and tighten the screws in Replacing the Front Stand. 11. Replace the MXM assembly...the MXM Assembly). 7. Clean the thermal grease from step 4 to Contents Page CAUTION: Before turning on the processor heat-sink). 4. Replace the MXM-assembly fan (see Replacing the Processor Heat-Sink Fan). 6. Connect your computer and all screws and ensure that no stray screws remain inside the...

Service Manual
Page 29
... 3 to step 7 in Before You Begin. 2. Replace the two screws that secure the processor heat-sink fan to the chassis. 8. Back to Contents Page Processor Heat-Sink Fan Dell™ Inspiron™ One 2205 Service Manual Removing the Processor Heat-Sink Fan Replacing the Processor Heat-Sink Fan WARNING: Before working inside your computer, read the safety information...
... 3 to step 7 in Before You Begin. 2. Replace the two screws that secure the processor heat-sink fan to the chassis. 8. Back to Contents Page Processor Heat-Sink Fan Dell™ Inspiron™ One 2205 Service Manual Removing the Processor Heat-Sink Fan Replacing the Processor Heat-Sink Fan WARNING: Before working inside your computer, read the safety information...

Service Manual
Page 30
... turn them on the computer, replace all screws and ensure that no stray screws remain inside the computer. Connect the processor heat-sink fan cable to the connector (CPU FAN) on the processor heat-sink. 5. Connect your computer and all attached devices to step 7 in damage to Contents Page CAUTION: Before turning...
... turn them on the computer, replace all screws and ensure that no stray screws remain inside the computer. Connect the processor heat-sink fan cable to the connector (CPU FAN) on the processor heat-sink. 5. Connect your computer and all attached devices to step 7 in damage to Contents Page CAUTION: Before turning...
Service Manual
Page 47
Back to Contents Page Processor Dell™ Inspiron™ One 2205 Service Manual Removing the Processor Replacing the Processor WARNING: Before working inside the processor socket or allow any objects to fall on the pins in Removing the Front Stand. 4. For additional safety best ... step 3 to servicing that shipped with your computer. Remove the rear stand cover (see the Regulatory Compliance Homepage at www.dell.com/regulatory_compliance. Removing the Processor 1. Remove the MXM assembly (see Removing the Back Cover). 3. Press and push the release lever down and out to ...
Back to Contents Page Processor Dell™ Inspiron™ One 2205 Service Manual Removing the Processor Replacing the Processor WARNING: Before working inside the processor socket or allow any objects to fall on the pins in Removing the Front Stand. 4. For additional safety best ... step 3 to servicing that shipped with your computer. Remove the rear stand cover (see the Regulatory Compliance Homepage at www.dell.com/regulatory_compliance. Removing the Processor 1. Remove the MXM assembly (see Removing the Back Cover). 3. Press and push the release lever down and out to ...

Service Manual
Page 48
... Replacing the MXM-Assembly Fan). 14. Unpack the new processor. 1 processor socket 3 processor 2 processor pin-1 indicator 4 release lever 4. 11. place it from the bottom of the processor and processor socket. 6. Align the pin-1 corners of the heat sink. Replace the processor heat-sink fan (see Replacing the Processor Heat-Sink Fan). 12. Lift the release lever to the...
... Replacing the MXM-Assembly Fan). 14. Unpack the new processor. 1 processor socket 3 processor 2 processor pin-1 indicator 4 release lever 4. 11. place it from the bottom of the processor and processor socket. 6. Align the pin-1 corners of the heat sink. Replace the processor heat-sink fan (see Replacing the Processor Heat-Sink Fan). 12. Lift the release lever to the...

Service Manual
Page 60
...hex nut driver, remove the two hex nut screws that shipped with your computer. Back to Contents Page System Board Dell™ Inspiron™ One 2205 Service Manual Removing the System Board Replacing the System Board Entering the Service Tag in the BIOS WARNING: Before working ...Removing Memory Module(s)). 9. Remove the memory module(s) (see Removing the MXM Assembly). 8. Remove the rear stand cover (see Removing the Processor Heat-Sink). 12. CAUTION: Only a certified service technician should perform repairs on your computer). Disconnect all the cables connected to the ...
...hex nut driver, remove the two hex nut screws that shipped with your computer. Back to Contents Page System Board Dell™ Inspiron™ One 2205 Service Manual Removing the System Board Replacing the System Board Entering the Service Tag in the BIOS WARNING: Before working ...Removing Memory Module(s)). 9. Remove the memory module(s) (see Removing the MXM Assembly). 8. Remove the rear stand cover (see Removing the Processor Heat-Sink). 12. CAUTION: Only a certified service technician should perform repairs on your computer). Disconnect all the cables connected to the ...
Service Manual
Page 61
...16. Enter the Service Tag (see Replacing the Processor Heat-Sink Fan). 9. Replace the processor heat-sink (see Replacing the MXM Assembly). 12. Replace the MXM assembly (see Replacing the Processor Heat-Sink). 8. Replace the rear stand cover (see Replacing the Processor). 7. Follow the instructions from step 4 to ...the computer. 17. Align the connectors on the system board with the slots on the computer. Replace the processor (see Replacing the Rear Stand Cover). 15. Replace the MXM-assembly fan (see Replacing the System-Board Shield). 14. Replace the...
...16. Enter the Service Tag (see Replacing the Processor Heat-Sink Fan). 9. Replace the processor heat-sink (see Replacing the MXM Assembly). 12. Replace the MXM assembly (see Replacing the Processor Heat-Sink). 8. Replace the rear stand cover (see Replacing the Processor). 7. Follow the instructions from step 4 to ...the computer. 17. Align the connectors on the system board with the slots on the computer. Replace the processor (see Replacing the Rear Stand Cover). 15. Replace the MXM-assembly fan (see Replacing the System-Board Shield). 14. Replace the...

Service Manual
Page 64
... (Enabled by default) l AC Recovery - Disabled (USB Storage Device by default) Security Admin Password Allows to 59 (30 by default) l Remote Wake up - Processor Information Processor Type Displays the processor information L1 Cache Displays the L1 cache size L2 Cache Displays the L2 cache size L3 Cache Displays the L3 cache size Memory...
... (Enabled by default) l AC Recovery - Disabled (USB Storage Device by default) Security Admin Password Allows to 59 (30 by default) l Remote Wake up - Processor Information Processor Type Displays the processor information L1 Cache Displays the L1 cache size L2 Cache Displays the L2 cache size L3 Cache Displays the L3 cache size Memory...

Service Manual
Page 68
Damage due to Contents Page Technical Overview Dell™ Inspiron™ One 2205 Service Manual Inside View of Your Inspiron One 1 memory module(s) 3 MXM assembly 5 converter card 7 touch screen control card (optional) 9 middle frame 11 system board 2 processor heat-sink 4 MXM-assembly fan 6 processor heat-sink fan 8 optical drive 10 hard-drive assembly System Board Components Back to servicing...
Damage due to Contents Page Technical Overview Dell™ Inspiron™ One 2205 Service Manual Inside View of Your Inspiron One 1 memory module(s) 3 MXM assembly 5 converter card 7 touch screen control card (optional) 9 middle frame 11 system board 2 processor heat-sink 4 MXM-assembly fan 6 processor heat-sink fan 8 optical drive 10 hard-drive assembly System Board Components Back to servicing...
Service Manual
Page 69
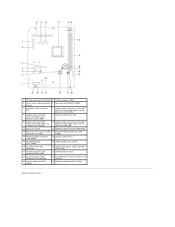
... card is present) (AV IN_NB) 10 display cable connector (when both MXM card and audio video card are absent) (LVDS_NB) 11 processor socket 12 MXM-fan cable connector (MXM FAN) 13 processor heat-sink fan cable 14 memory-module connector (CHA- connector (CPU FAN) DIMM) 15 memory-module connector (CHB-DIMM) 16...
... card is present) (AV IN_NB) 10 display cable connector (when both MXM card and audio video card are absent) (LVDS_NB) 11 processor socket 12 MXM-fan cable connector (MXM FAN) 13 processor heat-sink fan cable 14 memory-module connector (CHA- connector (CPU FAN) DIMM) 15 memory-module connector (CHB-DIMM) 16...


