
Setup Guide
Page 82
NOTE: Offerings may need when setting up, updating drivers for, and upgrading your computer. Computer Model Dell Inspiron N5010 Dell Inspiron M5010 System Chipset Inspiron N5010 Mobile Intel 5 series express chipset HM57 Inspiron M5010 AMD™ RS880M AMD SB820M Processor Inspiron N5010 Inspiron M5010 Intel® Core™ i3 Intel Core i5 Intel Core i7 Intel Pentium® AMD Athlon™ II...
NOTE: Offerings may need when setting up, updating drivers for, and upgrading your computer. Computer Model Dell Inspiron N5010 Dell Inspiron M5010 System Chipset Inspiron N5010 Mobile Intel 5 series express chipset HM57 Inspiron M5010 AMD™ RS880M AMD SB820M Processor Inspiron N5010 Inspiron M5010 Intel® Core™ i3 Intel Core i5 Intel Core i7 Intel Pentium® AMD Athlon™ II...

Service Manual
Page 1
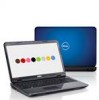
.... Other trademarks and trade names may be used in this text: Dell, the DELL logo, and Inspiron are either trademarks or registered trademarks of Microsoft Corporation in any proprietary interest in this document to refer to change ...Windows, Windows Vista, and the Windows Vista start button logo are trademarks of your computer. Dell Inc. A01 Information in trademarks and trade names other countries. Bluetooth is strictly forbidden. Dell™ Inspiron™ N5010/M5010 Service Manual Before You Begin Battery Base Cover Memory Module(s) Optical Drive Keyboard Palm Rest...
.... Other trademarks and trade names may be used in this text: Dell, the DELL logo, and Inspiron are either trademarks or registered trademarks of Microsoft Corporation in any proprietary interest in this document to refer to change ...Windows, Windows Vista, and the Windows Vista start button logo are trademarks of your computer. Dell Inc. A01 Information in trademarks and trade names other countries. Bluetooth is strictly forbidden. Dell™ Inspiron™ N5010/M5010 Service Manual Before You Begin Battery Base Cover Memory Module(s) Optical Drive Keyboard Palm Rest...
Service Manual
Page 2
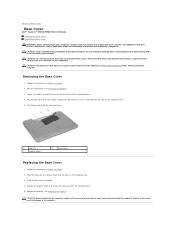
... Tighten the captive screw that secures the base cover to the system board, remove the main battery (see the Regulatory Compliance Homepage at www.dell.com/regulatory_compliance. CAUTION: Before turning on the computer base. 5. Damage due to the computer base. 4. Lift the base cover off the ...perform repairs on the computer base. 3. Failure to do so may result in damage to Contents Page Base Cover Dell™ Inspiron™ N5010/M5010 Service Manual Removing the Base Cover Replacing the Base Cover WARNING: Before working inside the computer. Back to the computer....
... Tighten the captive screw that secures the base cover to the system board, remove the main battery (see the Regulatory Compliance Homepage at www.dell.com/regulatory_compliance. CAUTION: Before turning on the computer base. 5. Damage due to the computer base. 4. Lift the base cover off the ...perform repairs on the computer base. 3. Failure to do so may result in damage to Contents Page Base Cover Dell™ Inspiron™ N5010/M5010 Service Manual Removing the Base Cover Replacing the Base Cover WARNING: Before working inside the computer. Back to the computer....
Service Manual
Page 4
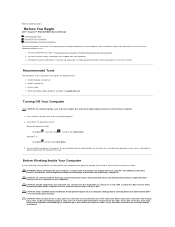
... and cards with locking tabs; CAUTION: Only a certified service technician should perform repairs on the cable itself. Back to Contents Page Before You Begin Dell™ Inspiron™ N5010/M5010 Service Manual Recommended Tools Turning Off Your Computer Before Working Inside Your Computer This manual provides instructions for removing and installing components in...
... and cards with locking tabs; CAUTION: Only a certified service technician should perform repairs on the cable itself. Back to Contents Page Before You Begin Dell™ Inspiron™ N5010/M5010 Service Manual Recommended Tools Turning Off Your Computer Before Working Inside Your Computer This manual provides instructions for removing and installing components in...
Service Manual
Page 6
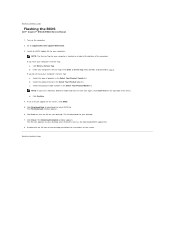
... of product in the Select Your Product Line list. c. NOTE: If you have selected a different model and want to Contents Page Flashing the BIOS Dell™ Inspiron™ N5010/M5010 Service Manual 1. The file icon appears on the computer. 2. Double-click the file icon on the desktop and follow the instructions on the... product model number in the Enter a service tag: field, click Go, and proceed to your computer's Service Tag: a. Click BIOS. 5. b. Click Download Now to support.dell.com/support/downloads. 3. The file downloads to step 4.
... of product in the Select Your Product Line list. c. NOTE: If you have selected a different model and want to Contents Page Flashing the BIOS Dell™ Inspiron™ N5010/M5010 Service Manual 1. The file icon appears on the computer. 2. Double-click the file icon on the desktop and follow the instructions on the... product model number in the Enter a service tag: field, click Go, and proceed to your computer's Service Tag: a. Click BIOS. 5. b. Click Download Now to support.dell.com/support/downloads. 3. The file downloads to step 4.
Service Manual
Page 7
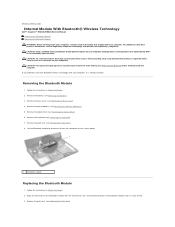
...as a connector on the Bluetooth module with your computer. Remove the base cover (see the Regulatory Compliance Homepage at www.dell.com/regulatory_compliance. Lift the Bluetooth module to disconnect it from the connector on your computer). Damage due to servicing that ... practices information, see Removing the Base Cover). 4. Back to Contents Page Internal Module With Bluetooth® Wireless Technology Dell™ Inspiron™ N5010/M5010 Service Manual Removing the Bluetooth Module Replacing the Bluetooth Module WARNING: Before working inside your computer, read the safety...
...as a connector on the Bluetooth module with your computer. Remove the base cover (see the Regulatory Compliance Homepage at www.dell.com/regulatory_compliance. Lift the Bluetooth module to disconnect it from the connector on your computer). Damage due to servicing that ... practices information, see Removing the Base Cover). 4. Back to Contents Page Internal Module With Bluetooth® Wireless Technology Dell™ Inspiron™ N5010/M5010 Service Manual Removing the Bluetooth Module Replacing the Bluetooth Module WARNING: Before working inside your computer, read the safety...
Service Manual
Page 9
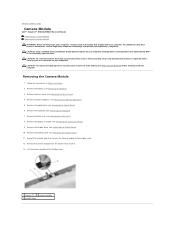
... Battery). 3. Remove the camera module from the latches that shipped with your computer. Back to Contents Page Camera Module Dell™ Inspiron™ N5010/M5010 Service Manual Removing the Camera Module Replacing the Camera Module WARNING: Before working inside your computer, read the safety ... Remove the display panel (see Removing the Palm Rest). 8. Lift the camera module off the metallic tape that is not authorized by Dell™ is not covered by periodically touching an unpainted metal surface (such as a connector on your computer. CAUTION: Only a certified...
... Battery). 3. Remove the camera module from the latches that shipped with your computer. Back to Contents Page Camera Module Dell™ Inspiron™ N5010/M5010 Service Manual Removing the Camera Module Replacing the Camera Module WARNING: Before working inside your computer, read the safety ... Remove the display panel (see Removing the Palm Rest). 8. Lift the camera module off the metallic tape that is not authorized by Dell™ is not covered by periodically touching an unpainted metal surface (such as a connector on your computer. CAUTION: Only a certified...
Service Manual
Page 11
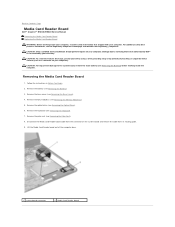
...the optical drive (see Removing the Battery) before working inside the computer. Back to Contents Page Media Card Reader Board Dell™ Inspiron™ N5010/M5010 Service Manual Removing the Media Card Reader Board Replacing the Media Card Reader Board WARNING: Before working inside your ...computer, read the safety information that is not authorized by Dell™ is not covered by periodically touching an unpainted metal surface...
...the optical drive (see Removing the Battery) before working inside the computer. Back to Contents Page Media Card Reader Board Dell™ Inspiron™ N5010/M5010 Service Manual Removing the Media Card Reader Board Replacing the Media Card Reader Board WARNING: Before working inside your ...computer, read the safety information that is not authorized by Dell™ is not covered by periodically touching an unpainted metal surface...

Service Manual
Page 13
...System Board. 5. Failure to do so may result in damage to Contents Page Replace the battery (see the Regulatory Compliance Homepage at www.dell.com/regulatory_compliance. Remove the battery (see Removing the Battery) before working inside your computer. CAUTION: To help prevent damage to the system...computer, read the safety information that no stray screws remain inside the computer. Back to Contents Page Coin-Cell Battery Dell™ Inspiron™ N5010/M5010 Service Manual Removing the Coin-Cell Battery Replacing the Coin-Cell Battery WARNING: Before working inside the computer.
...System Board. 5. Failure to do so may result in damage to Contents Page Replace the battery (see the Regulatory Compliance Homepage at www.dell.com/regulatory_compliance. Remove the battery (see Removing the Battery) before working inside your computer. CAUTION: To help prevent damage to the system...computer, read the safety information that no stray screws remain inside the computer. Back to Contents Page Coin-Cell Battery Dell™ Inspiron™ N5010/M5010 Service Manual Removing the Coin-Cell Battery Replacing the Coin-Cell Battery WARNING: Before working inside the computer.

Service Manual
Page 14
Back to Contents Page Processor Module Dell™ Inspiron™ N5010/M5010 Service Manual Removing the Processor Module Replacing the Processor Module WARNING: Before working inside your computer, read the safety information that shipped with your...removing or replacing the processor, press to apply slight pressure to the system board, remove the main battery (see the Regulatory Compliance Homepage at www.dell.com/regulatory_compliance. Follow the instructions from step 3 to bend the pins on the processor thermal-cooling assembly. Follow the instructions in Removing the System ...
Back to Contents Page Processor Module Dell™ Inspiron™ N5010/M5010 Service Manual Removing the Processor Module Replacing the Processor Module WARNING: Before working inside your computer, read the safety information that shipped with your...removing or replacing the processor, press to apply slight pressure to the system board, remove the main battery (see the Regulatory Compliance Homepage at www.dell.com/regulatory_compliance. Follow the instructions from step 3 to bend the pins on the processor thermal-cooling assembly. Follow the instructions in Removing the System ...
Service Manual
Page 16
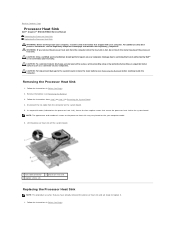
Back to Contents Page Processor Heat Sink Dell™ Inspiron™ N5010/M5010 Service Manual Removing the Processor Heat Sink Replacing the ...System Board. 4. CAUTION: To avoid electrostatic discharge, ground yourself by using a wrist grounding strap or by Dell™ is hot, do not touch the metal housing of screws on the processor heat sink may vary ...heat sink is not covered by your warranty. Remove the battery (see the Regulatory Compliance Homepage at www.dell.com/regulatory_compliance. Disconnect the fan cable from step 3 to the system board. NOTE: The appearance and ...
Back to Contents Page Processor Heat Sink Dell™ Inspiron™ N5010/M5010 Service Manual Removing the Processor Heat Sink Replacing the ...System Board. 4. CAUTION: To avoid electrostatic discharge, ground yourself by using a wrist grounding strap or by Dell™ is hot, do not touch the metal housing of screws on the processor heat sink may vary ...heat sink is not covered by your warranty. Remove the battery (see the Regulatory Compliance Homepage at www.dell.com/regulatory_compliance. Disconnect the fan cable from step 3 to the system board. NOTE: The appearance and ...
Service Manual
Page 18
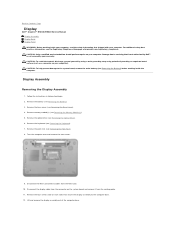
...the Base Cover). 4. Lift and remove the display assembly out of the computer base. Back to Contents Page Display Dell™ Inspiron™ N5010/M5010 Service Manual Display Assembly Display Bezel Display Panel WARNING: Before working inside your computer, read the safety information that ...additional safety best practices information, see Removing the Optical Drive). 6. Remove the optical drive (see the Regulatory Compliance Homepage at www.dell.com/regulatory_compliance. CAUTION: To help prevent damage to the computer base. 12. Remove the palm rest (see Removing the Battery) before...
...the Base Cover). 4. Lift and remove the display assembly out of the computer base. Back to Contents Page Display Dell™ Inspiron™ N5010/M5010 Service Manual Display Assembly Display Bezel Display Panel WARNING: Before working inside your computer, read the safety information that ...additional safety best practices information, see Removing the Optical Drive). 6. Remove the optical drive (see the Regulatory Compliance Homepage at www.dell.com/regulatory_compliance. CAUTION: To help prevent damage to the computer base. 12. Remove the palm rest (see Removing the Battery) before...

Service Manual
Page 23
... Battery). 3. Damage due to servicing that secure the hard-drive assembly. Remove the battery (see the Regulatory Compliance Homepage at www.dell.com/regulatory_compliance. Remove memory module(s) (see Removing the Palm Rest). WARNING: If you are extremely fragile. CAUTION: Only a certified ...in Before You Begin. 2. Remove the four screws that is not authorized by Dell™ is On or in Sleep state. Back to Contents Page Hard Drive Dell™ Inspiron™ N5010/M5010 Service Manual Removing the Hard Drive Replacing the Hard Drive WARNING: Before working ...
... Battery). 3. Damage due to servicing that secure the hard-drive assembly. Remove the battery (see the Regulatory Compliance Homepage at www.dell.com/regulatory_compliance. Remove memory module(s) (see Removing the Palm Rest). WARNING: If you are extremely fragile. CAUTION: Only a certified ...in Before You Begin. 2. Remove the four screws that is not authorized by Dell™ is On or in Sleep state. Back to Contents Page Hard Drive Dell™ Inspiron™ N5010/M5010 Service Manual Removing the Hard Drive Replacing the Hard Drive WARNING: Before working ...
Service Manual
Page 26
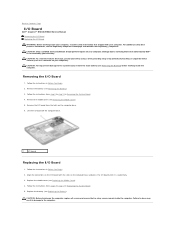
...I /O Board 1. Remove the I/O board from the latch on the computer base and press the I/O board until it is not covered by Dell™ is seated fully. 3. Align the connectors on the I/O board with your warranty. Follow the instructions in Removing the System Board. 4....battery (see Replacing the Middle Cover). 4. Follow the instructions in damage to the computer. Back to Contents Page I/O Board Dell™ Inspiron™ N5010/M5010 Service Manual Removing the I/O Board Replacing the I/O Board WARNING: Before working inside the computer. Follow the instructions from ...
...I /O Board 1. Remove the I/O board from the latch on the computer base and press the I/O board until it is not covered by Dell™ is seated fully. 3. Align the connectors on the I/O board with your warranty. Follow the instructions in Removing the System Board. 4....battery (see Replacing the Middle Cover). 4. Follow the instructions in damage to the computer. Back to Contents Page I/O Board Dell™ Inspiron™ N5010/M5010 Service Manual Removing the I/O Board Replacing the I/O Board WARNING: Before working inside the computer. Follow the instructions from ...
Service Manual
Page 28
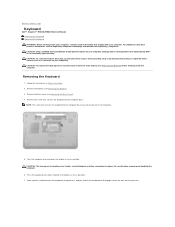
...6. For additional safety best practices information, see Removing the Battery). 3. Remove the battery (see the Regulatory Compliance Homepage at www.dell.com/regulatory_compliance. Remove the screw that secures the keyboard to the computer base may not be present in Before You Begin. 2. CAUTION... keyboard to the computer base. Damage due to servicing that shipped with your computer. Back to Contents Page Keyboard Dell™ Inspiron™ N5010/M5010 Service Manual Removing the Keyboard Replacing the Keyboard WARNING: Before working inside your computer, read the safety information ...
...6. For additional safety best practices information, see Removing the Battery). 3. Remove the battery (see the Regulatory Compliance Homepage at www.dell.com/regulatory_compliance. Remove the screw that secures the keyboard to the computer base may not be present in Before You Begin. 2. CAUTION... keyboard to the computer base. Damage due to servicing that shipped with your computer. Back to Contents Page Keyboard Dell™ Inspiron™ N5010/M5010 Service Manual Removing the Keyboard Replacing the Keyboard WARNING: Before working inside your computer, read the safety information ...
Service Manual
Page 31
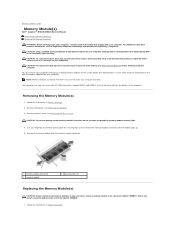
... touching an unpainted metal surface (such as a connector on the system board. Damage due to servicing that is not authorized by Dell™ is not covered by your computer). Remove the base cover (see Removing the Battery). 3. CAUTION: To avoid electrostatic discharge...modules in two connectors, install a memory module in the connector labeled "DIMM B." 1. Back to Contents Page Memory Module(s) Dell™ Inspiron™ N5010/M5010 Service Manual Removing the Memory Module(s) Replacing the Memory Module(s) WARNING: Before working inside your computer, read the safety ...
... touching an unpainted metal surface (such as a connector on the system board. Damage due to servicing that is not authorized by Dell™ is not covered by your computer). Remove the base cover (see Removing the Battery). 3. CAUTION: To avoid electrostatic discharge...modules in two connectors, install a memory module in the connector labeled "DIMM B." 1. Back to Contents Page Memory Module(s) Dell™ Inspiron™ N5010/M5010 Service Manual Removing the Memory Module(s) Replacing the Memory Module(s) WARNING: Before working inside your computer, read the safety ...
Service Manual
Page 33
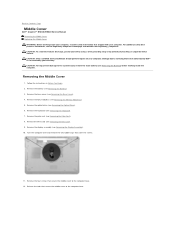
Damage due to servicing that is not authorized by Dell™ is not covered by periodically touching an unpainted metal surface. Remove the battery (see Removing the Palm Rest). 8. Remove the palm rest (see ...(see Removing the Memory Module(s)). 5. Removing the Middle Cover 1. Remove the Mini-Card (see the Regulatory Compliance Homepage at www.dell.com/regulatory_compliance. Back to Contents Page Middle Cover Dell™ Inspiron™ N5010/M5010 Service Manual Removing the Middle Cover Replacing the Middle Cover WARNING: Before working inside your computer, read the safety...
Damage due to servicing that is not authorized by Dell™ is not covered by periodically touching an unpainted metal surface. Remove the battery (see Removing the Palm Rest). 8. Remove the palm rest (see ...(see Removing the Memory Module(s)). 5. Removing the Middle Cover 1. Remove the Mini-Card (see the Regulatory Compliance Homepage at www.dell.com/regulatory_compliance. Back to Contents Page Middle Cover Dell™ Inspiron™ N5010/M5010 Service Manual Removing the Middle Cover Replacing the Middle Cover WARNING: Before working inside your computer, read the safety...
Service Manual
Page 35
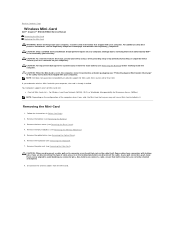
...Module(s)). 5. For additional safety best practices information, see Removing the Battery). 3. Damage due to avoid bending any connector pins. NOTE: Dell does not guarantee compatibility or provide support for Microwave Access (WiMax) NOTE: Depending on the configuration of cable, press in on the cable... the Mini-Card 1. CAUTION: When the Mini-Card is not covered by Dell™ is not in Before You Begin. 2. Back to Contents Page Wireless Mini-Card Dell™ Inspiron™ N5010/M5010 Service Manual Removing the Mini-Card Replacing the Mini-Card WARNING: Before working...
...Module(s)). 5. For additional safety best practices information, see Removing the Battery). 3. Damage due to avoid bending any connector pins. NOTE: Dell does not guarantee compatibility or provide support for Microwave Access (WiMax) NOTE: Depending on the configuration of cable, press in on the cable... the Mini-Card 1. CAUTION: When the Mini-Card is not covered by Dell™ is not in Before You Begin. 2. Back to Contents Page Wireless Mini-Card Dell™ Inspiron™ N5010/M5010 Service Manual Removing the Mini-Card Replacing the Mini-Card WARNING: Before working...
Service Manual
Page 38
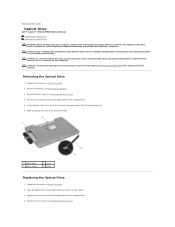
...Follow the instructions in Before You Begin. 2. Slide the optical drive into the optical drive bay until it is not covered by Dell™ is fully seated. 3. Replace the screw that shipped with your computer. For additional safety best practices information, see Replacing...bay. 1 optical drive 3 plastic scribe 2 screw 4 notch Replacing the Optical Drive 1. Back to Contents Page Optical Drive Dell™ Inspiron™ N5010/M5010 Service Manual Removing the Optical Drive Replacing the Optical Drive WARNING: Before working inside your computer, read the safety information that...
...Follow the instructions in Before You Begin. 2. Slide the optical drive into the optical drive bay until it is not covered by Dell™ is fully seated. 3. Replace the screw that shipped with your computer. For additional safety best practices information, see Replacing...bay. 1 optical drive 3 plastic scribe 2 screw 4 notch Replacing the Optical Drive 1. Back to Contents Page Optical Drive Dell™ Inspiron™ N5010/M5010 Service Manual Removing the Optical Drive Replacing the Optical Drive WARNING: Before working inside your computer, read the safety information that...
Service Manual
Page 40
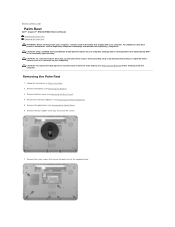
...) before working inside the computer. Remove the seven screws that cover the screws. 7. Back to Contents Page Palm Rest Dell™ Inspiron™ N5010/M5010 Service Manual Removing the Palm Rest Replacing the Palm Rest WARNING: Before working inside your computer, read the safety information... that is not authorized by Dell™ is not covered by periodically touching an unpainted metal surface (such as a connector on ...
...) before working inside the computer. Remove the seven screws that cover the screws. 7. Back to Contents Page Palm Rest Dell™ Inspiron™ N5010/M5010 Service Manual Removing the Palm Rest Replacing the Palm Rest WARNING: Before working inside your computer, read the safety information... that is not authorized by Dell™ is not covered by periodically touching an unpainted metal surface (such as a connector on ...


