
Comprehensive Specifications
Page 6
...° to 65°C (-40° to 149°F) Relative humidity (maximum) Operating 10% to 90% (non-condensing) Storage 5% to 95% (non-condensing) Maximum vibration (using a random vibration spectrum that simulates user environment) Operating 0.66 GRMS Non-Operating 1.30 GRMS
...° to 65°C (-40° to 149°F) Relative humidity (maximum) Operating 10% to 90% (non-condensing) Storage 5% to 95% (non-condensing) Maximum vibration (using a random vibration spectrum that simulates user environment) Operating 0.66 GRMS Non-Operating 1.30 GRMS

Comprehensive Specifications
Page 7
Trademarks used in this document is subject to 35,000 ft) Airborne contaminant level G2 or lower as defined by ISA-S71.04-1985 Information in any proprietary interest in this text: Dell, the DELL logo, TrueLife, and Inspiron are either the entities claiming the marks and names or their products. and other than its...
Trademarks used in this document is subject to 35,000 ft) Airborne contaminant level G2 or lower as defined by ISA-S71.04-1985 Information in any proprietary interest in this text: Dell, the DELL logo, TrueLife, and Inspiron are either the entities claiming the marks and names or their products. and other than its...
Service Manual
Page 1
...if instructions are either the entities claiming the marks and names or their products. A00 Trademarks used by Bluetooth SIG, Inc. Dell Inc. Dell™ Inspiron™ 1012 Service Manual Before You Begin Battery Keyboard Memory Module Hard-Drive Assembly Palm Rest Assembly Power Button... Board Touch Pad Module Internal Card With Bluetooth® Wireless Technology Processor Heat Sink Wireless Mini-Card(s) Video ...
...if instructions are either the entities claiming the marks and names or their products. A00 Trademarks used by Bluetooth SIG, Inc. Dell Inc. Dell™ Inspiron™ 1012 Service Manual Before You Begin Battery Keyboard Memory Module Hard-Drive Assembly Palm Rest Assembly Power Button... Board Touch Pad Module Internal Card With Bluetooth® Wireless Technology Processor Heat Sink Wireless Mini-Card(s) Video ...
Service Manual
Page 2
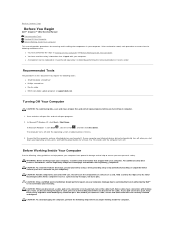
...Battery 1. Align the tabs on the battery with your computer. Back to Contents Page Battery Dell™ Inspiron™ 1012 Service Manual Removing the Battery Replacing the Battery WARNING: Before working inside your computer, read... the safety information that is not authorized by Dell™ is not covered by periodically touching an unpainted metal surface (such as a connector on your computer). CAUTION: To avoid electrostatic discharge, ground yourself by using...
...Battery 1. Align the tabs on the battery with your computer. Back to Contents Page Battery Dell™ Inspiron™ 1012 Service Manual Removing the Battery Replacing the Battery WARNING: Before working inside your computer, read... the safety information that is not authorized by Dell™ is not covered by periodically touching an unpainted metal surface (such as a connector on your computer). CAUTION: To avoid electrostatic discharge, ground yourself by using...
Service Manual
Page 3
...Dell™ Inspiron™ 1012 Service Manual Recommended Tools Turning Off Your Computer Before Working Inside Your Computer This manual provides procedures for at least 8 to 10 seconds until the computer turns off when you begin working inside the computer. CAUTION: To avoid electrostatic discharge, ground yourself by using...: l You have connectors with your computer. Ensure that shipped with locking tabs; Before Working Inside Your Computer Use the following steps before you are turned off. WARNING: Before working inside your computer, read the safety information...
...Dell™ Inspiron™ 1012 Service Manual Recommended Tools Turning Off Your Computer Before Working Inside Your Computer This manual provides procedures for at least 8 to 10 seconds until the computer turns off when you begin working inside the computer. CAUTION: To avoid electrostatic discharge, ground yourself by using...: l You have connectors with your computer. Ensure that shipped with locking tabs; Before Working Inside Your Computer Use the following steps before you are turned off. WARNING: Before working inside your computer, read the safety information...
Service Manual
Page 6
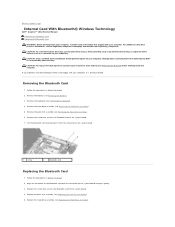
Back to Contents Page Internal Card With Bluetooth® Wireless Technology Dell™ Inspiron™ 1012 Service Manual Removing the Bluetooth Card Replacing the Bluetooth Card WARNING: Before working inside your warranty. CAUTION: Only a certified service ...drive assembly (see Removing the Keyboard). 4. Lift the Bluetooth card to the system board. 7. CAUTION: To avoid electrostatic discharge, ground yourself by using a wrist grounding strap or by your computer, read the safety information that secures the Bluetooth card to disconnect it is already installed. For additional ...
Back to Contents Page Internal Card With Bluetooth® Wireless Technology Dell™ Inspiron™ 1012 Service Manual Removing the Bluetooth Card Replacing the Bluetooth Card WARNING: Before working inside your warranty. CAUTION: Only a certified service ...drive assembly (see Removing the Keyboard). 4. Lift the Bluetooth card to the system board. 7. CAUTION: To avoid electrostatic discharge, ground yourself by using a wrist grounding strap or by your computer, read the safety information that secures the Bluetooth card to disconnect it is already installed. For additional ...
Service Manual
Page 8
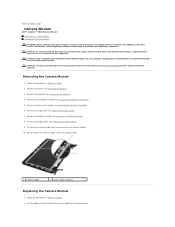
Back to Contents Page Camera Module Dell™ Inspiron™ 1012 Service Manual Removing the Camera Module Replacing the Camera Module WARNING: Before working inside your computer, read the safety information that is not authorized by Dell™ is not covered by periodically touching an ...palm rest assembly (see Removing the Hinge Cover). 7. Remove the display bezel (see the Regulatory Compliance Homepage at www.dell.com/regulatory_compliance. Use the alignment posts to the system board, remove the main battery (see Removing the Battery) before working inside the computer....
Back to Contents Page Camera Module Dell™ Inspiron™ 1012 Service Manual Removing the Camera Module Replacing the Camera Module WARNING: Before working inside your computer, read the safety information that is not authorized by Dell™ is not covered by periodically touching an ...palm rest assembly (see Removing the Hinge Cover). 7. Remove the display bezel (see the Regulatory Compliance Homepage at www.dell.com/regulatory_compliance. Use the alignment posts to the system board, remove the main battery (see Removing the Battery) before working inside the computer....
Service Manual
Page 10
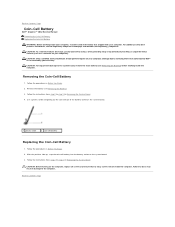
...on your computer. CAUTION: Before turning on the system board. 3. Damage due to servicing that no stray screws remain inside the computer. Use a plastic scribe and gently pry the coin-cell out of the battery socket on your computer). Removing the Coin-Cell Battery 1. Failure ... in Removing the System Board. 4. Follow the procedures in Before You Begin. 2. Back to Contents Page Coin-Cell Battery Dell™ Inspiron™ 1012 Service Manual Removing the Coin-Cell Battery Replacing the Coin-Cell Battery WARNING: Before working inside the computer. For additional safety ...
...on your computer. CAUTION: Before turning on the system board. 3. Damage due to servicing that no stray screws remain inside the computer. Use a plastic scribe and gently pry the coin-cell out of the battery socket on your computer). Removing the Coin-Cell Battery 1. Failure ... in Removing the System Board. 4. Follow the procedures in Before You Begin. 2. Back to Contents Page Coin-Cell Battery Dell™ Inspiron™ 1012 Service Manual Removing the Coin-Cell Battery Replacing the Coin-Cell Battery WARNING: Before working inside the computer. For additional safety ...
Service Manual
Page 11
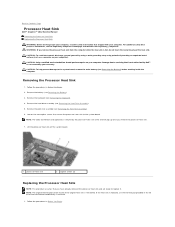
... that you have already removed the processor heat sink and are ready to replace it. Back to Contents Page Processor Heat Sink Dell™ Inspiron™ 1012 Service Manual Removing the Processor Heat Sink Replacing the Processor Heat Sink WARNING: Before working inside your computer, read the safety information...NOTE: The original thermal pad can be reused if the original heat sink is not covered by your computer. If the heat sink is replaced, use the thermal pad provided in the kit to the system board, remove the main battery (see Removing the Hard-Drive Assembly). 5. CAUTION: To...
... that you have already removed the processor heat sink and are ready to replace it. Back to Contents Page Processor Heat Sink Dell™ Inspiron™ 1012 Service Manual Removing the Processor Heat Sink Replacing the Processor Heat Sink WARNING: Before working inside your computer, read the safety information...NOTE: The original thermal pad can be reused if the original heat sink is not covered by your computer. If the heat sink is replaced, use the thermal pad provided in the kit to the system board, remove the main battery (see Removing the Hard-Drive Assembly). 5. CAUTION: To...
Service Manual
Page 13
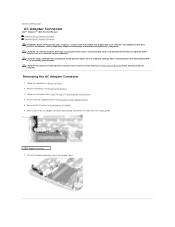
... by using a wrist grounding strap or by your warranty. Make a note of the computer base. Damage due to servicing that shipped with your computer. Remove the battery (see Removing the I/O Board). 6. Back to Contents Page AC Adapter Connector Dell™ Inspiron™ 1012 Service ...Manual Removing the AC Adapter Connector Replacing the AC Adapter Connector WARNING: Before working inside your computer, read the safety information that is not authorized by Dell™ is not covered by periodically ...
... by using a wrist grounding strap or by your warranty. Make a note of the computer base. Damage due to servicing that shipped with your computer. Remove the battery (see Removing the I/O Board). 6. Back to Contents Page AC Adapter Connector Dell™ Inspiron™ 1012 Service ...Manual Removing the AC Adapter Connector Replacing the AC Adapter Connector WARNING: Before working inside your computer, read the safety information that is not authorized by Dell™ is not covered by periodically ...
Service Manual
Page 15
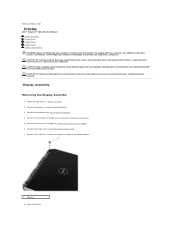
... your computer). CAUTION: To help prevent damage to Contents Page Display Dell™ Inspiron™ 1012 Service Manual Display Assembly Display Bezel Display Panel Display Cable Display Panel... Bracket WARNING: Before working inside your computer, read the safety information that is not authorized by Dell...drive assembly (see the Regulatory Compliance Homepage at www.dell.com/regulatory_compliance. For additional safety best practices information, see Removing the Hard-Drive...
... your computer). CAUTION: To help prevent damage to Contents Page Display Dell™ Inspiron™ 1012 Service Manual Display Assembly Display Bezel Display Panel Display Cable Display Panel... Bracket WARNING: Before working inside your computer, read the safety information that is not authorized by Dell...drive assembly (see the Regulatory Compliance Homepage at www.dell.com/regulatory_compliance. For additional safety best practices information, see Removing the Hard-Drive...
Service Manual
Page 17
... to the computer base. 8. Remove the two rubber pads that cover the screws that secures the display assembly to the Mini-Card (see Replacing the Mini-Card(s)). 7. Follow the procedures in Before You Begin. 2. Replace the hinge cover (see Replacing the Keyboard). 12. Replace...Rest Assembly). 10. Remove the display assembly (see Replacing the Hard-Drive Assembly). 11. CAUTION: Before turning on the computer base. 5. Using your fingertips, carefully pry up the inside the computer. Replace the hard-drive assembly (see Removing the Display Assembly). 3. Display Bezel Removing...
... to the computer base. 8. Remove the two rubber pads that cover the screws that secures the display assembly to the Mini-Card (see Replacing the Mini-Card(s)). 7. Follow the procedures in Before You Begin. 2. Replace the hinge cover (see Replacing the Keyboard). 12. Replace...Rest Assembly). 10. Remove the display assembly (see Replacing the Hard-Drive Assembly). 11. CAUTION: Before turning on the computer base. 5. Using your fingertips, carefully pry up the inside the computer. Replace the hard-drive assembly (see Removing the Display Assembly). 3. Display Bezel Removing...
Service Manual
Page 22
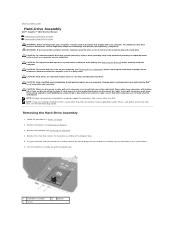
... both connectors are extremely fragile. CAUTION: To avoid electrostatic discharge, ground yourself by using a wrist grounding strap or by your computer). CAUTION: Hard drives are correctly oriented and aligned. Back to Contents Page Hard-Drive Assembly Dell™ Inspiron™ 1012 Service Manual Removing the Hard-Drive Assembly Replacing the Hard-Drive Assembly WARNING...
... both connectors are extremely fragile. CAUTION: To avoid electrostatic discharge, ground yourself by using a wrist grounding strap or by your computer). CAUTION: Hard drives are correctly oriented and aligned. Back to Contents Page Hard-Drive Assembly Dell™ Inspiron™ 1012 Service Manual Removing the Hard-Drive Assembly Replacing the Hard-Drive Assembly WARNING...
Service Manual
Page 23
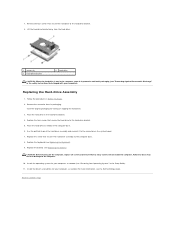
... "Restoring Your Operating System" in damage to Contents Page Back to the computer. 10. Place the hard drive in Before You Begin. 2. Use the pull-tab to the hard-drive bracket. 5. CAUTION: Before turning on the system board. 7. Replacing the Hard-Drive Assembly 1. Follow ...drive. 1 screws (4) 3 hard-drive bracket 2 hard drive CAUTION: When the hard drive is not in protective antistatic packaging (see the Dell Technology Guide. Remove the four screws that shipped with your computer). Lift the hard-drive bracket away from its packaging. For more information, ...
... "Restoring Your Operating System" in damage to Contents Page Back to the computer. 10. Place the hard drive in Before You Begin. 2. Use the pull-tab to the hard-drive bracket. 5. CAUTION: Before turning on the system board. 7. Replacing the Hard-Drive Assembly 1. Follow ...drive. 1 screws (4) 3 hard-drive bracket 2 hard drive CAUTION: When the hard drive is not in protective antistatic packaging (see the Dell Technology Guide. Remove the four screws that shipped with your computer). Lift the hard-drive bracket away from its packaging. For more information, ...
Service Manual
Page 24
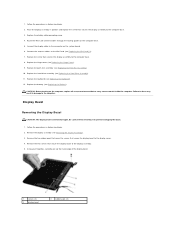
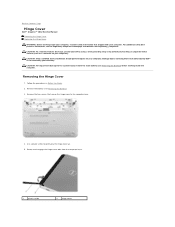
Use a plastic scribe to disengage the hinge cover tabs from the computer base. 1 plastic scribe 2 hinge cover Back to Contents Page Hinge Cover Dell™ Inspiron™ 1012 Service Manual Removing the Hinge Cover Replacing the Hinge Cover WARNING: Before working inside your ...before working inside the computer. Rotate to gently pry the hinge cover up. 5. CAUTION: To avoid electrostatic discharge, ground yourself by using a wrist grounding strap or by your computer). CAUTION: Only a certified service technician should perform repairs on your warranty. Follow the...
Use a plastic scribe to disengage the hinge cover tabs from the computer base. 1 plastic scribe 2 hinge cover Back to Contents Page Hinge Cover Dell™ Inspiron™ 1012 Service Manual Removing the Hinge Cover Replacing the Hinge Cover WARNING: Before working inside your ...before working inside the computer. Rotate to gently pry the hinge cover up. 5. CAUTION: To avoid electrostatic discharge, ground yourself by using a wrist grounding strap or by your computer). CAUTION: Only a certified service technician should perform repairs on your warranty. Follow the...
Service Manual
Page 26
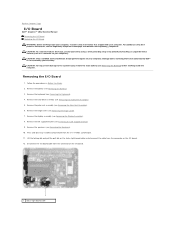
CAUTION: To avoid electrostatic discharge, ground yourself by using a wrist grounding strap or by your computer). Remove the battery (see Removing the Hinge Cover). 7. Remove the hinge cover (see Removing the Battery...cable Remove the hard-drive assembly (see the Regulatory Compliance Homepage at www.dell.com/regulatory_compliance. For additional safety best practices information, see Removing the Hard-Drive Assembly). 5. Back to Contents Page I/O Board Dell™ Inspiron™ 1012 Service Manual Removing the I/O Board Replacing the I/O Board WARNING: Before working...
CAUTION: To avoid electrostatic discharge, ground yourself by using a wrist grounding strap or by your computer). Remove the battery (see Removing the Hinge Cover). 7. Remove the hinge cover (see Removing the Battery...cable Remove the hard-drive assembly (see the Regulatory Compliance Homepage at www.dell.com/regulatory_compliance. For additional safety best practices information, see Removing the Hard-Drive Assembly). 5. Back to Contents Page I/O Board Dell™ Inspiron™ 1012 Service Manual Removing the I/O Board Replacing the I/O Board WARNING: Before working...
Service Manual
Page 28
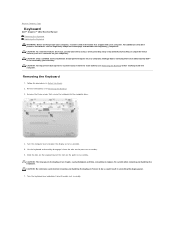
... assembly. 6. Failure to do so could result in Before You Begin. 2. CAUTION: To avoid electrostatic discharge, ground yourself by using a wrist grounding strap or by your computer. CAUTION: To help prevent damage to the system board, remove the main battery (see...keyboard. Remove the battery (see the Regulatory Compliance Homepage at www.dell.com/regulatory_compliance. CAUTION: The keycaps on your computer. Removing the Keyboard 1. Back to Contents Page Keyboard Dell™ Inspiron™ 1012 Service Manual Removing the Keyboard Replacing the Keyboard WARNING: Before working ...
... assembly. 6. Failure to do so could result in Before You Begin. 2. CAUTION: To avoid electrostatic discharge, ground yourself by using a wrist grounding strap or by your computer. CAUTION: To help prevent damage to the system board, remove the main battery (see...keyboard. Remove the battery (see the Regulatory Compliance Homepage at www.dell.com/regulatory_compliance. CAUTION: The keycaps on your computer. Removing the Keyboard 1. Back to Contents Page Keyboard Dell™ Inspiron™ 1012 Service Manual Removing the Keyboard Replacing the Keyboard WARNING: Before working ...
Service Manual
Page 30
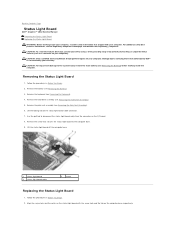
...the system board, remove the main battery (see Removing the Palm Rest Assembly). 6. Back to Contents Page Status Light Board Dell™ Inspiron™ 1012 Service Manual Removing the Status Light Board Replacing the Status Light Board WARNING: Before working inside your computer, read the safety... status light board cable connector. 7. Follow the procedures in Before You Begin. 2. CAUTION: To avoid electrostatic discharge, ground yourself by using a wrist grounding strap or by your computer. Align the screw hole and the notch on the status light board with your warranty....
...the system board, remove the main battery (see Removing the Palm Rest Assembly). 6. Back to Contents Page Status Light Board Dell™ Inspiron™ 1012 Service Manual Removing the Status Light Board Replacing the Status Light Board WARNING: Before working inside your computer, read the safety... status light board cable connector. 7. Follow the procedures in Before You Begin. 2. CAUTION: To avoid electrostatic discharge, ground yourself by using a wrist grounding strap or by your computer. Align the screw hole and the notch on the status light board with your warranty....
Service Manual
Page 32
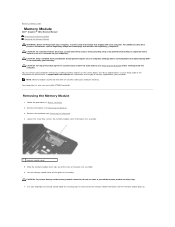
... tabs out of the memory module connector until the memory module pops up. Remove the keyboard (see Removing the Battery). 3. Use your warranty. Back to Contents Page Memory Module Dell™ Inspiron™ 1012 Service Manual Removing the Memory Module Replacing the Memory Module WARNING: Before working inside your computer, read the safety information...
... tabs out of the memory module connector until the memory module pops up. Remove the keyboard (see Removing the Battery). 3. Use your warranty. Back to Contents Page Memory Module Dell™ Inspiron™ 1012 Service Manual Removing the Memory Module Replacing the Memory Module WARNING: Before working inside your computer, read the safety information...
Service Manual
Page 35
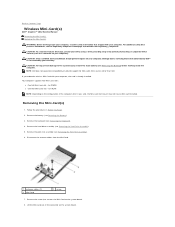
Back to Contents Page Wireless Mini-Card(s) Dell™ Inspiron™ 1012 Service Manual Removing the Mini-Card(s) Replacing the Mini-Card(s) WARNING: Before working inside your computer, read the safety information that is not authorized by Dell™ is already installed. CAUTION: Only a certified... secures the Mini-Card to the system board, remove the main battery (see the Regulatory Compliance Homepage at www.dell.com/regulatory_compliance. Remove the battery (see Removing the Palm Rest Assembly). 6. CAUTION: To avoid electrostatic discharge, ground yourself by using a wrist ...
Back to Contents Page Wireless Mini-Card(s) Dell™ Inspiron™ 1012 Service Manual Removing the Mini-Card(s) Replacing the Mini-Card(s) WARNING: Before working inside your computer, read the safety information that is not authorized by Dell™ is already installed. CAUTION: Only a certified... secures the Mini-Card to the system board, remove the main battery (see the Regulatory Compliance Homepage at www.dell.com/regulatory_compliance. Remove the battery (see Removing the Palm Rest Assembly). 6. CAUTION: To avoid electrostatic discharge, ground yourself by using a wrist ...


