Service Manual
Page 4
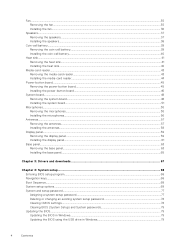
... display panel...59 Installing the display panel...61 Base panel...63 Removing the base panel...63 Installing the base panel...65 Chapter 3: Drivers and downloads 67 Chapter 4: System setup...68 Entering BIOS setup program...68 Navigation keys...68 Boot Sequence...68 System setup options...69 System and setup password...77 Assigning a system setup password...77 Deleting or changing an existing system setup password 78 Clearing CMOS settings...78 Clearing BIOS (System Setup) and System passwords 79 Updating the BIOS...79 Updating the BIOS in Windows...79 Updating the BIOS using the USB drive...
... display panel...59 Installing the display panel...61 Base panel...63 Removing the base panel...63 Installing the base panel...65 Chapter 3: Drivers and downloads 67 Chapter 4: System setup...68 Entering BIOS setup program...68 Navigation keys...68 Boot Sequence...68 System setup options...69 System and setup password...77 Assigning a system setup password...77 Deleting or changing an existing system setup password 78 Clearing CMOS settings...78 Clearing BIOS (System Setup) and System passwords 79 Updating the BIOS...79 Updating the BIOS in Windows...79 Updating the BIOS using the USB drive...
Service Manual
Page 6
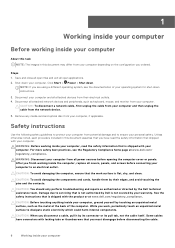
... cable itself. After you ordered. CAUTION: You should only perform troubleshooting and repairs as keyboard, mouse, and monitor from your computer from their edges, and avoid touching the pins and the contacts. Damage due to an electrical outlet. See the safety instructions that you are using a different operating system, see the Regulatory Compliance home page at www.dell.com/regulatory_compliance. Click Start > Power...
... cable itself. After you ordered. CAUTION: You should only perform troubleshooting and repairs as keyboard, mouse, and monitor from your computer from their edges, and avoid touching the pins and the contacts. Damage due to an electrical outlet. See the safety instructions that you are using a different operating system, see the Regulatory Compliance home page at www.dell.com/regulatory_compliance. Click Start > Power...
Service Manual
Page 7
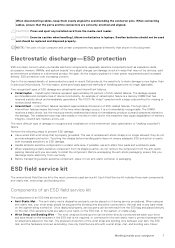
...; Use a wired ESD wrist strap that the ports and the connectors are : ● Anti-Static Mat - they do not remove the component from the anti-static packing material until you discharge static electricity from the media-card reader. NOTE: The color of your skin, the ESD mat, and the hardware is the intermittent (also called latent or "walking wounded") failure...
...; Use a wired ESD wrist strap that the ports and the connectors are : ● Anti-Static Mat - they do not remove the component from the anti-static packing material until you discharge static electricity from the media-card reader. NOTE: The color of your skin, the ESD mat, and the hardware is the intermittent (also called latent or "walking wounded") failure...
Service Manual
Page 8
... do not have one. When using the same ESD bag and packaging that the new part arrived in static-safe packaging. If you should always be moved at an ESD-protected work area, insulators such as plastic heat sink casings, away from all times when servicing Dell products. To perform the test, plug the wrist-strap's bonding-wire into the tester...
... do not have one. When using the same ESD bag and packaging that the new part arrived in static-safe packaging. If you should always be moved at an ESD-protected work area, insulators such as plastic heat sink casings, away from all times when servicing Dell products. To perform the test, plug the wrist-strap's bonding-wire into the tester...
Service Manual
Page 9
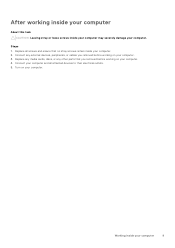
Connect any other parts that you removed before working on your computer and all screws and ensure that no stray screws remain inside your computer. 3. Replace all attached devices to their electrical outlets. 5. Connect your computer. Turn on your computer 9 Working inside your computer may severely damage your computer. Replace any media cards, discs, or any external devices, peripherals, or cables you removed before working inside your computer About this task CAUTION...
Connect any other parts that you removed before working on your computer and all screws and ensure that no stray screws remain inside your computer. 3. Replace all attached devices to their electrical outlets. 5. Connect your computer. Turn on your computer 9 Working inside your computer may severely damage your computer. Replace any media cards, discs, or any external devices, peripherals, or cables you removed before working inside your computer About this task CAUTION...
Service Manual
Page 54
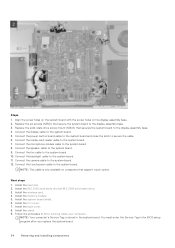
... cable to the system board. 9. NOTE: This cable is stored in the system board. Install the heat sink. 2. Install the back cover. 8. You must enter the Service Tag in After working inside your computer. Install the M.2 2230 solid-state drive or M.2 2280 solid-state drive. 3. Install the memory module. 5. Install the stand. 9. Connect the fan cable to the system board. 7. Steps 1. Connect the media-card reader cable to the system board. 10. Install the wireless card. 4. Install the system-board shield. 6. Install the I/O cover...
... cable to the system board. 9. NOTE: This cable is stored in the system board. Install the heat sink. 2. Install the back cover. 8. You must enter the Service Tag in After working inside your computer. Install the M.2 2230 solid-state drive or M.2 2280 solid-state drive. 3. Install the memory module. 5. Install the stand. 9. Connect the fan cable to the system board. 7. Steps 1. Connect the media-card reader cable to the system board. 10. Install the wireless card. 4. Install the system-board shield. 6. Install the I/O cover...
Service Manual
Page 68
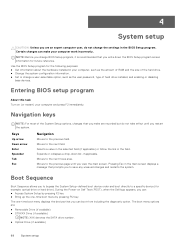
... user password, type of the System Setup options, changes that prompts you write down list, if applicable. Expands or collapses a drop-down the BIOS Setup program screen information for example: optical drive or hard drive). Entering BIOS setup program About this task Turn on Self Test (POST), when the Dell logo appears, you can: ● Access System Setup by pressing F2 key ● Bring up the one-time boot menu by pressing F12 key The one-time boot menu displays the devices...
... user password, type of the System Setup options, changes that prompts you write down list, if applicable. Expands or collapses a drop-down the BIOS Setup program screen information for example: optical drive or hard drive). Entering BIOS setup program About this task Turn on Self Test (POST), when the Dell logo appears, you can: ● Access System Setup by pressing F2 key ● Bring up the one-time boot menu by pressing F12 key The one-time boot menu displays the devices...
Service Manual
Page 69
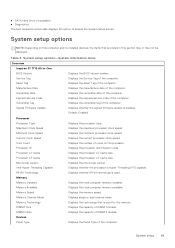
...Clock Speed Minimum Clock Speed Current Clock Speed Core Count Processor ID Processor L2 Cache Processor L3 Cache Microcode Version Intel Hyper-Threading Capable 64-Bit Technology Memory Memory Installed Memory Available Memory Speed Memory Channel Mode Memory Technology DIMM 1 Size DIMM 2 Size Devices Panel Type Displays the processor type. Displays the current processor clock speed. Displays whether the processor is enabled. System setup 69 ● SATA Hard Drive (if available) ● Diagnostics The boot sequence screen also displays the option to access the System Setup screen.
...Clock Speed Minimum Clock Speed Current Clock Speed Core Count Processor ID Processor L2 Cache Processor L3 Cache Microcode Version Intel Hyper-Threading Capable 64-Bit Technology Memory Memory Installed Memory Available Memory Speed Memory Channel Mode Memory Technology DIMM 1 Size DIMM 2 Size Devices Panel Type Displays the processor type. Displays the current processor clock speed. Displays whether the processor is enabled. System setup 69 ● SATA Hard Drive (if available) ● Diagnostics The boot sequence screen also displays the option to access the System Setup screen.

Service Manual
Page 70
.... Video BIOS Version Displays the video BIOS version of the computer. By default, Enable Camera is selected Secure Boot Enable Secure Boot Enables secure boot using only validated boot software. Bluetooth Device Displays whether a Bluetooth device is installed in MM/DD/YYYY format. Video Memory Displays the video memory information of the computer. Audio Controller Displays the audio controller information of the computer. Allows to switch between 12-hour and 24-hour clock. You can switch between Deployed Mode and Audit Mode. Enables or disables...
.... Video BIOS Version Displays the video BIOS version of the computer. By default, Enable Camera is selected Secure Boot Enable Secure Boot Enables secure boot using only validated boot software. Bluetooth Device Displays whether a Bluetooth device is installed in MM/DD/YYYY format. Video Memory Displays the video memory information of the computer. Audio Controller Displays the audio controller information of the computer. Allows to switch between 12-hour and 24-hour clock. You can switch between Deployed Mode and Audit Mode. Enables or disables...

Service Manual
Page 71
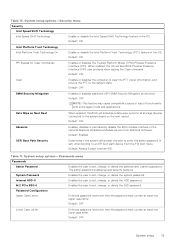
...Windows RST (Intel Rapid Restore Technology) driver, or Linux kernel VMD driver must be mapped under VMD controller. Enable Internal Speaker Enables or disables internal speaker. USB Configuration Enable Rear USB Ports Enables or disables rear USB ports. Storage device is selected. When enabled, all integrated audio controller. Default: OFF Drive Information Displays the information of the integrated storage device controller. By default, Enable Rear USB Ports is displayed if the image matches the screen resolution. Enable USB Boot Support Enables or disables USB Boot...
...Windows RST (Intel Rapid Restore Technology) driver, or Linux kernel VMD driver must be mapped under VMD controller. Enable Internal Speaker Enables or disables internal speaker. USB Configuration Enable Rear USB Ports Enables or disables rear USB ports. Storage device is selected. When enabled, all integrated audio controller. Default: OFF Drive Information Displays the information of the integrated storage device controller. By default, Enable Rear USB Ports is displayed if the image matches the screen resolution. Enable USB Boot Support Enables or disables USB Boot...

Service Manual
Page 72
... setup options-Connection menu Connection Network Controller Configuration Integrated NIC Enables or disables integrated NIC. Enables or disables UEFI networking protocols, if they are selected. Default: OFF USB Wake Support Enable USB Wake Support Enables or disables USB Wake Support. Default: OFF NOTE: If enabled, the computer will not go to sleep, Intel Rapid Start will be disabled automatically, and the operating system power option will be blank if it was set to recover the last power state. Default: Enabled with PXE Wireless Device Enable WLAN Bluetooth Enable UEFI Network...
... setup options-Connection menu Connection Network Controller Configuration Integrated NIC Enables or disables integrated NIC. Enables or disables UEFI networking protocols, if they are selected. Default: OFF USB Wake Support Enable USB Wake Support Enables or disables USB Wake Support. Default: OFF NOTE: If enabled, the computer will not go to sleep, Intel Rapid Start will be disabled automatically, and the operating system power option will be blank if it was set to recover the last power state. Default: Enabled with PXE Wireless Device Enable WLAN Bluetooth Enable UEFI Network...
Service Manual
Page 73
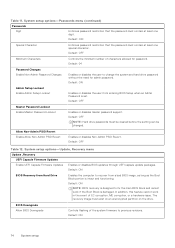
... permanently disable the BIOS module interface of functionality with some legacy tools and applications. Password Configuration Upper Case Letter Enforces password restriction that the password must contain at least one upper case letter. Default: OFF System setup 73 Internal HDD-0 Enables the user to set , change , or delete the SSD password. Default: OFF Lower Case Letter Enforces password restriction that the password must contain at least one lower case letter. System setup options-Security menu Security Intel Speed...
... permanently disable the BIOS module interface of functionality with some legacy tools and applications. Password Configuration Upper Case Letter Enforces password restriction that the password must contain at least one upper case letter. Default: OFF System setup 73 Internal HDD-0 Enables the user to set , change , or delete the SSD password. Default: OFF Lower Case Letter Enforces password restriction that the password must contain at least one lower case letter. System setup options-Security menu Security Intel Speed...
Service Manual
Page 74
... capsule update packages. Default: OFF Minimum Characters Controls the minimum number of the system firmware to change the system and hard drive password without the need for password. In addition, this feature cannot work if the Boot Block is damaged. Default: OFF Special Character Enforces password restriction that the password must be cleared before the setting can be changed. Default: OFF Master Password Lockout Enable Master Password Lockout Enables or disables master password support. Default: ON BIOS Recovery from a bad BIOS image...
... capsule update packages. Default: OFF Minimum Characters Controls the minimum number of the system firmware to change the system and hard drive password without the need for password. In addition, this feature cannot work if the Boot Block is damaged. Default: OFF Special Character Enforces password restriction that the password must be cleared before the setting can be changed. Default: OFF Master Password Lockout Enable Master Password Lockout Enables or disables master password support. Default: ON BIOS Recovery from a bad BIOS image...
Service Manual
Page 75
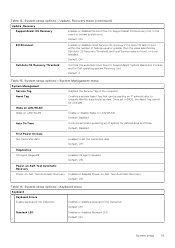
... System Management Service Tag Displays the Service Tag of system for Dell operating system Recovery tool. Default: OFF Diagnostics OS Agent Requests Enables OS agent requests. Default: ON Power-on-Self-Test Automatic Recovery Power-on-Self-Test Automatic Recovery Enables or disables Power-on LAN/WLAN. Default: ON Table 14. Default: ON System setup 75 Table 12. Asset Tag Creates a system Asset Tag that can be changed. System setup options-Keyboard menu Keyboard Keyboard Errors Enable keyboard Error Detection Enables or disables keyboard Error Detection. Once set...
... System Management Service Tag Displays the Service Tag of system for Dell operating system Recovery tool. Default: OFF Diagnostics OS Agent Requests Enables OS agent requests. Default: ON Power-on-Self-Test Automatic Recovery Power-on-Self-Test Automatic Recovery Enables or disables Power-on LAN/WLAN. Default: ON Table 14. Default: ON System setup 75 Table 12. Asset Tag Creates a system Asset Tag that can be changed. System setup options-Keyboard menu Keyboard Keyboard Errors Enable keyboard Error Detection Enables or disables keyboard Error Detection. Once set...
Service Manual
Page 76
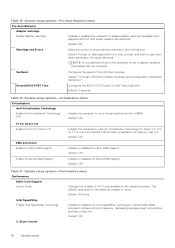
... operation of cores. NOTE: Errors deemed critical to run a virtual machine monitor (VMM). Performs complete hardware and configuration initialization during boot. Default: ON VT for Direct I/O Enable Intel VT for memory map I /O (VTd). System setup options-Performance menu Performance Multi-Core Support Active Cores Changes the number of the UEFI boot process. Table 15. System setup options-Pre-boot Behavior menu Pre-boot Behavior Adapter warnings Enable Adapter warnings Enables or disables the computer to display adapter warning messages when adapters...
... operation of cores. NOTE: Errors deemed critical to run a virtual machine monitor (VMM). Performs complete hardware and configuration initialization during boot. Default: ON VT for Direct I/O Enable Intel VT for memory map I /O (VTd). System setup options-Performance menu Performance Multi-Core Support Active Cores Changes the number of the UEFI boot process. Table 15. System setup options-Pre-boot Behavior menu Pre-boot Behavior Adapter warnings Enable Adapter warnings Enables or disables the computer to display adapter warning messages when adapters...
Service Manual
Page 81
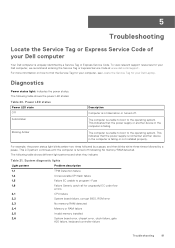
... Locate the Service Tag for ungraceful EC code flow errors 2,1 CPU failure 2,2 System board failure, corrupt BIOS, ROM error 2,3 No memory/RAM detected 2,4 Memory or RAM failure 2,5 Invalid memory installed 2,6 System board error, chipset error, clock failure, gate A20 failure, keyboard controller failure Troubleshooting 81 For more information on how to program i-Fuse 1,6 Failure Generic catch-all for your Dell Laptop. Diagnostics Power status light: Indicates the power status. This indicates that the power supply or another device in hibernation or turned...
... Locate the Service Tag for ungraceful EC code flow errors 2,1 CPU failure 2,2 System board failure, corrupt BIOS, ROM error 2,3 No memory/RAM detected 2,4 Memory or RAM failure 2,5 Invalid memory installed 2,6 System board error, chipset error, clock failure, gate A20 failure, keyboard controller failure Troubleshooting 81 For more information on how to program i-Fuse 1,6 Failure Generic catch-all for your Dell Laptop. Diagnostics Power status light: Indicates the power status. This indicates that the power supply or another device in hibernation or turned...
Service Manual
Page 83
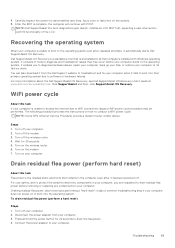
... to access the internet due to WiFi connectivity issues a WiFi power cycle procedure may occur before removing or replacing any lines, fuzzy color or distortion on or boot into their primary operating system due to your computer. 2. Turn off the wireless router. 4. Drain residual flea power (perform hard reset) About this task If your computer. To drain residual flea power (perform a hard reset) Steps 1. Connect the power adapter to software or hardware failures. NOTE: Dell...
... to access the internet due to WiFi connectivity issues a WiFi power cycle procedure may occur before removing or replacing any lines, fuzzy color or distortion on or boot into their primary operating system due to your computer. 2. Turn off the wireless router. 4. Drain residual flea power (perform hard reset) About this task If your computer. To drain residual flea power (perform a hard reset) Steps 1. Connect the power adapter to software or hardware failures. NOTE: Dell...
Setup and Specifications
Page 13
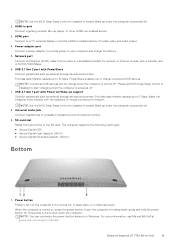
HDMI-in Windows. Provides data transfer speeds up when the computer is turned on, press the power button to charge connected USB devices. Please set BIOS Deep Sleep control to disabled to 10 Gbps. When the computer is powered off. 8. Network port Connect an Ethernet (RJ45) cable from standby with a transfer rate of Inspiron 27 7710 All-in hibernate state. PowerShare enables you to put the computer into sleep state; Universal audio jack Connect headphones or a headset (headphone...
HDMI-in Windows. Provides data transfer speeds up when the computer is turned on, press the power button to charge connected USB devices. Please set BIOS Deep Sleep control to disabled to 10 Gbps. When the computer is powered off. 8. Network port Connect an Ethernet (RJ45) cable from standby with a transfer rate of Inspiron 27 7710 All-in hibernate state. PowerShare enables you to put the computer into sleep state; Universal audio jack Connect headphones or a headset (headphone...
Setup and Specifications
Page 22
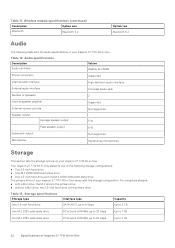
... The following table lists the audio specifications of your Inspiron 27 7710 All-in -One Audio specifications Description Audio controller Values Realtek ALC3289 Stereo conversion Supported Internal audio interface High definition audio interface External audio interface Universal Audio Jack Number of Inspiron 27 7710 All-in -One varies with a M.2 drive, the M.2 drive is the primary drive ● without a M.2 drive, the 2.5-inch hard drive is the primary drive Table 13. Storage specifications Storage type Interface type Capacity One 2.5-inch hard-drive SATA AHCI, up to 6 Gbps...
... The following table lists the audio specifications of your Inspiron 27 7710 All-in -One Audio specifications Description Audio controller Values Realtek ALC3289 Stereo conversion Supported Internal audio interface High definition audio interface External audio interface Universal Audio Jack Number of Inspiron 27 7710 All-in -One varies with a M.2 drive, the M.2 drive is the primary drive ● without a M.2 drive, the 2.5-inch hard drive is the primary drive Table 13. Storage specifications Storage type Interface type Capacity One 2.5-inch hard-drive SATA AHCI, up to 6 Gbps...
Setup and Specifications
Page 27
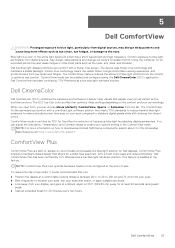
... how to download and install DellCinema components, search about it is an optional hardware feature to be enabled and configured using the Dell CinemaColor (DCC) application. Chronic exposure to blue light, particularly from eye strain and fatigue. Dell low blue light displays optimize eye comfort with a Low Blue Light software solution that meets TÜV standards to reduce harmful blue light emissions to make extended screen time easy...
... how to download and install DellCinema components, search about it is an optional hardware feature to be enabled and configured using the Dell CinemaColor (DCC) application. Chronic exposure to blue light, particularly from eye strain and fatigue. Dell low blue light displays optimize eye comfort with a Low Blue Light software solution that meets TÜV standards to reduce harmful blue light emissions to make extended screen time easy...


