Quick Start Guide - Windows 8
Page 1
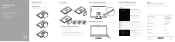
...ón del sistema operativo Windows Enable security and updates Schakel de beveiliging en updates in Activez la sécurité et les mises à jour Active la seguridad y las actualizaciones Ubuntu Follow the instructions on the screen to a secured wireless network, enter the password for the wireless network access when prompted. Printed in Installez le clavier et la souris Configure el teclado y el rat...
...ón del sistema operativo Windows Enable security and updates Schakel de beveiliging en updates in Activez la sécurité et les mises à jour Active la seguridad y las actualizaciones Ubuntu Follow the instructions on the screen to a secured wireless network, enter the password for the wireless network access when prompted. Printed in Installez le clavier et la souris Configure el teclado y el rat...
Quick Start Guide - Windows 10
Page 1
... instructions on the screen to a secured wireless network, enter the password for the wireless network access when prompted. Suivez les instructions qui s'affichent pour terminer la configuration. Consulte la documentación que se envía con el teclado y el ratón. 4 Press the power button Druk op de aan-uitknop | Appuyez sur le bouton d'alimentation Pulse el botón de encendido 5 Finish operating system setup...
... instructions on the screen to a secured wireless network, enter the password for the wireless network access when prompted. Suivez les instructions qui s'affichent pour terminer la configuration. Consulte la documentación que se envía con el teclado y el ratón. 4 Press the power button Druk op de aan-uitknop | Appuyez sur le bouton d'alimentation Pulse el botón de encendido 5 Finish operating system setup...
Inspiron 24 5000 Setup and Specifications
Page 1
Inspiron 24 5000 Setup and Specifications Computer Model: Inspiron 24-5459 Regulatory Model: W12C Regulatory Type: W12C004
Inspiron 24 5000 Setup and Specifications Computer Model: Inspiron 24-5459 Regulatory Model: W12C Regulatory Type: W12C004

Inspiron 24 5000 Setup and Specifications
Page 14
Provides data transfer speeds up to 480 Mbps. 5 Network port Connect an Ethernet (RJ45) cable from a router or a broadband modem for network or internet access. 6 Power-adapter port 14 Provides video and audio output. 3 HDMI-in port Connect a gaming console, Blu-ray player, or other HDMI-out enabled devices. 4 USB 2.0 ports (4) Connect peripherals such as speakers, amplifiers, and so on. 2 HDMI-out port Connect a TV or another HDMI-in enabled device. Back 1 Audio-out port Connect audio-output devices such as storage devices and printers.
Provides data transfer speeds up to 480 Mbps. 5 Network port Connect an Ethernet (RJ45) cable from a router or a broadband modem for network or internet access. 6 Power-adapter port 14 Provides video and audio output. 3 HDMI-in port Connect a gaming console, Blu-ray player, or other HDMI-out enabled devices. 4 USB 2.0 ports (4) Connect peripherals such as speakers, amplifiers, and so on. 2 HDMI-out port Connect a TV or another HDMI-in enabled device. Back 1 Audio-out port Connect audio-output devices such as storage devices and printers.

Inspiron 24 5000 Setup and Specifications
Page 17
System information Computer model Processor System chipset Inspiron 24-5459 • 6th generation Intel Core i3/i5/i7 series • 6th generation Intel Pentium H110 Dimensions and weight Table 3. Specifications System information Table 2. Dimensions and weight Height Width Depth Weight (maximum) Without stand With pedestal stand With articulating stand Touchscreen 385.33 mm (15.17 ...) 5.89 kg (12.99 lb) 7.11 kg (15.67 lb) 8.68 kg (19.14 lb) NOTE: The weight of your computer varies depending on the configuration ordered and the manufacturing variability. 17
System information Computer model Processor System chipset Inspiron 24-5459 • 6th generation Intel Core i3/i5/i7 series • 6th generation Intel Pentium H110 Dimensions and weight Table 3. Specifications System information Table 2. Dimensions and weight Height Width Depth Weight (maximum) Without stand With pedestal stand With articulating stand Touchscreen 385.33 mm (15.17 ...) 5.89 kg (12.99 lb) 7.11 kg (15.67 lb) 8.68 kg (19.14 lb) NOTE: The weight of your computer varies depending on the configuration ordered and the manufacturing variability. 17

Inspiron 24 5000 Setup and Specifications
Page 18
Memory specifications Slots Type Speed Configurations supported Two SODIMM slots Dual-channel DDR3L Up to 1600 MHz 4 GB, 8 GB, 12 GB, and 16 GB Ports and connectors Table 5. Ports and connectors specifications External: Network One RJ45 port USB • Four USB 2.0 ports • Two USB 3.0 ports Audio/Video • One headset port • One audio-out port • One HDMI-out port • One HDMI-in port Table 6. Ports and connectors specifications Internal: M.2 card One M.2 slot for WLAN and Bluetooth combo card 18 Memory Table 4.
Memory specifications Slots Type Speed Configurations supported Two SODIMM slots Dual-channel DDR3L Up to 1600 MHz 4 GB, 8 GB, 12 GB, and 16 GB Ports and connectors Table 5. Ports and connectors specifications External: Network One RJ45 port USB • Four USB 2.0 ports • Two USB 3.0 ports Audio/Video • One headset port • One audio-out port • One HDMI-out port • One HDMI-in port Table 6. Ports and connectors specifications Internal: M.2 card One M.2 slot for WLAN and Bluetooth combo card 18 Memory Table 4.

Inspiron 24 5000 Setup and Specifications
Page 19
... specifications Interface Hard drive Optical drive 10/100/1000 Mbps Ethernet controller integrated on system board • Wi-Fi 802.11ac • Wi-Fi 802.11b/g/n • Bluetooth 4.0 Realtek ALC3661 with Waves Maxx Audio Pro Two • Average - 3 W • Peak - 3.5 W Dual Digital Microphone Program menus • SATA 3 Gbps for optical drive • SATA 6 Gbps for hard drive One 2.5-inch drive One 9.5-mm DVD+/-RW drive 19 Communications Table 7. Communication specifications Ethernet Wireless Audio...
... specifications Interface Hard drive Optical drive 10/100/1000 Mbps Ethernet controller integrated on system board • Wi-Fi 802.11ac • Wi-Fi 802.11b/g/n • Bluetooth 4.0 Realtek ALC3661 with Waves Maxx Audio Pro Two • Average - 3 W • Peak - 3.5 W Dual Digital Microphone Program menus • SATA 3 Gbps for optical drive • SATA 6 Gbps for hard drive One 2.5-inch drive One 9.5-mm DVD+/-RW drive 19 Communications Table 7. Communication specifications Ethernet Wireless Audio...
Inspiron 24 5000 Setup and Specifications
Page 25
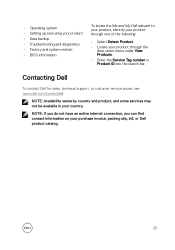
...; Operating system • Setting up and using your product • Data backup • Troubleshooting and diagnostics • Factory and system restore • BIOS information To locate the Me and My Dell relevant to your product, identify your product through one of the following: • Select Detect Product. • Locate your product through the drop-down menu under View Products. • Enter the Service Tag number...
...; Operating system • Setting up and using your product • Data backup • Troubleshooting and diagnostics • Factory and system restore • BIOS information To locate the Me and My Dell relevant to your product, identify your product through one of the following: • Select Detect Product. • Locate your product through the drop-down menu under View Products. • Enter the Service Tag number...
Inspiron 24 5000 Service Manual
Page 1
Inspiron 24 5000 Service Manual Computer Model: Inspiron 24-5459 Regulatory Model: W12C Regulatory Type: W12C004
Inspiron 24 5000 Service Manual Computer Model: Inspiron 24-5459 Regulatory Model: W12C Regulatory Type: W12C004

Inspiron 24 5000 Service Manual
Page 4
Removing the optical drive 24 Procedure 24 Post-requisites 24 Removing the hard drive 25 Prerequisites 25 Procedure 25 Replacing the hard drive 28 Procedure 28 Post-requisites 28 Removing the memory modules 29 Prerequisites 29 Procedure 29 Replacing the memory modules 31 Procedure 31 Post-requisites 32 Removing the wireless card 33 Prerequisites 33 Procedure 33 Replacing the wireless card 35 Procedure 35 Post-requisites 36 Removing the heat sink 37 Prerequisites 37 Procedure 37 4
Removing the optical drive 24 Procedure 24 Post-requisites 24 Removing the hard drive 25 Prerequisites 25 Procedure 25 Replacing the hard drive 28 Procedure 28 Post-requisites 28 Removing the memory modules 29 Prerequisites 29 Procedure 29 Replacing the memory modules 31 Procedure 31 Post-requisites 32 Removing the wireless card 33 Prerequisites 33 Procedure 33 Replacing the wireless card 35 Procedure 35 Post-requisites 36 Removing the heat sink 37 Prerequisites 37 Procedure 37 4

Inspiron 24 5000 Service Manual
Page 9
... and hold the power button for shut-down instructions. 3 Disconnect your computer and all attached devices from their electrical outlets. 4 Disconnect all cables such as telephone cables, network cables, and so on, from your computer. 5 Disconnect all attached devices and peripherals, such as keyboard, mouse, monitor, and so on, from your computer. 6 Remove any media card and optical disc from your computer depending on the configuration you begin...
... and hold the power button for shut-down instructions. 3 Disconnect your computer and all attached devices from their electrical outlets. 4 Disconnect all cables such as telephone cables, network cables, and so on, from your computer. 5 Disconnect all attached devices and peripherals, such as keyboard, mouse, monitor, and so on, from your computer. 6 Remove any media card and optical disc from your computer depending on the configuration you begin...

Inspiron 24 5000 Service Manual
Page 10
... edges, and avoid touching pins and contacts. See the safety instructions that the ports and connectors are correctly oriented and aligned. CAUTION: Before touching anything inside your computer, read the safety information that is not authorized by the Dell technical assistance team. Safety instructions Use the following safety guidelines to protect your computer from the media-card reader. 10 CAUTION: To avoid...
... edges, and avoid touching pins and contacts. See the safety instructions that the ports and connectors are correctly oriented and aligned. CAUTION: Before touching anything inside your computer, read the safety information that is not authorized by the Dell technical assistance team. Safety instructions Use the following safety guidelines to protect your computer from the media-card reader. 10 CAUTION: To avoid...

Inspiron 24 5000 Service Manual
Page 12
After working inside your computer CAUTION: Leaving stray or loose screws inside your computer may severely damage your computer. 1 Replace all screws and ensure that no stray screws remain inside your computer. 2 Connect any external devices, peripherals, or cables you removed before working on your computer. 3 Replace any media cards, discs, or any other parts that you removed before working on your computer. 4 Connect your computer and all attached devices to their electrical outlets. 5 Turn on your computer. 12
After working inside your computer CAUTION: Leaving stray or loose screws inside your computer may severely damage your computer. 1 Replace all screws and ensure that no stray screws remain inside your computer. 2 Connect any external devices, peripherals, or cables you removed before working on your computer. 3 Replace any media cards, discs, or any other parts that you removed before working on your computer. 4 Connect your computer and all attached devices to their electrical outlets. 5 Turn on your computer. 12

Inspiron 24 5000 Service Manual
Page 14
9 fan 11 heat sink 13 memory modules 15 system board 10 left microphone (touch-screen models only) 12 wireless card 14 coin-cell battery System Board Components 1 display-backlight cable connector 2 control-buttons board cable connector 3 display-cable connector 4 hard-drive data cable connector 5 optical-drive data cable connector 6 hard-drive and optical-drive power cable connector 7 touch-screen board cable connector 8 fan cable connector 14
9 fan 11 heat sink 13 memory modules 15 system board 10 left microphone (touch-screen models only) 12 wireless card 14 coin-cell battery System Board Components 1 display-backlight cable connector 2 control-buttons board cable connector 3 display-cable connector 4 hard-drive data cable connector 5 optical-drive data cable connector 6 hard-drive and optical-drive power cable connector 7 touch-screen board cable connector 8 fan cable connector 14

Inspiron 24 5000 Service Manual
Page 28
.... Replacing the hard drive WARNING: Before working inside your computer, read the safety information that secures the hard-drive assembly to the middle cover. 5 Connect the hard-drive cable to the hard drive. 3 Slide the hard-drive assembly into the hard-drive bay and align the screw hole on the middle cover. 4 Replace the screw that shipped with the screw hole on the hard-drive bracket with your computer and follow the instructions...
.... Replacing the hard drive WARNING: Before working inside your computer, read the safety information that secures the hard-drive assembly to the middle cover. 5 Connect the hard-drive cable to the hard drive. 3 Slide the hard-drive assembly into the hard-drive bay and align the screw hole on the middle cover. 4 Replace the screw that shipped with the screw hole on the hard-drive bracket with your computer and follow the instructions...
Inspiron 24 5000 Service Manual
Page 56
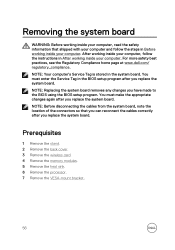
... must enter the Service Tag in After working inside your computer. NOTE: Before disconnecting the cables from the system board, note the location of the connectors so that shipped with your computer and follow the instructions in the BIOS setup program after you have made to the BIOS using the BIOS setup program. Prerequisites 1 Remove the stand. 2 Remove the back cover. 3 Remove the wireless card. 4 Remove the memory modules. 5 Remove the heat sink. 6 Remove the processor. 7 Remove...
... must enter the Service Tag in After working inside your computer. NOTE: Before disconnecting the cables from the system board, note the location of the connectors so that shipped with your computer and follow the instructions in the BIOS setup program after you have made to the BIOS using the BIOS setup program. Prerequisites 1 Remove the stand. 2 Remove the back cover. 3 Remove the wireless card. 4 Remove the memory modules. 5 Remove the heat sink. 6 Remove the processor. 7 Remove...

Inspiron 24 5000 Service Manual
Page 58
3 Open the latches and disconnect the control-buttons board cable and display cable from the system board. 1 display-backlight cable 3 display cable 5 optical-drive data cable 7 touch-screen board cable 2 control-buttons board cable 4 hard-drive data cable 6 hard-drive and optical-drive power cable 4 Remove the screws that secure the system board to the middle cover. 5 Starting from the inner edge, carefully lift the system board and release the ports from the slots on the middle cover. 58
3 Open the latches and disconnect the control-buttons board cable and display cable from the system board. 1 display-backlight cable 3 display cable 5 optical-drive data cable 7 touch-screen board cable 2 control-buttons board cable 4 hard-drive data cable 6 hard-drive and optical-drive power cable 4 Remove the screws that secure the system board to the middle cover. 5 Starting from the inner edge, carefully lift the system board and release the ports from the slots on the middle cover. 58
Inspiron 24 5000 Service Manual
Page 60
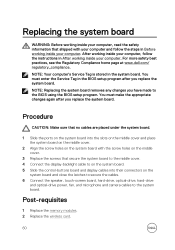
... BIOS setup program after you replace the system board. Post-requisites 1 Replace the memory modules. 2 Replace the wireless card. 60 You must make the appropriate changes again after you replace the system board. Procedure CAUTION: Make sure that no cables are placed under the system board. 1 Slide the ports on the system board into their connectors on the system board and close the latches to secure the cables. 6 Connect the speaker, touch-screen board, hard-drive, optical-drive, hard-drive and optical-drive power, fan...
... BIOS setup program after you replace the system board. Post-requisites 1 Replace the memory modules. 2 Replace the wireless card. 60 You must make the appropriate changes again after you replace the system board. Procedure CAUTION: Make sure that no cables are placed under the system board. 1 Slide the ports on the system board into their connectors on the system board and close the latches to secure the cables. 6 Connect the speaker, touch-screen board, hard-drive, optical-drive, hard-drive and optical-drive power, fan...

Inspiron 24 5000 Service Manual
Page 74
... Regulatory Compliance home page at www.dell.com/ regulatory_compliance. Removing the middle cover WARNING: Before working inside your computer, read the safety information that shipped with your computer and follow the instructions in Before working inside your computer. Prerequisites 1 Remove the stand. 2 Remove the back cover. 3 Remove the optical drive. 4 Remove the hard drive. 5 Remove the wireless card. 6 Remove the heat sink. 7 Remove the fan. 8 Remove the system board. 9 Remove the VESA-mount bracket. 10 Remove the speaker cover.
... Regulatory Compliance home page at www.dell.com/ regulatory_compliance. Removing the middle cover WARNING: Before working inside your computer, read the safety information that shipped with your computer and follow the instructions in Before working inside your computer. Prerequisites 1 Remove the stand. 2 Remove the back cover. 3 Remove the optical drive. 4 Remove the hard drive. 5 Remove the wireless card. 6 Remove the heat sink. 7 Remove the fan. 8 Remove the system board. 9 Remove the VESA-mount bracket. 10 Remove the speaker cover.

Inspiron 24 5000 Service Manual
Page 79
....dell.com/ regulatory_compliance. After working inside your computer, follow the steps in After working inside your computer. Procedure CAUTION: Ensure that secure the middle cover to the display assembly. 5 Route the antenna , camera and microphone, touch-screen board, optical drive and hard drive cables through the routing guides on the middle cover with your computer and follow the instructions in Before working inside your computer. Replacing the middle cover WARNING: Before working inside...
....dell.com/ regulatory_compliance. After working inside your computer, follow the steps in After working inside your computer. Procedure CAUTION: Ensure that secure the middle cover to the display assembly. 5 Route the antenna , camera and microphone, touch-screen board, optical drive and hard drive cables through the routing guides on the middle cover with your computer and follow the instructions in Before working inside your computer. Replacing the middle cover WARNING: Before working inside...


