Me and My Dell
Page 4
Touchscreen Gestures 30 Zoom 30 Dwell 31 Flick 31 Scroll 31 Rotate 32 Keyboard 33 Backlit Keyboard 34 Keyboard Connection Types 35 Locating the Service Tag and Express-Service Code 36 Locating the Label on Your Computer 36 Using Dell's Online System Profiler 36 Storage 36 About Storage Devices 36 Internal Storage Devices 37 Hard Drives 37 Solid-State Drives 37 Removable Storage Devices 37 Optical Discs 38 Memory Cards 38 Memory Module 39 System Board 40 Processor 42 Computer Fan 43 Heat Sink 43 Thermal Grease 44 4 Contents
Touchscreen Gestures 30 Zoom 30 Dwell 31 Flick 31 Scroll 31 Rotate 32 Keyboard 33 Backlit Keyboard 34 Keyboard Connection Types 35 Locating the Service Tag and Express-Service Code 36 Locating the Label on Your Computer 36 Using Dell's Online System Profiler 36 Storage 36 About Storage Devices 36 Internal Storage Devices 37 Hard Drives 37 Solid-State Drives 37 Removable Storage Devices 37 Optical Discs 38 Memory Cards 38 Memory Module 39 System Board 40 Processor 42 Computer Fan 43 Heat Sink 43 Thermal Grease 44 4 Contents
Me and My Dell
Page 43
...Sink Heat sinks are specifically designed for easy exchange of a computer by the processor or some high-end graphics cards. Computer Fan 43 Fans are made up of fins or blades instead of a single block of heat. Heat sinks generally have high power consumption and ... the processor/graphics card and the heat sink for mobile devices, laptop computers, desktop computers, servers, and so on . Computer Fan A computer fan cools the internal components of heat. This helps increase the surface area for desktop computers or servers. A processor designed for mobile ...
...Sink Heat sinks are specifically designed for easy exchange of a computer by the processor or some high-end graphics cards. Computer Fan 43 Fans are made up of fins or blades instead of a single block of heat. Heat sinks generally have high power consumption and ... the processor/graphics card and the heat sink for mobile devices, laptop computers, desktop computers, servers, and so on . Computer Fan A computer fan cools the internal components of heat. This helps increase the surface area for desktop computers or servers. A processor designed for mobile ...
Me and My Dell
Page 138
...click Run Tests. Displays detailed configuration and status information about all the devices in your computer, click Exit. • Status - When the DELL logo appears, press to wait until you see the Microsoft Windows desktop; Appears on . • Event Log - Provides detailed information about all...Device Tree - Restart the computer. 2. Displays all devices under ePSA. • Results - Displays the status of the battery, AC adapter, fans, and so on the right of the ePSA home screen. Selecting the Thorough Test Mode check-box maximizes the intensity and length of the tests...
...click Run Tests. Displays detailed configuration and status information about all the devices in your computer, click Exit. • Status - When the DELL logo appears, press to wait until you see the Microsoft Windows desktop; Appears on . • Event Log - Provides detailed information about all...Device Tree - Restart the computer. 2. Displays all devices under ePSA. • Results - Displays the status of the battery, AC adapter, fans, and so on the right of the ePSA home screen. Selecting the Thorough Test Mode check-box maximizes the intensity and length of the tests...
Me and My Dell
Page 140
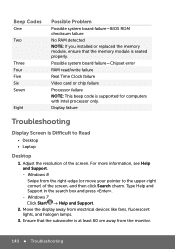
... or chip failure Processor failure NOTE: This beep code is Difficult to the upper-right corner) of the screen. Windows 8 Swipe from electrical devices like fans, fluorescent lights, and halogen lamps. 3. Move the display away from the right-edge (or move your pointer to Read • Desktop • Laptop Desktop 1. Windows...
... or chip failure Processor failure NOTE: This beep code is Difficult to the upper-right corner) of the screen. Windows 8 Swipe from electrical devices like fans, fluorescent lights, and halogen lamps. 3. Move the display away from the right-edge (or move your pointer to Read • Desktop • Laptop Desktop 1. Windows...
Owner's Manual
Page 5
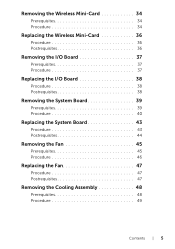
Removing the Wireless Mini-Card 34 Prerequisites 34 Procedure 34 Replacing the Wireless Mini-Card 36 Procedure 36 Postrequisites 36 Removing the I/O Board 37 Prerequisites 37 Procedure 37 Replacing the I/O Board 38 Procedure 38 Postrequisites 38 Removing the System Board 39 Prerequisites 39 Procedure 40 Replacing the System Board 43 Procedure 43 Postrequisites 44 Removing the Fan 45 Prerequisites 45 Procedure 46 Replacing the Fan 47 Procedure 47 Postrequisites 47 Removing the Cooling Assembly 48 Prerequisites 48 Procedure 49 Contents | 5
Removing the Wireless Mini-Card 34 Prerequisites 34 Procedure 34 Replacing the Wireless Mini-Card 36 Procedure 36 Postrequisites 36 Removing the I/O Board 37 Prerequisites 37 Procedure 37 Replacing the I/O Board 38 Procedure 38 Postrequisites 38 Removing the System Board 39 Prerequisites 39 Procedure 40 Replacing the System Board 43 Procedure 43 Postrequisites 44 Removing the Fan 45 Prerequisites 45 Procedure 46 Replacing the Fan 47 Procedure 47 Postrequisites 47 Removing the Cooling Assembly 48 Prerequisites 48 Procedure 49 Contents | 5
Owner's Manual
Page 42
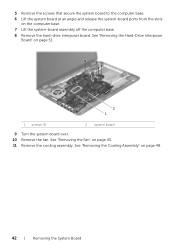
See "Removing the Hard-Drive Interposer Board" on page 48. 42 | Removing the System Board See "Removing the Cooling Assembly" on page 51 2 1 1 screws (5) 2 system board 9 Turn the system board over. 10 Remove the fan. See "Removing the Fan" on the computer base. 7 Lift the system-board assembly off the computer base. 8 Remove the hard-drive interposer board. 5 Remove the screws that secure the system board to the computer base. 6 Lift the system board at an angle and release the system-board ports from the slots on page 45. 11 Remove the cooling assembly.
See "Removing the Hard-Drive Interposer Board" on page 48. 42 | Removing the System Board See "Removing the Cooling Assembly" on page 51 2 1 1 screws (5) 2 system board 9 Turn the system board over. 10 Remove the fan. See "Removing the Fan" on the computer base. 7 Lift the system-board assembly off the computer base. 8 Remove the hard-drive interposer board. 5 Remove the screws that secure the system board to the computer base. 6 Lift the system board at an angle and release the system-board ports from the slots on page 45. 11 Remove the cooling assembly.
Owner's Manual
Page 43
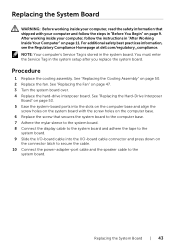
...'s Service Tag is stored in the system setup after you replace the system board. See "Replacing the Fan" on page 50. 2 Replace the fan. For additional safety best practices information, see the Regulatory Compliance Homepage at dell.com/regulatory_compliance. Replacing the System Board | 43 Procedure 1 Replace the cooling assembly. You must enter the...
...'s Service Tag is stored in the system setup after you replace the system board. See "Replacing the Fan" on page 50. 2 Replace the fan. For additional safety best practices information, see the Regulatory Compliance Homepage at dell.com/regulatory_compliance. Replacing the System Board | 43 Procedure 1 Replace the cooling assembly. You must enter the...
Owner's Manual
Page 45
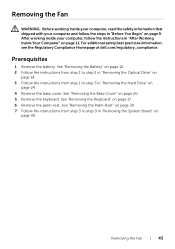
...page 24. 4 Remove the base cover. Prerequisites 1 Remove the battery. See "Removing the Keyboard" on page 20. 5 Remove the keyboard. Removing the Fan | 45 See "Removing the Battery" on page 12. 2 Follow the instructions from step 1 to step 2 in "Removing the Optical Drive" on ... in "Before You Begin" on page 9. For additional safety best practices information, see the Regulatory Compliance Homepage at dell.com/regulatory_compliance. Removing the Fan WARNING: Before working inside your computer, read the safety information that shipped with your computer, follow the steps in ...
...page 24. 4 Remove the base cover. Prerequisites 1 Remove the battery. See "Removing the Keyboard" on page 20. 5 Remove the keyboard. Removing the Fan | 45 See "Removing the Battery" on page 12. 2 Follow the instructions from step 1 to step 2 in "Removing the Optical Drive" on ... in "Before You Begin" on page 9. For additional safety best practices information, see the Regulatory Compliance Homepage at dell.com/regulatory_compliance. Removing the Fan WARNING: Before working inside your computer, read the safety information that shipped with your computer, follow the steps in ...

Owner's Manual
Page 46
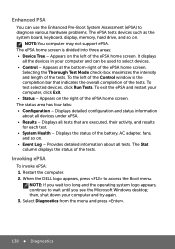
Procedure 1 Disconnect the fan cable from the system board. 2 Remove the screw that secures the fan to the system board. 3 Lift the fan along with the cable, off the computer base. 1 2 3 1 fan cable 3 fan 2 screw 46 | Removing the Fan
Procedure 1 Disconnect the fan cable from the system board. 2 Remove the screw that secures the fan to the system board. 3 Lift the fan along with the cable, off the computer base. 1 2 3 1 fan cable 3 fan 2 screw 46 | Removing the Fan
Owner's Manual
Page 47
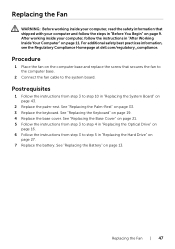
...9. See "Replacing the Keyboard" on page 33. 3 Replace the keyboard. For additional safety best practices information, see the Regulatory Compliance Homepage at dell.com/regulatory_compliance. See "Replacing the Palm-Rest" on page 19. 4 Replace the base cover. See "Replacing the Battery" on page 11. See...instructions from step 3 to step 10 in "Replacing the Hard Drive" on page 27. 7 Replace the battery. Replacing the Fan | 47 Procedure 1 Place the fan on the computer base and replace the screw that shipped with your computer, follow the steps in "After Working Inside Your ...
...9. See "Replacing the Keyboard" on page 33. 3 Replace the keyboard. For additional safety best practices information, see the Regulatory Compliance Homepage at dell.com/regulatory_compliance. See "Replacing the Palm-Rest" on page 19. 4 Replace the base cover. See "Replacing the Battery" on page 11. See...instructions from step 3 to step 10 in "Replacing the Hard Drive" on page 27. 7 Replace the battery. Replacing the Fan | 47 Procedure 1 Place the fan on the computer base and replace the screw that shipped with your computer, follow the steps in "After Working Inside Your ...


