
Service Manual
Page 4
Coin-cell battery...35 Removing the coin-cell battery...35 Installing the coin-cell battery...36 Power-supply unit...36 Removing the power-supply unit...36 Installing the power-supply unit...38 Processor fan and heat-sink assembly...41 Removing the processor fan and heat-sink assembly 41 Installing the processor fan and heat-sink ...
Coin-cell battery...35 Removing the coin-cell battery...35 Installing the coin-cell battery...36 Power-supply unit...36 Removing the power-supply unit...36 Installing the power-supply unit...38 Processor fan and heat-sink assembly...41 Removing the processor fan and heat-sink assembly 41 Installing the processor fan and heat-sink ...

Service Manual
Page 9
Figure 1. 2 Removing and installing components Inside view of heat sink differs depending on the graphics configuration you ordered. light bar Removing and installing components 9 Inside view of your computer NOTE: The appearance of your computer 1. 3.5-inch hard drive assembly 2. PCIE door 6. processor fan and heat-sink assembly 7. 2.5-inch hard-drive assembly 8. graphics card 4. power-supply unit 5. front cover 3.
Figure 1. 2 Removing and installing components Inside view of heat sink differs depending on the graphics configuration you ordered. light bar Removing and installing components 9 Inside view of your computer NOTE: The appearance of your computer 1. 3.5-inch hard drive assembly 2. PCIE door 6. processor fan and heat-sink assembly 7. 2.5-inch hard-drive assembly 8. graphics card 4. power-supply unit 5. front cover 3.

Service Manual
Page 10
System-board components Figure 2. solid-state drive connector (m.2 PCIe SSD) 8. processor power cable connector (ATX CPU) 12. memory-module slot (DIMM4) 16. hard-drive power cable connector (SATA PWR) 4. processor 10. power-supply unit cable connector 6. graphics-card slot 7. chassis-fan cable connector (FAN SYS) 9. memory-module slot (DIMM1) 15. front LED cable connector (PWR...
System-board components Figure 2. solid-state drive connector (m.2 PCIe SSD) 8. processor power cable connector (ATX CPU) 12. memory-module slot (DIMM4) 16. hard-drive power cable connector (SATA PWR) 4. processor 10. power-supply unit cable connector 6. graphics-card slot 7. chassis-fan cable connector (FAN SYS) 9. memory-module slot (DIMM1) 15. front LED cable connector (PWR...

Service Manual
Page 11
... hard drive Chassis #6-32 1 3.5-inch hard drive Hard-drive cage #6-32 4 Wireless-card bracket Solid-state drive Intel Optane Power-supply unit System board System board System board Chassis M2x3 1 M2x3 1 M2x3 1 #6-32 2 Power-supply unit Chassis #6-32 3 Ports bezel Chassis #6-32 1 System board Chassis #6-32 8 System board Chassis #6-32 1 Removing and installing components...
... hard drive Chassis #6-32 1 3.5-inch hard drive Hard-drive cage #6-32 4 Wireless-card bracket Solid-state drive Intel Optane Power-supply unit System board System board System board Chassis M2x3 1 M2x3 1 M2x3 1 #6-32 2 Power-supply unit Chassis #6-32 3 Ports bezel Chassis #6-32 1 System board Chassis #6-32 8 System board Chassis #6-32 1 Removing and installing components...

Service Manual
Page 36
... the coin-cell battery. Next steps 1. Remove the left -side cover. 3. Install the graphics card. 2. Using your computer. Install the left -side cover. 3. Power-supply unit Removing the power-supply unit Prerequisites 1. Remove the graphics card. 36 Removing and installing components Installing the coin-cell battery Prerequisites If you are replacing a component, remove the...
... the coin-cell battery. Next steps 1. Remove the left -side cover. 3. Install the graphics card. 2. Using your computer. Install the left -side cover. 3. Power-supply unit Removing the power-supply unit Prerequisites 1. Remove the graphics card. 36 Removing and installing components Installing the coin-cell battery Prerequisites If you are replacing a component, remove the...

Service Manual
Page 37
NOTE: Note the routing of the removal procedure. About this task The following images indicate the location of the power-supply unit and provides a visual representation of all cables as you remove them so that you can route them correctly while you are replacing the power-supply unit. Remove the 3.5-inch hard drive. Removing and installing components 37 4.
NOTE: Note the routing of the removal procedure. About this task The following images indicate the location of the power-supply unit and provides a visual representation of all cables as you remove them so that you can route them correctly while you are replacing the power-supply unit. Remove the 3.5-inch hard drive. Removing and installing components 37 4.

Service Manual
Page 38
... to do so may result in the cable to the chassis. Steps 1. Lift the power-supply unit off the power-supply unit. 4. NOTE: Only the computer with power-supply unit cover. 3. About this task The following images indicate the location of the power-supply unit and provides a visual representation of the chassis. 7. Remove the three screws (#6-32) that...
... to do so may result in the cable to the chassis. Steps 1. Lift the power-supply unit off the power-supply unit. 4. NOTE: Only the computer with power-supply unit cover. 3. About this task The following images indicate the location of the power-supply unit and provides a visual representation of the chassis. 7. Remove the three screws (#6-32) that...

Service Manual
Page 40
... step is applicable only for computers shipped with power-supply unit cover. Replace the three screws (#6-32) that secure the power-supply unit to the chassis. NOTE: Only the computer with clear doors are shipped with power-supply unit cover. 5. Route the power cable through the routing guides on the chassis.... Steps 1. Next steps 1. Slide and align the screw holes on the power-supply unit cover with the screw holes on the chassis and connect the power cables to the chassis. 4. Install the graphics card. 40 Removing and installing components Install the 3.5-...
... step is applicable only for computers shipped with power-supply unit cover. Replace the three screws (#6-32) that secure the power-supply unit to the chassis. NOTE: Only the computer with clear doors are shipped with power-supply unit cover. 5. Route the power cable through the routing guides on the chassis.... Steps 1. Next steps 1. Slide and align the screw holes on the power-supply unit cover with the screw holes on the chassis and connect the power cables to the chassis. 4. Install the graphics card. 40 Removing and installing components Install the 3.5-...

Service Manual
Page 50
.... Remove the processor. 12. wireless-card slot 2. memory-module slot (DIMM3) 50 Removing and installing components 9. System-board components 1. coin-cell battery 5. power-supply unit cable connector 6. processor-power cable connector (ATX CPU) 12. hard-drive power cable connector (SATA PWR) 4. Remove the processor fan and heat-sink assembly. 11. About this task Figure 3.
.... Remove the processor. 12. wireless-card slot 2. memory-module slot (DIMM3) 50 Removing and installing components 9. System-board components 1. coin-cell battery 5. power-supply unit cable connector 6. processor-power cable connector (ATX CPU) 12. hard-drive power cable connector (SATA PWR) 4. Remove the processor fan and heat-sink assembly. 11. About this task Figure 3.

Service Manual
Page 53
... chassis-fan cable connector (FAN SYS) 9. processor-fan cable connector (FAN CPU) 13. Removing and installing components 53 graphics-card slot 7. processor-power cable connector (ATX CPU) 12. memory-module slot (DIMM4) 16. memory-module slot (DIMM2) 17. front LED cable connector (PWR SW) ...of the system board and provides a visual representation of the installation procedure. solid-state drive connector (m.2 PCIe SSD) 8. power-supply unit cable connector 6. hard-drive data cable connector (SATA0) 3. System-board components 1. memory-module slot (DIMM1) 15. processor...
... chassis-fan cable connector (FAN SYS) 9. processor-fan cable connector (FAN CPU) 13. Removing and installing components 53 graphics-card slot 7. processor-power cable connector (ATX CPU) 12. memory-module slot (DIMM4) 16. memory-module slot (DIMM2) 17. front LED cable connector (PWR SW) ...of the system board and provides a visual representation of the installation procedure. solid-state drive connector (m.2 PCIe SSD) 8. power-supply unit cable connector 6. hard-drive data cable connector (SATA0) 3. System-board components 1. memory-module slot (DIMM1) 15. processor...

Service Manual
Page 72
.... This does not indicate a fault condition. A device might be malfunctioning or incorrectly installed. System state System board failure System board, power-supply unit, or cabling failure System board, memory, or processor failure System state BIOS state 1 BIOS state 2 BIOS state 3 BIOS state...execute and the LED register is working correctly. The computer is receiving electrical power, and power supplied by the power supply is in a low-power state, either S1 or S3. Table 15. Power LED summary Amber LED state White LED state Off Off Off Blinking Previous State...
.... This does not indicate a fault condition. A device might be malfunctioning or incorrectly installed. System state System board failure System board, power-supply unit, or cabling failure System board, memory, or processor failure System state BIOS state 1 BIOS state 2 BIOS state 3 BIOS state...execute and the LED register is working correctly. The computer is receiving electrical power, and power supplied by the power supply is in a low-power state, either S1 or S3. Table 15. Power LED summary Amber LED state White LED state Off Off Off Blinking Previous State...
Service Manual
Page 73
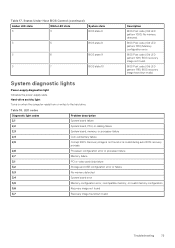
... activity light Turns on when the computer reads from or writes to the hard drive. Recovery image is not found . System diagnostic lights Power-supply diagnostics light Indicates the power-supply state. States Under Host BIOS Control (continued) Amber LED state White LED state 3 3 System state BIOS state 6 3 5 BIOS state 8 3 6 BIOS state 9 3 7 BIOS state...
... activity light Turns on when the computer reads from or writes to the hard drive. Recovery image is not found . System diagnostic lights Power-supply diagnostics light Indicates the power-supply state. States Under Host BIOS Control (continued) Amber LED state White LED state 3 3 System state BIOS state 6 3 5 BIOS state 8 3 6 BIOS state 9 3 7 BIOS state...

Setup and Specifications
Page 10
.... PCI-Express x16 (graphics) slot 1 Connect a PCI-Express graphics card to enhance the capabilities of your computer. 3. Power-supply diagnostics light Indicates the power-supply state. 10 Views of a dual-width graphics card if it is installed in the PCI-Express x16 slot. 4. USB ...3.1 Gen 1 (Type-C) port Connect to enhance the capabilities of your computer. 6. Expansion slot for dual-width graphics card This expansion slot seats the bottom half of G5 5090...
.... PCI-Express x16 (graphics) slot 1 Connect a PCI-Express graphics card to enhance the capabilities of your computer. 3. Power-supply diagnostics light Indicates the power-supply state. 10 Views of a dual-width graphics card if it is installed in the PCI-Express x16 slot. 4. USB ...3.1 Gen 1 (Type-C) port Connect to enhance the capabilities of your computer. 6. Expansion slot for dual-width graphics card This expansion slot seats the bottom half of G5 5090...


