Dell Printer Setup Guide
Page 28
... manuels Asistencia del producto y manuales Contact Dell Prenez contact avec Dell. All other jurisdictions. Printed in the United States and/or other marks and names mentioned herein may be trademarks of Dell Inc. All rights reserved. in Vietnam ...regulador y tipo Printer model Modèle d'imprimante Modelo de impresora dell.com/support dell.com/support/manuals dell.com/printer dell.com/contactdell dell.com/regulatory_compliance E310dw E310dw Copyright © 2015 Dell Inc. and international copyright and intellectual property laws. Dell™ and the Dell logo are trademarks...
... manuels Asistencia del producto y manuales Contact Dell Prenez contact avec Dell. All other jurisdictions. Printed in the United States and/or other marks and names mentioned herein may be trademarks of Dell Inc. All rights reserved. in Vietnam ...regulador y tipo Printer model Modèle d'imprimante Modelo de impresora dell.com/support dell.com/support/manuals dell.com/printer dell.com/contactdell dell.com/regulatory_compliance E310dw E310dw Copyright © 2015 Dell Inc. and international copyright and intellectual property laws. Dell™ and the Dell logo are trademarks...
Dell Printer Users Guide
Page 3
... 19 Front View and Back View 19 Control Panel Overview 20 Status Messages 21 Dell Printer Hub (Windows®Only 21 2 Paper Handling 25 Load and Print using the Paper Tray 25 Load and Print Paper in the Manual Feed Slot ...
... 19 Front View and Back View 19 Control Panel Overview 20 Status Messages 21 Dell Printer Hub (Windows®Only 21 2 Paper Handling 25 Load and Print using the Paper Tray 25 Load and Print Paper in the Manual Feed Slot ...

Dell Printer Users Guide
Page 5
... Computer (Macintosh 74 Adjust Print Settings from the Machine's Control Panel 75 Cancel a Print Job 75 Change 2-Sided Print Settings 75 Auto Continue 76 Restore Printer Factory Settings 76 Print the Internal Font List 76 Print a List of Printer Settings 76 Test Print 76 4 Network 79 Get Started 79 Contents 5
... Computer (Macintosh 74 Adjust Print Settings from the Machine's Control Panel 75 Cancel a Print Job 75 Change 2-Sided Print Settings 75 Auto Continue 76 Restore Printer Factory Settings 76 Print the Internal Font List 76 Print a List of Printer Settings 76 Test Print 76 4 Network 79 Get Started 79 Contents 5
Dell Printer Users Guide
Page 8
... 127 Error Messages 128 Where Can I Find My Dell Machine's Network Settings 128 I Cannot Complete the Wireless Network Setup Configuration 128 My Dell Machine is Not Found on the Network During Printer Driver Installation 130 My Dell Machine Cannot Print over the Network 131 My Dell Machine is not Found on the Network Even After...
... 127 Error Messages 128 Where Can I Find My Dell Machine's Network Settings 128 I Cannot Complete the Wireless Network Setup Configuration 128 My Dell Machine is Not Found on the Network During Printer Driver Installation 130 My Dell Machine Cannot Print over the Network 131 My Dell Machine is not Found on the Network Even After...
Dell Printer Users Guide
Page 10
... Machine the Settings 177 Settings Table 177 9 Specifications 185 General Specifications 185 Print Media Specifications 186 Printer Specifications 186 Interface Specifications 187 Supported Protocols and Security Features 187 Computer Requirements Specifications 187 10 How to Enter Text ...on Your Dell Machine 191 11 Environmental Information Notice 195 Appendix 199 Dell™ Technical Support Policy 199 Warranty and Return Policy 200 Contacting Dell 200 Additional documents for Important Information 201 SAFETY: Laser Printer 201 SAFETY: General Safety 201 ...
... Machine the Settings 177 Settings Table 177 9 Specifications 185 General Specifications 185 Print Media Specifications 186 Printer Specifications 186 Interface Specifications 187 Supported Protocols and Security Features 187 Computer Requirements Specifications 187 10 How to Enter Text ...on Your Dell Machine 191 11 Environmental Information Notice 195 Appendix 199 Dell™ Technical Support Policy 199 Warranty and Return Policy 200 Contacting Dell 200 Additional documents for Important Information 201 SAFETY: Laser Printer 201 SAFETY: General Safety 201 ...

Dell Printer Users Guide
Page 17
Introduction to Your Dell Machine 19 Front View and Back View 19 Control Panel Overview 20 Status Messages 21 Dell Printer Hub (Windows®Only 21 17
Introduction to Your Dell Machine 19 Front View and Back View 19 Control Panel Overview 20 Status Messages 21 Dell Printer Hub (Windows®Only 21 17

Dell Printer Users Guide
Page 19
Paper tray 6. AC power connector 10. Manual feed slot 4. Back cover (Face-up output tray) 9. Face-down output tray 8. Front cover 7. Network port Introduction to Your Dell Machine • Front View and Back View • Control Panel Overview • Status Messages • Dell Printer Hub (Windows®Only) Front View and Back View 1 1. USB port 11. Manual feed paper guide 3. Manual feed slot cover 5. Control panel 2. Introduction to Your Dell Machine 19
Paper tray 6. AC power connector 10. Manual feed slot 4. Back cover (Face-up output tray) 9. Face-down output tray 8. Front cover 7. Network port Introduction to Your Dell Machine • Front View and Back View • Control Panel Overview • Status Messages • Dell Printer Hub (Windows®Only) Front View and Back View 1 1. USB port 11. Manual feed paper guide 3. Manual feed slot cover 5. Control panel 2. Introduction to Your Dell Machine 19
Dell Printer Users Guide
Page 21
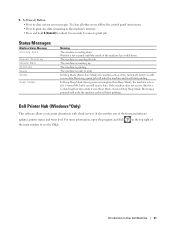
... is printing. Receiving a print job will wake the machine and it can still receive data. on the top right of the firmware/software updates, printer status and toner level. The machine is warming up. In Sleep Mode (Power Save Mode), the machine acts as if it is turned off ,... but it will start printing. Dell Printer Hub (Windows®Only) This software allows you of Introduction to clear certain error messages. To clear all other errors, follow the control panel instructions...
... is printing. Receiving a print job will wake the machine and it can still receive data. on the top right of the firmware/software updates, printer status and toner level. The machine is warming up. In Sleep Mode (Power Save Mode), the machine acts as if it is turned off ,... but it will start printing. Dell Printer Hub (Windows®Only) This software allows you of Introduction to clear certain error messages. To clear all other errors, follow the control panel instructions...

Dell Printer Users Guide
Page 39
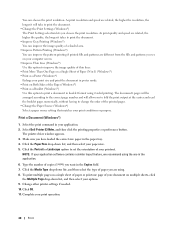
...any printing operation, confirm the following: • Make sure you have installed the printer driver. • The instructions for printer driver are using the Windows®Firewall and you installed the printer driver from the CD-ROM, the necessary firewall settings have already been set. If...being printed on the selected media type. • Change the Resolution (Windows®) Print 39 Since the XPS printer driver is installed as the default printer driver for your computer is physically secure. Firewall (Windows®) If your software or contact the software manufacturer.
...any printing operation, confirm the following: • Make sure you have installed the printer driver. • The instructions for printer driver are using the Windows®Firewall and you installed the printer driver from the CD-ROM, the necessary firewall settings have already been set. If...being printed on the selected media type. • Change the Resolution (Windows®) Print 39 Since the XPS printer driver is installed as the default printer driver for your computer is physically secure. Firewall (Windows®) If your software or contact the software manufacturer.
Dell Printer Users Guide
Page 40
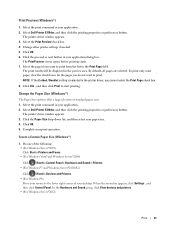
... area. • Improve Pattern Printing (Windows®) You can choose the print resolution. Select the print command in the application. 6. The printer driver window appears. 3. NOTE: If your application software contains a similar layout feature, we recommend using . 8. Click the Media Type drop-down...As print quality and speed are using the one page of your document on Both Sides of your print operation. 40 Print Select Dell Printer E310dw, and then click the printing properties or preferences button. Print a Document (Windows®) 1. Click the Portrait or Landscape option to...
... area. • Improve Pattern Printing (Windows®) You can choose the print resolution. Select the print command in the application. 6. The printer driver window appears. 3. NOTE: If your application software contains a similar layout feature, we recommend using . 8. Click the Media Type drop-down...As print quality and speed are using the one page of your document on Both Sides of your print operation. 40 Print Select Dell Printer E310dw, and then click the printing properties or preferences button. Print a Document (Windows®) 1. Click the Portrait or Landscape option to...
Dell Printer Users Guide
Page 41
... will be displayed in your desktop. Create a Custom Paper Size (Windows®) 1. The printer driver window appears. 3. Select the print command in the preview area. Change the Paper Size (Windows®) The Paper Size options offer a large selection of your application. 2. Select Dell Printer E310dw, and then click the printing properties or preferences button.
... will be displayed in your desktop. Create a Custom Paper Size (Windows®) 1. The printer driver window appears. 3. Select the print command in the preview area. Change the Paper Size (Windows®) The Paper Size options offer a large selection of your application. 2. Select Dell Printer E310dw, and then click the printing properties or preferences button.
Dell Printer Users Guide
Page 42
...click the Printing Preferences... Right-click the Dell Printer E310dw icon, and then select Printer properties. Specify the Width and Height values. 7. Click OK. 10. NOTE: If your printer driver. 3. In the Hardware group, click View devices and printers. • (For Windows Server®2012... Panel. NOTE: To change the printer port, click the Ports tab. 4. In the Hardware group, click View devices and printers. 2. Click the Paper Size drop-down list, and then select User Defined. 5. Click OK. 9. Select Dell Printer E310dw, and then click the printing properties...
...click the Printing Preferences... Right-click the Dell Printer E310dw icon, and then select Printer properties. Specify the Width and Height values. 7. Click OK. 10. NOTE: If your printer driver. 3. In the Hardware group, click View devices and printers. • (For Windows Server®2012... Panel. NOTE: To change the printer port, click the Ports tab. 4. In the Hardware group, click View devices and printers. 2. Click the Paper Size drop-down list, and then select User Defined. 5. Click OK. 9. Select Dell Printer E310dw, and then click the printing properties...
Dell Printer Users Guide
Page 43
...Windows®) To achieve the best print results, the media being printed on the selected media type. 1. Select Dell Printer E310dw, and then click the printing properties or preferences button. The printer driver window appears. 3. Thick Env. Complete your print operation. Print Multiple Copies of copies (1-999) you want...copies chosen before the next page of copies you have selected Thick Paper , and toner smudges while printing. Select Dell Printer E310dw, and then click the printing properties or preferences button. Select the print command in your application. 2.
...Windows®) To achieve the best print results, the media being printed on the selected media type. 1. Select Dell Printer E310dw, and then click the printing properties or preferences button. The printer driver window appears. 3. Thick Env. Complete your print operation. Print Multiple Copies of copies (1-999) you want...copies chosen before the next page of copies you have selected Thick Paper , and toner smudges while printing. Select Dell Printer E310dw, and then click the printing properties or preferences button. Select the print command in your application. 2.
Dell Printer Users Guide
Page 44
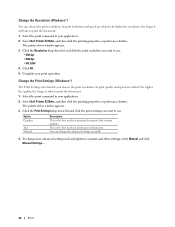
Select Dell Printer E310dw, and then click the printing properties or preferences button. Click OK. 5. The printer driver window appears. 3. Change the Resolution (Windows®) You can change more advanced settings such as brightness, contrast... print resolution you choose the print resolution. To change the advanced settings manually. 4. The printer driver window appears. 3. Complete your application. 2. You can choose the print resolution. Select Dell Printer E310dw, and then click the printing properties or preferences button. Change the Print Settings (Windows®...
Select Dell Printer E310dw, and then click the printing properties or preferences button. Click OK. 5. The printer driver window appears. 3. Change the Resolution (Windows®) You can change more advanced settings such as brightness, contrast... print resolution you choose the print resolution. To change the advanced settings manually. 4. The printer driver window appears. 3. Complete your application. 2. You can choose the print resolution. Select Dell Printer E310dw, and then click the printing properties or preferences button. Change the Print Settings (Windows®...
Dell Printer Users Guide
Page 45
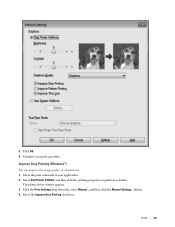
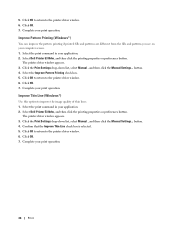
Select the print command in your print operation. button. 4. Select Dell Printer E310dw, and then click the printing properties or preferences button. Click OK. 6. The printer driver window appears. 3. Print 45 Click the Print Settings drop-down list, select Manual , and then click the Manual Settings... 5. Complete your application. 2. Improve Gray Printing (Windows®) You can improve the image quality of a shaded area. 1. Select the Improve Gray Printing check box.
Select the print command in your print operation. button. 4. Select Dell Printer E310dw, and then click the printing properties or preferences button. Click OK. 6. The printer driver window appears. 3. Print 45 Click the Print Settings drop-down list, select Manual , and then click the Manual Settings... 5. Complete your application. 2. Improve Gray Printing (Windows®) You can improve the image quality of a shaded area. 1. Select the Improve Gray Printing check box.
Dell Printer Users Guide
Page 46
... Improve Pattern Printing check box. 5. Click OK. 7. Improve Thin Line (Windows®) Use this option to the printer driver window. 6. Select Dell Printer E310dw, and then click the printing properties or preferences button. button. 4. Complete your computer screen. 1. Click the Print ...application. 2. Click OK to return to the printer driver window. 6. Confirm that the Improve Thin Line check box is selected. 5. Select Dell Printer E310dw, and then click the printing properties or preferences button. Click OK. 7. The printer driver window appears. 3. Select the print ...
... Improve Pattern Printing check box. 5. Click OK. 7. Improve Thin Line (Windows®) Use this option to the printer driver window. 6. Select Dell Printer E310dw, and then click the printing properties or preferences button. button. 4. Complete your computer screen. 1. Click the Print ...application. 2. Click OK to return to the printer driver window. 6. Confirm that the Improve Thin Line check box is selected. 5. Select Dell Printer E310dw, and then click the printing properties or preferences button. Click OK. 7. The printer driver window appears. 3. Select the print ...
Dell Printer Users Guide
Page 47
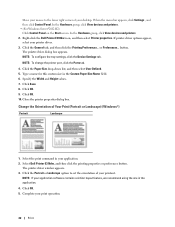
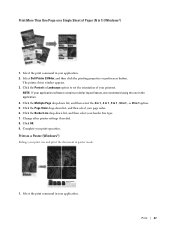
Select Dell Printer E310dw, and then click the printing properties or preferences button. Click OK. 9. Select the print command in your page.... Click the Portrait or Landscape option to set the orientation of Paper (N in poster mode. 1. NOTE: If your printout. Complete your border line type. 7. The printer driver window appears. 3. Click the Border Line drop-down list, and then select the 2 in 1 , 4 in 1 , 9 in 1 , 16 in .... 5. Select the print command in your print size and print the document in 1) (Windows®) 1. Change other printer settings if needed. 8.
Select Dell Printer E310dw, and then click the printing properties or preferences button. Click OK. 9. Select the print command in your page.... Click the Portrait or Landscape option to set the orientation of Paper (N in poster mode. 1. NOTE: If your printout. Complete your border line type. 7. The printer driver window appears. 3. Click the Border Line drop-down list, and then select the 2 in 1 , 4 in 1 , 9 in 1 , 16 in .... 5. Select the print command in your print size and print the document in 1) (Windows®) 1. Change other printer settings if needed. 8.
Dell Printer Users Guide
Page 48
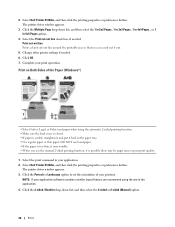
... and put it out. 5. Print on Both Sides of your application. 2. Select Dell Printer E310dw, and then click the printing properties or preferences button. The printer driver window appears. 3. Change other printer settings if needed . NOTE: If your print operation. Select the Print cut it ... option. 48 Print Select the print command in the paper tray. • Use regular paper or thin paper. Click OK. 7. 2. Select Dell Printer E310dw, and then click the printing properties or preferences button. Click the 2-sided / Booklet drop-down list, and then select the 1 in 2x2 ...
... and put it out. 5. Print on Both Sides of your application. 2. Select Dell Printer E310dw, and then click the printing properties or preferences button. The printer driver window appears. 3. Change other printer settings if needed . NOTE: If your print operation. Select the Print cut it ... option. 48 Print Select the print command in the paper tray. • Use regular paper or thin paper. Click OK. 7. 2. Select Dell Printer E310dw, and then click the printing properties or preferences button. Click the 2-sided / Booklet drop-down list, and then select the 1 in 2x2 ...

Dell Printer Users Guide
Page 49
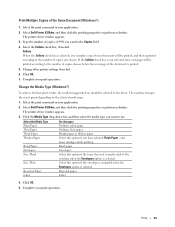
When 2-sided is selected, four types of 2-sided binding are available for each orientation: Option for certain models) 2-sided (Manual) Description Automatically prints on one of the options from the 2-sided Type menu. Then, the printer driver instructs you (with a pop-up message) to reinsert the paper. 5. Select one side of the paper. Click the 2-sided Settings button. 6. Option 2-sided (available only for Portrait Long Edge (Left) Description Long Edge (Right) Short Edge (Top) Print 49 The machine prints all the even-numbered pages on both sides of the paper first.
When 2-sided is selected, four types of 2-sided binding are available for each orientation: Option for certain models) 2-sided (Manual) Description Automatically prints on one of the options from the 2-sided Type menu. Then, the printer driver instructs you (with a pop-up message) to reinsert the paper. 5. Select one side of the paper. Click the 2-sided Settings button. 6. Option 2-sided (available only for Portrait Long Edge (Left) Description Long Edge (Right) Short Edge (Top) Print 49 The machine prints all the even-numbered pages on both sides of the paper first.

Dell Printer Users Guide
Page 50
Short Edge (Bottom) Option for binding in inches or millimeters. 8. Do one of the following: 50 Print Select the Binding Offset check box if you want to specify the offset for Landscape Long Edge (Top) Description Long Edge (Bottom) Short Edge (Right) Short Edge (Left) 7. Click OK. 10. Change other printer settings if needed. 9.
Short Edge (Bottom) Option for binding in inches or millimeters. 8. Do one of the following: 50 Print Select the Binding Offset check box if you want to specify the offset for Landscape Long Edge (Top) Description Long Edge (Bottom) Short Edge (Right) Short Edge (Left) 7. Click OK. 10. Change other printer settings if needed. 9.


