Dell Printer Setup Guide
Page 28
...èle et type réglementaire Modelo regulador y tipo Printer model Modèle d'imprimante Modelo de impresora dell.com/support dell.com/support/manuals dell.com/printer dell.com/contactdell dell.com/regulatory_compliance E310dw E310dw Copyright © 2015 Dell Inc. and international copyright and intellectual property laws. Product support and manuals Assistance produit et manuels Asistencia del...
...èle et type réglementaire Modelo regulador y tipo Printer model Modèle d'imprimante Modelo de impresora dell.com/support dell.com/support/manuals dell.com/printer dell.com/contactdell dell.com/regulatory_compliance E310dw E310dw Copyright © 2015 Dell Inc. and international copyright and intellectual property laws. Product support and manuals Assistance produit et manuels Asistencia del...
Dell Printer Users Guide
Page 40
... Printing (Windows®) You can improve the image quality of copies (1-999) you have loaded the correct size paper in the Copies field. 7. Select Dell Printer E310dw, and then click the printing properties or preferences button. Make sure you want in the paper tray. 4. Change other printer settings if needed. 10. Click...
... Printing (Windows®) You can improve the image quality of copies (1-999) you have loaded the correct size paper in the Copies field. 7. Select Dell Printer E310dw, and then click the printing properties or preferences button. Make sure you want in the paper tray. 4. Change other printer settings if needed. 10. Click...
Dell Printer Users Guide
Page 41
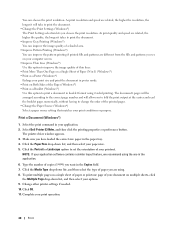
...the printer driver, you want to the lower right corner of standard paper sizes. 1. The printer driver window appears. 3. Select Dell Printer E310dw, and then click the printing properties or preferences button. Click OK. 5. Print Preview (Windows®) 1. Change the Paper Size...The printer driver window appears. 3. Click OK. 6. Complete your application. 2. Create a Custom Paper Size (Windows®) 1. Select Dell Printer E310dw, and then click the printing properties or preferences button. When the menu bar appears, click Settings , and then click Control Panel. ...
...the printer driver, you want to the lower right corner of standard paper sizes. 1. The printer driver window appears. 3. Select Dell Printer E310dw, and then click the printing properties or preferences button. Click OK. 5. Print Preview (Windows®) 1. Change the Paper Size...The printer driver window appears. 3. Click OK. 6. Complete your application. 2. Create a Custom Paper Size (Windows®) 1. Select Dell Printer E310dw, and then click the printing properties or preferences button. When the menu bar appears, click Settings , and then click Control Panel. ...
Dell Printer Users Guide
Page 42
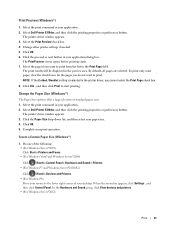
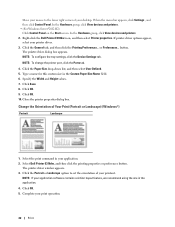
... application. 2. Click the Portrait or Landscape option to the lower right corner of Your Print (Portrait or Landscape) (Windows®) Portrait Landscape 1. Right-click the Dell Printer E310dw icon, and then select Printer properties. The printer driver dialog box appears. Select...
... application. 2. Click the Portrait or Landscape option to the lower right corner of Your Print (Portrait or Landscape) (Windows®) Portrait Landscape 1. Right-click the Dell Printer E310dw icon, and then select Printer properties. The printer driver dialog box appears. Select...
Dell Printer Users Guide
Page 43
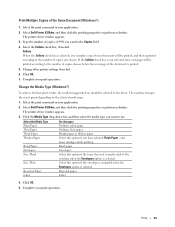
Click OK. 7. Select Dell Printer E310dw, and then click the printing properties or preferences button. Click the Media Type drop-down list, and then select the media type you want in ... to use. Change the Media Type (Windows®) To achieve the best print results, the media being printed on the selected media type. 1. Select Dell Printer E310dw, and then click the printing properties or preferences button. The printer driver window appears. 3. The machine changes the way it prints depending on should be...
Click OK. 7. Select Dell Printer E310dw, and then click the printing properties or preferences button. Click the Media Type drop-down list, and then select the media type you want in ... to use. Change the Media Type (Windows®) To achieve the best print results, the media being printed on the selected media type. 1. Select Dell Printer E310dw, and then click the printing properties or preferences button. The printer driver window appears. 3. The machine changes the way it prints depending on should be...
Dell Printer Users Guide
Page 44
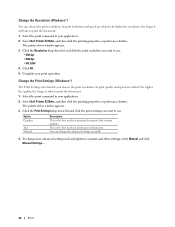
... settings manually. 4. Option Graphics Text Manual Description This is the best mode for printing documents that contain graphics. Select Dell Printer E310dw, and then click the printing properties or preferences button. Select Dell Printer E310dw, and then click the printing properties or preferences button. As print resolution and speed are related, the higher the...
... settings manually. 4. Option Graphics Text Manual Description This is the best mode for printing documents that contain graphics. Select Dell Printer E310dw, and then click the printing properties or preferences button. Select Dell Printer E310dw, and then click the printing properties or preferences button. As print resolution and speed are related, the higher the...
Dell Printer Users Guide
Page 45
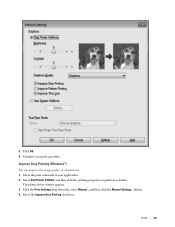
Click OK. 6. Select Dell Printer E310dw, and then click the printing properties or preferences button. Improve Gray Printing (Windows®) You can improve the image quality of a shaded area. 1. The printer driver window appears. 3. Click the Print Settings drop-down list, select Manual , and then click the Manual Settings... Complete your application. 2. Select the print command in your print operation. button. 4. Print 45 5. Select the Improve Gray Printing check box.
Click OK. 6. Select Dell Printer E310dw, and then click the printing properties or preferences button. Improve Gray Printing (Windows®) You can improve the image quality of a shaded area. 1. The printer driver window appears. 3. Click the Print Settings drop-down list, select Manual , and then click the Manual Settings... Complete your application. 2. Select the print command in your print operation. button. 4. Print 45 5. Select the Improve Gray Printing check box.
Dell Printer Users Guide
Page 46
... Thin Line (Windows®) Use this option to the printer driver window. 6. Complete your application. 2. Click OK to return to the printer driver window. 6. Select Dell Printer E310dw, and then click the printing properties or preferences button. Click OK to return to the printer driver window. 6. Select...
... Thin Line (Windows®) Use this option to the printer driver window. 6. Complete your application. 2. Click OK to return to the printer driver window. 6. Select Dell Printer E310dw, and then click the printing properties or preferences button. Click OK to return to the printer driver window. 6. Select...
Dell Printer Users Guide
Page 47
Click the Page Order drop-down list, and then select your printout. Select the print command in the application. 4. Select Dell Printer E310dw, and then click the printing properties or preferences button. The printer driver window appears. 3. Change other printer settings if needed. 8. Click the Portrait or Landscape ...
Click the Page Order drop-down list, and then select your printout. Select the print command in the application. 4. Select Dell Printer E310dw, and then click the printing properties or preferences button. The printer driver window appears. 3. Change other printer settings if needed. 8. Click the Portrait or Landscape ...
Dell Printer Users Guide
Page 48
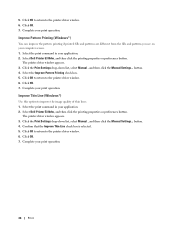
...;) • Select Letter, Legal, or Folio sized paper when using the one in 5x5 Pages option. 4. Click OK. 7. Select Dell Printer E310dw, and then click the printing properties or preferences button. Select Dell Printer E310dw, and then click the printing properties or preferences button. Print cut-out line Prints a faint cut-out line around...
...;) • Select Letter, Legal, or Folio sized paper when using the one in 5x5 Pages option. 4. Click OK. 7. Select Dell Printer E310dw, and then click the printing properties or preferences button. Select Dell Printer E310dw, and then click the printing properties or preferences button. Print cut-out line Prints a faint cut-out line around...
Dell Printer Users Guide
Page 51
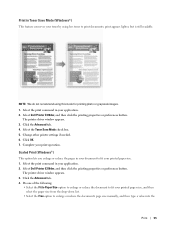
... printing, click OK again, and then complete your application software contains a similar layout feature, we recommend using the one in the application. Print 51 Select Dell Printer E310dw, and then click the printing properties or preferences button. The document's pages will allow you use bond paper. • If the paper is possible...
... printing, click OK again, and then complete your application software contains a similar layout feature, we recommend using the one in the application. Print 51 Select Dell Printer E310dw, and then click the printing properties or preferences button. The document's pages will allow you use bond paper. • If the paper is possible...
Dell Printer Users Guide
Page 53
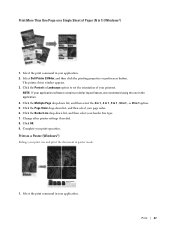
... OK again, and then complete your paper tray from the Booklet Printing Method menu. Click OK. 11. Change other printer settings if needed. 10. Select Dell Printer E310dw, and then click the printing properties or preferences button. Bottom Binding 7. Print 53
... OK again, and then complete your paper tray from the Booklet Printing Method menu. Click OK. 11. Change other printer settings if needed. 10. Select Dell Printer E310dw, and then click the printing properties or preferences button. Bottom Binding 7. Print 53
Dell Printer Users Guide
Page 55
... for printing photo or grayscale images. 1. Click OK. 7. print appears lighter, but is still readable. Select Dell Printer E310dw, and then click the printing properties or preferences button. The printer driver window appears. 3. Select Dell Printer E310dw, and then click the printing properties or preferences button. NOTE: We do not recommend using less toner...
... for printing photo or grayscale images. 1. Click OK. 7. print appears lighter, but is still readable. Select Dell Printer E310dw, and then click the printing properties or preferences button. The printer driver window appears. 3. Select Dell Printer E310dw, and then click the printing properties or preferences button. NOTE: We do not recommend using less toner...

Dell Printer Users Guide
Page 56
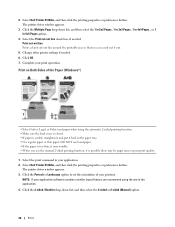
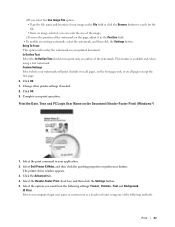
... File option in your document as a watermark. Select the print command in the Watermark Style field. Change other printer settings if needed . 6. Select Dell Printer E310dw, and then click the printing properties or preferences button. Reverse Print (Windows®) This setting rotates the printed image 180 degrees. 1. Select the Reverse.... 3. Click OK. 7. Click the Advanced tab. 4. b.Type a title for the watermark in your Text , Font , Style , Size and Darkness options. 56 Print Select Dell Printer E310dw, and then click the printing properties or preferences button.
... File option in your document as a watermark. Select the print command in the Watermark Style field. Change other printer settings if needed . 6. Select Dell Printer E310dw, and then click the printing properties or preferences button. Reverse Print (Windows®) This setting rotates the printed image 180 degrees. 1. Select the Reverse.... 3. Click OK. 7. Click the Advanced tab. 4. b.Type a title for the watermark in your Text , Font , Style , Size and Darkness options. 56 Print Select Dell Printer E310dw, and then click the printing properties or preferences button.
Dell Printer Users Guide
Page 57
... the Settings button. 5. Change other printer settings if needed. 8. Custom Settings Select where your watermark will overlay the watermark on your printed document. Select Dell Printer E310dw, and then click the printing properties or preferences button. Complete your application. 2. Select the options you want from the following methods: Print 57 Click the...
... the Settings button. 5. Change other printer settings if needed. 8. Custom Settings Select where your watermark will overlay the watermark on your printed document. Select Dell Printer E310dw, and then click the printing properties or preferences button. Complete your application. 2. Select the options you want from the following methods: Print 57 Click the...
Dell Printer Users Guide
Page 58
... insert the macro onto a specific page. Send the macro data to the bottom of the page. Click OK. 11. Click OK. 9. Select Dell Printer E310dw, and then click the printing properties or preferences button. Click the Macro Settings button. 7. Enter Macro ID and Macro Name you want to use.... Booklet has been selected, the Page setting in Insert Macro Command is printed as an overlay on the print job you want . 1. Select Dell Printer E310dw, and then click the printing properties or preferences button. 58 Print Use a Macro from Your Computer (Windows®) If you have stored the...
... insert the macro onto a specific page. Send the macro data to the bottom of the page. Click OK. 11. Click OK. 9. Select Dell Printer E310dw, and then click the printing properties or preferences button. Click the Macro Settings button. 7. Enter Macro ID and Macro Name you want to use.... Booklet has been selected, the Page setting in Insert Macro Command is printed as an overlay on the print job you want . 1. Select Dell Printer E310dw, and then click the printing properties or preferences button. 58 Print Use a Macro from Your Computer (Windows®) If you have stored the...

Dell Printer Users Guide
Page 59
Clear the Printer Default check box. 7. Click OK. 10. .Complete your print operation. Thin setting. Select Dell Printer E310dw, and then click the printing properties or preferences button. Click the Other Print Options button. 5. Click OK. 9. Click OK to return to the right or ...
Clear the Printer Default check box. 7. Click OK. 10. .Complete your print operation. Thin setting. Select Dell Printer E310dw, and then click the printing properties or preferences button. Click the Other Print Options button. 5. Click OK. 9. Click OK to return to the right or ...

Dell Printer Users Guide
Page 60
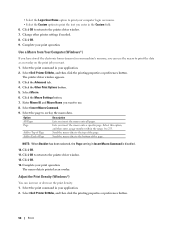
...active: • Use Watermark • Header-Footer Print • N in 1 or 1 in NxN Pages in your application. 2. Select Dell Printer E310dw, and then click the printing properties or preferences button. Click the Other Print Options button. 60 Print The printer driver window appears. 3. ... Select the print command in the printer driver to automatically detect blank pages and exclude them from the Printer Function list. 6. Select Dell Printer E310dw, and then click the printing properties or preferences button. Click OK to return to paper. 1. Thick setting. Improve Toner Fixing (...
...active: • Use Watermark • Header-Footer Print • N in 1 or 1 in NxN Pages in your application. 2. Select Dell Printer E310dw, and then click the printing properties or preferences button. Click the Other Print Options button. 60 Print The printer driver window appears. 3. ... Select the print command in the printer driver to automatically detect blank pages and exclude them from the Printer Function list. 6. Select Dell Printer E310dw, and then click the printing properties or preferences button. Click OK to return to paper. 1. Thick setting. Improve Toner Fixing (...

Dell Printer Users Guide
Page 61
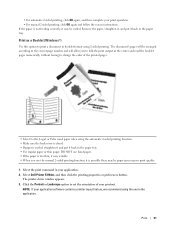
.... 9. Save an Archive File of the Print Data (Windows®) Print data can be saved as a PDF file to the printer driver window. 8. Select Dell Printer E310dw, and then click the printing properties or preferences button. Click the Other Print Options button. 5. Select the Print Archive check box. 7. Click OK to return...
.... 9. Save an Archive File of the Print Data (Windows®) Print data can be saved as a PDF file to the printer driver window. 8. Select Dell Printer E310dw, and then click the printing properties or preferences button. Click the Other Print Options button. 5. Select the Print Archive check box. 7. Click OK to return...

Dell Printer Users Guide
Page 104
... the printer icon. Install Drivers Used for Printing for Printing (Windows Vista®, Windows®7 and Windows®8) 1. NOTE: The Web Services Name for the Dell machine is your model name and the MAC Address (Ethernet Address) of your mouse over the machine name to display the machine's information. 6. NOTE: (Windows...
... the printer icon. Install Drivers Used for Printing for Printing (Windows Vista®, Windows®7 and Windows®8) 1. NOTE: The Web Services Name for the Dell machine is your model name and the MAC Address (Ethernet Address) of your mouse over the machine name to display the machine's information. 6. NOTE: (Windows...


