User's Guide
Page 1
... forbidden. Other trademarks and trade names may be used in this text: Dell and the DELL logo are trademarks of Dell Inc; Microsoft a n d Windows are either potential damage to hardware or loss of data and tells you make better use of Dell Inc. Dell™ E2011H Monitor User's Guide About Your Monitor Setting Up the Monitor Operating the Monitor Troubleshooting Appendix Notes, Notices, and Cautions NOTE: A NOTE...
... forbidden. Other trademarks and trade names may be used in this text: Dell and the DELL logo are trademarks of Dell Inc; Microsoft a n d Windows are either potential damage to hardware or loss of data and tells you make better use of Dell Inc. Dell™ E2011H Monitor User's Guide About Your Monitor Setting Up the Monitor Operating the Monitor Troubleshooting Appendix Notes, Notices, and Cautions NOTE: A NOTE...
User's Guide
Page 2
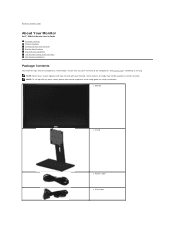
... below. l Monitor l Stand l Power Cable l VGA Cable Ensure that you have received all the components and contact Dell if something is missing. Back to Contents Page About Your Monitor Dell™ E2011H Monitor User's Guide Package Contents Product Features Identifying Parts and Controls Monitor Specifications Plug and Play Capability LCD Monitor Quality and Pixel Policy Maintenance Guidelines Package Contents Your monitor ships with any other stand, please refer to the respective stand setup guide for setup instructions. NOTE...
... below. l Monitor l Stand l Power Cable l VGA Cable Ensure that you have received all the components and contact Dell if something is missing. Back to Contents Page About Your Monitor Dell™ E2011H Monitor User's Guide Package Contents Product Features Identifying Parts and Controls Monitor Specifications Plug and Play Capability LCD Monitor Quality and Pixel Policy Maintenance Guidelines Package Contents Your monitor ships with any other stand, please refer to the respective stand setup guide for setup instructions. NOTE...
User's Guide
Page 3
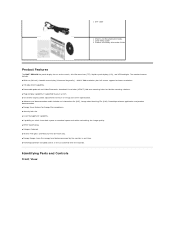
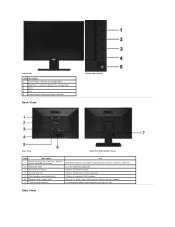
... Free for Panel only. ■ Energy Gauge shows the energy level being consumed by the monitor in real time. ■ PowerNap Software included (comes in the CD attached with the monitor). l DVI Cable l Drivers and Documentation media l Quick Setup Guide l Product and Safety Information Guide Product Features The Dell™ E2011H flat panel display has an active matrix, thin-film transistor (TFT), liquid crystal display (LCD), and LED backlight. Identifying Parts and Controls Front View...
... Free for Panel only. ■ Energy Gauge shows the energy level being consumed by the monitor in real time. ■ PowerNap Software included (comes in the CD attached with the monitor). l DVI Cable l Drivers and Documentation media l Quick Setup Guide l Product and Safety Information Guide Product Features The Dell™ E2011H flat panel display has an active matrix, thin-film transistor (TFT), liquid crystal display (LCD), and LED backlight. Identifying Parts and Controls Front View...
User's Guide
Page 4
... regulatory approvals. 3 Stand release button Release stand from monitor. 4 Security lock slot Secures monitor with monitor stand Label Description Use VESA mounting holes (100 mm x 100 mm - 1 Wall mount monitor using VESA-compatible wall mount kit (100 mm x 100 mm). Front View Label Description 1 Preset Modes (default, but configurable) 2 Brightness & Contrast (default, but configurable) 3 Menu 4 Exit 5 Power button (with power light indicator) Back View Front panel controls Back view Back view with security cable lock. 5 Dell Soundbar mounting brackets Attaches...
... regulatory approvals. 3 Stand release button Release stand from monitor. 4 Security lock slot Secures monitor with monitor stand Label Description Use VESA mounting holes (100 mm x 100 mm - 1 Wall mount monitor using VESA-compatible wall mount kit (100 mm x 100 mm). Front View Label Description 1 Preset Modes (default, but configurable) 2 Brightness & Contrast (default, but configurable) 3 Menu 4 Exit 5 Power button (with power light indicator) Back View Front panel controls Back view Back view with security cable lock. 5 Dell Soundbar mounting brackets Attaches...
User's Guide
Page 5
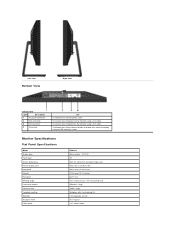
To disable the stand release button and lock the stand assembly using a DVI cable. Monitor Specifications Flat Panel Specifications Model Screen type Panel type Screen dimensions Preset display area Horizontal Vertical Pixel pitch Viewing angle Luminance output Contrast ratio Faceplate coating Backlight Response Time Color depth E2011H Active matrix - Left view Bottom View Right view Bottom view Label Description 1 AC power connector 2 VGA connector 3 DVI connector 4 Stand lock Use To connect the monitor power cable. TFT LCD TN 50.8 cm (20-inches viewable image size) 462...
To disable the stand release button and lock the stand assembly using a DVI cable. Monitor Specifications Flat Panel Specifications Model Screen type Panel type Screen dimensions Preset display area Horizontal Vertical Pixel pitch Viewing angle Luminance output Contrast ratio Faceplate coating Backlight Response Time Color depth E2011H Active matrix - Left view Bottom View Right view Bottom view Label Description 1 AC power connector 2 VGA connector 3 DVI connector 4 Stand lock Use To connect the monitor power cable. TFT LCD TN 50.8 cm (20-inches viewable image size) 462...

User's Guide
Page 6
... Model Connector type Signal cable type Dimensions (with stand) Height Width Depth Dimensions (without stand) Height E2011H 15-pin D-subminiature, blue connector; Resolution Specifications Model Horizontal scan range Vertical scan range Maximum resolution E2011H 30 kHz to 83 kHz (automatic) 56 Hz to the monitor 362.50 mm (14.27 inches) 481.51 mm (18.96 inches) 151.70 mm (5.97 inches) 287.61 mm (11.32 inches) DVI-D, white connector Digital: Detachable, DVI-D, Solid pins, shipped detached from the monitor Analog...
... Model Connector type Signal cable type Dimensions (with stand) Height Width Depth Dimensions (without stand) Height E2011H 15-pin D-subminiature, blue connector; Resolution Specifications Model Horizontal scan range Vertical scan range Maximum resolution E2011H 30 kHz to 83 kHz (automatic) 56 Hz to the monitor 362.50 mm (14.27 inches) 481.51 mm (18.96 inches) 151.70 mm (5.97 inches) 287.61 mm (11.32 inches) DVI-D, white connector Digital: Detachable, DVI-D, Solid pins, shipped detached from the monitor Analog...
User's Guide
Page 7
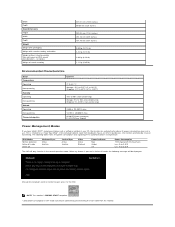
... automatic power saving feature: VESA Modes Normal operation Active-off mode Switch off Horizontal Sync Active Inactive - Video Active Blanked - When any button is ENERGY STAR®-compliant. * Zero power consumption in OFF mode can automatically reduce its power consumption when not in use. NOTE: This monitor is pressed in Active-off mode, the following table shows the power consumption and signaling of stand assembly 481.51 mm (18.96 inches...
... automatic power saving feature: VESA Modes Normal operation Active-off mode Switch off Horizontal Sync Active Inactive - Video Active Blanked - When any button is ENERGY STAR®-compliant. * Zero power consumption in OFF mode can automatically reduce its power consumption when not in use. NOTE: This monitor is pressed in Active-off mode, the following table shows the power consumption and signaling of stand assembly 481.51 mm (18.96 inches...
User's Guide
Page 9
... to clean the monitor. l To help maintain the best image quality on your monitor, use benzene, thinner, ammonia, abrasive cleaners, or compressed air. Do not use a dynamically changing screen saver and turn off with water. Plug and Play Capability You can select different settings if desired. The monitor automatically provides the computer system with care as some detergents leave a milky film on Dell Monitor Quality and Pixel...
... to clean the monitor. l To help maintain the best image quality on your monitor, use benzene, thinner, ammonia, abrasive cleaners, or compressed air. Do not use a dynamically changing screen saver and turn off with water. Plug and Play Capability You can select different settings if desired. The monitor automatically provides the computer system with care as some detergents leave a milky film on Dell Monitor Quality and Pixel...
User's Guide
Page 10
..., and/or mechanical hazards. Only) and Other Regulatory Information Contacting Dell WARNING: Safety Instructions WARNING: Use of the page. 3. NOTE: If you do not have an active Internet connection, you . Dell provides several online and telephone-based support and service options. Back to Contents Page Appendix Dell™ E2011H Monitor User's Guide Safety Instructions FCC Notice (U.S. For information on your area. FCC Notices (U.S. Availability...
..., and/or mechanical hazards. Only) and Other Regulatory Information Contacting Dell WARNING: Safety Instructions WARNING: Use of the page. 3. NOTE: If you do not have an active Internet connection, you . Dell provides several online and telephone-based support and service options. Back to Contents Page Appendix Dell™ E2011H Monitor User's Guide Safety Instructions FCC Notice (U.S. For information on your area. FCC Notices (U.S. Availability...
User's Guide
Page 13
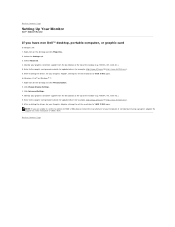
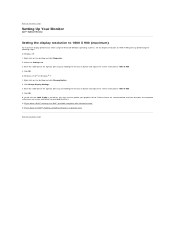
... on the desktop and click Personalization. 2. Click Change Display Settings. 3. NVIDIA, ATI, Intel etc.). 5. Select Advanced. 4. Identify your computer or consider purchasing a graphics adapter that will support the video resolution of 1600 x 900. In Windows Vista® or Windows® 7: 1. Back to Contents Page Setting Up Your Monitor Dell™ E2011H Monitor If you are unable to set the resolution to 1600 x 900, please contact the...
... on the desktop and click Personalization. 2. Click Change Display Settings. 3. NVIDIA, ATI, Intel etc.). 5. Select Advanced. 4. Identify your computer or consider purchasing a graphics adapter that will support the video resolution of 1600 x 900. In Windows Vista® or Windows® 7: 1. Back to Contents Page Setting Up Your Monitor Dell™ E2011H Monitor If you are unable to set the resolution to 1600 x 900, please contact the...
User's Guide
Page 14
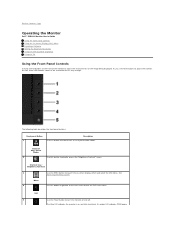
... they change. See Accessing the Menu System. Exit 5 Use the Power button to launch the on-screen display (OSD) and select the OSD Menu. Shortcut key / Brightness/Contrast 3 Use the MENU button to turn the monitor on and off. The Blue LED indicates the monitor is on and fully functional. Back to Contents Page Operating the Monitor Dell™ E2011H Monitor User's Guide Using the Front Panel Controls Using the On-Screen Display (OSD) Menu PowerNap Software Setting the Maximum Resolution Using the Dell Soundbar (Optional) Using the Tilt Using the Front Panel Controls Use...
... they change. See Accessing the Menu System. Exit 5 Use the Power button to launch the on-screen display (OSD) and select the OSD Menu. Shortcut key / Brightness/Contrast 3 Use the MENU button to turn the monitor on and off. The Blue LED indicates the monitor is on and fully functional. Back to Contents Page Operating the Monitor Dell™ E2011H Monitor User's Guide Using the Front Panel Controls Using the On-Screen Display (OSD) Menu PowerNap Software Setting the Maximum Resolution Using the Dell Soundbar (Optional) Using the Tilt Using the Front Panel Controls Use...
User's Guide
Page 20
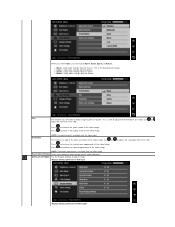
Auto Adjustment allows the monitor to self-adjust to the current input: NOTE: In most cases, Auto Adjust produces the best image for use with your particular setup. NOTE: AUTO ADJUST option is necessary. The Contrast function adjusts the degree of difference between darkness and lightness on startup, the Auto Adjustment function optimizes the display settings for your configuration. The following dialog appears on a black screen as the monitor automatically adjusts to the incoming video signal. Contrast AUTO ADJUST Adjust Brightness first, and...
Auto Adjustment allows the monitor to self-adjust to the current input: NOTE: In most cases, Auto Adjust produces the best image for use with your particular setup. NOTE: AUTO ADJUST option is necessary. The Contrast function adjusts the degree of difference between darkness and lightness on startup, the Auto Adjustment function optimizes the display settings for your configuration. The following dialog appears on a black screen as the monitor automatically adjusts to the incoming video signal. Contrast AUTO ADJUST Adjust Brightness first, and...
User's Guide
Page 21
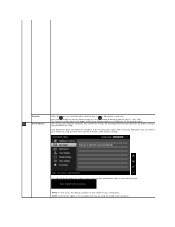
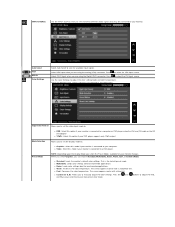
... using the analog (VGA) connector. Select VGA input when you to your monitor. l RGB: Select this mode if your own preset color mode. When you select Graphics, you can choose Standard, Multimedia, Game, Warm, Cool, or Custom (RGB): l Standard: Loads the monitor's default color settings. l Multimedia: Loads color settings ideal for available input signals. INPUT SOURCE Use the INPUT SOURCE menu to select between different video signals that may be connected to adjust the color setting mode and color temperature. Press to adjust the Red, Green, and Blue...
... using the analog (VGA) connector. Select VGA input when you to your monitor. l RGB: Select this mode if your own preset color mode. When you select Graphics, you can choose Standard, Multimedia, Game, Warm, Cool, or Custom (RGB): l Standard: Loads the monitor's default color settings. l Multimedia: Loads color settings ideal for available input signals. INPUT SOURCE Use the INPUT SOURCE menu to select between different video signals that may be connected to adjust the color setting mode and color temperature. Press to adjust the Red, Green, and Blue...
User's Guide
Page 22
... can shift color of video image to adjust image. Press Press to the factory defaults. Reset Color Settings Resets your monitor's color settings to increase the green shade of the video image. Use or adjust the hue from '0' to adjust the desired flesh tone color. NOTE: Saturation adjustment is the default preset mode. l Sports: Loads color settings ideal for games. to '100' . Display Setting submenu for video input. When you select Video, you can adjust the color saturation of the video image. l Game: Loads color settings ideal...
... can shift color of video image to adjust image. Press Press to the factory defaults. Reset Color Settings Resets your monitor's color settings to increase the green shade of the video image. Use or adjust the hue from '0' to adjust the desired flesh tone color. NOTE: Saturation adjustment is the default preset mode. l Sports: Loads color settings ideal for games. to '100' . Display Setting submenu for video input. When you select Video, you can adjust the color saturation of the video image. l Game: Loads color settings ideal...
User's Guide
Page 24
... -mouse button and adjust the screen resolution to 1600 X 900. 4. Move the slider-bar to the right by performing the following steps: In Windows XP: 1. Please choose the scenario below that best describes the computer system you are using the Microsoft Windows operating systems, set the display resolution to 1600 X 900. 4. Back to Contents Page Setting Up Your Monitor Dell™ E2011H Monitor Setting the display resolution to 1600...
... -mouse button and adjust the screen resolution to 1600 X 900. 4. Move the slider-bar to the right by performing the following steps: In Windows XP: 1. Please choose the scenario below that best describes the computer system you are using the Microsoft Windows operating systems, set the display resolution to 1600 X 900. 4. Back to Contents Page Setting Up Your Monitor Dell™ E2011H Monitor Setting the display resolution to 1600...

User's Guide
Page 25
...used in this document to refer to either trademarks or registered trademarks of Dell Inc; Microsoft a n d Windows are either the entities claiming the marks and names or their products. Model E2011Ht, E2011Hc. is a registered trademark of Intel Corporation in this text: Dell and the DELL.... Dell™ E2011H Monitor User Guide Setting the display resolution to 1600 X 900 (maximum) Information in trademarks and trade names other than its own. has determined that this document is subject to change without the written permission of Advanced Micro Devices, Inc. Dell Inc...
...used in this document to refer to either trademarks or registered trademarks of Dell Inc; Microsoft a n d Windows are either the entities claiming the marks and names or their products. Model E2011Ht, E2011Hc. is a registered trademark of Intel Corporation in this text: Dell and the DELL.... Dell™ E2011H Monitor User Guide Setting the display resolution to 1600 X 900 (maximum) Information in trademarks and trade names other than its own. has determined that this document is subject to change without the written permission of Advanced Micro Devices, Inc. Dell Inc...
User's Guide
Page 26
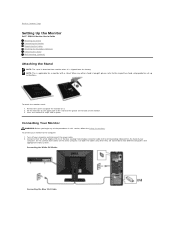
... video systems. Connecting the White DVI Cable Connecting the Blue VGA Cable Connect either the white (digital DVI-D) or the blue (analog VGA) display connector cable to two different computers with a stand. To attach the monitor stand: 1. Press the stand till it . 2. NOTE: This is shipped from monitor when it is applicable for set up instructions. Back to Contents Page Setting Up the Monitor Dell™ E2011H Monitor User's Guide Attaching the Stand Connecting the Monitor Organizing the Cables Attaching the Soundbar (Optional) Removing the Stand Wall Mounting (Optional...
... video systems. Connecting the White DVI Cable Connecting the Blue VGA Cable Connect either the white (digital DVI-D) or the blue (analog VGA) display connector cable to two different computers with a stand. To attach the monitor stand: 1. Press the stand till it . 2. NOTE: This is shipped from monitor when it is applicable for set up instructions. Back to Contents Page Setting Up the Monitor Dell™ E2011H Monitor User's Guide Attaching the Stand Connecting the Monitor Organizing the Cables Attaching the Soundbar (Optional) Removing the Stand Wall Mounting (Optional...
User's Guide
Page 29
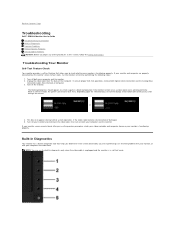
... the screen. Turn on the monitor. Turn off both Digital (white connector) and the Analog (blue connector) cables from the back of the procedures in this section, follow the Safety Instructions Troubleshooting Your Monitor Self-Test Feature Check Your monitor provides a self-test feature that allows you to Contents Page Troubleshooting Dell™ E2011H Monitor User's Guide Troubleshooting Your Monitor Built-in Diagnostics Common Problems Product Specific Problems Dell Soundbar Problems CAUTION: Before you are properly connected but the monitor screen remains...
... the screen. Turn on the monitor. Turn off both Digital (white connector) and the Analog (blue connector) cables from the back of the procedures in this section, follow the Safety Instructions Troubleshooting Your Monitor Self-Test Feature Check Your monitor provides a self-test feature that allows you to Contents Page Troubleshooting Dell™ E2011H Monitor User's Guide Troubleshooting Your Monitor Built-in Diagnostics Common Problems Product Specific Problems Dell Soundbar Problems CAUTION: Before you are properly connected but the monitor screen remains...
User's Guide
Page 30
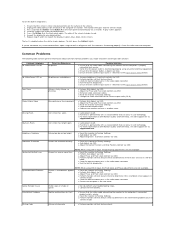
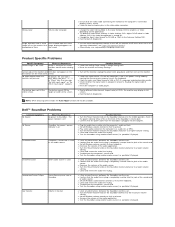
... The monitor then goes into the self-test mode. 3. The color of the computer or monitor. The test is clean (no brightness l Increase brightness & contrast controls via the Input Source Select button. Check the video card and computer. l Verify that the correct input source is functioning properly. l Eliminate video extension cables. l Check environmental factors. l For more information on the front panel again. l Auto Adjust via OSD. Synchronization Problems NOTE: When using DVI-D input, the positioning adjustments are not available. l Reset the monitor to red. 6. l Check...
... The monitor then goes into the self-test mode. 3. The color of the computer or monitor. The test is clean (no brightness l Increase brightness & contrast controls via the Input Source Select button. Check the video card and computer. l Verify that the correct input source is functioning properly. l Eliminate video extension cables. l Check environmental factors. l For more information on the front panel again. l Auto Adjust via OSD. Synchronization Problems NOTE: When using DVI-D input, the positioning adjustments are not available. l Reset the monitor to red. 6. l Check...
User's Guide
Page 31
... Windows volume controls to a lower volume setting. l Check for more information, see Power Management Modes). l Try different Color Preset Settings in the video cable connector. l Run the built-in Image Setting OSD l Reset the monitor to VGA or DVI-D is completely inserted into the jack of time the screen l Ensure that the power cable from the Soundbar is blue. The picture cannot fill the height or width of DVDs, the monitor may display in plug. l Turn off the monitor, unplug the power cord, plug...
... Windows volume controls to a lower volume setting. l Check for more information, see Power Management Modes). l Try different Color Preset Settings in the video cable connector. l Run the built-in Image Setting OSD l Reset the monitor to VGA or DVI-D is completely inserted into the jack of time the screen l Ensure that the power cable from the Soundbar is blue. The picture cannot fill the height or width of DVDs, the monitor may display in plug. l Turn off the monitor, unplug the power cord, plug...


