Owner's Manual
Page 1
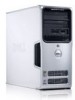
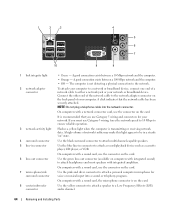
Dell™ Dimension™ 5150/E510 Owner's Manual Service Tag cover latch release CD or DVD eject button CD or DVD activity light FlexBay for optional floppy drive or Media Card Reader microphone connector headphone connector diagnostic lights hard-drive activity light power button/ power activity light USB 2.0 connectors (2) power connector sound connectors (integrated) (5) VGA video connector (integrated) network adapter USB 2.0 connectors (5) Model DCSM card slots for PCI Express x16 (1), PCI (2), PCI Express x1 (1) www.dell.com | support.dell.com
Dell™ Dimension™ 5150/E510 Owner's Manual Service Tag cover latch release CD or DVD eject button CD or DVD activity light FlexBay for optional floppy drive or Media Card Reader microphone connector headphone connector diagnostic lights hard-drive activity light power button/ power activity light USB 2.0 connectors (2) power connector sound connectors (integrated) (5) VGA video connector (integrated) network adapter USB 2.0 connectors (5) Model DCSM card slots for PCI Express x16 (1), PCI (2), PCI Express x1 (1) www.dell.com | support.dell.com
Owner's Manual
Page 6
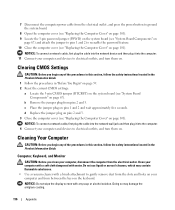
... the Drive Panel 80 Removing the Drive-Panel Insert 81 Replacing the Drive-Panel Insert 82 Replacing the Drive Panel 82 Drives 83 IDE Drive Addressing 83 Connecting Drive Cables 84 Drive Interface Connectors 84 Power Cable Connector 84 Connecting and Disconnecting Drive Cables 85 Hard Drive 85 Removing a Hard Drive 85 Installing a Hard Drive 86 Adding a Second Hard Drive 88 Floppy Drive 89 Removing a Floppy Drive 89 Installing a Floppy Drive 91 Media Card Reader 93 Removing a Media Card Reader 93 Installing a Media Card Reader 95 CD/DVD Drive 96 Removing a CD/DVD Drive 96...
... the Drive Panel 80 Removing the Drive-Panel Insert 81 Replacing the Drive-Panel Insert 82 Replacing the Drive Panel 82 Drives 83 IDE Drive Addressing 83 Connecting Drive Cables 84 Drive Interface Connectors 84 Power Cable Connector 84 Connecting and Disconnecting Drive Cables 85 Hard Drive 85 Removing a Hard Drive 85 Installing a Hard Drive 86 Adding a Second Hard Drive 88 Floppy Drive 89 Removing a Floppy Drive 89 Installing a Floppy Drive 91 Media Card Reader 93 Removing a Media Card Reader 93 Installing a Media Card Reader 95 CD/DVD Drive 96 Removing a CD/DVD Drive 96...
Owner's Manual
Page 11
... problem. 4 Follow the instructions on the screen. DSS is necessary for Dell™ 3.5-inch USB floppy drives, Intel® Pentium® M processors, optical drives, and USB devices. To download Desktop System Software: 1 Go to support.dell.com and click Downloads. 2 Enter your Service Tag or product model. 3 In the Download Category drop-down menu, click All. 4 Select the operating system and operating system language for your configuration. The software automatically detects your computer and operating system and installs...
... problem. 4 Follow the instructions on the screen. DSS is necessary for Dell™ 3.5-inch USB floppy drives, Intel® Pentium® M processors, optical drives, and USB devices. To download Desktop System Software: 1 Go to support.dell.com and click Downloads. 2 Enter your Service Tag or product model. 3 In the Download Category drop-down menu, click All. 4 Select the operating system and operating system language for your configuration. The software automatically detects your computer and operating system and installs...
Owner's Manual
Page 18
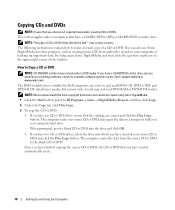
... by country. The following instructions explain how to make an exact copy of CD or DVD drives offered by Dell™ may not read DVD-RAM or DVD-R DL media. NOTE: Most commercial DVDs have copyright protection and cannot be copied using Sonic DigitalMedia. 1 Click the Start button, point to computers that the settings are correct and click the Disc Copy button. This section applies only...
... by country. The following instructions explain how to make an exact copy of CD or DVD drives offered by Dell™ may not read DVD-RAM or DVD-R DL media. NOTE: Most commercial DVDs have copyright protection and cannot be copied using Sonic DigitalMedia. 1 Click the Start button, point to computers that the settings are correct and click the Disc Copy button. This section applies only...

Owner's Manual
Page 21
... a graphics card that have VGA connectors, you how to connect either two monitors (each with a VGA connector), one monitor with a DVI connector, or a TV. xD-Picture Card and SmartMedia (SMC) CompactFlash Type I and II (CF I/II) and MicroDrive Card Memory Stick (MS/MS Pro) SecureDigital Card (SD)/ MultiMediaCard (MMC) To use the Media Card Reader: 1 Check the media or card to connect and enable your monitors. The instructions tell you must have the optional DVI adapter. NOTICE...
... a graphics card that have VGA connectors, you how to connect either two monitors (each with a VGA connector), one monitor with a DVI connector, or a TV. xD-Picture Card and SmartMedia (SMC) CompactFlash Type I and II (CF I/II) and MicroDrive Card Memory Stick (MS/MS Pro) SecureDigital Card (SD)/ MultiMediaCard (MMC) To use the Media Card Reader: 1 Check the media or card to connect and enable your monitors. The instructions tell you must have the optional DVI adapter. NOTICE...
Owner's Manual
Page 39
... Start button, click Control Panel, and then click Printers and Other Hardware. 2 Click Mouse. 3 Try adjusting the settings. IF YOU EXPERIENCE OTHER MEMORY PROBLEMS - • Reseat the memory modules (see "Installing Memory" on page 69) to ensure that your computer is successfully communicating with the memory. • Ensure that you begin any of memory supported by your computer, see "Memory" on page 103. • Run the Dell Diagnostics (see "Installing Memory...
... Start button, click Control Panel, and then click Printers and Other Hardware. 2 Click Mouse. 3 Try adjusting the settings. IF YOU EXPERIENCE OTHER MEMORY PROBLEMS - • Reseat the memory modules (see "Installing Memory" on page 69) to ensure that your computer is successfully communicating with the memory. • Ensure that you begin any of memory supported by your computer, see "Memory" on page 103. • Run the Dell Diagnostics (see "Installing Memory...

Owner's Manual
Page 52
... Hardware tab. 5 Click Device Manager. 6 Right-click the device for Dell™ computers. If an exclamation point is the source of your computer after you install or update a driver, use System Restore to the operating state that existed before you may need to replace the driver with a [!]) on your problem and, if necessary, update the driver. Windows XP 1 Click the Start button and click Control Panel. 2 Under Pick a Category, click Performance and Maintenance...
... Hardware tab. 5 Click Device Manager. 6 Right-click the device for Dell™ computers. If an exclamation point is the source of your computer after you install or update a driver, use System Restore to the operating state that existed before you may need to replace the driver with a [!]) on your problem and, if necessary, update the driver. Windows XP 1 Click the Start button and click Control Panel. 2 Under Pick a Category, click Performance and Maintenance...
Owner's Manual
Page 53
... your hard drive, click the Start button and right-click My Computer. 2 Click Properties. 3 Click the Hardware tab and click Device Manager. 4 Double-click the type of device for which you previously extracted the driver files. 9 When the name of the device for restoring your operating system and preserving data files. • Dell PC Restore by Symantec restores your operating system problem. Troubleshooting Tools 53 Restoring Your Operating System You can use...
... your hard drive, click the Start button and right-click My Computer. 2 Click Properties. 3 Click the Hardware tab and click Device Manager. 4 Double-click the type of device for which you previously extracted the driver files. 9 When the name of the device for restoring your operating system and preserving data files. • Dell PC Restore by Symantec restores your operating system problem. Troubleshooting Tools 53 Restoring Your Operating System You can use...
Owner's Manual
Page 54
... if you set your Dell™ computer to the Windows Classic view. The Select a Restore Point screen provides a calendar that restore point is unsuccessful, then use Device Driver Rollback (see and select restore points. If a calendar date has only one restore point, then that allows you install a device driver, use System Restore. System Restore does not monitor your computer. Restoring the Computer to an Earlier Operating State If problems occur after...
... if you set your Dell™ computer to the Windows Classic view. The Select a Restore Point screen provides a calendar that restore point is unsuccessful, then use Device Driver Rollback (see and select restore points. If a calendar date has only one restore point, then that allows you install a device driver, use System Restore. System Restore does not monitor your computer. Restoring the Computer to an Earlier Operating State If problems occur after...
Owner's Manual
Page 64
...-out connector (available on the card. NOTE: Do not plug a telephone cable into a sound or telephony program. It is on the card. A click indicates that you must use the connector on computers with integrated sound) to ensure reliable operation. A good connection exists between a 100-Mbps network and the computer. • Off - A high volume of a network cable to a Low Frequency Effects (LFE) audio channel. 64 Removing and Installing Parts
...-out connector (available on the card. NOTE: Do not plug a telephone cable into a sound or telephony program. It is on the card. A click indicates that you must use the connector on computers with integrated sound) to ensure reliable operation. A good connection exists between a 100-Mbps network and the computer. • Off - A high volume of a network cable to a Low Frequency Effects (LFE) audio channel. 64 Removing and Installing Parts

Owner's Manual
Page 75
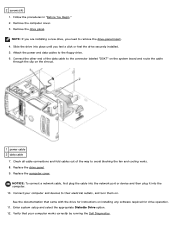
... the cards. If you installed an add-in network adapter and want to disable the integrated network adapter: a Enter system setup (see "System Setup" on page 107), select Integrated NIC, and then change the setting to pivot the door open position. 3 If you installed a sound card: a Enter system setup (see "Contacting Dell" on page 120). NOTICE: To connect a network cable, first plug the cable into the network device and then plug it into the computer. 10 Replace the computer cover...
... the cards. If you installed an add-in network adapter and want to disable the integrated network adapter: a Enter system setup (see "System Setup" on page 107), select Integrated NIC, and then change the setting to pivot the door open position. 3 If you installed a sound card: a Enter system setup (see "Contacting Dell" on page 120). NOTICE: To connect a network cable, first plug the cable into the network device and then plug it into the computer. 10 Replace the computer cover...
Owner's Manual
Page 76
... operating system. If you are replacing a card, remove the current driver for an illustration of the card retention door). 76 Removing and Installing Parts If you are installing or replacing a PCI card, see "Installing a PCI Card" on page 107), select Integrated NIC, and then change the setting to On. 7 If you removed a sound card: a Enter system setup (see "System Setup" on page 107), select Audio Controller, and then change the setting to On. b Connect external audio devices to the audio connectors on the back panel...
... operating system. If you are replacing a card, remove the current driver for an illustration of the card retention door). 76 Removing and Installing Parts If you are installing or replacing a PCI card, see "Installing a PCI Card" on page 107), select Integrated NIC, and then change the setting to On. 7 If you removed a sound card: a Enter system setup (see "System Setup" on page 107), select Audio Controller, and then change the setting to On. b Connect external audio devices to the audio connectors on the back panel...

Owner's Manual
Page 79
... in network adapter and want to disable the integrated network adapter: a Enter system setup (see "System Setup" on page 107), select Audio Controller, and then change the setting to electrical outlets, and then turn them on. 13 If you need a filler bracket, contact Dell (see "Installing a PCI Card" on the card retention door from the operating system. NOTICE: To connect a network cable, first plug the cable into the computer. 7 Replace the computer cover, reconnect the computer and devices...
... in network adapter and want to disable the integrated network adapter: a Enter system setup (see "System Setup" on page 107), select Audio Controller, and then change the setting to electrical outlets, and then turn them on. 13 If you need a filler bracket, contact Dell (see "Installing a PCI Card" on the card retention door from the operating system. NOTICE: To connect a network cable, first plug the cable into the computer. 7 Replace the computer cover, reconnect the computer and devices...
Owner's Manual
Page 100
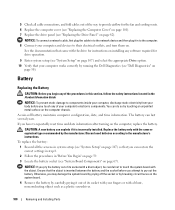
... turning on the computer chassis. Otherwise, you pry the battery out of your computer and devices to provide airflow for drive operation. 9 Enter system setup (see "System Setup" on page 107) and select the appropriate Drive option. 10 Verify that the object is incorrectly installed. Battery Replacing the Battery CAUTION: Before you have to the manufacturer's instructions. on the system board. 4 Remove the battery by running the Dell Diagnostics (see "Replacing the Drive Panel...
... turning on the computer chassis. Otherwise, you pry the battery out of your computer and devices to provide airflow for drive operation. 9 Enter system setup (see "System Setup" on page 107) and select the appropriate Drive option. 10 Verify that the object is incorrectly installed. Battery Replacing the Battery CAUTION: Before you have to the manufacturer's instructions. on the system board. 4 Remove the battery by running the Dell Diagnostics (see "Replacing the Drive Panel...
Owner's Manual
Page 111
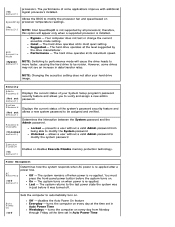
... hard drive to modify the System password • Unlocked - NOTE: SpeedStep is installed. • Bypass - The hard drive operates at the level suggested by all processors; The performance of some drives may not see an increase in data transfer rates. Allows the BIOS to modify the system password Enables or disables Execute Disable memory protection technology. NOTE: Changing the acoustics setting does not alter your System Setup program's password...
... hard drive to modify the System password • Unlocked - NOTE: SpeedStep is installed. • Bypass - The hard drive operates at the level suggested by all processors; The performance of some drives may not see an increase in data transfer rates. Allows the BIOS to modify the system password Enables or disables Execute Disable memory protection technology. NOTE: Changing the acoustics setting does not alter your System Setup program's password...
Owner's Manual
Page 116
... and devices to electrical outlets, and turn them on. NOTICE: To connect a network cable, first plug the cable into the network wall jack and then plug it into the computer. 4 Connect your computer and from the electrical outlet, and press the power button to ground the system board. 8 Open the computer cover (see "Replacing the Computer Cover" on page 101). 9 Locate the 3-pin password jumper (PSWD) on the system board (see "System Board...
... and devices to electrical outlets, and turn them on. NOTICE: To connect a network cable, first plug the cable into the network wall jack and then plug it into the computer. 4 Connect your computer and from the electrical outlet, and press the power button to ground the system board. 8 Open the computer cover (see "Replacing the Computer Cover" on page 101). 9 Locate the 3-pin password jumper (PSWD) on the system board (see "System Board...
Owner's Manual
Page 141
... connecting, 13 problems, 41 setting up, 13 USB, 13 problems battery, 31 blue screen, 37 CD drive, 32 CD-RW drive, 33 computer crashes, 36-37 computer stops responding, 36-37 problems (continued) Dell Diagnostics, 50 diagnostic lights, 47 drives, 32 DVD drive, 32 e-mail, 33 error messages, 34 general, 36 hard drive, 33 Internet, 33 keyboard, 36 Media Card Reader, 35 memory, 38 modem, 33 monitor is blank, 44 monitor is hard to read, 45 mouse, 39 network, 40 power, 40 power light...
... connecting, 13 problems, 41 setting up, 13 USB, 13 problems battery, 31 blue screen, 37 CD drive, 32 CD-RW drive, 33 computer crashes, 36-37 computer stops responding, 36-37 problems (continued) Dell Diagnostics, 50 diagnostic lights, 47 drives, 32 DVD drive, 32 e-mail, 33 error messages, 34 general, 36 hard drive, 33 Internet, 33 keyboard, 36 Media Card Reader, 35 memory, 38 modem, 33 monitor is blank, 44 monitor is hard to read, 45 mouse, 39 network, 40 power, 40 power light...

Service Manual
Page 25
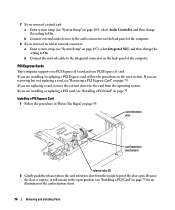
If you are removing but not replacing a card, see "Installing a PCI Card." NOTICE: To connect a network cable, first plug the cable into the network port or device and then plug it will remain in the next section. Remove the card's driver from the operating system. Enter system setup, select Audio Controller, and then change the setting to the audio connectors on . 7. Connect external audio devices to On. If you are installing or replacing a PCI Express card, follow the procedures in the open . Installing a PCI Express Card 1. Gently push the release...
If you are removing but not replacing a card, see "Installing a PCI Card." NOTICE: To connect a network cable, first plug the cable into the network port or device and then plug it will remain in the next section. Remove the card's driver from the operating system. Enter system setup, select Audio Controller, and then change the setting to the audio connectors on . 7. Connect external audio devices to On. If you are installing or replacing a PCI Express card, follow the procedures in the open . Installing a PCI Express Card 1. Gently push the release...
Service Manual
Page 41
... until you need to the floppy drive. 6. See the documentation that your computer and devices to their electrical outlets, and turn them on installing any software required for instructions on . Follow the procedures in "Before You Begin." 2. Remove the computer cover. 3. Remove the drive panel. Replace the computer cover. Enter system setup and select the appropriate Diskette Drive option. 12. 2 screws (4) 1. Connect your computer works correctly by running the Dell Diagnostics. Connect the other...
... until you need to the floppy drive. 6. See the documentation that your computer and devices to their electrical outlets, and turn them on installing any software required for instructions on . Follow the procedures in "Before You Begin." 2. Remove the computer cover. 3. Remove the drive panel. Replace the computer cover. Enter system setup and select the appropriate Diskette Drive option. 12. 2 screws (4) 1. Connect your computer works correctly by running the Dell Diagnostics. Connect the other...
Service Manual
Page 68
... all processors; NOTE: Changing the acoustics setting does not alter your System Setup program's password security feature and allows you to be assigned and verified. Power Management Determines how the system responds when AC power is installed. Off - The performance of your hard drive image. therefore, this option will cause the drive heads to move faster, causing the hard drive to verify and assign a new admin password. The hard drive operates...
... all processors; NOTE: Changing the acoustics setting does not alter your System Setup program's password security feature and allows you to be assigned and verified. Power Management Determines how the system responds when AC power is installed. Off - The performance of your hard drive image. therefore, this option will cause the drive heads to move faster, causing the hard drive to verify and assign a new admin password. The hard drive operates...


