

Owner's Manual
Page 1
Dell™ Dimension™ 3100/E310 Owner's Manual Service Tag CD or DVD activity light FlexBay for optional floppy drive or Media Card Reader headphone connector diagnostic lights 1234 CD or DVD eject button USB 2.0 connectors (2) hard drive activity light power button cover latch release card slots for PCI (2), PCI Express x1 (1) power connector sound-card connectors USB 2.0 connectors (4) network adapter VGA video connector (integrated) Model DCSM www.dell.com | support.dell.com
Dell™ Dimension™ 3100/E310 Owner's Manual Service Tag CD or DVD activity light FlexBay for optional floppy drive or Media Card Reader headphone connector diagnostic lights 1234 CD or DVD eject button USB 2.0 connectors (2) hard drive activity light power button cover latch release card slots for PCI (2), PCI Express x1 (1) power connector sound-card connectors USB 2.0 connectors (4) network adapter VGA video connector (integrated) Model DCSM www.dell.com | support.dell.com
Owner's Manual
Page 7
System Setup Options 104 Boot Sequence 107 Clearing Forgotten Passwords 109 Clearing CMOS Settings 110 Cleaning Your Computer 110 Computer, Keyboard, and Monitor 110 Mouse 111 Floppy Drive 111 CDs and DVDs 111 Dell Technical Support Policy (U.S. Only 112 Class A 113 Class B 113 FCC Identification Information 114 Contacting Dell 114 Index 133 Contents 7 Only 112 Definition of "Dell-Installed" Software and Peripherals 112 Definition of "Third-Party" Software and Peripherals 112 FCC Notices (U.S.
System Setup Options 104 Boot Sequence 107 Clearing Forgotten Passwords 109 Clearing CMOS Settings 110 Cleaning Your Computer 110 Computer, Keyboard, and Monitor 110 Mouse 111 Floppy Drive 111 CDs and DVDs 111 Dell Technical Support Policy (U.S. Only 112 Class A 113 Class B 113 FCC Identification Information 114 Contacting Dell 114 Index 133 Contents 7 Only 112 Definition of "Dell-Installed" Software and Peripherals 112 Definition of "Third-Party" Software and Peripherals 112 FCC Notices (U.S.

Owner's Manual
Page 10
... System Software. 10 Finding Information If you should also reinstall the DSS utility. To download Desktop System Software: 1 Go to support.dell.com and click Downloads. 2 Enter your Service Tag or product model. 3 In the Download Category drop-down menu, click All. ...4 Select the operating system and operating system language for components, such premier.support. support.dell.com from technicians, and online courses, frequently asked NOTE: Select your computer, and click Submit. 5 Under Select a Device, scroll to view the...
... System Software. 10 Finding Information If you should also reinstall the DSS utility. To download Desktop System Software: 1 Go to support.dell.com and click Downloads. 2 Enter your Service Tag or product model. 3 In the Download Category drop-down menu, click All. ...4 Select the operating system and operating system language for components, such premier.support. support.dell.com from technicians, and online courses, frequently asked NOTE: Select your computer, and click Submit. 5 Under Select a Device, scroll to view the...
Owner's Manual
Page 11
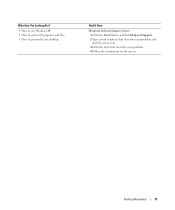
Finding Information 11 What Are You Looking For? • How to use Windows XP • How to work with programs and files • How to personalize my desktop Find It Here Windows Help and Support Center 1 Click the Start button and click Help and Support. 2 Type a word or phrase that describes your problem and click the arrow icon. 3 Click the topic that describes your problem. 4 Follow the instructions on the screen.
Finding Information 11 What Are You Looking For? • How to use Windows XP • How to work with programs and files • How to personalize my desktop Find It Here Windows Help and Support Center 1 Click the Start button and click Help and Support. 2 Type a word or phrase that describes your problem and click the arrow icon. 3 Click the topic that describes your problem. 4 Follow the instructions on the screen.

Owner's Manual
Page 18
... cannot write to computers that you experience recording problems, check for other purposes, such as creating music CDs from audio files stored on the Sonic support website at www.sonic.com. Copying CDs and DVDs NOTE: Ensure that have a CD-RW, DVD+/-RW, or CD-RW/DVD (combo) drive. NOTE... pixels. 5 Click the drop-down menu under Color quality, and then click Medium (16 bit). 6 Click OK. The DVD-writable drives installed in Dell™ computers can also use Sonic DigitalMedia for available software patches on your computer or backing up important data. You can write to and read...
... cannot write to computers that you experience recording problems, check for other purposes, such as creating music CDs from audio files stored on the Sonic support website at www.sonic.com. Copying CDs and DVDs NOTE: Ensure that have a CD-RW, DVD+/-RW, or CD-RW/DVD (combo) drive. NOTE... pixels. 5 Click the drop-down menu under Color quality, and then click Medium (16 bit). 6 Click OK. The DVD-writable drives installed in Dell™ computers can also use Sonic DigitalMedia for available software patches on your computer or backing up important data. You can write to and read...
Owner's Manual
Page 20
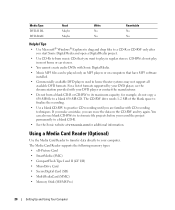
... test music file projects before you can be played only on MP3 players or on the CD-RW and try again. The Media Card Reader supports the following memory types: • xD-Picture Card • SmartMedia (SMC) • CompactFlash Type I and II (CF I/II) • MicroDrive Card &#... MultiMediaCard (MMC) • Memory Stick (MS/MS Pro) 20 Setting Up and Using Your Computer The CD-RW drive needs 1-2 MB of formats supported by your DVD player, see the documentation provided with CD recording techniques. Using a Media Card Reader (Optional) Use the Media Card Reader to transfer data...
... test music file projects before you can be played only on MP3 players or on the CD-RW and try again. The Media Card Reader supports the following memory types: • xD-Picture Card • SmartMedia (SMC) • CompactFlash Type I and II (CF I/II) • MicroDrive Card &#... MultiMediaCard (MMC) • Memory Stick (MS/MS Pro) 20 Setting Up and Using Your Computer The CD-RW drive needs 1-2 MB of formats supported by your DVD player, see the documentation provided with CD recording techniques. Using a Media Card Reader (Optional) Use the Media Card Reader to transfer data...

Owner's Manual
Page 25
...overview of the RAID configuration that you might have selected when you should be cleared to ensure that desire a higher level of uses, Dell offers RAID level 1 on your computer can only create a RAID configuration using a hard-drive security option available in the computer industry...Up and Using Your Computer 25 For more information on power management options: 1 Click the Start button and click Help and Support. 2 In the Help and Support window, click Performance and maintenance. 3 In the Performance and maintenance window, click Conserving power on the other drive. This ...
...overview of the RAID configuration that you might have selected when you should be cleared to ensure that desire a higher level of uses, Dell offers RAID level 1 on your computer can only create a RAID configuration using a hard-drive security option available in the computer industry...Up and Using Your Computer 25 For more information on power management options: 1 Click the Start button and click Help and Support. 2 In the Help and Support window, click Performance and maintenance. 3 In the Performance and maintenance window, click Conserving power on the other drive. This ...
Owner's Manual
Page 30
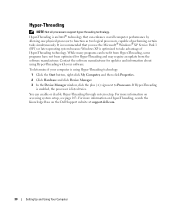
.... If Hyper-Threading is enabled, the processor is using Hyper-Threading with your computer is listed twice. For more information on the Dell Support website at support.dell.com. 30 Setting Up and Using Your Computer To determine if your software. It is recommended that you use the Microsoft® ...XP is an Intel® technology that can enable or disable Hyper-Threading through system setup. Hyper-Threading NOTE: Not all processors support hyper-threading technology. Hyper-Threading is optimized to function as two logical processors, capable of Hyper-Threading technology.
.... If Hyper-Threading is enabled, the processor is using Hyper-Threading with your computer is listed twice. For more information on the Dell Support website at support.dell.com. 30 Setting Up and Using Your Computer To determine if your software. It is recommended that you use the Microsoft® ...XP is an Intel® technology that can enable or disable Hyper-Threading through system setup. Hyper-Threading NOTE: Not all processors support hyper-threading technology. Hyper-Threading is optimized to function as two logical processors, capable of Hyper-Threading technology.
Owner's Manual
Page 31
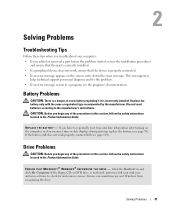
This message may help technical support personnel diagnose and fix the problem. • If an error message occurs in the Product Information Guide. Discard used batteries according to check for and ... before the problem started, review the installation procedures and ensure that the part is correctly installed. • If a peripheral device does not work properly, contact Dell (see page 95). If you begin any of a new battery exploding if it is properly connected. • If an error message appears on the computer...
This message may help technical support personnel diagnose and fix the problem. • If an error message occurs in the Product Information Guide. Discard used batteries according to check for and ... before the problem started, review the installation procedures and ensure that the part is correctly installed. • If a peripheral device does not work properly, contact Dell (see page 95). If you begin any of a new battery exploding if it is properly connected. • If an error message appears on the computer...

Owner's Manual
Page 39
... "Resolving Software and Hardware Incompatibilities" on page 53. Mouse Problems CAUTION: Before you are following the memory installation guidelines (see page 67). • Your computer supports DDR2 memory. R E I N S T A L L T H E M O U S E D R I V E R - RESTART THE COMPUTER - 1 Simultaneously press to display the Start menu. 2 Type u, press the keyboard...ensure that your computer is successfully communicating with the memory. • Ensure that you begin any of memory supported by your computer, see "Memory" on page 65. • Run the Dell Diagnostics (see "Mouse" on page 111.
... "Resolving Software and Hardware Incompatibilities" on page 53. Mouse Problems CAUTION: Before you are following the memory installation guidelines (see page 67). • Your computer supports DDR2 memory. R E I N S T A L L T H E M O U S E D R I V E R - RESTART THE COMPUTER - 1 Simultaneously press to display the Start menu. 2 Type u, press the keyboard...ensure that your computer is successfully communicating with the memory. • Ensure that you begin any of memory supported by your computer, see "Memory" on page 65. • Run the Dell Diagnostics (see "Mouse" on page 111.
Owner's Manual
Page 51
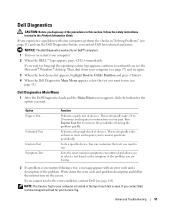
... takes an hour or more and requires you contact Dell, technical support will ask for your computer (see page 57) and try again. 3 When the boot device list appears, highlight Boot to Utility Partition and press . 4 When the Dell Diagnostics Main Menu appears, select the test you want...Express Test Extended Test Custom Test Symptom Tree Function Performs a quick test of devices. Run Express Test first to run the Dell Diagnostics before you contact Dell for your part. Tests a specific device. Lists the most common symptoms encountered and allows you to answer questions periodically. ...
... takes an hour or more and requires you contact Dell, technical support will ask for your computer (see page 57) and try again. 3 When the boot device list appears, highlight Boot to Utility Partition and press . 4 When the Dell Diagnostics Main Menu appears, select the test you want...Express Test Extended Test Custom Test Symptom Tree Function Performs a quick test of devices. Run Express Test first to run the Dell Diagnostics before you contact Dell for your part. Tests a specific device. Lists the most common symptoms encountered and allows you to answer questions periodically. ...

Owner's Manual
Page 53
.... 3 Click System. 4 In the System Properties window, click the Hardware tab. 5 Click Device Manager. 6 Right-click the device for Dell™ computers. If Device Driver Rollback does not resolve the problem, then use Windows XP Device Driver Rollback to replace the driver with a ...install drivers obtained from other sources, your computer to reinstall the driver or install a new driver. Reinstalling Drivers NOTICE: The Dell Support website at support.dell.com provides approved drivers for which the new driver was installed and click Properties. 7 Click the Drivers tab. 8 Click ...
.... 3 Click System. 4 In the System Properties window, click the Hardware tab. 5 Click Device Manager. 6 Right-click the device for Dell™ computers. If Device Driver Rollback does not resolve the problem, then use Windows XP Device Driver Rollback to replace the driver with a ...install drivers obtained from other sources, your computer to reinstall the driver or install a new driver. Reinstalling Drivers NOTICE: The Dell Support website at support.dell.com provides approved drivers for which the new driver was installed and click Properties. 7 Click the Drivers tab. 8 Click ...

Owner's Manual
Page 54
Restoring Your Operating System You can use the Hardware Troubleshooter to resolve the incompatibility. Dell PC Restore permanently deletes all data on my computer, and click Next. Resolving Software and Hardware Incompatibilities If a device is either not detected...operating state it was in when you purchased the computer. To resolve incompatibilities using the Hardware Troubleshooter: 1 Click the Start button and click Help and Support. 2 Type hardware troubleshooter in the Search field and click the arrow to start the search. 3 Click Hardware Troubleshooter in the Search Results list. 4...
Restoring Your Operating System You can use the Hardware Troubleshooter to resolve the incompatibility. Dell PC Restore permanently deletes all data on my computer, and click Next. Resolving Software and Hardware Incompatibilities If a device is either not detected...operating state it was in when you purchased the computer. To resolve incompatibilities using the Hardware Troubleshooter: 1 Click the Start button and click Help and Support. 2 Type hardware troubleshooter in the Search field and click the arrow to start the search. 3 Click Hardware Troubleshooter in the Search Results list. 4...

Owner's Manual
Page 55
... the Windows default view, so they may not work if you set your computer. Creating a Restore Point 1 Click the Start button and click Help and Support. 2 Click System Restore. 3 Follow the instructions on using a different restore point, or you prefer. 5 Click Next. NOTICE: Before you restore the computer to an ... the steps using System Restore. If that restore point is selected and click Next. 3 Click a calendar date to which you want to restore your Dell™ computer to the Windows Classic view. The Restoration Complete screen appears after you to resolve the problem.
... the Windows default view, so they may not work if you set your computer. Creating a Restore Point 1 Click the Start button and click Help and Support. 2 Click System Restore. 3 Follow the instructions on using a different restore point, or you prefer. 5 Click Next. NOTICE: Before you restore the computer to an ... the steps using System Restore. If that restore point is selected and click Next. 3 Click a calendar date to which you want to restore your Dell™ computer to the Windows Classic view. The Restoration Complete screen appears after you to resolve the problem.

Owner's Manual
Page 62
... power button to turn off the computer. Use the lights to a USB device). For more information on booting to help you access the Dell Support website or call technical support. 60 Removing and Installing Parts 5 USB 2.0 connectors (2) 6 hard-drive activity light 7 vents 8 power button 9 headphone connector 10 diagnostic lights (4) 11 Service Tag Use...
... power button to turn off the computer. Use the lights to a USB device). For more information on booting to help you access the Dell Support website or call technical support. 60 Removing and Installing Parts 5 USB 2.0 connectors (2) 6 hard-drive activity light 7 vents 8 power button 9 headphone connector 10 diagnostic lights (4) 11 Service Tag Use...

Owner's Manual
Page 64
... a telephone cable into the VGA connector on a level, protected surface to avoid scratching either a network port or your monitor has a VGA connector, plug it supports a maximum of 3 cards; 4 network adapter connector To attach your computer to a network or broadband device, connect one end of a network cable to... support the removed cover-at least 30 cm (1 ft) of desk top space. On computers with the computer cover facing up. 3 Pull back the cover ...
... a telephone cable into the VGA connector on a level, protected surface to avoid scratching either a network port or your monitor has a VGA connector, plug it supports a maximum of 3 cards; 4 network adapter connector To attach your computer to a network or broadband device, connect one end of a network cable to... support the removed cover-at least 30 cm (1 ft) of desk top space. On computers with the computer cover facing up. 3 Pull back the cover ...

Owner's Manual
Page 67
Your computer supports DDR2 memory. System Board Components processor power connector memory module connectors (1, 2) SATA connectors (SATA-0 and SATA-1) processor and heat sink connector front panel I/O connector main ... connectors Memory If your computer memory by installing an additional memory module. Removing and Installing Parts 65 For additional information on the type of memory supported by your computer, see "Specifications" on the system board, you can increase your computer only has one memory module installed on page 99.
Your computer supports DDR2 memory. System Board Components processor power connector memory module connectors (1, 2) SATA connectors (SATA-0 and SATA-1) processor and heat sink connector front panel I/O connector main ... connectors Memory If your computer memory by installing an additional memory module. Removing and Installing Parts 65 For additional information on the type of memory supported by your computer, see "Specifications" on the system board, you can increase your computer only has one memory module installed on page 99.

Owner's Manual
Page 68
... to the processor, before you install a module in the other connector. 1 2 matched pair of memory modules in DIMM connectors 1 and 2 NOTE: Memory purchased from Dell is supported. • If you install mixed pairs of matched memory size, speed, and technology. DDR2 Memory Overview DDR2 memory modules should be installed in DIMM connectors...
... to the processor, before you install a module in the other connector. 1 2 matched pair of memory modules in DIMM connectors 1 and 2 NOTE: Memory purchased from Dell is supported. • If you install mixed pairs of matched memory size, speed, and technology. DDR2 Memory Overview DDR2 memory modules should be installed in DIMM connectors...
Owner's Manual
Page 78
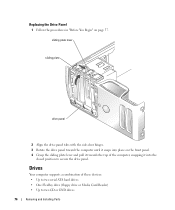
... panel toward the computer until it snaps into the closed position to two CD or DVD drives 76 Removing and Installing Parts Drives Your computer supports a combination of the computer, snapping it into place on page 57.
... panel toward the computer until it snaps into the closed position to two CD or DVD drives 76 Removing and Installing Parts Drives Your computer supports a combination of the computer, snapping it into place on page 57.

Owner's Manual
Page 101
...1 (L1) cache Level 2 (L2) cache Memory Type Memory connectors Memory capacities Minimum memory Maximum memory BIOS address Computer Information Chipset RAID support DMA channels Interrupt levels BIOS chip (NVRAM) NIC System clock Intel® Pentium® 4 with Hyper-Threading technology NOTE: Not all Pentium 4 ...processors support Hyper-Threading technology. and 533-MHz DDR2 unbuffered SDRAM two 256 MB, 512 MB, or 1 GB non-ECC 256 MB 2 GB F0000h ...
...1 (L1) cache Level 2 (L2) cache Memory Type Memory connectors Memory capacities Minimum memory Maximum memory BIOS address Computer Information Chipset RAID support DMA channels Interrupt levels BIOS chip (NVRAM) NIC System clock Intel® Pentium® 4 with Hyper-Threading technology NOTE: Not all Pentium 4 ...processors support Hyper-Threading technology. and 533-MHz DDR2 unbuffered SDRAM two 256 MB, 512 MB, or 1 GB non-ECC 256 MB 2 GB F0000h ...


