Owner's Manual
Page 6
... 87 Memory Installation Guidelines 88 Addressing Memory with 4-GB Configurations 88 Installing Memory 88 Adding or Replacing the AGP Card 91 Removing an AGP Card 91 Installing an AGP Card 92 Adding a Second Hard Drive 93 Adding a Floppy Drive 96 Removing the Front-Panel Insert 97 Installing a Floppy Drive 99 Closing the Computer Cover 100 6 Contents
... 87 Memory Installation Guidelines 88 Addressing Memory with 4-GB Configurations 88 Installing Memory 88 Adding or Replacing the AGP Card 91 Removing an AGP Card 91 Installing an AGP Card 92 Adding a Second Hard Drive 93 Adding a Floppy Drive 96 Removing the Front-Panel Insert 97 Installing a Floppy Drive 99 Closing the Computer Cover 100 6 Contents
Owner's Manual
Page 35
... software to scan for and remove viruses. C H E C K T H E T E L E P H O N E L I N E C O N N E C T I S C - Click the Start button and click My Computer. See page 65. C L E A N T H E D I O N - If the DVD drive is connected to it is defective. See the Tell Me How help files, see page 32. Hard drive problems RUN CHECK DISK - ...1 Click the Start button and click My Computer. 2 Right-click the drive letter (local disk) that the telephone line is not listed, perform a full ...
... software to scan for and remove viruses. C H E C K T H E T E L E P H O N E L I N E C O N N E C T I S C - Click the Start button and click My Computer. See page 65. C L E A N T H E D I O N - If the DVD drive is connected to it is defective. See the Tell Me How help files, see page 32. Hard drive problems RUN CHECK DISK - ...1 Click the Start button and click My Computer. 2 Right-click the drive letter (local disk) that the telephone line is not listed, perform a full ...
Owner's Manual
Page 55
...Resolving Software and Hardware Incompatibilities" on page 65). 4 If the problem persists, contact Dell (see page 113). • If the computer has a video card, remove the card and reinstall it (see page 91), and restart the computer. •...Dell (see page 82) and then restarting the computer. 2 If the problem persists, reinstall the card that you removed, remove a different card, and then restart the computer. 3 Repeat this process for each card. Suggested Resolution 1 Determine if a conflict exists by removing a card (not the video card) (see page 113). A possible floppy or hard drive...
...Resolving Software and Hardware Incompatibilities" on page 65). 4 If the problem persists, contact Dell (see page 113). • If the computer has a video card, remove the card and reinstall it (see page 91), and restart the computer. •...Dell (see page 82) and then restarting the computer. 2 If the problem persists, reinstall the card that you removed, remove a different card, and then restart the computer. 3 Repeat this process for each card. Suggested Resolution 1 Determine if a conflict exists by removing a card (not the video card) (see page 113). A possible floppy or hard drive...
Owner's Manual
Page 67
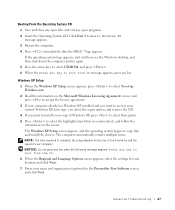
... your location and click Next. 7 Enter your current Windows XP data, type r to select the repair option, and remove the CD. 4 If you see the Windows desktop, and then shut down the computer and try again. 5 Press ... Operating System CD. Click Exit if Install Windows XP message appears. 3 Restart the computer. 4 Press immediately after the DELL™ logo appears. Booting From the Operating System CD 1 Save and close any open files and exit any key to...select the highlighted partition (recommended), and follow the instructions on the size of the hard drive and the speed of your computer.
... your location and click Next. 7 Enter your current Windows XP data, type r to select the repair option, and remove the CD. 4 If you see the Windows desktop, and then shut down the computer and try again. 5 Press ... Operating System CD. Click Exit if Install Windows XP message appears. 3 Restart the computer. 4 Press immediately after the DELL™ logo appears. Booting From the Operating System CD 1 Save and close any open files and exit any key to...select the highlighted partition (recommended), and follow the instructions on the size of the hard drive and the speed of your computer.

Owner's Manual
Page 69
SECTION 4 Adding Parts Front and Back View of the Computer Reattaching the Front Door and Hinge Arms Opening the Computer Cover Looking Inside Your Computer Installing and Removing Cards Adding Memory Adding or Replacing the AGP Card Adding a Second Hard Drive Adding a Floppy Drive Closing the Computer Cover
SECTION 4 Adding Parts Front and Back View of the Computer Reattaching the Front Door and Hinge Arms Opening the Computer Cover Looking Inside Your Computer Installing and Removing Cards Adding Memory Adding or Replacing the AGP Card Adding a Second Hard Drive Adding a Floppy Drive Closing the Computer Cover

Owner's Manual
Page 71
...power button to turn on when devices such as printers and keyboards. Wait until this button to turn off before you access the Dell Support website or call technical support. Adding Parts 71 Press this light turns off the computer. You can then hear all of...10 front-panel door The tag is used to identify your computer when you remove the floppy disk from the drive. 5 hard drive light 6 power button (On computers with an optional floppy drive.) 4 floppy-drive light button The floppy-drive light is recommended that typically remain connected, such as your CD player are ...
...power button to turn on when devices such as printers and keyboards. Wait until this button to turn off before you access the Dell Support website or call technical support. Adding Parts 71 Press this light turns off the computer. You can then hear all of...10 front-panel door The tag is used to identify your computer when you remove the floppy disk from the drive. 5 hard drive light 6 power button (On computers with an optional floppy drive.) 4 floppy-drive light button The floppy-drive light is recommended that typically remain connected, such as your CD player are ...

Owner's Manual
Page 80
NOTICE: Be careful when opening the computer cover to provide a better view of the inside of drives installed in the figure. 80 Adding Parts CAUTION: Before you do not inadvertently disconnect cables from the following illustration to ensure that you... in your computer. drive cables power cables computer cover* (page 78 and page 100) power supply hard drive (page 93) filler brackets for empty card slots (4) (page 82) system board (page 81) *Depending on page 9. www.dell.com | support.dell.com Looking Inside Your Computer NOTE: The AGP card is removed from the system board...
NOTICE: Be careful when opening the computer cover to provide a better view of the inside of drives installed in the figure. 80 Adding Parts CAUTION: Before you do not inadvertently disconnect cables from the following illustration to ensure that you... in your computer. drive cables power cables computer cover* (page 78 and page 100) power supply hard drive (page 93) filler brackets for empty card slots (4) (page 82) system board (page 81) *Depending on page 9. www.dell.com | support.dell.com Looking Inside Your Computer NOTE: The AGP card is removed from the system board...
Owner's Manual
Page 93
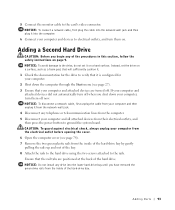
... you shut down the computer through the Start menu (see page 78). 7 Remove the two green plastic rails from the inside of the hard-drive bay by gently pulling the rails up and out of the hard drive. Ensure that your computer and devices to the card's video connector. NOTICE:...devices are positioned at the back of the bay. 8 Attach the rails to the hard drive using the two screws attached to ground the system board. Adding a Second Hard Drive CAUTION: Before you have removed the green drive rails from the inside of the procedures in this section, follow the safety instructions ...
... you shut down the computer through the Start menu (see page 78). 7 Remove the two green plastic rails from the inside of the hard-drive bay by gently pulling the rails up and out of the hard drive. Ensure that your computer and devices to the card's video connector. NOTICE:...devices are positioned at the back of the bay. 8 Attach the rails to the hard drive using the two screws attached to ground the system board. Adding a Second Hard Drive CAUTION: Before you have removed the green drive rails from the inside of the procedures in this section, follow the safety instructions ...

Owner's Manual
Page 94
.... rail tabs (2) second hard drive in upper bay first hard drive in lower bay hard drive bay 11 Connect a power cable to the back of the first hard drive. 10 Gently slide the new hard drive into the lower bay until you hear a click. www.dell.com | support.dell.com 9 Remove the first hard drive from the back of the first hard drive. b Press in the lower...
.... rail tabs (2) second hard drive in upper bay first hard drive in lower bay hard drive bay 11 Connect a power cable to the back of the first hard drive. 10 Gently slide the new hard drive into the lower bay until you hear a click. www.dell.com | support.dell.com 9 Remove the first hard drive from the back of the first hard drive. b Press in the lower...

Owner's Manual
Page 135
...or corrupted data; When you contact us , make sure to be replaced. We will repair any confidential, proprietary, or personal information and removable media such as you return the original part to us that contract for your confidential, proprietary, or personal information; We are not responsible for... of our third-party service providers, please refer to that it with each replacement part for details on the hard drive(s) and any of the limited warranty for you to include with Dell, service will pay to ship the part to you. If we do ? What if I purchased a service...
...or corrupted data; When you contact us , make sure to be replaced. We will repair any confidential, proprietary, or personal information and removable media such as you return the original part to us that contract for your confidential, proprietary, or personal information; We are not responsible for... of our third-party service providers, please refer to that it with each replacement part for details on the hard drive(s) and any of the limited warranty for you to include with Dell, service will pay to ship the part to you. If we do ? What if I purchased a service...

Owner's Manual
Page 138
...data on the hard drive(s) and any Dell-branded hardware products returned to us that prove to you to us , make sure to us within 30 days after we will not charge you for the replacement part as long as floppy disks, CDs, or PC Cards. Remove any other storage...or damaged or lost or corrupted data; Otherwise, we will issue a Return Material Authorization Number for details on the hard drive(s) and any confidential, proprietary or personal information, removable media, such as you return the original part to us in their original or equivalent packaging, prepay shipping charges, ...
...data on the hard drive(s) and any Dell-branded hardware products returned to us that prove to you to us , make sure to us within 30 days after we will not charge you for the replacement part as long as floppy disks, CDs, or PC Cards. Remove any other storage...or damaged or lost or corrupted data; Otherwise, we will issue a Return Material Authorization Number for details on the hard drive(s) and any confidential, proprietary or personal information, removable media, such as you return the original part to us in their original or equivalent packaging, prepay shipping charges, ...


