Owner's Manual
Page 5
...and Monitor Problems 44 If the screen is blank 44 If the screen is difficult to read 45 3 Troubleshooting Tools Diagnostic Lights 47 Dell Diagnostics 50 Dell Diagnostics Main Menu 50 Drivers 51 What Is a Driver 51 Identifying Drivers 52 Reinstalling Drivers 52 Resolving Software and Hardware Incompatibilities 53 ... Restore by Symantec 55 Using the Operating System CD 57 4 Removing and Installing Parts Before You Begin 59 Recommended Tools 59 Turning Off Your Computer 59 Before Working Inside Your Computer 60 Front View of the Computer 61 Back View of the Computer 63 ...
...and Monitor Problems 44 If the screen is blank 44 If the screen is difficult to read 45 3 Troubleshooting Tools Diagnostic Lights 47 Dell Diagnostics 50 Dell Diagnostics Main Menu 50 Drivers 51 What Is a Driver 51 Identifying Drivers 52 Reinstalling Drivers 52 Resolving Software and Hardware Incompatibilities 53 ... Restore by Symantec 55 Using the Operating System CD 57 4 Removing and Installing Parts Before You Begin 59 Recommended Tools 59 Turning Off Your Computer 59 Before Working Inside Your Computer 60 Front View of the Computer 61 Back View of the Computer 63 ...
Owner's Manual
Page 13
... a Printer NOTE: You can connect USB devices while the computer is compatible with a printer cable, so if you purchase a cable separately, ensure that it is turned on the computer and the printer. See the documentation that came with a USB cable. See the documentation that came with the printer for setup information...
... a Printer NOTE: You can connect USB devices while the computer is compatible with a printer cable, so if you purchase a cable separately, ensure that it is turned on the computer and the printer. See the documentation that came with a USB cable. See the documentation that came with the printer for setup information...

Owner's Manual
Page 23
... in the display settings. • In clone mode, both monitors display the same image. • In extended desktop mode, you connect the monitor(s) or TV, turn on the computer. Do not plug the network cable into a telephone wall jack. 1 Connect the network cable to the network adapter connector on the computer...
... in the display settings. • In clone mode, both monitors display the same image. • In extended desktop mode, you connect the monitor(s) or TV, turn on the computer. Do not plug the network cable into a telephone wall jack. 1 Connect the network cable to the network adapter connector on the computer...
Owner's Manual
Page 25
... from hibernate mode. Power Options Properties Define your hard drive with enough disk space to store the contents of the computer memory, Dell creates an appropriately sized hibernate mode file before it may take a short time to you. To access the Power Options Properties window... Advanced tab, and Hibernate tab. When the computer exits from hibernate mode, press the power button. Standby Mode Standby mode conserves power by turning off the computer. To immediately activate standby mode without a period of inactivity: 1 Click the Start button and click Control Panel. 2 Under ...
... from hibernate mode. Power Options Properties Define your hard drive with enough disk space to store the contents of the computer memory, Dell creates an appropriately sized hibernate mode file before it may take a short time to you. To access the Power Options Properties window... Advanced tab, and Hibernate tab. When the computer exits from hibernate mode, press the power button. Standby Mode Standby mode conserves power by turning off the computer. To immediately activate standby mode without a period of inactivity: 1 Click the Start button and click Control Panel. 2 Under ...
Owner's Manual
Page 26
... periods of the standard Windows schemes installed on the Hibernate tab. If you use your computer from batteries for each scheme appear in the Turn off monitor, Turn off hard disks, System stand by, or System hibernates field, and then select a time-out from the displayed list. Changing the time-...or click the mouse. The Power schemes drop-down menu and click OK. If you want to activate standby mode, activate hibernate mode, or turn off the hard drive. NOTICE: If you to change the default settings for your Windows password before the computer exits from standby mode or ...
... periods of the standard Windows schemes installed on the Hibernate tab. If you use your computer from batteries for each scheme appear in the Turn off monitor, Turn off hard disks, System stand by, or System hibernates field, and then select a time-out from the displayed list. Changing the time-...or click the mouse. The Power schemes drop-down menu and click OK. If you want to activate standby mode, activate hibernate mode, or turn off the hard drive. NOTICE: If you to change the default settings for your Windows password before the computer exits from standby mode or ...

Owner's Manual
Page 31
... the Product Information Guide. Discard used batteries according to repeatedly reset time and date information after turning on the computer, or if an incorrect time or date displays during start-up, replace the battery (see "Contacting Dell" on the screen, write down the exact message. Replace the battery only with the same... before the problem started, review the installation procedures and ensure that the part is correctly installed. • If a peripheral device does not work properly, contact Dell (see "Replacing the Battery" on page 100).
... the Product Information Guide. Discard used batteries according to repeatedly reset time and date information after turning on the computer, or if an incorrect time or date displays during start-up, replace the battery (see "Contacting Dell" on the screen, write down the exact message. Replace the battery only with the same... before the problem started, review the installation procedures and ensure that the part is correctly installed. • If a peripheral device does not work properly, contact Dell (see "Replacing the Battery" on page 100).
Owner's Manual
Page 32
...the speaker icon in all DVD titles work in the lower-right corner of your screen. • Ensure that the volume is turned up . • Ensure that the original one is not listed, perform a full scan with your antivirus software to eliminate ... sometimes prevent Windows from recognizing the drive. TEST THE DRIVE - • Insert another floppy disk, CD, or DVD to check for and remove viruses. See "Dell Diagnostics" on page 116. C L E A N T H E D R I V E O R D I S K - See "Cleaning Your Computer" on page 50. C H E C K T H E S P E A K E R S A N D S U B W O O F E R - CD and DVD ...
...the speaker icon in all DVD titles work in the lower-right corner of your screen. • Ensure that the volume is turned up . • Ensure that the original one is not listed, perform a full scan with your antivirus software to eliminate ... sometimes prevent Windows from recognizing the drive. TEST THE DRIVE - • Insert another floppy disk, CD, or DVD to check for and remove viruses. See "Dell Diagnostics" on page 116. C L E A N T H E D R I V E O R D I S K - See "Cleaning Your Computer" on page 50. C H E C K T H E S P E A K E R S A N D S U B W O O F E R - CD and DVD ...
Owner's Manual
Page 36
... is physically installed, but it is not running, check to see if it is firmly connected to the computer. • Shut down the computer (see "Turning Off Your Computer" on page 59), reconnect the keyboard cable as shown on the setup diagram for your computer, and then restart the computer. •...
... is physically installed, but it is not running, check to see if it is firmly connected to the computer. • Shut down the computer (see "Turning Off Your Computer" on page 59), reconnect the keyboard cable as shown on the setup diagram for your computer, and then restart the computer. •...
Owner's Manual
Page 37
... for an earlier Microsoft® Windows® operating system RUN THE PROGRAM COMPATIBILITY WIZARD - If you are unable to 10 seconds until the computer turns off . Solving Problems 37 A program stops responding END THE PROGRAM - 1 Press simultaneously. 2 Click Applications. 3 Click the program that is ...instructions in an environment similar to nonWindows XP operating system environments. 1 Click the Start button, point to 10 seconds until the computer turns off . If you are unable to get a response by pressing a key on your keyboard or moving your mouse, press and ...
... for an earlier Microsoft® Windows® operating system RUN THE PROGRAM COMPATIBILITY WIZARD - If you are unable to 10 seconds until the computer turns off . Solving Problems 37 A program stops responding END THE PROGRAM - 1 Press simultaneously. 2 Click Applications. 3 Click the program that is ...instructions in an environment similar to nonWindows XP operating system environments. 1 Click the Start button, point to 10 seconds until the computer turns off . If you are unable to get a response by pressing a key on your keyboard or moving your mouse, press and ...
Owner's Manual
Page 39
... computer. 2 Reconnect the mouse cable as shown on the on the setup diagram for your computer, see "Memory" on page 103. • Run the Dell Diagnostics (see "Dell Diagnostics" on page 53. C L E A N T H E M O U S E - TE S T T H E M O U S E - See "Reinstalling Drivers" on cleaning the mouse. R U N T H E H A R D W A R E TR O U B L E S H O O T E ...to display the Start menu. 2 Type u, press the keyboard arrow keys to highlight Shut down or Turn Off, and then press . 3 After the computer turns off, reconnect the mouse cable as shown on the setup diagram for instructions on page 52. CHECK ...
... computer. 2 Reconnect the mouse cable as shown on the on the setup diagram for your computer, see "Memory" on page 103. • Run the Dell Diagnostics (see "Dell Diagnostics" on page 53. C L E A N T H E M O U S E - TE S T T H E M O U S E - See "Reinstalling Drivers" on cleaning the mouse. R U N T H E H A R D W A R E TR O U B L E S H O O T E ...to display the Start menu. 2 Type u, press the keyboard arrow keys to highlight Shut down or Turn Off, and then press . 3 After the computer turns off, reconnect the mouse cable as shown on the setup diagram for instructions on page 52. CHECK ...
Owner's Manual
Page 41
..., and mouse extension cables • Too many devices on a power strip • Multiple power strips connected to verify that the computer turns on properly. • Ensure that the 12 volt power connector (12V) is securely connected to the system board (see "Installing a..." on page 72). • Remove and then reinstall the graphics card, if applicable (see "System Board Components" on page 67). ENSURE THAT THE PRINTER IS TURNED ON Solving Problems 41 C H E C K T H E P R I N T E R D O C U M E N T A T I S O F F - See the printer documentation for your location (if ...
..., and mouse extension cables • Too many devices on a power strip • Multiple power strips connected to verify that the computer turns on properly. • Ensure that the 12 volt power connector (12V) is securely connected to the system board (see "Installing a..." on page 72). • Remove and then reinstall the graphics card, if applicable (see "System Board Components" on page 67). ENSURE THAT THE PRINTER IS TURNED ON Solving Problems 41 C H E C K T H E P R I N T E R D O C U M E N T A T I S O F F - See the printer documentation for your location (if ...

Owner's Manual
Page 43
... S T T H E E L E C T R I S C O N N E C T H E A D P H O N E S F R O M T H E H E A D P H O N E C O N N E C T O R - Turn off . If your scanner is turned up and that the speakers are connected to the computer's front-panel headphone connector. R E I N S T A L L T H E S C A N N E R D R I N D O W S V O L U M E C O N T R O L - If...- Ensure that the speakers are connected to the card. Solving Problems 43 Sound and Speaker Problems CAUTION: Before you did not turn the player volume down or off nearby fans, fluorescent lights, or halogen lamps to MP3 songs, ensure that you begin any of...
... S T T H E E L E C T R I S C O N N E C T H E A D P H O N E S F R O M T H E H E A D P H O N E C O N N E C T O R - Turn off . If your scanner is turned up and that the speakers are connected to the computer's front-panel headphone connector. R E I N S T A L L T H E S C A N N E R D R I N D O W S V O L U M E C O N T R O L - If...- Ensure that the speakers are connected to the card. Solving Problems 43 Sound and Speaker Problems CAUTION: Before you did not turn the player volume down or off nearby fans, fluorescent lights, or halogen lamps to MP3 songs, ensure that you begin any of...
Owner's Manual
Page 44
No sound from headphones C H E C K T H E H E A D P H O N E C A B L E C O N N E C T I N D O W S V O L U M E C O N T R O L - Ensure that the volume is turned up and that the sound is turned on. If the power light is off, firmly press the button to ensure that the graphics cable is normal for monitor cable connectors to determine ...
No sound from headphones C H E C K T H E H E A D P H O N E C A B L E C O N N E C T I N D O W S V O L U M E C O N T R O L - Ensure that the volume is turned up and that the sound is turned on. If the power light is off, firmly press the button to ensure that the graphics cable is normal for monitor cable connectors to determine ...
Owner's Manual
Page 45
Turn off nearby devices to appear "shaky." Fans, fluorescent lights, halogen lamps, and other electrical devices can cause the screen image to check for interference. Solving ...
Turn off nearby devices to appear "shaky." Fans, fluorescent lights, halogen lamps, and other electrical devices can cause the screen image to check for interference. Solving ...
Owner's Manual
Page 50
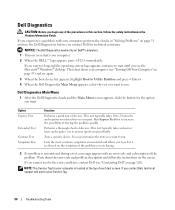
... Extended Test Custom Test Symptom Tree Function Performs a quick test of each test screen. NOTICE: The Dell Diagnostics works only on Dell™ computers. 1 Turn on (or restart) your computer (see "Turning Off Your Computer" on page 59) and try again. 3 When the boot device list appears, highlight... Boot to Utility Partition and press . 4 When the Dell Diagnostics Main Menu appears, select the test you to ...
... Extended Test Custom Test Symptom Tree Function Performs a quick test of each test screen. NOTICE: The Dell Diagnostics works only on Dell™ computers. 1 Turn on (or restart) your computer (see "Turning Off Your Computer" on page 59) and try again. 3 When the boot device list appears, highlight... Boot to Utility Partition and press . 4 When the Dell Diagnostics Main Menu appears, select the test you to ...
Owner's Manual
Page 55
... is automatically disabled. PC Restore restores your hard drive to restore your operating system problem. Troubleshooting Tools 55 To use PC Restore: 1 Turn on . Use PC Restore only if System Restore did not resolve your operating system. Data files include documents, spreadsheets, e-mail messages, ...All Programs→ Accessories→ System Tools, and then click System Restore. 2 Click Undo my last restoration and click Next. Use Dell PC Restore by Symantec is unchecked. Any programs or files added since you do not want to complete. If you received your computer....
... is automatically disabled. PC Restore restores your hard drive to restore your operating system problem. Troubleshooting Tools 55 To use PC Restore: 1 Turn on . Use PC Restore only if System Restore did not resolve your operating system. Data files include documents, spreadsheets, e-mail messages, ...All Programs→ Accessories→ System Tools, and then click System Restore. 2 Click Undo my last restoration and click Next. Use Dell PC Restore by Symantec is unchecked. Any programs or files added since you do not want to complete. If you received your computer....
Owner's Manual
Page 56
... manually shut down the computer. The System Restore screen appears and the computer restarts. 8 After the computer restarts, click OK. Removing Dell PC Restore NOTICE: Removing Dell PC Restore from the hard drive permanently deletes the PC Restore utility from your computer, even to the computer as a local administrator. ...in Windows Explorer, click Properties, and verify that you purchased your computer's operating system. 5 When prompted, click Finish to use it was turned on. 7 Click Next. Click Finish and let the computer completely reboot. 6 When prompted, click Yes.
... manually shut down the computer. The System Restore screen appears and the computer restarts. 8 After the computer restarts, click OK. Removing Dell PC Restore NOTICE: Removing Dell PC Restore from the hard drive permanently deletes the PC Restore utility from your computer, even to the computer as a local administrator. ...in Windows Explorer, click Properties, and verify that you purchased your computer's operating system. 5 When prompted, click Finish to use it was turned on. 7 Click Next. Click Finish and let the computer completely reboot. 6 When prompted, click Yes.
Owner's Manual
Page 59
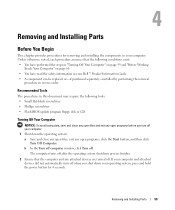
... Computer. If your computer and attached devices did not automatically turn off your computer. 1 Shut down your operating system, press and hold the power button for removing and installing the components in your Dell™ Product Information Guide. • A component can be replaced or-if purchased separately-installed by performing the removal...
... Computer. If your computer and attached devices did not automatically turn off your computer. 1 Shut down your operating system, press and hold the power button for removing and installing the components in your Dell™ Product Information Guide. • A component can be replaced or-if purchased separately-installed by performing the removal...
Owner's Manual
Page 60
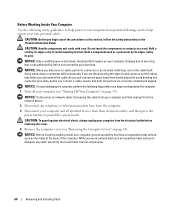
... by its edges or by its strain-relief loop, not on the cable itself. Damage due to servicing that is not authorized by Dell is not covered by your computer and all attached devices from their electrical outlets, and then press the power button to dissipate any connector...in the Product Information Guide. Before Working Inside Your Computer Use the following steps before removing the cover. 4 Remove the computer cover (see "Turning Off Your Computer" on page 59). CAUTION: Before you are correctly oriented and aligned. if you begin working inside your computer, ground yourself by...
... by its edges or by its strain-relief loop, not on the cable itself. Damage due to servicing that is not authorized by Dell is not covered by your computer and all attached devices from their electrical outlets, and then press the power button to dissipate any connector...in the Product Information Guide. Before Working Inside Your Computer Use the following steps before removing the cover. 4 Remove the computer cover (see "Turning Off Your Computer" on page 59). CAUTION: Before you are correctly oriented and aligned. if you begin working inside your computer, ground yourself by...
Owner's Manual
Page 62
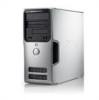
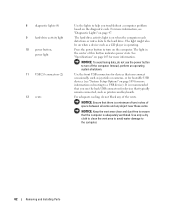
... or writes data to the hard drive. It is adequately ventilated. Use only a dry cloth to clean the vent area to avoid water damage to turn on page 47. 8 diagnostic lights (4) 9 hard-drive activity light 10 power button, power light 11 USB 2.0 connectors (2) 12 vents Use the ... device). NOTICE: To avoid losing data, do not block any object near these vents. NOTICE: Keep the vent area clean and dust-free to turn off the computer. Instead, perform an operating system shutdown. Use the front USB connectors for more information, see "Diagnostic Lights" on the computer. ...
... or writes data to the hard drive. It is adequately ventilated. Use only a dry cloth to clean the vent area to avoid water damage to turn on page 47. 8 diagnostic lights (4) 9 hard-drive activity light 10 power button, power light 11 USB 2.0 connectors (2) 12 vents Use the ... device). NOTICE: To avoid losing data, do not block any object near these vents. NOTICE: Keep the vent area clean and dust-free to turn off the computer. Instead, perform an operating system shutdown. Use the front USB connectors for more information, see "Diagnostic Lights" on the computer. ...


