
Owner's Manual
Page 6
... Definition of "Dell-Installed" Software and Peripherals 103 Definition of "Third-Party" Software and Peripherals 103 6 Contents Drives 72 General Installation Guidelines 73 Connecting Drive Cables 73 Hard Drive 74 Removing a Hard Drive 75 Installing a Hard Drive 77 Adding a Second Hard Drive 78 Floppy Drive 81 Removing a Floppy Drive 81 Installing a Floppy Drive 82 CD/DVD Drive 83 Removing a CD/DVD Drive 84 Installing a CD/DVD Drive 85 Adding a Second...
... Definition of "Dell-Installed" Software and Peripherals 103 Definition of "Third-Party" Software and Peripherals 103 6 Contents Drives 72 General Installation Guidelines 73 Connecting Drive Cables 73 Hard Drive 74 Removing a Hard Drive 75 Installing a Hard Drive 77 Adding a Second Hard Drive 78 Floppy Drive 81 Removing a Floppy Drive 81 Installing a Floppy Drive 82 CD/DVD Drive 83 Removing a CD/DVD Drive 84 Installing a CD/DVD Drive 85 Adding a Second...

Owner's Manual
Page 23
... - If you cannot open your e-mail attachments: 1 In Outlook Express, click Tools, click Options, and then click Security. 2 Click Do not allow attachments to remove the checkmark. C H E C K T H E M I C R O S O F T O U T L O O K ® E X P R E S S S E C U R I T Y S E T T I C S - Hard drive problems RUN CHECK DISK - 1 Click the Start button and click My Computer. 2 Right-click Local Disk C:. 3 Click Properties. 4 Click the Tools tab. 5 Under...
... - If you cannot open your e-mail attachments: 1 In Outlook Express, click Tools, click Options, and then click Security. 2 Click Do not allow attachments to remove the checkmark. C H E C K T H E M I C R O S O F T O U T L O O K ® E X P R E S S S E C U R I T Y S E T T I C S - Hard drive problems RUN CHECK DISK - 1 Click the Start button and click My Computer. 2 Right-click Local Disk C:. 3 Click Properties. 4 Click the Tools tab. 5 Under...

Owner's Manual
Page 38
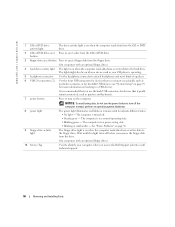
...of the same type into your computer (see page 57). • If the problem persists, contact Dell (see page 105). • If the computer has a graphics card, remove the card, reinstall it (see page 57) and restart the computer. • If you have two... yellow = green = off 38 Advanced Troubleshooting www.dell.com | support.dell.com Light Pattern ABCD ABCD ABCD Problem Description Memory modules are detected, but a memory failure has occurred. A possible graphics card failure has occurred. A possible USB failure has occurred. A possible floppy or hard drive failure has occurred.
...of the same type into your computer (see page 57). • If the problem persists, contact Dell (see page 105). • If the computer has a graphics card, remove the card, reinstall it (see page 57) and restart the computer. • If you have two... yellow = green = off 38 Advanced Troubleshooting www.dell.com | support.dell.com Light Pattern ABCD ABCD ABCD Problem Description Memory modules are detected, but a memory failure has occurred. A possible graphics card failure has occurred. A possible USB failure has occurred. A possible floppy or hard drive failure has occurred.
Owner's Manual
Page 43
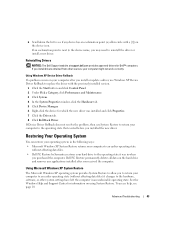
Using Windows XP Device Driver Rollback If a problem occurs on the hard drive and removes any device has an exclamation point (a yellow circle with the previously installed version. 1 Click the Start button and click Control Panel. 2 Under Pick a Category, click ... to replace the driver with a [!]) on using System Restore. If you to return your computer to an earlier operating state (without affecting data files. • Dell PC Restore by Symantec restores your computer to the operating state that existed before you may need to reinstall the driver or install a new driver...
Using Windows XP Device Driver Rollback If a problem occurs on the hard drive and removes any device has an exclamation point (a yellow circle with the previously installed version. 1 Click the Start button and click Control Panel. 2 Under Pick a Category, click ... to replace the driver with a [!]) on using System Restore. If you to return your computer to an earlier operating state (without affecting data files. • Dell PC Restore by Symantec restores your computer to the operating state that existed before you may need to reinstall the driver or install a new driver...

Owner's Manual
Page 45
...dell.com appears at the top of the screen. 2 Immediately upon seeing the blue bar, press . Any programs or files added since you received your operating system. NOTICE: Using PC Restore permanently deletes all data before using PC Restore. To use PC Restore: 1 Turn on the hard drive and removes... and the computer restarts. 8 After the computer restarts, click OK. Using Dell PC Restore by Symantec Use Dell PC Restore by Symantec only as the End User License Agreement, are permanently deleted from the hard drive. During the boot process, a blue bar with PC Restore, click Reboot in...
...dell.com appears at the top of the screen. 2 Immediately upon seeing the blue bar, press . Any programs or files added since you received your operating system. NOTICE: Using PC Restore permanently deletes all data before using PC Restore. To use PC Restore: 1 Turn on the hard drive and removes... and the computer restarts. 8 After the computer restarts, click OK. Using Dell PC Restore by Symantec Use Dell PC Restore by Symantec only as the End User License Agreement, are permanently deleted from the hard drive. During the boot process, a blue bar with PC Restore, click Reboot in...
Owner's Manual
Page 50
... data to the hard drive. The computer is recommended that you use the power button to turn on when a device such as printers and keyboards. 7 power button Press to indicate different states: • No light - The computer is on booting to the floppy drive. www.dell.com | support.dell.com 1 CD ...on when the computer reads data from the CD or DVD drive. 2 CD or DVD drive eject Press to identify your CD player is on page 95 for devices that typically remain connected, such as your computer when you remove the floppy disk from or writes data to a USB device)....
... data to the hard drive. The computer is recommended that you use the power button to turn on when a device such as printers and keyboards. 7 power button Press to indicate different states: • No light - The computer is on booting to the floppy drive. www.dell.com | support.dell.com 1 CD ...on when the computer reads data from the CD or DVD drive. 2 CD or DVD drive eject Press to identify your CD player is on page 95 for devices that typically remain connected, such as your computer when you remove the floppy disk from or writes data to a USB device)....
Owner's Manual
Page 55
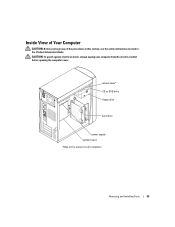
release lever* CD or DVD drive floppy drive hard drive power supply system board *May not be present on all computers. Inside View of Your Computer CAUTION: Before you begin any of the procedures in this section, see the safety instructions located in the Product Information Guide. Removing and Installing Parts 55 CAUTION: To guard against electrical shock, always unplug your computer from the electrical outlet before opening the computer cover.
release lever* CD or DVD drive floppy drive hard drive power supply system board *May not be present on all computers. Inside View of Your Computer CAUTION: Before you begin any of the procedures in this section, see the safety instructions located in the Product Information Guide. Removing and Installing Parts 55 CAUTION: To guard against electrical shock, always unplug your computer from the electrical outlet before opening the computer cover.

Owner's Manual
Page 72
Drives Your computer supports a combination of the computer. www.dell.com | support.dell.com Reattaching the Front Panel 1 Reattach the front panel to two CD or DVD drives 72 Removing and Installing Parts side hinges (3) front panel 2 Rotate the front panel until it snaps onto the front of these devices: • Up to two hard drives • One optional floppy • Up to the side hinges.
Drives Your computer supports a combination of the computer. www.dell.com | support.dell.com Reattaching the Front Panel 1 Reattach the front panel to two CD or DVD drives 72 Removing and Installing Parts side hinges (3) front panel 2 Rotate the front panel until it snaps onto the front of these devices: • Up to two hard drives • One optional floppy • Up to the side hinges.

Owner's Manual
Page 73
...drives may have an audio connector; Drive Interface Connectors Serial ATA Connector interface cable interface connector Most interface connectors are keyed for information on the other will attach to the system board. NOTE: The system board serial ATA connector may also have an attached cover or shroud. Removing...cable, hold the cable by the connector at each end. General Installation Guidelines Connect serial ATA hard drives to the connector labeled PRI IDE. See the drive documentation in hole on configuring devices for the cable select setting, the device attached to the ...
...drives may have an audio connector; Drive Interface Connectors Serial ATA Connector interface cable interface connector Most interface connectors are keyed for information on the other will attach to the system board. NOTE: The system board serial ATA connector may also have an attached cover or shroud. Removing...cable, hold the cable by the connector at each end. General Installation Guidelines Connect serial ATA hard drives to the connector labeled PRI IDE. See the drive documentation in hole on configuring devices for the cable select setting, the device attached to the ...
Owner's Manual
Page 74
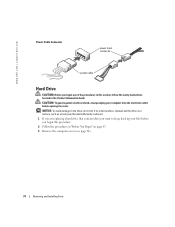
... sufficiently cushion it. 1 If you are replacing a hard drive that contains data you want to the drive, do not set it on page 47. 3 Remove the computer cover (see page 54). 74 Removing and Installing Parts www.dell.com | support.dell.com Power Cable Connector power input connector power cable Hard Drive CAUTION: Before you begin any of the...
... sufficiently cushion it. 1 If you are replacing a hard drive that contains data you want to the drive, do not set it on page 47. 3 Remove the computer cover (see page 54). 74 Removing and Installing Parts www.dell.com | support.dell.com Power Cable Connector power input connector power cable Hard Drive CAUTION: Before you begin any of the...

Owner's Manual
Page 75
Removing and Installing Parts 75 Removing a Hard Drive 1 Disconnect the power and data cables from the drive and from the computer. b Remove the bracket for the hard drive. data cable power cable 2 Remove the hard drive bracket from the computer: a Remove the bracket-securing screws for the hard drive from the system board.
Removing and Installing Parts 75 Removing a Hard Drive 1 Disconnect the power and data cables from the drive and from the computer. b Remove the bracket for the hard drive. data cable power cable 2 Remove the hard drive bracket from the computer: a Remove the bracket-securing screws for the hard drive from the system board.

Owner's Manual
Page 76
b Remove the hard drive from the bracket: a Remove the hard drive-securing screws. www.dell.com | support.dell.com hard drive bracket-securing screw hard drive-securing screws (3) drive bracket bracket-securing screw 3 If you are replacing the hard drive, remove the drive from the bracket. 76 Removing and Installing Parts
b Remove the hard drive from the bracket: a Remove the hard drive-securing screws. www.dell.com | support.dell.com hard drive bracket-securing screw hard drive-securing screws (3) drive bracket bracket-securing screw 3 If you are replacing the hard drive, remove the drive from the bracket. 76 Removing and Installing Parts

Owner's Manual
Page 77
... the computer cover (see page 75). 4 Attach the hard drive to the hard drive. d Insert and tighten all three drive-securing screws. 5 Install the hard drive: a Place the two bracket tabs into the drive-securing screw holes on the other side of the drive. Removing and Installing Parts 77 b Gently swing the drive toward the bracket and align the three screw...
... the computer cover (see page 75). 4 Attach the hard drive to the hard drive. d Insert and tighten all three drive-securing screws. 5 Install the hard drive: a Place the two bracket tabs into the drive-securing screw holes on the other side of the drive. Removing and Installing Parts 77 b Gently swing the drive toward the bracket and align the three screw...

Owner's Manual
Page 78
... "Before You Begin" on page 47. 3 Remove the computer cover (see page 54). 4 Remove the existing hard drive (see page 75). 5 Remove the additional hard drive bracket from the computer: a Remove the bracket-securing screws for instructions. 15 Test the hard drive by running the Dell Diagnostics (see page 96), and update the appropriate Drive option. 13 Exit system setup, and restart...
... "Before You Begin" on page 47. 3 Remove the computer cover (see page 54). 4 Remove the existing hard drive (see page 75). 5 Remove the additional hard drive bracket from the computer: a Remove the bracket-securing screws for instructions. 15 Test the hard drive by running the Dell Diagnostics (see page 96), and update the appropriate Drive option. 13 Exit system setup, and restart...

Owner's Manual
Page 79
..., that it on the back of the computer. NOTICE: When you are replacing the additional hard drive, remove the drive from the bracket. b Swing the bracket forward so that will sufficiently cushion it. 7 Install the additional hard drive: a Place the two bracket tabs into the drive slots inside the computer's front panel. c Replace the bracket-securing screws...
..., that it on the back of the computer. NOTICE: When you are replacing the additional hard drive, remove the drive from the bracket. b Swing the bracket forward so that will sufficiently cushion it. 7 Install the additional hard drive: a Place the two bracket tabs into the drive slots inside the computer's front panel. c Replace the bracket-securing screws...
Owner's Manual
Page 80
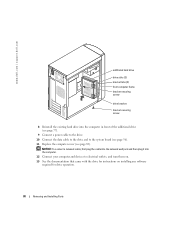
...dell.com | support.dell.com additional hard drive drive slots (2) bracket tabs (2) front computer frame bracket-securing screw drive bracket bracket-securing screw 8 Reinstall the existing hard drive... into the computer. 12 Connect your computer and devices to the system board (see page 56). 11 Replace the computer cover (see page 89). NOTICE: To connect a network cable, first plug the cable into the network wall jack and then plug it into the computer in front of the additional drive... (see page 77). 9 Connect a power cable to the drive. 10 Connect the data cable to the drive ...
...dell.com | support.dell.com additional hard drive drive slots (2) bracket tabs (2) front computer frame bracket-securing screw drive bracket bracket-securing screw 8 Reinstall the existing hard drive... into the computer. 12 Connect your computer and devices to the system board (see page 56). 11 Replace the computer cover (see page 89). NOTICE: To connect a network cable, first plug the cable into the network wall jack and then plug it into the computer in front of the additional drive... (see page 77). 9 Connect a power cable to the drive. 10 Connect the data cable to the drive ...

Owner's Manual
Page 95
Certain changes can make your computer • To set the type of hard drive installed Before you use system setup, it is recommended that you are an expert computer user, do not change , or remove any hardware in velocity of 20 inches/sec (50.8 cm/sec) 27-G faired square wave with a velocity change of...
Certain changes can make your computer • To set the type of hard drive installed Before you use system setup, it is recommended that you are an expert computer user, do not change , or remove any hardware in velocity of 20 inches/sec (50.8 cm/sec) 27-G faired square wave with a velocity change of...

Owner's Manual
Page 124
... lights, 37 F Finding Information, 9 floppy drive activity light, 50 eject button, 50 installing, 82 removing, 81 front panel, 69 insert, 71 removing, 70 H hard drive activity light, 50 installing, 77 installing second, 78 problems, 23 removing, 75 Hardware Troubleshooter, 46 headphone connector, 50 Help and Support Center, 10 help file Dell Dimension Help, 9 Windows Help and Support Center...
... lights, 37 F Finding Information, 9 floppy drive activity light, 50 eject button, 50 installing, 82 removing, 81 front panel, 69 insert, 71 removing, 70 H hard drive activity light, 50 installing, 77 installing second, 78 problems, 23 removing, 75 Hardware Troubleshooter, 46 headphone connector, 50 Help and Support Center, 10 help file Dell Dimension Help, 9 Windows Help and Support Center...
Owner's Manual
Page 125
...Network Setup Wizard, 16 O operating system reinstalling Windows XP, 43 P password clearing, 101 jumper, 101 PCI cards installing, 61 removing, 63 PCI Express cards installing, 65 removing, 68 power button, 50 connector, 53 light, 50 problems, 30 power light conditions, 30 printer cable, 11 connecting, 11...USB, 11 problems battery, 21 blue screen, 27 CD drive, 22 problems (continued) CD-RW drive, 22 computer crashes, 26-27 computer stops responding, 26 diagnostic lights, 37 drives, 21 DVD drive, 22 e-mail, 23 error messages, 24 general, 26 hard drive, 23 IEEE 1394, 25 internet, 23 keyboard, 26 ...
...Network Setup Wizard, 16 O operating system reinstalling Windows XP, 43 P password clearing, 101 jumper, 101 PCI cards installing, 61 removing, 63 PCI Express cards installing, 65 removing, 68 power button, 50 connector, 53 light, 50 problems, 30 power light conditions, 30 printer cable, 11 connecting, 11...USB, 11 problems battery, 21 blue screen, 27 CD drive, 22 problems (continued) CD-RW drive, 22 computer crashes, 26-27 computer stops responding, 26 diagnostic lights, 37 drives, 21 DVD drive, 22 e-mail, 23 error messages, 24 general, 26 hard drive, 23 IEEE 1394, 25 internet, 23 keyboard, 26 ...


