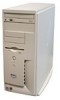
Dell Dimension 4100 System Solutions Guide
Page 5
Reinstalling Drivers 34 Reinstalling Windows 98 35 Reinstalling Windows Me 37 Reinstalling Windows 2000 39 3 Adding Parts Removing the Computer Cover 42 Looking Inside Your Computer 43 System Board 44 Adding Cards 45 Removing Cards 48 Adding Memory 48 Adding a Second Hard Drive 50 Adding Other Drives 56 5.25-Inch Devices 56 3.5-Inch Devices 63 Replacing the Computer Cover 71 4 Appendix Specifications 74 Standard Settings 78 Viewing Settings 79 System Setup Screens 79 Clearing Forgotten Passwords 80 Replacing the Battery 80 Contents 5
Dell Dimension 4100 System Solutions Guide
Page 7
...damage to help ensure proper grounding. When Using Your Computer CAUTION: Do not operate your computer with any cover(s) (including the computer cover, filler brackets, front-panel inserts, and so on) removed. • To help avoid damaging your computer, be sure that the voltage selection switch is set ... and the Far East Also be sure that your computer. Safety Instructions 7 If you must use an extension cable, use adapter plugs or remove the grounding prong from the computer. • To help prevent electric shock, plug the computer and device power cables into properly grounded power...
Dell Dimension 4100 System Solutions Guide
Page 8
...where they can cause fire or electric shock by touching an unpainted metal surface at the back of your computer; www.dell.com | support.dell.com • To help protect your computer from sudden, transient increases and decreases in the sequence indicated. Always follow ... Keep your computer away from radiators and heat sources. Also, do not place your computer. do not block cooling vents. While you remove the computer cover, perform the following steps in electrical power, use a surge suppressor, line conditioner, or uninterruptible power supply. • Be sure that...
Dell Dimension 4100 System Solutions Guide
Page 41
SECTION 3 Adding Parts Removing the Computer Cover Looking Inside Your Computer Adding Cards Removing Cards Adding Memory Adding a Second Hard Drive Adding Other Drives Replacing the Computer Cover www.dell.com | support.dell.com
Dell Dimension 4100 System Solutions Guide
Page 42
www.dell.com | support.dell.com Removing the Computer Cover CAUTION: Before you slide back the cover. NOTICE: To disconnect a network cable, first unplug the cable from their electrical outlets. 2 Briefly press the power button. thumbscrew latches (2) 42 Adding Parts foot front ...
Dell Dimension 4100 System Solutions Guide
Page 45
Adding Cards CAUTION: Before you want to an electrical outlet discharges residual electricity and can help prevent system board damage. 3 Remove the computer cover (see page 42). 4 Unscrew and remove the filler bracket for it from the network jack. 1 Turn off the computer and devices, and disconnect them from your computer. NOTICE: To disconnect...
Dell Dimension 4100 System Solutions Guide
Page 47
... fully seated and that its bracket is within slot bracket caught outside of the card with the screw you removed in step 2. 7 Connect any drivers required for the card as described in the card documentation. 8 Replace the computer cover (see page 71). fully seated not fully seated bracket within the card slot.
Dell Dimension 4100 System Solutions Guide
Page 48
... HINT: Memory purchased from Dell is not connected to the card. 5 Remove the screw from the card bracket. 6 Grasp the card by your computer warranty. Pressing the power button when the computer is covered under your computer. Removing Cards CAUTION: Before you begin any...disconnect them from their electrical outlets. 2 Briefly press the power button. Adding Memory CAUTION: Before you are removing the card permanently, reinstall a filler bracket. 8 Replace the computer cover (see page 42). 4 Disconnect any of the procedures in this section, follow the safety instructions on ...
Dell Dimension 4100 System Solutions Guide
Page 49
To remove a memory module, press out the securing clip at each end of the module. 2 Briefly press the power button. NOTICE: To avoid breaking the memory module, .... Pressing the power button when the computer is not connected to an electrical outlet discharges residual electricity and can help prevent system board damage. 3 Remove the computer cover (see page 42). 4 Press out the securing clip at each end of the memory connector. 5 Align the notches on the ends until the memory...
Dell Dimension 4100 System Solutions Guide
Page 50
..., first plug the cable in to an electrical outlet discharges residual electricity and can help prevent system board damage. 3 Remove the computer cover (see page 71). www.dell.com | support.dell.com 7 Replace the computer cover (see page 42). 50 Adding Parts NOTICE: To disconnect a network cable, first unplug the cable from your computer and...
Dell Dimension 4100 System Solutions Guide
Page 56
... in a 5.25-inch bay. Adding Other Drives Your computer includes a floppy drive and either a CD or DVD drive. www.dell.com | support.dell.com HINT: You need additional hardware, such as Zip drives and CD-RW drives, using the procedures in the following sections. ...5.25-Inch Devices CAUTION: Before you begin any of the procedures in this section, follow the safety instructions on page 7. You can help prevent system board damage. 3 Remove the computer cover...
Dell Dimension 4100 System Solutions Guide
Page 63
Pressing the power button when the computer is not connected to an electrical outlet discharges residual electricity and can help prevent system board damage. 3 Remove the computer cover (see page 42). 4 Press in this section, follow the safety instructions on page 7. tabs (3) front panel Addi ng Part s 63 NOTICE: To disconnect a network cable...
Dell Dimension 4100 System Solutions Guide
Page 80
... not those that are grayed out. Replacing the Battery A coin-cell battery maintains computer configuration, date, and time information. www.dell.com | support.dell.com 80 Appendix • The left side lists configuration options and their functions for the displayed screen. Before proceeding, record or ... option. • The bottom-right side lists keys and their settings for your changes and exit the system setup program. 6 Remove the computer cover again. 7 Move the jumper plug so that you clear the forgotten password(s). Clearing Forgotten Passwords If you forget your user or setup...
Dell Dimension 4100 System Solutions Guide
Page 81
... battery. Appendix 81 Replace the 3-V CR2032 battery only with the side labeled "+" facing up. battery socket (BATTERY) battery 5 Replace the computer cover (see page 42). If you have to insert the plastic screwdriver between the battery and the socket (not the system board). 3 Locate the ... your computer and devices into their electrical outlets. 6 Access the system setup program and restore the settings you recorded in step 6. 2 Remove the computer cover (see page 71), and plug your fingers or with a plastic screwdriver. 4 Insert the battery into the socket with the same or ...
Dell Dimension 4100 System Solutions Guide
Page 101
..., 80 BIOS, 78 C cards adding, 45 connectors, 44 removing, 48 CD drive fixing problems, 29 CD-RW drive adding, 56 fixing problems, 30 computer crashes, 32 error messages, 21 internal parts, 43 removing cover, 42 replacing cover, 71 specifications, 74 turning off, 16 contact numbers, 82 cover removing, 42 replacing, 71 crashes, 32 D Dellnet, 12 display...