Dell Dimension 2100 Solutions Guide
Page 26
www.dell.com | support.dell.com I N S E R T B O O T A B L E M E D I S K E R R O R - S Y S T E M D I A - There is trying to boot to determine if the power cable is lit or blinking, the monitor has power. Be ... operating system is a floppy disk in the floppy drive. Check for your monitor. C H E C K T H E P O W E R L I O N - Swap the computer and monitor power cables to a nonbootable floppy disk or CD. If the screen is defective. When the power light is defective. TE S T T H E E L E C T R I F U S E D ) - TE S T T H E V I D E O EX T E N S I O N C A B L E ( I C A L O U T L E T -...
www.dell.com | support.dell.com I N S E R T B O O T A B L E M E D I S K E R R O R - S Y S T E M D I A - There is trying to boot to determine if the power cable is lit or blinking, the monitor has power. Be ... operating system is a floppy disk in the floppy drive. Check for your monitor. C H E C K T H E P O W E R L I O N - Swap the computer and monitor power cables to a nonbootable floppy disk or CD. If the screen is defective. When the power light is defective. TE S T T H E E L E C T R I F U S E D ) - TE S T T H E V I D E O EX T E N S I O N C A B L E ( I C A L O U T L E T -...
Dell Dimension 2100 Solutions Guide
Page 53
...type R to select the repair option, and then go to step 14. The options can potentially overwrite files installed by a Dell technical support representative. 1 Insert the operating system CD into the CD or DVD drive. 2 Turn off the computer (see page 49). Then follow the instructions on the next screen to finish... performing a Windows System Restore (see page 18), and then turn the computer on again. 3 Press any key when the Press any key to boot from CD message appears on the screen. 4 When the Windows XP Setup screen appears, press to select To set up Windows now. 5 Read the information ...
...type R to select the repair option, and then go to step 14. The options can potentially overwrite files installed by a Dell technical support representative. 1 Insert the operating system CD into the CD or DVD drive. 2 Turn off the computer (see page 49). Then follow the instructions on the next screen to finish... performing a Windows System Restore (see page 18), and then turn the computer on again. 3 Press any key when the Press any key to boot from CD message appears on the screen. 4 When the Windows XP Setup screen appears, press to select To set up Windows now. 5 Read the information ...
Dell Dimension 2100 Solutions Guide
Page 55
... program as directed by a Dell technical support representative (see page 92). 2 In the system setup program Boot menu, write down the boot sequence, and then change C:\WINDOWS.000 to Windows Me window. 10 Select the directory in the CD or DVD drive and close ... Windows Me operating system. NOTICE: The operating system CD provides options for reinstalling your current operating system, and then press . 8 Press again. The options can potentially overwrite files installed by a Dell technical support representative. Therefore, Dell does not recommend that the CD or DVD drive boots first.
... program as directed by a Dell technical support representative (see page 92). 2 In the system setup program Boot menu, write down the boot sequence, and then change C:\WINDOWS.000 to Windows Me window. 10 Select the directory in the CD or DVD drive and close ... Windows Me operating system. NOTICE: The operating system CD provides options for reinstalling your current operating system, and then press . 8 Press again. The options can potentially overwrite files installed by a Dell technical support representative. Therefore, Dell does not recommend that the CD or DVD drive boots first.

Dell Dimension 2100 Solutions Guide
Page 56
... Password window, if desired, and then click Next. 24 Remove the operating system CD from the CD or DVD drive. 56 Solving Pr oblems Windows Setup installs additional files, and then restarts the computer. 22 Select Boot From Hard Drive, and then press . 23 Enter a password in the fields provided..., and then click Next. The Name field must be completed; The product key is the bar code number found on the side of your name and, if applicable, company name, and then click Next. www.dell.com | support.dell...
... Password window, if desired, and then click Next. 24 Remove the operating system CD from the CD or DVD drive. 56 Solving Pr oblems Windows Setup installs additional files, and then restarts the computer. 22 Select Boot From Hard Drive, and then press . 23 Enter a password in the fields provided..., and then click Next. The Name field must be completed; The product key is the bar code number found on the side of your name and, if applicable, company name, and then click Next. www.dell.com | support.dell...
Dell Dimension 2100 Solutions Guide
Page 57
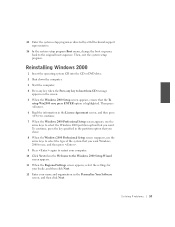
Solving Problems 57 25 Enter the system setup program as directed by a Dell technical support representative. 26 In the system setup program Boot menu, change the boot sequence back to the Windows 2000 Setup Wizard screen appears. 11 When the Regional Settings screen appears, select the settings for ...click Next. Then, exit the system setup program. 1 Insert the operating system CD into the CD or DVD drive. 2 Shut down the computer. 3 Start the computer. 4 Press any key when the Press any key to boot from CD message appears on the screen. 5 When the Windows 2000 Setup screen appears, ensure...
Solving Problems 57 25 Enter the system setup program as directed by a Dell technical support representative. 26 In the system setup program Boot menu, change the boot sequence back to the Windows 2000 Setup Wizard screen appears. 11 When the Regional Settings screen appears, select the settings for ...click Next. Then, exit the system setup program. 1 Insert the operating system CD into the CD or DVD drive. 2 Shut down the computer. 3 Start the computer. 4 Press any key when the Press any key to boot from CD message appears on the screen. 5 When the Windows 2000 Setup screen appears, ensure...
System Reference
Page 31
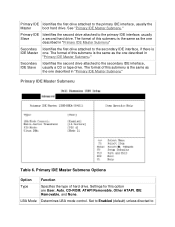
... IDE Master Submenu Table 6. Set to Enabled (default) unless directed to the secondary IDE interface, usually a CD or tape drive. The format of this option are User, Auto, CD-ROM, ATAPI Removable, Other ATAPI, IDE Removable, and None. Settings for this submenu is the same as ...the one described in "Primary IDE Master Submenu." Primary IDE Identifies the second drive attached to the primary IDE interface, usually the Master boot hard drive. Primary IDE Identifies the first drive attached to the primary IDE interface, usually Slave a second hard drive. See "Primary IDE...
... IDE Master Submenu Table 6. Set to Enabled (default) unless directed to the secondary IDE interface, usually a CD or tape drive. The format of this option are User, Auto, CD-ROM, ATAPI Removable, Other ATAPI, IDE Removable, and None. Settings for this submenu is the same as ...the one described in "Primary IDE Master Submenu." Primary IDE Identifies the second drive attached to the primary IDE interface, usually the Master boot hard drive. Primary IDE Identifies the first drive attached to the primary IDE interface, usually Slave a second hard drive. See "Primary IDE...

System Reference
Page 37
...if it cannot boot from the device selected for this option are as those for 1st BootDevice except for 1st Boot Device and 2nd Boot Device. Settings for this option are the same as follows: • Floppy • ARMD FDD • ARMD HDD • IDE-HDD • ATAPI CD-ROM • ...SCSI* • Network* • Disabled 2nd Boot Device 3rd Boot Device 4th Boot Device *Where SCSI or Network is the name of the installed device. Determines which device the computer tries to...
...if it cannot boot from the device selected for this option are as those for 1st BootDevice except for 1st Boot Device and 2nd Boot Device. Settings for this option are the same as follows: • Floppy • ARMD FDD • ARMD HDD • IDE-HDD • ATAPI CD-ROM • ...SCSI* • Network* • Disabled 2nd Boot Device 3rd Boot Device 4th Boot Device *Where SCSI or Network is the name of the installed device. Determines which device the computer tries to...


