Dell Dimension 2100 Solutions Guide
Page 3
Safety Instructions 7 When Using Your Computer 7 Ergonomic Computing Habits 8 When Working Inside Your Computer 10 Protecting Against Electrostatic Discharge 11 1 Setting Up Connecting a Printer 14 Parallel Printer 14 USB Printer 16 Installing the Printer Driver 16 Transferring Information to a New Computer (Windows XP Only 17 Setting Up a Home and Office Network (Windows XP Only 18 Turning Off the Computer 18 Windows XP 18 Windows Me and Windows 2000 18 2 Solving Problems Finding Solutions 22 Accessing Help Files 24 Power Problems 25 Start-Up Error Messages 25 Contents 3
Safety Instructions 7 When Using Your Computer 7 Ergonomic Computing Habits 8 When Working Inside Your Computer 10 Protecting Against Electrostatic Discharge 11 1 Setting Up Connecting a Printer 14 Parallel Printer 14 USB Printer 16 Installing the Printer Driver 16 Transferring Information to a New Computer (Windows XP Only 17 Setting Up a Home and Office Network (Windows XP Only 18 Turning Off the Computer 18 Windows XP 18 Windows Me and Windows 2000 18 2 Solving Problems Finding Solutions 22 Accessing Help Files 24 Power Problems 25 Start-Up Error Messages 25 Contents 3
Dell Dimension 2100 Solutions Guide
Page 10
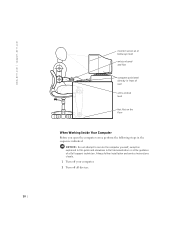
www.dell.com | support.dell.com monitor screen at desk level feet flat on the floor When Working Inside Your Computer Before you open the computer cover, perform the following steps in front of a Dell support technician. Always follow installation and service instructions closely. 1 Turn off your computer. 2 Turn off all devices. 10 NOTICE: Do not attempt to service the computer yourself, except as explained in this guide and elsewhere...
www.dell.com | support.dell.com monitor screen at desk level feet flat on the floor When Working Inside Your Computer Before you open the computer cover, perform the following steps in front of a Dell support technician. Always follow installation and service instructions closely. 1 Turn off your computer. 2 Turn off all devices. 10 NOTICE: Do not attempt to service the computer yourself, except as explained in this guide and elsewhere...
Dell Dimension 2100 Solutions Guide
Page 16
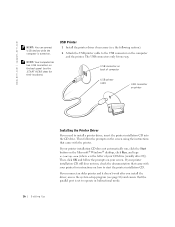
... . If you connect an older printer and it doesn't work after you need to the USB connector on printer 16 Setting Up Installing the Printer Driver If you install the driver, access the system setup program (see the START HERE sheet for their locations). If your printer installation CD does not automatically run , check the documentation that came with your printer for instructions on the back panel (see...
... . If you connect an older printer and it doesn't work after you need to the USB connector on printer 16 Setting Up Installing the Printer Driver If you install the driver, access the system setup program (see the START HERE sheet for their locations). If your printer installation CD does not automatically run , check the documentation that came with your printer for instructions on the back panel (see...

Dell Dimension 2100 Solutions Guide
Page 28
... connected as shown on the START HERE sheet for your computer and the setup diagram supplied with another device, such as a lamp. Ensure that the speakers are using Windows 98 SE or Windows 2000, plug the speaker audio cable into the headphone jack of the CD or DVD drive. Be sure that the volume is turned up and that the headphone volume control is working by testing it with the speakers...
... connected as shown on the START HERE sheet for your computer and the setup diagram supplied with another device, such as a lamp. Ensure that the speakers are using Windows 98 SE or Windows 2000, plug the speaker audio cable into the headphone jack of the CD or DVD drive. Be sure that the volume is turned up and that the headphone volume control is working by testing it with the speakers...
Dell Dimension 2100 Solutions Guide
Page 44
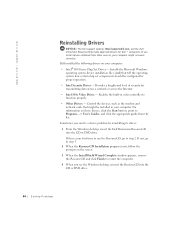
... the Start button, point to function properly. • Other Drivers - Dell installed the following drivers on the screen. 3 When the InstallShield Wizard Complete window appears, remove the ResourceCD and click Finish to step 2. Installs the Microsoft Windows operating system device installation files (.inf) that might not work correctly. Control the devices, such as the modem and network cards that tell the operating system how certain chip set components should be installed in video controller...
... the Start button, point to function properly. • Other Drivers - Dell installed the following drivers on the screen. 3 When the InstallShield Wizard Complete window appears, remove the ResourceCD and click Finish to step 2. Installs the Microsoft Windows operating system device installation files (.inf) that might not work correctly. Control the devices, such as the modem and network cards that tell the operating system how certain chip set components should be installed in video controller...
Dell Dimension 2100 Solutions Guide
Page 53
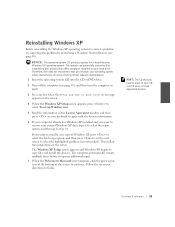
... you want to install a new copy of the screen to select the highlighted partition (recommended). Then follow the instructions on -screen directions to place in the License Agreement window, and then press on your CD or DVD drive is titled Operating System. The options can potentially overwrite files installed by a Dell technical support representative. 1 Insert the operating system CD into the CD or DVD drive. 2 Turn off the computer...
... you want to install a new copy of the screen to select the highlighted partition (recommended). Then follow the instructions on -screen directions to place in the License Agreement window, and then press on your CD or DVD drive is titled Operating System. The options can potentially overwrite files installed by a Dell technical support representative. 1 Insert the operating system CD into the CD or DVD drive. 2 Turn off the computer...

Dell Dimension 2100 Solutions Guide
Page 73
.... To install a card: 1 Turn off the computer and devices, and disconnect them on. 18 See the drive's documentation for drive operation. 13 Replace the front panel. Pressing the power button when the computer is not connected to an electrical outlet discharges residual electricity and can help prevent system board damage. 3 Remove the computer cover (see page 60). 4 Rotate the power supply (see page 80). 17 Plug your computer...
.... To install a card: 1 Turn off the computer and devices, and disconnect them on. 18 See the drive's documentation for drive operation. 13 Replace the front panel. Pressing the power button when the computer is not connected to an electrical outlet discharges residual electricity and can help prevent system board damage. 3 Remove the computer cover (see page 60). 4 Rotate the power supply (see page 80). 17 Plug your computer...
Dell Dimension 2100 Solutions Guide
Page 77
... removing the card permanently, reinstall a filler bracket. 9 Rotate the power supply back into place (see page 64). 10 Replace the computer cover (see page 62). 5 Disconnect any of the procedures in this section, follow the safety instructions on page 7. 1 Turn off the computer and devices, and disconnect them on the wall. 2 Press the power button. NOTICE: To disconnect a network cable, first unplug the cable...
... removing the card permanently, reinstall a filler bracket. 9 Rotate the power supply back into place (see page 64). 10 Replace the computer cover (see page 62). 5 Disconnect any of the procedures in this section, follow the safety instructions on page 7. 1 Turn off the computer and devices, and disconnect them on the wall. 2 Press the power button. NOTICE: To disconnect a network cable, first unplug the cable...
Dell Dimension 2100 Solutions Guide
Page 88
... incorrectly installed. Replacing the Battery A coin-cell battery maintains computer configuration, date, and time information. If you can restore the correct settings in the system setup program so that you have to save your changes and exit the system setup program. 8 Remove the computer cover again. 9 Rotate the power supply (see page 62). 10 Move the jumper plug so that pins 1 and 2 are jumpered (standard setting). 11 Rotate the power supply...
... incorrectly installed. Replacing the Battery A coin-cell battery maintains computer configuration, date, and time information. If you can restore the correct settings in the system setup program so that you have to save your changes and exit the system setup program. 8 Remove the computer cover again. 9 Rotate the power supply (see page 62). 10 Move the jumper plug so that pins 1 and 2 are jumpered (standard setting). 11 Rotate the power supply...

Dell Dimension 2100 Solutions Guide
Page 98
... Institutions, and Medical Institutions) Global Segment Japan Individual User Faxbox Service Switchboard Website: http://support.jp.dell.com Korea (Seoul) Technical Support International Access Code: 001 Sales Country Code: 82 Customer Service (Seoul, Korea) City Code: 2 Customer Service (Penang, Malaysia) Fax Switchboard Area Codes, Local Numbers, and Toll Free Numbers toll free: 0120-1984-35 81-44-556-4152 toll free: 0120-1982-26 81-44-520-1435 toll...
... Institutions, and Medical Institutions) Global Segment Japan Individual User Faxbox Service Switchboard Website: http://support.jp.dell.com Korea (Seoul) Technical Support International Access Code: 001 Sales Country Code: 82 Customer Service (Seoul, Korea) City Code: 2 Customer Service (Penang, Malaysia) Fax Switchboard Area Codes, Local Numbers, and Toll Free Numbers toll free: 0120-1984-35 81-44-556-4152 toll free: 0120-1982-26 81-44-520-1435 toll...

Dell Dimension 2100 Solutions Guide
Page 103
...) International Access Code: 00 Technical Support (Corporate) Country Code: 41 Customer Care (Home and Small Business) City Code: 22 Customer Care (Corporate) Fax Switchboard Website: http://support.euro.dell.com E-mail: swisstech@dell.com E-mail for French Speaking HSB and Corporate Customers: http://support.euro.dell.com/ch/fr/emaildell/ Taiwan Technical Support International Access Code: 002 Technical Support (Servers) Country Code: 886 Transaction Sales Corporate Sales Area Codes, Local Numbers, and Toll Free Numbers...
...) International Access Code: 00 Technical Support (Corporate) Country Code: 41 Customer Care (Home and Small Business) City Code: 22 Customer Care (Corporate) Fax Switchboard Website: http://support.euro.dell.com E-mail: swisstech@dell.com E-mail for French Speaking HSB and Corporate Customers: http://support.euro.dell.com/ch/fr/emaildell/ Taiwan Technical Support International Access Code: 002 Technical Support (Servers) Country Code: 886 Transaction Sales Corporate Sales Area Codes, Local Numbers, and Toll Free Numbers...

Dell Dimension 2100 Solutions Guide
Page 114
www.dell.com | support.dell.com Dell will repair or replace products covered under this limited warranty that are returned to Dell, back up the data on the hard drive(s) and any removable media, such as floppy disks, CDs, or PC Cards. You must contact Dell's Customer Technical Support within the limited warranty period. DELL'S RESPONSIBILITY FOR MALFUNCTIONS AND DEFECTS IN HARDWARE IS LIMITED TO REPAIR AND REPLACEMENT AS SET FORTH IN THIS...
www.dell.com | support.dell.com Dell will repair or replace products covered under this limited warranty that are returned to Dell, back up the data on the hard drive(s) and any removable media, such as floppy disks, CDs, or PC Cards. You must contact Dell's Customer Technical Support within the limited warranty period. DELL'S RESPONSIBILITY FOR MALFUNCTIONS AND DEFECTS IN HARDWARE IS LIMITED TO REPAIR AND REPLACEMENT AS SET FORTH IN THIS...
Dell Dimension 2100 Solutions Guide
Page 115
... instructions, failure to exchange a product or portion of a product, the exchange will receive. Otherwise, this warranty. If Dell elects to perform required preventive maintenance, and problems caused by the limited warranty. Only) Dell Computer Corporation ("Dell") manufactures its hardware products from defects in accordance with electrical power, servicing not authorized by Dell. Dell warrants that the hardware products it manufactures will be covered by use...
... instructions, failure to exchange a product or portion of a product, the exchange will receive. Otherwise, this warranty. If Dell elects to perform required preventive maintenance, and problems caused by the limited warranty. Only) Dell Computer Corporation ("Dell") manufactures its hardware products from defects in accordance with electrical power, servicing not authorized by Dell. Dell warrants that the hardware products it manufactures will be covered by use...
Dell Dimension 2100 Solutions Guide
Page 122
... a Return Material Authorization Number, Dell must receive the product(s) for the repair(s) to new in effect on the date of parts and components not supplied by Dell. accessories or parts added to Dell's three-year limited warranty only. Damage due to shipping the products to your system, refer to you will be covered by use of the exchange. all other monitors, keyboards, and mice...
... a Return Material Authorization Number, Dell must receive the product(s) for the repair(s) to new in effect on the date of parts and components not supplied by Dell. accessories or parts added to Dell's three-year limited warranty only. Damage due to shipping the products to your system, refer to you will be covered by use of the exchange. all other monitors, keyboards, and mice...
Dell Dimension 2100 Solutions Guide
Page 123
... to you (freight prepaid) if you ship the product(s) to Dell, back up the data on the hard drive(s) and any removable media, such as floppy disks, CDs, or PC Cards. Remove any other locations will be made by various manufacturers in performing warranty repairs and building replacement products. DELL MAKES NO EXPRESS WARRANTIES OR CONDITIONS BEYOND THOSE STATED IN THIS LIMITED WARRANTY...
... to you (freight prepaid) if you ship the product(s) to Dell, back up the data on the hard drive(s) and any removable media, such as floppy disks, CDs, or PC Cards. Remove any other locations will be made by various manufacturers in performing warranty repairs and building replacement products. DELL MAKES NO EXPRESS WARRANTIES OR CONDITIONS BEYOND THOSE STATED IN THIS LIMITED WARRANTY...
Dell Dimension 2100 Solutions Guide
Page 124
... cover damage due to external causes, including accident, abuse, misuse, problems with electrical power, servicing not authorized by Dell, usage not in accordance with industry-standard practices. If Dell elects to perform required preventive maintenance, and problems caused by use of a product, the exchange will be made in accordance with product instructions, failure to exchange a product or portion of parts and components not supplied...
... cover damage due to external causes, including accident, abuse, misuse, problems with electrical power, servicing not authorized by Dell, usage not in accordance with industry-standard practices. If Dell elects to perform required preventive maintenance, and problems caused by use of a product, the exchange will be made in accordance with product instructions, failure to exchange a product or portion of parts and components not supplied...
Dell Dimension 2100 Solutions Guide
Page 128
... instructions, failure to Dell in one -year period of the following categories: software; Otherwise, this limited warranty. This limited warranty does not cover any other locations will repair or replace products covered under this limited warranty does not cover damage due to external causes, including accident, abuse, misuse, problems with electrical power, servicing not authorized by Dell. external devices (except as floppy disks, CDs, or PC Cards. 128 Appendix Batteries...
... instructions, failure to Dell in one -year period of the following categories: software; Otherwise, this limited warranty. This limited warranty does not cover any other locations will repair or replace products covered under this limited warranty does not cover damage due to external causes, including accident, abuse, misuse, problems with electrical power, servicing not authorized by Dell. external devices (except as floppy disks, CDs, or PC Cards. 128 Appendix Batteries...
Dell Dimension 2100 Solutions Guide
Page 136
..., 46 K keyboard fixing problems, 35 M memory adding, 78 connectors, 66 removing, 78 messages start-up , 14 troubleshooting, 29 programs fixing problems, 40 R RAM. See system board mouse fixing problems, 34 N network fixing problems, 39 setting up, 18 Network Setup Wizard, 18 P password clearing system setup, 87 PCI card, 73 power fixing problems, 25 turning off, 18 power supply rotating, 62 printer connecting, 14 fixing problems, 29 reinstalling driver, 16 setting up , 25 Windows, 39 modem fixing problems, 32 monitor fixing problems, 26 136 Index motherboard. See memory regulatory...
..., 46 K keyboard fixing problems, 35 M memory adding, 78 connectors, 66 removing, 78 messages start-up , 14 troubleshooting, 29 programs fixing problems, 40 R RAM. See system board mouse fixing problems, 34 N network fixing problems, 39 setting up, 18 Network Setup Wizard, 18 P password clearing system setup, 87 PCI card, 73 power fixing problems, 25 turning off, 18 power supply rotating, 62 printer connecting, 14 fixing problems, 29 reinstalling driver, 16 setting up , 25 Windows, 39 modem fixing problems, 32 monitor fixing problems, 26 136 Index motherboard. See memory regulatory...
System Reference
Page 24
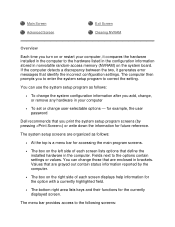
... area lists keys and their functions for future reference. The menu bar provides access to the options contain settings or values. Main Screen Advanced Screen Exit Screen Clearing NVRAM Overview Each time you turn on or restart your computer • To set or change , or remove any hardware in nonvolatile random-access memory (NVRAM) on the system board. You can change the system configuration information after you to enter the system setup...
... area lists keys and their functions for future reference. The menu bar provides access to the options contain settings or values. Main Screen Advanced Screen Exit Screen Clearing NVRAM Overview Each time you turn on or restart your computer • To set or change , or remove any hardware in nonvolatile random-access memory (NVRAM) on the system board. You can change the system configuration information after you to enter the system setup...
System Reference
Page 26
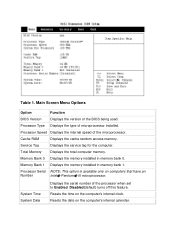
... the type of the processor when set to Enabled. System Time System Date Displays the serial number of microprocessor installed. Disabled(default) turns off this feature. Cache RAM Displays the cache random access memory. Processor Speed Displays the internal speed of the BIOS being used. Memory Bank 1 Displays the memory installed in memory bank 0. Resets the date on the computer's internal clock. Memory Bank 0 Displays the memory installed in memory bank 1. Main Screen Menu Options Option Function BIOS Version Displays the version of the microprocessor. Service Tag...
... the type of the processor when set to Enabled. System Time System Date Displays the serial number of microprocessor installed. Disabled(default) turns off this feature. Cache RAM Displays the cache random access memory. Processor Speed Displays the internal speed of the BIOS being used. Memory Bank 1 Displays the memory installed in memory bank 0. Resets the date on the computer's internal clock. Memory Bank 0 Displays the memory installed in memory bank 1. Main Screen Menu Options Option Function BIOS Version Displays the version of the microprocessor. Service Tag...


