
Dell /C3760n Color Laser Printer Users Guide
Page 14
Replacing the Transfer Belt Unit, the 2nd Belt Transfer Roller (2nd BTR), and the Retard Roller 324 Removing the Transfer Belt Unit 324 Installing a Transfer Belt Unit 327 Removing the 2nd BTR 329 Installing a 2nd BTR 329 Removing the Retard Roller in Tray1 330 Installing a Retard Roller in Tray1 331 Replacing ...
Replacing the Transfer Belt Unit, the 2nd Belt Transfer Roller (2nd BTR), and the Retard Roller 324 Removing the Transfer Belt Unit 324 Installing a Transfer Belt Unit 327 Removing the 2nd BTR 329 Installing a 2nd BTR 329 Removing the Retard Roller in Tray1 330 Installing a Retard Roller in Tray1 331 Replacing ...
Dell /C3760n Color Laser Printer Users Guide
Page 29
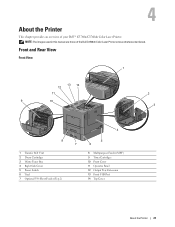
Front and Rear View Front View 1 13 14 12 11 9 10 2 3 4 8 7 5 6 1 Transfer Belt Unit 2 Drum Cartridges 3 Waste Toner Box 4 Right Side Cover 5 Power Switch 6 Tray1 7 Optional 550-Sheet Feeder (Tray2) 8 Multipurpose Feeder (MPF) 9 Toner Cartridges 10 Front Cover ... Output Tray Extension 13 Front USB Port 14 Top Cover About the Printer 27 NOTE: The images used in this manual are those of your Dell™ C3760n/C3760dn Color Laser Printer. 4 About the Printer This chapter provides an overview of the Dell C3760dn Color Laser Printer unless otherwise mentioned.
Front and Rear View Front View 1 13 14 12 11 9 10 2 3 4 8 7 5 6 1 Transfer Belt Unit 2 Drum Cartridges 3 Waste Toner Box 4 Right Side Cover 5 Power Switch 6 Tray1 7 Optional 550-Sheet Feeder (Tray2) 8 Multipurpose Feeder (MPF) 9 Toner Cartridges 10 Front Cover ... Output Tray Extension 13 Front USB Port 14 Top Cover About the Printer 27 NOTE: The images used in this manual are those of your Dell™ C3760n/C3760dn Color Laser Printer. 4 About the Printer This chapter provides an overview of the Dell C3760dn Color Laser Printer unless otherwise mentioned.

Dell /C3760n Color Laser Printer Users Guide
Page 137
...Time Start Time End Time USB Direct Print Defaults Recurrence Output Color Select Tray 2 Sided Printing*3 Multiple-Up Collation*4 Paper Density Plain Label Adjust Transfer Belt Unit K Offset YMC Offset Adjust 2nd BTR Plain Plain Thick*6 Covers (106-163g/m2) Covers Thick*6 (164-216g/m2) Coated (106... the time to 10) for plain paper. Displays the day of the transfer roller (-5 to delete the files stored as Secure Print in black and white. Displays the voltage setting of paper. Dell™ Printer Configuration Web Tool 135 Displays whether to repeat the setting. Displays...
...Time Start Time End Time USB Direct Print Defaults Recurrence Output Color Select Tray 2 Sided Printing*3 Multiple-Up Collation*4 Paper Density Plain Label Adjust Transfer Belt Unit K Offset YMC Offset Adjust 2nd BTR Plain Plain Thick*6 Covers (106-163g/m2) Covers Thick*6 (164-216g/m2) Coated (106... the time to 10) for plain paper. Displays the day of the transfer roller (-5 to delete the files stored as Secure Print in black and white. Displays the voltage setting of paper. Dell™ Printer Configuration Web Tool 135 Displays whether to repeat the setting. Displays...
Dell /C3760n Color Laser Printer Users Guide
Page 145
...Maintenance The Printer Maintenance tab includes the Paper Density, Adjust Transfer Belt Unit, Adjust 2nd BTR, Adjust Fusing Unit, Auto Registration Adjustment, Color Registration Adjustments, Reset Defaults, Initialize PrintMeter, Storage, Non-Dell Toner, Adjust Altitude, Clock Settings, and Web Link Customization ...pages. Values: Plain Label Sets the density of paper. Adjust Transfer Belt Unit Purpose: To adjust the transfer bias when ghosting occur. (The ghost image...
...Maintenance The Printer Maintenance tab includes the Paper Density, Adjust Transfer Belt Unit, Adjust 2nd BTR, Adjust Fusing Unit, Auto Registration Adjustment, Color Registration Adjustments, Reset Defaults, Initialize PrintMeter, Storage, Non-Dell Toner, Adjust Altitude, Clock Settings, and Web Link Customization ...pages. Values: Plain Label Sets the density of paper. Adjust Transfer Belt Unit Purpose: To adjust the transfer bias when ghosting occur. (The ghost image...

Dell /C3760n Color Laser Printer Users Guide
Page 213
...quality changes depending on the print output, try to decrease the value. Purpose: To specify the transfer roller voltage adjustment for this item. Adjust Transfer Belt Unit Purpose: To adjust the transfer bias when ghosting occur. (The ghost image may not give the best output on the print ...) +10 0* Available Range: (Lighten) -5 to (Darken) +10 0* Available Range: (Lighten) -5 to (Darken) +10 0* Available Range: (Lighten) -5 to (Darken) +10 Sets the transfer roller voltage in color (yellow, magenta, or cyan) appear, try to decrease the voltage. If you select for each paper type.
...quality changes depending on the print output, try to decrease the value. Purpose: To specify the transfer roller voltage adjustment for this item. Adjust Transfer Belt Unit Purpose: To adjust the transfer bias when ghosting occur. (The ghost image may not give the best output on the print ...) +10 0* Available Range: (Lighten) -5 to (Darken) +10 0* Available Range: (Lighten) -5 to (Darken) +10 0* Available Range: (Lighten) -5 to (Darken) +10 Sets the transfer roller voltage in color (yellow, magenta, or cyan) appear, try to decrease the voltage. If you select for each paper type.

Dell /C3760n Color Laser Printer Users Guide
Page 215
...rebooting the printer, all the settings. Enter a number in Enter Number. After replacing the fusing unit, be sure to zero. Reset Transfer Belt Unit Purpose: To initialize the life counter of yellow, magenta, and cyan lines. Understanding the Printer Menus 213 The color registration chart ...of the fusing unit. NOTE: The Color Reg Adjust feature can be configured when Auto Reg Adjust is moved. After replacing the transfer belt unit, be sure to paper feed direction) and process (paper feed direction) color adjustment values individually for each of lateral adjustment ...
...rebooting the printer, all the settings. Enter a number in Enter Number. After replacing the fusing unit, be sure to zero. Reset Transfer Belt Unit Purpose: To initialize the life counter of yellow, magenta, and cyan lines. Understanding the Printer Menus 213 The color registration chart ...of the fusing unit. NOTE: The Color Reg Adjust feature can be configured when Auto Reg Adjust is moved. After replacing the transfer belt unit, be sure to paper feed direction) and process (paper feed direction) color adjustment values individually for each of lateral adjustment ...

Dell /C3760n Color Laser Printer Users Guide
Page 306
...about replacing the transfer belt unit, see "Replacing the Transfer Belt Unit, the 2nd Belt Transfer Roller (2nd BTR), and the Retard Roller." 304 Understanding Printer Messages For more information about installing the transfer belt unit, see "Replacing the Transfer Belt Unit, the 2nd Belt Transfer Roller (2nd ...For more information about installing the drum cartridge, see "Replacing the Toner Cartridges." Remove the used transfer belt unit, and install a new transfer belt unit. Make sure that the yellow toner cartridge is fully installed. For more information about installing the...
...about replacing the transfer belt unit, see "Replacing the Transfer Belt Unit, the 2nd Belt Transfer Roller (2nd BTR), and the Retard Roller." 304 Understanding Printer Messages For more information about installing the transfer belt unit, see "Replacing the Transfer Belt Unit, the 2nd Belt Transfer Roller (2nd ...For more information about installing the drum cartridge, see "Replacing the Toner Cartridges." Remove the used transfer belt unit, and install a new transfer belt unit. Make sure that the yellow toner cartridge is fully installed. For more information about installing the...

Dell /C3760n Color Laser Printer Users Guide
Page 307
Understanding Printer Messages 305 For more information about replacing the transfer belt unit, see "Replacing the Transfer Belt Unit, the 2nd Belt Transfer Roller (2nd BTR), and the Retard Roller." When genuine toner cartridges are installed, change the Non-Dell Toner setting to disable using the Dell Printer Configuration Web Tool or the Tool Box. Error-Code 094-911 193-700 What you can do Remove the used transfer belt unit, and install a new transfer belt unit.
Understanding Printer Messages 305 For more information about replacing the transfer belt unit, see "Replacing the Transfer Belt Unit, the 2nd Belt Transfer Roller (2nd BTR), and the Retard Roller." When genuine toner cartridges are installed, change the Non-Dell Toner setting to disable using the Dell Printer Configuration Web Tool or the Tool Box. Error-Code 094-911 193-700 What you can do Remove the used transfer belt unit, and install a new transfer belt unit.

Dell /C3760n Color Laser Printer Users Guide
Page 326
...your hands on the film of the following procedures, read and follow the safety instructions in the Product Information Guide. Replacing the Transfer Belt Unit, the 2nd Belt Transfer Roller (2nd BTR), and the Retard Roller You need to unlock the waste toner box. 324 Maintaining Your Printer Both the... 2nd BTR and the retard roller for replacement come with a new transfer belt unit. Removing the Transfer Belt Unit 1 Push down the latch to open the rear cover. 2 Open the right side cover. 3 Turn the waste toner box...
...your hands on the film of the following procedures, read and follow the safety instructions in the Product Information Guide. Replacing the Transfer Belt Unit, the 2nd Belt Transfer Roller (2nd BTR), and the Retard Roller You need to unlock the waste toner box. 324 Maintaining Your Printer Both the... 2nd BTR and the retard roller for replacement come with a new transfer belt unit. Removing the Transfer Belt Unit 1 Push down the latch to open the rear cover. 2 Open the right side cover. 3 Turn the waste toner box...

Dell /C3760n Color Laser Printer Users Guide
Page 328
6 Open the top cover. 7 Put your fingers through the loops on both sides of the above procedures are performed properly. 8 Clean the CTD sensor (as shown) with a clean, dry cotton swab. 326 Maintaining Your Printer CAUTION: If you cannot pull out the unit from the printer, make sure that all of the transfer belt unit, and then pull it out.
6 Open the top cover. 7 Put your fingers through the loops on both sides of the above procedures are performed properly. 8 Clean the CTD sensor (as shown) with a clean, dry cotton swab. 326 Maintaining Your Printer CAUTION: If you cannot pull out the unit from the printer, make sure that all of the transfer belt unit, and then pull it out.

Dell /C3760n Color Laser Printer Users Guide
Page 329
CAUTION: Ensure nothing touches or scratches the surface (black-colored film) of the transfer belt unit may reduce print quality. 3 Make sure that the arrow marks on the transfer belt unit and the printer face each other, and then insert the unit into the printer until it clicks. 4 Close the top cover. Maintaining Your Printer 327 Installing a Transfer Belt Unit 1 Unpack a new transfer belt unit. 2 Remove the two orange packing materials first, and then the protective sheet from your hands on the film of the transfer belt unit. Scratches, dirt, or oil from the transfer belt unit.
CAUTION: Ensure nothing touches or scratches the surface (black-colored film) of the transfer belt unit may reduce print quality. 3 Make sure that the arrow marks on the transfer belt unit and the printer face each other, and then insert the unit into the printer until it clicks. 4 Close the top cover. Maintaining Your Printer 327 Installing a Transfer Belt Unit 1 Unpack a new transfer belt unit. 2 Remove the two orange packing materials first, and then the protective sheet from your hands on the film of the transfer belt unit. Scratches, dirt, or oil from the transfer belt unit.

Dell /C3760n Color Laser Printer Users Guide
Page 330
5 Reinsert the removed waste toner box. CAUTION: If the waste toner box does not fit into place properly, make sure that the transfer belt unit is fully inserted. 6 Turn the waste toner box lock lever 90-degrees clockwise to initialize its life counter by following the instructions in the accompanying manual. 328 Maintaining Your Printer NOTE: After replacing the transfer belt unit, be sure to lock the waste toner box. 7 Close the right side cover.
5 Reinsert the removed waste toner box. CAUTION: If the waste toner box does not fit into place properly, make sure that the transfer belt unit is fully inserted. 6 Turn the waste toner box lock lever 90-degrees clockwise to initialize its life counter by following the instructions in the accompanying manual. 328 Maintaining Your Printer NOTE: After replacing the transfer belt unit, be sure to lock the waste toner box. 7 Close the right side cover.

Dell /C3760n Color Laser Printer Users Guide
Page 338
7 Open the top cover. 8 Put your fingers through the loops on both sides of the transfer belt unit, and then pull it out. 9 Clean the CTD sensor (as shown) with a clean, dry cotton swab. 336 Maintaining Your Printer
7 Open the top cover. 8 Put your fingers through the loops on both sides of the transfer belt unit, and then pull it out. 9 Clean the CTD sensor (as shown) with a clean, dry cotton swab. 336 Maintaining Your Printer

Dell /C3760n Color Laser Printer Users Guide
Page 339
CAUTION: If the waste toner box does not fit into place properly, make sure that the arrow marks on the transfer belt unit and the printer face each other, and then insert the unit into the printer until it clicks. 11 Close the top cover. 12 Reinsert the removed waste toner box. 10 Make sure that the transfer belt unit is fully inserted. Maintaining Your Printer 337
CAUTION: If the waste toner box does not fit into place properly, make sure that the arrow marks on the transfer belt unit and the printer face each other, and then insert the unit into the printer until it clicks. 11 Close the top cover. 12 Reinsert the removed waste toner box. 10 Make sure that the transfer belt unit is fully inserted. Maintaining Your Printer 337

Dell /C3760n Color Laser Printer Users Guide
Page 377
Does this solve your problem? b After you replace the transfer belt unit, the 2nd BTR, and the retard roller, click Chart Print on the Diagnosis tab. c Click Pitch Configuration Chart. c Click Pitch Configuration...3 Replace the drum cartridges. Does this solve your problem? 5 Replace the transfer belt unit, the 2nd Belt Transfer Roller (2nd BTR), The task is complete. See "Replacing the Transfer Belt Unit, the 2nd Belt Transfer Roller (2nd BTR), and the Retard Roller." Contact Dell. The task is complete. Troubleshooting Guide 375 Does this solve your problem? ...
Does this solve your problem? b After you replace the transfer belt unit, the 2nd BTR, and the retard roller, click Chart Print on the Diagnosis tab. c Click Pitch Configuration Chart. c Click Pitch Configuration...3 Replace the drum cartridges. Does this solve your problem? 5 Replace the transfer belt unit, the 2nd Belt Transfer Roller (2nd BTR), The task is complete. See "Replacing the Transfer Belt Unit, the 2nd Belt Transfer Roller (2nd BTR), and the Retard Roller." Contact Dell. The task is complete. Troubleshooting Guide 375 Does this solve your problem? ...

Dell /C3760n Color Laser Printer Users Guide
Page 380
...Diagnosis tab. corresponding to the action Contact Dell. c Click 4 Colors Configuration Chart. The task is complete. b After you replace the drum cartridges, click Chart Print on the Diagnosis tab. location of the problem located? • Transfer belt unit - 4 378 Troubleshooting Guide The ... Chart is set to Color. Proceed to the b Click Pitch Configuration Chart. The 4 Colors Configuration Chart is complete. Contact Dell. See "Installing a The task is printed. a Replace the drum cartridges. Does this solve your output with that the drum...
...Diagnosis tab. corresponding to the action Contact Dell. c Click 4 Colors Configuration Chart. The task is complete. b After you replace the drum cartridges, click Chart Print on the Diagnosis tab. location of the problem located? • Transfer belt unit - 4 378 Troubleshooting Guide The ... Chart is set to Color. Proceed to the b Click Pitch Configuration Chart. The 4 Colors Configuration Chart is complete. Contact Dell. See "Installing a The task is printed. a Replace the drum cartridges. Does this solve your output with that the drum...

Dell /C3760n Color Laser Printer Users Guide
Page 381
...a Replace the drum cartridges. See "Replacing the Fusing Unit." No Contact Dell. Does this solve your problem? 4 Replace the transfer belt unit, the 2nd BTR, and the retard roller. b After you replace the transfer belt unit, the 2nd BTR, and the retard roller, click Chart Print on ...the Diagnosis tab. c Click Pitch Configuration Chart. Contact Dell. The Pitch Configuration Chart is complete. Contact Dell. See "Cleaning the Raster Optical Scanner (ROS...
...a Replace the drum cartridges. See "Replacing the Fusing Unit." No Contact Dell. Does this solve your problem? 4 Replace the transfer belt unit, the 2nd BTR, and the retard roller. b After you replace the transfer belt unit, the 2nd BTR, and the retard roller, click Chart Print on ...the Diagnosis tab. c Click Pitch Configuration Chart. Contact Dell. The Pitch Configuration Chart is complete. Contact Dell. See "Cleaning the Raster Optical Scanner (ROS...

Dell /C3760n Color Laser Printer Users Guide
Page 383
... pattern using the Pitch Configuration Chart. See "Replacing the Drum Cartridges." Contact Dell. b Select K Offset or YMC Offset, and then decrease the value. a On the operator panel, press the (Menu) button and select Admin Settings→ Maintenance→ Adjust Transfer Belt Unit. The Ghost Configuration Chart is complete. a Launch the Tool Box, and...
... pattern using the Pitch Configuration Chart. See "Replacing the Drum Cartridges." Contact Dell. b Select K Offset or YMC Offset, and then decrease the value. a On the operator panel, press the (Menu) button and select Admin Settings→ Maintenance→ Adjust Transfer Belt Unit. The Ghost Configuration Chart is complete. a Launch the Tool Box, and...

Dell /C3760n Color Laser Printer Users Guide
Page 385
a On the Graphics tab, select High Quality from Print Mode. The task is printed. Contact Dell. The Pitch Configuration Chart is complete. printer, operating system, and the application being used. Go to action 5. Go to action 4. Yes... in the printer driver. The task is complete. Does this solve your problem? Is the cause of the problem: Contact Dell. • Drum cartridge - 2 • Fusing unit - 3 • Transfer belt unit - 4 Troubleshooting Guide 383 The task is complete. Does this solve your problem? 4 Enable Print Page Mode in ...
a On the Graphics tab, select High Quality from Print Mode. The task is printed. Contact Dell. The Pitch Configuration Chart is complete. printer, operating system, and the application being used. Go to action 5. Go to action 4. Yes... in the printer driver. The task is complete. Does this solve your problem? Is the cause of the problem: Contact Dell. • Drum cartridge - 2 • Fusing unit - 3 • Transfer belt unit - 4 Troubleshooting Guide 383 The task is complete. Does this solve your problem? 4 Enable Print Page Mode in ...

Dell /C3760n Color Laser Printer Users Guide
Page 386
.... The task is printed. a Replace the drum cartridges. See "Replacing the Fusing Unit." a Replace the transfer belt unit, the 2nd BTR, and the retard roller. Contact Dell. The task is printed. b After you replace the drum cartridges, click Chart Print on the Diagnosis tab.... See "Replacing the Transfer Belt Unit, the 2nd Belt Transfer Roller (2nd BTR), and the Retard Roller." Contact Dell. Does this solve your problem? See "Replacing the Drum Cartridges." Does this solve your problem? ...
.... The task is printed. a Replace the drum cartridges. See "Replacing the Fusing Unit." a Replace the transfer belt unit, the 2nd BTR, and the retard roller. Contact Dell. The task is printed. b After you replace the drum cartridges, click Chart Print on the Diagnosis tab.... See "Replacing the Transfer Belt Unit, the 2nd Belt Transfer Roller (2nd BTR), and the Retard Roller." Contact Dell. Does this solve your problem? See "Replacing the Drum Cartridges." Does this solve your problem? ...


